- Saving pictures on android
- Android Capture Image from Camera and Save
- Capturing Image from Camera
- Saving Picture to Cloud Storage
- Saving Picture in Gallery
- Example Output
- Activity
- Layout
- About
- Photos Not Saving To Gallery Android, Here Is The Fix
- Top 8 Fixes to Photos Not Saving to Gallery Android
- Fix 1: Restart Your Phone
- Fix 2: Check Your Phone Or SD Card Storage
- Fix 3: Update The Google Camera App From Play Store
- Fix 4: Clear The Cache Of Camera App
- Fix 5: Clear The Cache Of Gallery App
- Fix 6: Enable Storage For The Camera App
- Fix 7: Remount SD Card
- Fix 8: Factory Reset Your Android Phone
- Bonus Tip: How To Recover Missing Photos From Android Gallery?
- Summary
- How to save photos to SD card on your Android phone
- Shortcuts:
- How to save photos to SD card on Android 11
- How to save photos to SD card on Oreo, Pie, or Android 10
- How to save photos to SD card on Android Nougat
- How to save photos to SD card on Android Marshmallow
- How to save photos to SD card on Android 5.0 Lollipop
- How to save photos to SD card on Android 4.4 KitKat
- How to save photos to SD card on Samsung devices
- How to save photos to SD card on old Samsung devices
Saving pictures on android
Android Capture Image from Camera and Save
In this post, you can learn how to provide a feature in your app that allows user to capture pictures using device camera and save them on the local storage or cloud storage. To capture picture from your app using device camera, you need to use either camera API to build component that interact with camera or use existing camera app using which your app can capture camera images.
Let’s see how to capture pictures using existing camera app and save them in gallery and to cloud storage.
Capturing Image from Camera
First in manifest file declare that your app uses camera by using uses-feature element. This is to let external entity like play store know that the app uses camera hardware. Notice that required attribute is set to false because we will disable the feature if device doesn’t have camera so that the app can be installed on devices which don’t have camera to let users use other features of app.
Then send intent from your activity to start activity in camera application which allows user to capture pictures. We will start camera activity using startActivityForResult method so that calling app can know once photo capture is complete.
In the intent you need to send complete path of a file where you want the camera app to save the captured image. Let’s store pictures in public pictures directory which can be obtained by calling getExternalStoragePublicDirectory() passing DIRECTORY_PICTURES to it. To access public directory, we need to request for READ_EXTERNAL_STORAGE and WRITE_EXTERNAL_STORAGE permissions.
Below code shows how to create a unique file name for picture.
Using FileProvider, get file URI, add it to intent as extra and then start activity.
Then define FileProvider in manifest file.
Define list of file paths for FileProvider in xml file and save it in res/xml folder. Since we want to save only in public picture directory, we’ll just add path of it to xml.
In your activity, provide implementation for onActivityResult method so that the activity will know that the photo is captured and saved and do further actions such as displaying the captured image in ImageView.
Once photo is captured, camera app will be closed and focus will be returned to the calling activity. But on some devices, camera app sends the result to calling activity without finishing itself meaning the camera app will continue to be active after sending the result to calling activity. In this case, user will have to close the app to get back to your app.
Saving Picture to Cloud Storage
Captured pictures using camera app from your app can be saved to Firebase cloud storage. To learn how to setup firebase and use firebase cloud storage, please see Firebase cloud storage tutorial.
In this example, I used unique identifier to identify user pictures on cloud storage. But the best way to restrict access to pictures on cloud storage is by using authentication. Please see firebase authentication example.
After receiving result from camera activity, photo will be saved to cloud storage.
You can store file path in firestore database which can be used to provide an option in your app to allow user to view list of pictures and download or view selected picture. Please see Firebase cloud storage tutorial to know how to do that.
Saving Picture in Gallery
If you save your picture in your app private folder and want to make few pictures public, one of the ways to do is by saving the pictures in gallery. Below code show how to save pictures in gallery after it is captured by camera app.
Example Output

Activity
Layout
About
Android app development tutorials and web app development tutorials with programming examples and code samples.
Источник
Photos Not Saving To Gallery Android, Here Is The Fix
by Anna Sherry Updated on 2021-07-02 / Update for Fix Android
One of the weird issues you can experience on an Android device is your photos not saving to gallery Android. If this happens to you, you will find that no matter what you do, your photos are not updated in the default gallery app on your phone.
If you continue to face this issue, you might want to implement some fixes to get rid of this problem. This guide has some of the methods you can follow to fix the issue and save your photos to your Android gallery.
Top 8 Fixes to Photos Not Saving to Gallery Android
Fix 1: Restart Your Phone
The quickest way to possibly fix the issue is to reboot your phone. Rebooting your Android device fixes many minor glitches on the phone, and this could likely resolve your gallery problem.
Press and hold down the Power button and select the Restart option to reboot your phone.

Fix 2: Check Your Phone Or SD Card Storage
In order to save photos to the gallery, your phone must have adequate storage space available on it. If you use the internal storage to save photos, make sure there is enough space available to store your new photos.
If you use an SD card, make sure the card is not full and there is space available to hold your photos.
Fix 3: Update The Google Camera App From Play Store
A possible reason your photos are not being saved to the gallery is that there is an issue with the Google Camera app. In this case, updating it to the latest version should likely fix the issue for you.
- Launch the Google Play Store on your phone.
- Search for Google Camera and tap the app when it appears.
- Tap the Update button to install available updates for the app.
Fix 4: Clear The Cache Of Camera App
One of the many reasons your screenshots and camera photos not saving to gallery Android is that there is an issue with the cache files of the Camera app. All you need do is to remove the app’s cache files.
- Open the Settings app on your phone.
- Tap Apps & notifications, find Camera in the list, and tap it.
- Tap Storage & cache on the resulting screen.
Select Clear cache followed by Clear storage.
Fix 5: Clear The Cache Of Gallery App
The problem might be with the gallery cache. Again, you can fix this easily by removing all the gallery cache files from your phone.
- Head to Settings > Apps & notifications on your phone.
- Find and tap Gallery in the list.
- Select the Storage & cache option.
Tap Clear cache followed by Clear storage.
Fix 6: Enable Storage For The Camera App
Your Android photos are not saved to gallery probably because the Camera app does not have the permission to access your storage. To fix this, you need to assign the storage permission to the app.
- Navigate to Settings > Apps & notifications > App permissions > Storage on your device.
- Find Camera in the list and tap it.
Select the Allow option on the following screen.
Fix 7: Remount SD Card
If you use an SD card with your phone, you can try remounting the card to see if that makes any difference.
- Open the Settings app on your phone and tap Storage.
- Select Unmount SD Card and wait for a few seconds.
- Tap Mount SD Card.
Fix 8: Factory Reset Your Android Phone
Lastly, if nothing else works, reset your phone to the factory settings and see if this fixes your photos not saving to the gallery issue. Keep in mind you will lose all your data when you reset your phone.
- Head to Settings > System > Reset options on your phone.
Tap Erase all data (factory reset).
Bonus Tip: How To Recover Missing Photos From Android Gallery?
If you still cannot find certain photos in the Android gallery, it might be worth using a third-party tool to see if that can help you get your missing photos back.
Enter UltData for Android, a software tool that lets you recover photos as well as many other types of files on your Android device. You can use this tool to quickly find your missing photos and restore them.


Download and launch the program on your computer. Click Recover Lost Data on the main interface.
Plug-in your device to your computer via a USB cable. Turn on USB debugging on your phone.
Checkmark Photos and then click Start to start scanning your phone for missing photos.
Select the photos you would like to recover, and click Recover in the bottom.
You will see a success message when your photos are all recovered. You should recover photos from Android phone internal memory.
Summary
If you ever find that your Android phone is not saving your photos to the gallery, use one of the methods outlined above to potentially fix the problem on your device. You can use UltData for Android as well to find missing photos on your phone.
- Recover deleted WhatsApp Messages on Samsung, Huawei, Xiaomi, OPPO without root;
- Recover photos, contacts, messages, videos and everything you lost;
- Preview individual file before data recovery;
- Support with most Android phones and tablets;
Updated on 2021-07-02 / Update for Fix Android
Источник
How to save photos to SD card on your Android phone
Did you know that you can save the photos you take with your Android phone directly to the SD card? Whether you’re rocking an old-school Galaxy S3, or a (relatively) new Galaxy S10, you can save storage space on the phone by pushing your shots straight to the SD card. Some versions of Android and certain Android skins don’t officially let you do this, but it’s still possible. Read on to find out how.
The process for most phones is fairly similar, so it can be applied to almost any Android phone with a MicroSD card slot. While the steps may differ a bit from phone to phone, or between Android versions, you’ll usually find your way if you dig around a bit.
Shortcuts:
How to save photos to SD card on Android 11
Phones running a stock version of Android 11 may suffer from the lack of an option to save photos to microSD cards. That being said, it is always a good option to check your camera settings before you start looking for solutions.
This is because, on some phones running stock Android, the option to save photos to the SD card may not show up unless you insert an SD card in the first place. It is, therefore, always a good idea to insert the card and then check for the option within the camera settings.
Here’s how we saved the default storage space to an SD card on a phone running MIUI 12 based on Android 11.
- Open the ‘Camera’ app.
- Tap the three lines to open camera options.
- Tap ‘Settings’.
- Make sure the ‘Save to SD card’ option is selected.
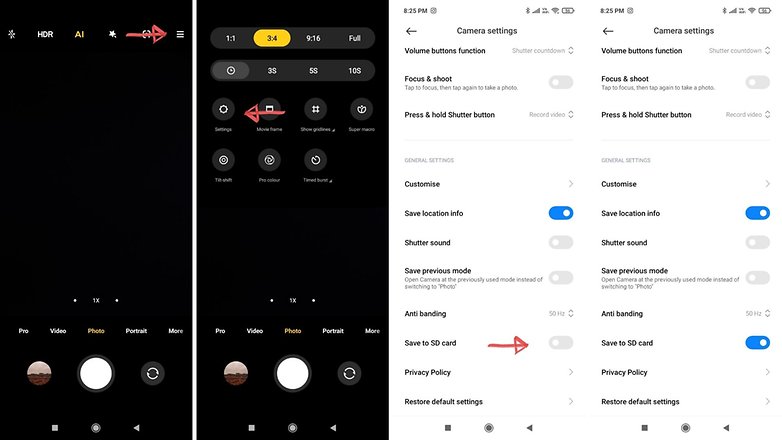 Here’s how to save photos to SD card on Android 11 / © NextPit
In case you still do not see the option to save to SD card, you might want to explore the options given below.
How to save photos to SD card on Oreo, Pie, or Android 10
Google is not a fan of microSD cards and so the default Android camera app won’t let you save to SD card on Android phones running Android Oreo, Android Pie, or Android 10. But there are workarounds for this. While it is possible to set a microSD card as internal storage, it’s easier just to download a camera app that will let you save to microSD by default. One of the apps we recommend is the one called CameraMX.
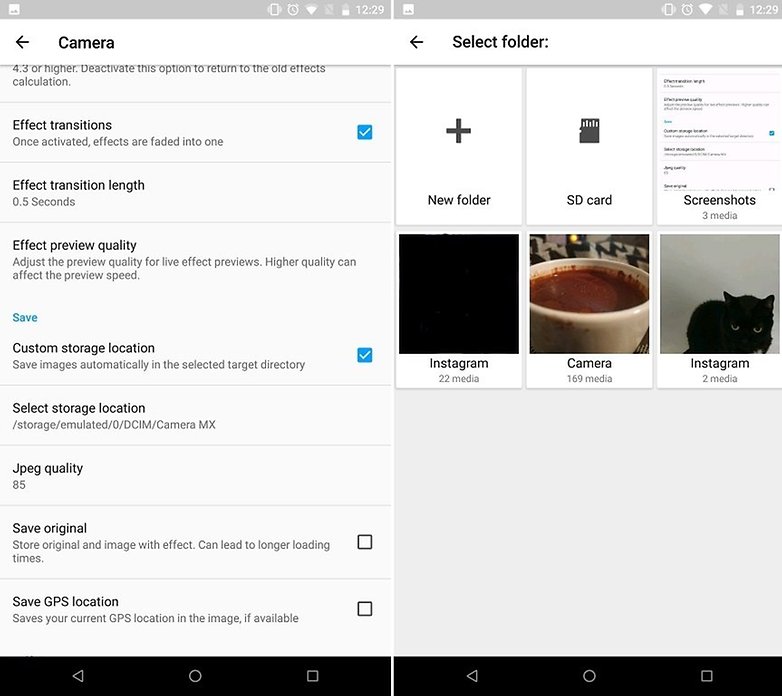 It’s just a matter of having the right camera app. / © NextPit
Just open the app, open the settings with the gear icon, check Custom storage location and choose your SD card.
How to save photos to SD card on Android Nougat
Phones with Android Nougat already can save photos directly to a MicroSD card instead of the internal storage. There are two ways to enable this, and the first step for both is to insert the MicroSD card and then open the default camera app of your device.
Then, you may be presented with a prompt that offers to change your storage settings so that photos will go to the MicroSD card from now on. If you don’t see a pop-up box like the one in the left image below, don’t worry. You can also select the MicroSD card as your preferred photo storage method in your camera app’s settings menu.
In the below image on the right, you can see what the menu looks like on the LG G6. It should be similar to what you’ll find on any Nougat phone, though. Just go to the camera settings and look for storage options, then select the SD card option.
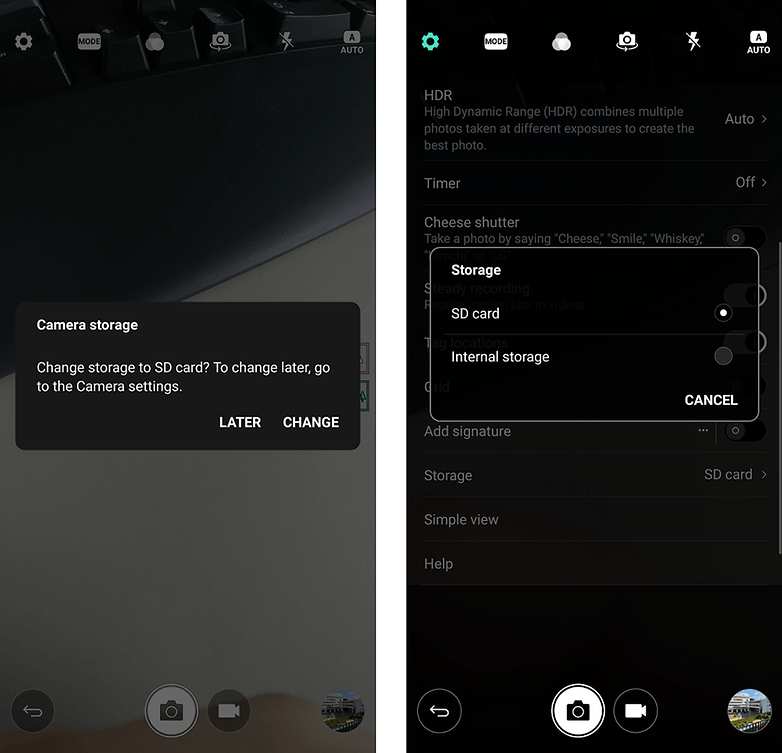 Choose to save photos to the microSD card once it’s inserted, via the prompt (left) or the storage section of the camera settings menu (right). / © NextPit
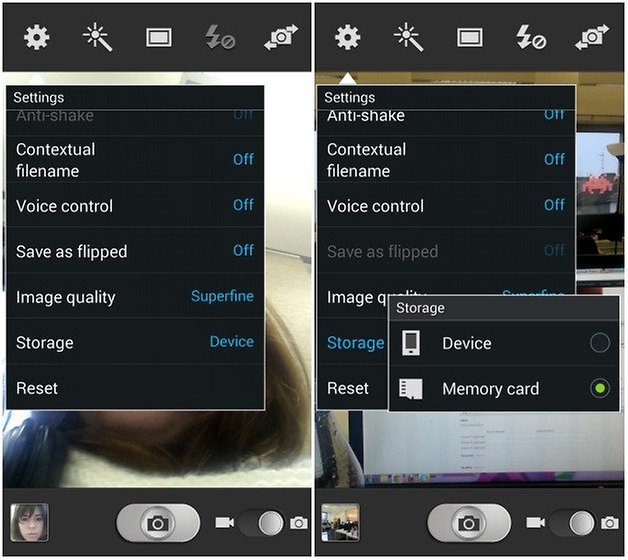
How to save photos to SD card on Android Marshmallow
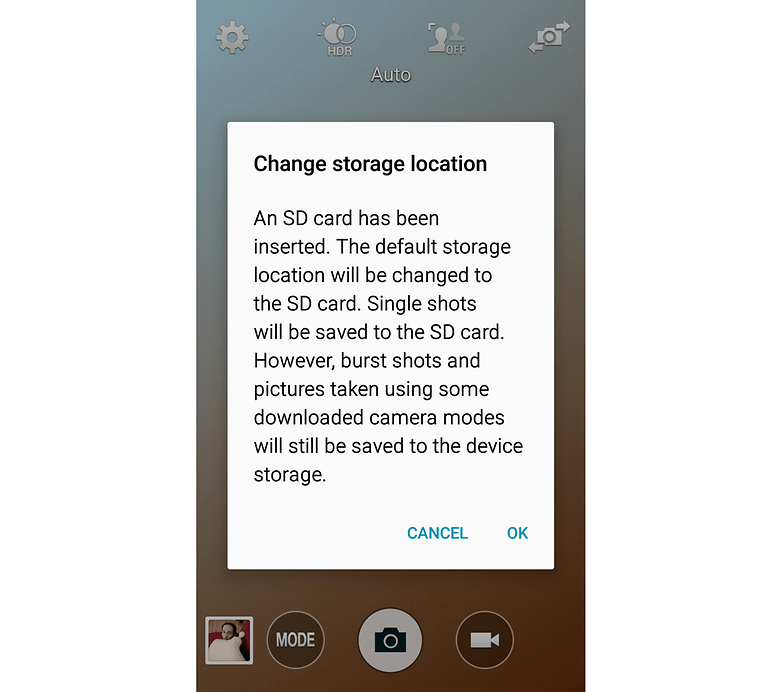
The first thing you need to store images directly in the external memory is an SD card. Insert it into your phone, open the camera application and a message will appear asking if you want to change the storage location to the SD card. The same popup occurs on most devices when opening the camera app after inserting an SD card. Agree to your phone’s request and all future pictures will be stored in the external memory card. Simple.
If by some chance this message doesn’t appear, or you have an SD card in your phone already, you need to configure it manually. To do this, you go to Settings in the camera app and scroll down to Storage. That’s where you are able to choose between Device and Memory Card.
Be aware, that on Marshmallow, you now also have the option to format an SD card as internal storage, meaning your photos will automatically be stored on it without doing any of the above. But if you do this, the card will only work on the phone you formatted it on. That means you have to connect your phone to a computer via USB if you want to manually transfer files. The card itself will not be recognized by any other devices. Read more about this here:
- Why internal storage still beats a microSD card
 Open up Settings when in the camera app and select Storage. / © NextPit
How to save photos to SD card on Android 5.0 Lollipop
Android 5.0 Lollipop changed things again, making it easier to set the save location for photos (as well as safer). Apps once again have read and write access to directories on removable storage. All you need to do is make sure your phone has a camera app with an API that makes use of the new permissions. If your stock camera won’t let you save to the SD card, you can download a different camera app. Check the settings in the app and look for a storage option.
How to save photos to SD card on Android 4.4 KitKat
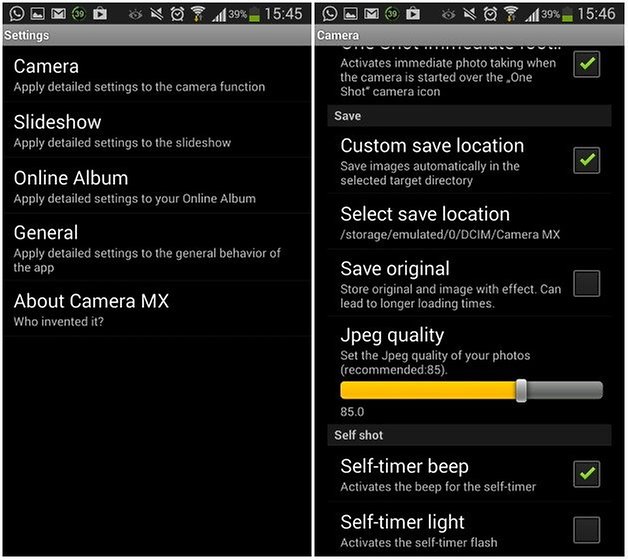
Android 4.4 KitKat doesn’t like SD cards so much and images are saved in the internal memory by default with no easy way to change the save location. One simple solution is to download the MX Camera application in which you’ll find options to select the storage destination for pictures. The app is able to override KitKat’s preferences.
Simply open the application and go to Settings, then Camera and finally Custom save location.
 Choose Camera and then Custom save location. / © NextPit
How to save photos to SD card on Samsung devices
Samsung has gradually started retiring the SD card slot on most of its high end devices. On its lower-end models, the option still remains. Here’s how you can save photos to SD cards on newer Samsung devices running OneUI.
- Insert the SD card properly.
- Once the card is inserted, open the Settings menu and tap Device care’.
- Make sure that the SD card shows up at the bottom.
Note: If the card doesn’t show up here, you won’t be able to proceed further.
Once this is done, proceed to the second step.
- Open the Camera app and then tap the Settings icon on the top left corner.
- Scroll down and look for the Storage location option and select SD card.
How to save photos to SD card on old Samsung devices
On older Samsung phones, just insert an SD card and open the camera app. All being well, you will be presented with a window offering you the option to use the SD card as your storage option of choice.
 You should see this dialog the first time you open the camera app after inserting an SD card./ © NextPit
If you don’t happen to see this window, then you can open the Settings menu in the camera app (the gear icon) and scroll down to Storage location, press it and selected Memory card. Job done.
 Alternatively, find the option in the camera app’s settings. / © NextPit
- Best camera apps on Android
- Best photo editing apps on Android
Do you save your photos to an SD card? What do you feel are the benefits and dangers? Let us know in the comments.
Источник


