- How to Scan a QR Code on an iPhone or Android
- How to Scan a QR Code on an iPhone
- How to Scan a QR code on an Android Phone
- How to Scan Documents With Your Android Phone
- Scan Documents With Android Phone
- Steps to Scan Documents With Android Phone
- Print, Share or Send Scanned Documents
- Как отсканировать документы телефоном: 8 способов для Android и iOS
- Редактирование фото вручную (любой телефон)
- Google Диск (Android)
- Заметки на iPhone (iOS)
- iScanner (Android и iOS)
- FineReader (Android и iOS)
- Microsoft Lens (Android и iOS)
- CamScanner (Android и iOS)
- Adobe Scan (Android и iOS)
- Несколько советов
How to Scan a QR Code on an iPhone or Android
These days, you can find QR codes on everything from candy wrappers to billboards. Scanning these modern-day barcodes with your smartphone lets you quickly open a web page, download an app, send a text message, and much more. Many restaurants and bars are even replacing their menus with QR codes, while some stores allow you to pay with a QR code now, so you don’t have to touch anything. Here’s how to scan a QR code with your iPhone or Android phone and what to do when you can’t scan them.

How to Scan a QR Code on an iPhone
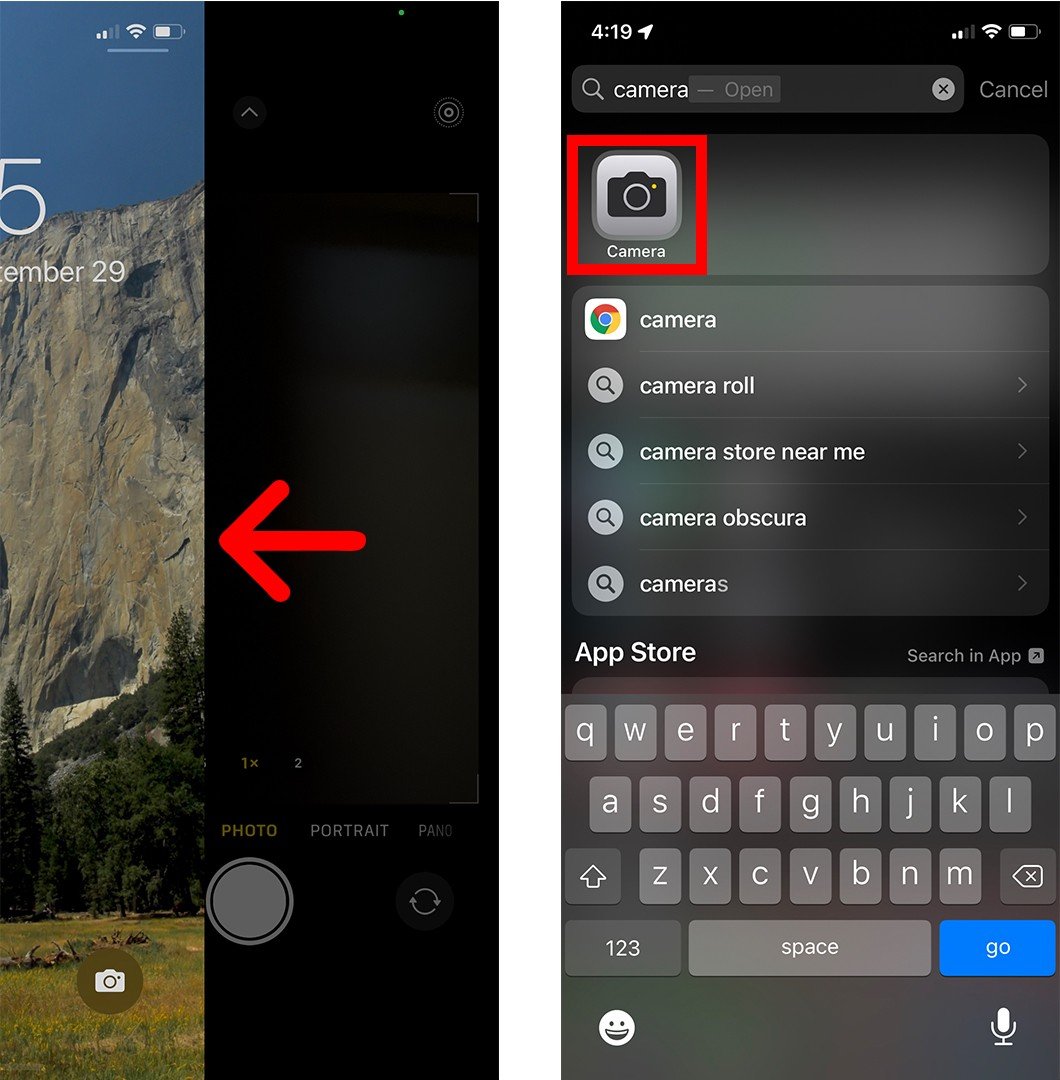
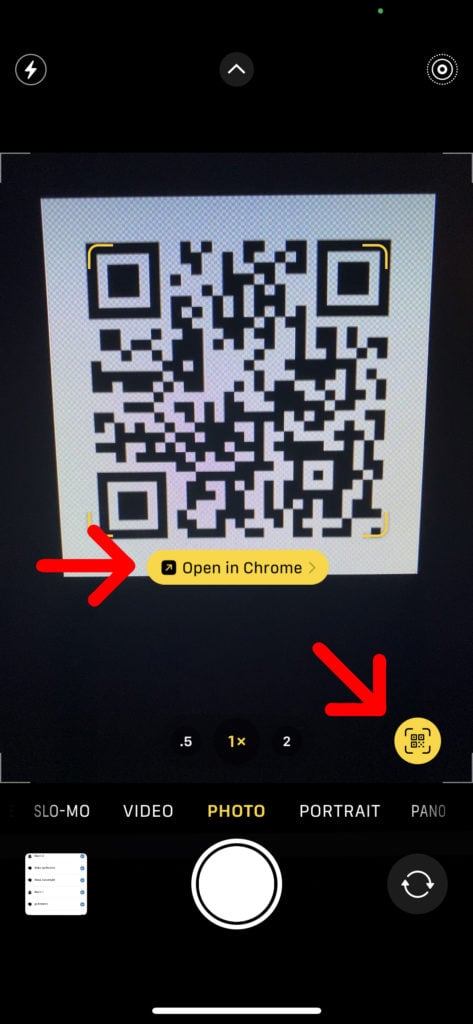
To scan a QR code on your iPhone, all you have to do is open the Camera app and point your phone at the QR code. Make sure the QR code is inside the box on your screen, and then tap the pop-up banner or the yellow QR code icon in the bottom-right corner.
- Open the Camera app on your iPhone. You can quickly open the camera app by swiping left from the lock screen. Or you can swipe down from the middle of your home screen and type “Camera” into the search bar at the top of your screen.

- Then point your iPhone at the QR code to scan it. You don’t have to fill the entire screen, but make sure that you can see all four corners of the QR code in the app. Once you correctly scan the QR code, a pop-up banner will appear above it, and you will also see a yellow QR code icon appear in the bottom right corner.
- Finally, tap the pop-up banner or the QR icon in the bottom-right corner of the app. This will immediately send you to the website, open the app, or perform another action, so make sure you know what the banner does before tapping on it.
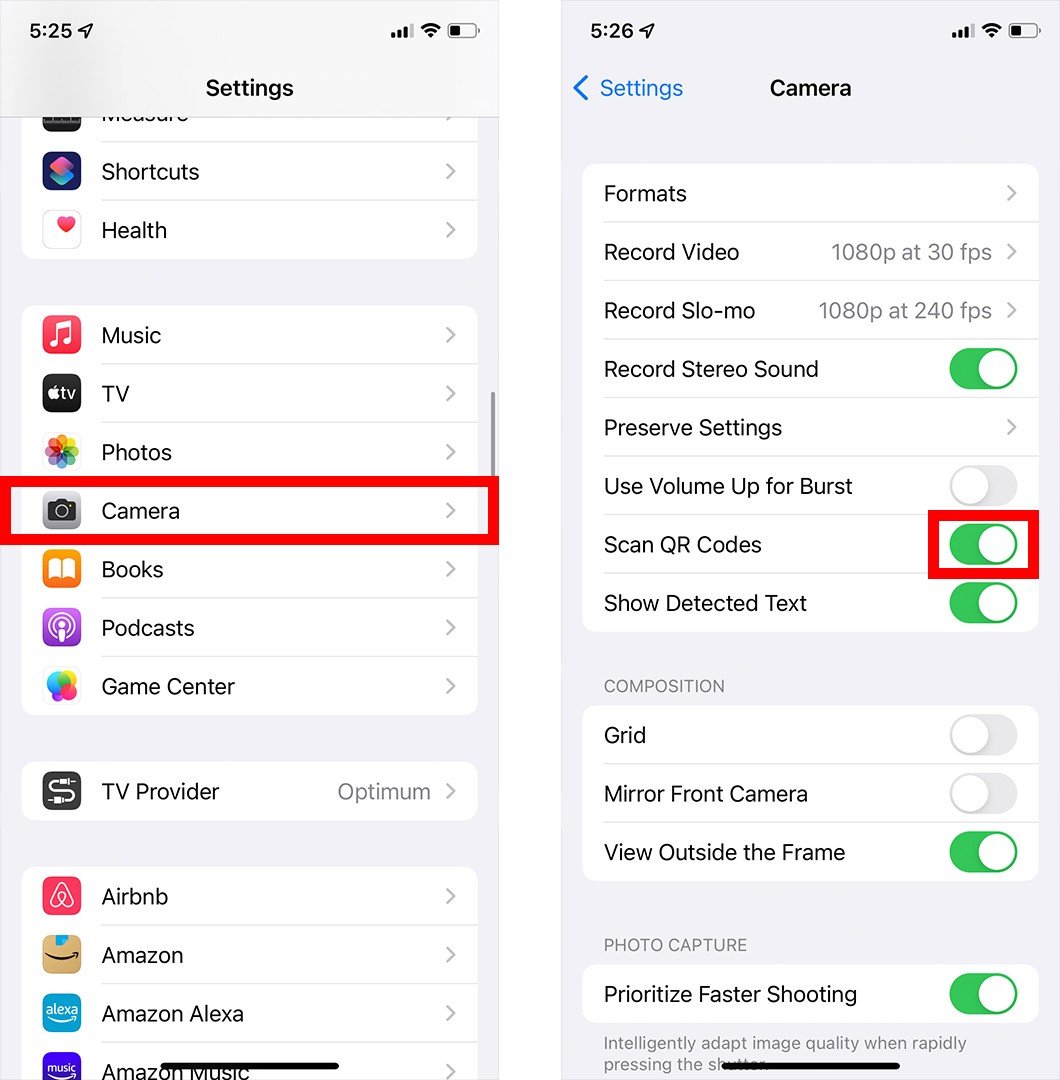
If you don’t see the banner or QR icon, make sure that you have the Scan QR Codes feature enabled. You can do this by going to Settings > Camera and tapping the slider next to Scan QR Codes. You will know it is turned on when it is green.
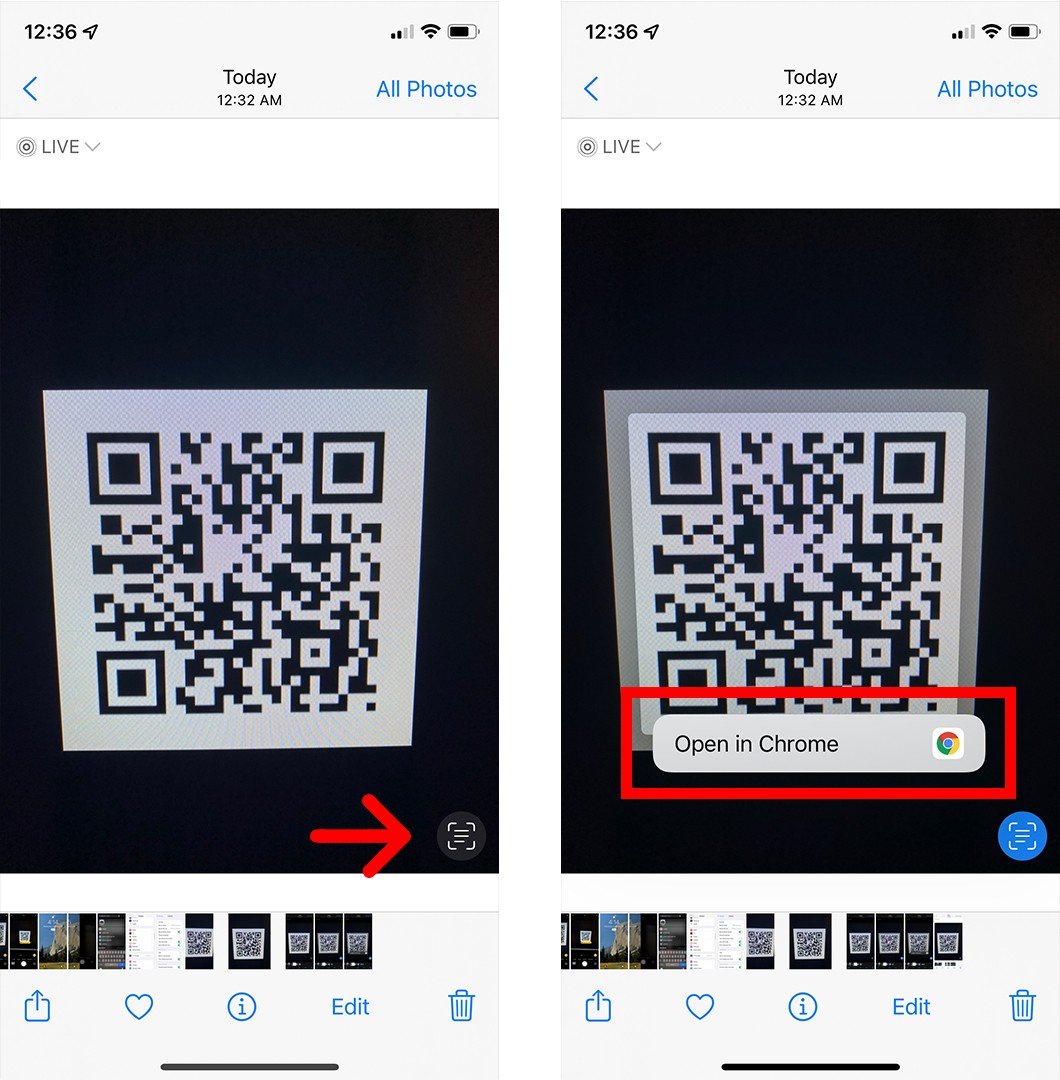
If you still don’t see the pop-up banner or QR code icon, take a picture of the QR code and open it in the Photos app. Then tap the Live Text icon that looks like three lines in a box in the bottom-right corner. Finally, tap the QR code, and then the pop-up banner should appear.
If you want to know more about how to take a screenshot on an iPhone, check out our step-by-step guide here.

How to Scan a QR code on an Android Phone
If you’re running Android 8 or later, you can scan a QR code by opening the camera app, pointing your phone at the QR code, and tapping the pop-up banner. If you don’t see the pop-up banner, you can use the Google Lens app to scan the QR code instead.
- Open the Camera app on your Android phone. You can open the camera app by swiping up from the bottom of your screen. Or you can tap the search bar on your home screen and enter “Camera.”
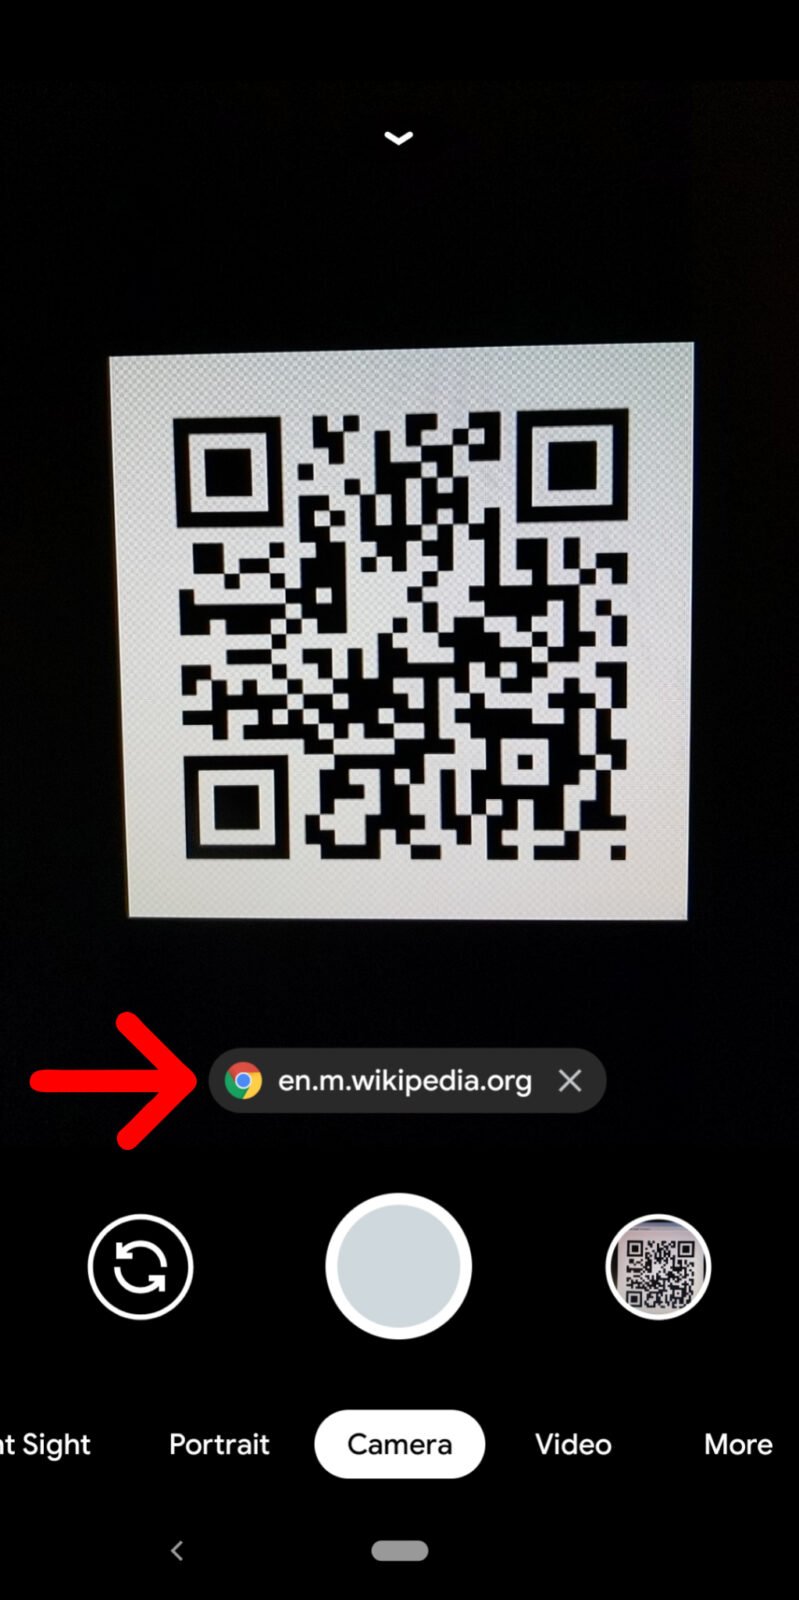
- Then point your Android phone at the QR code to scan it. Make sure that all four corners of the QR code are visible in the viewfinder. If you are running Android 8 or later, you should see a pop-up banner appear.
- Finally, tap the pop-up banner. This will immediately send you to the website, open the app, or perform another action, so make sure you know what the banner does before tapping on it.
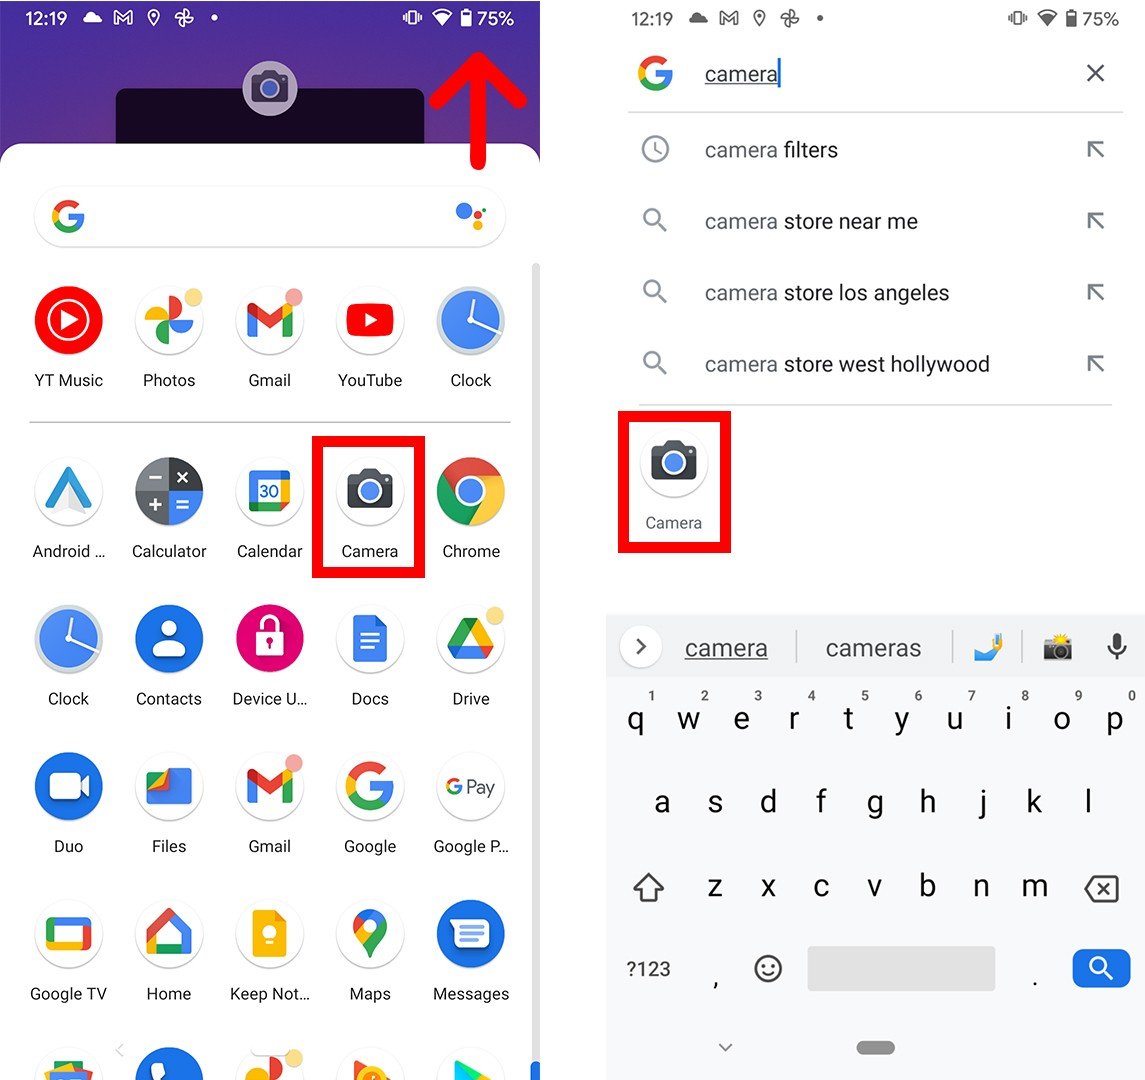
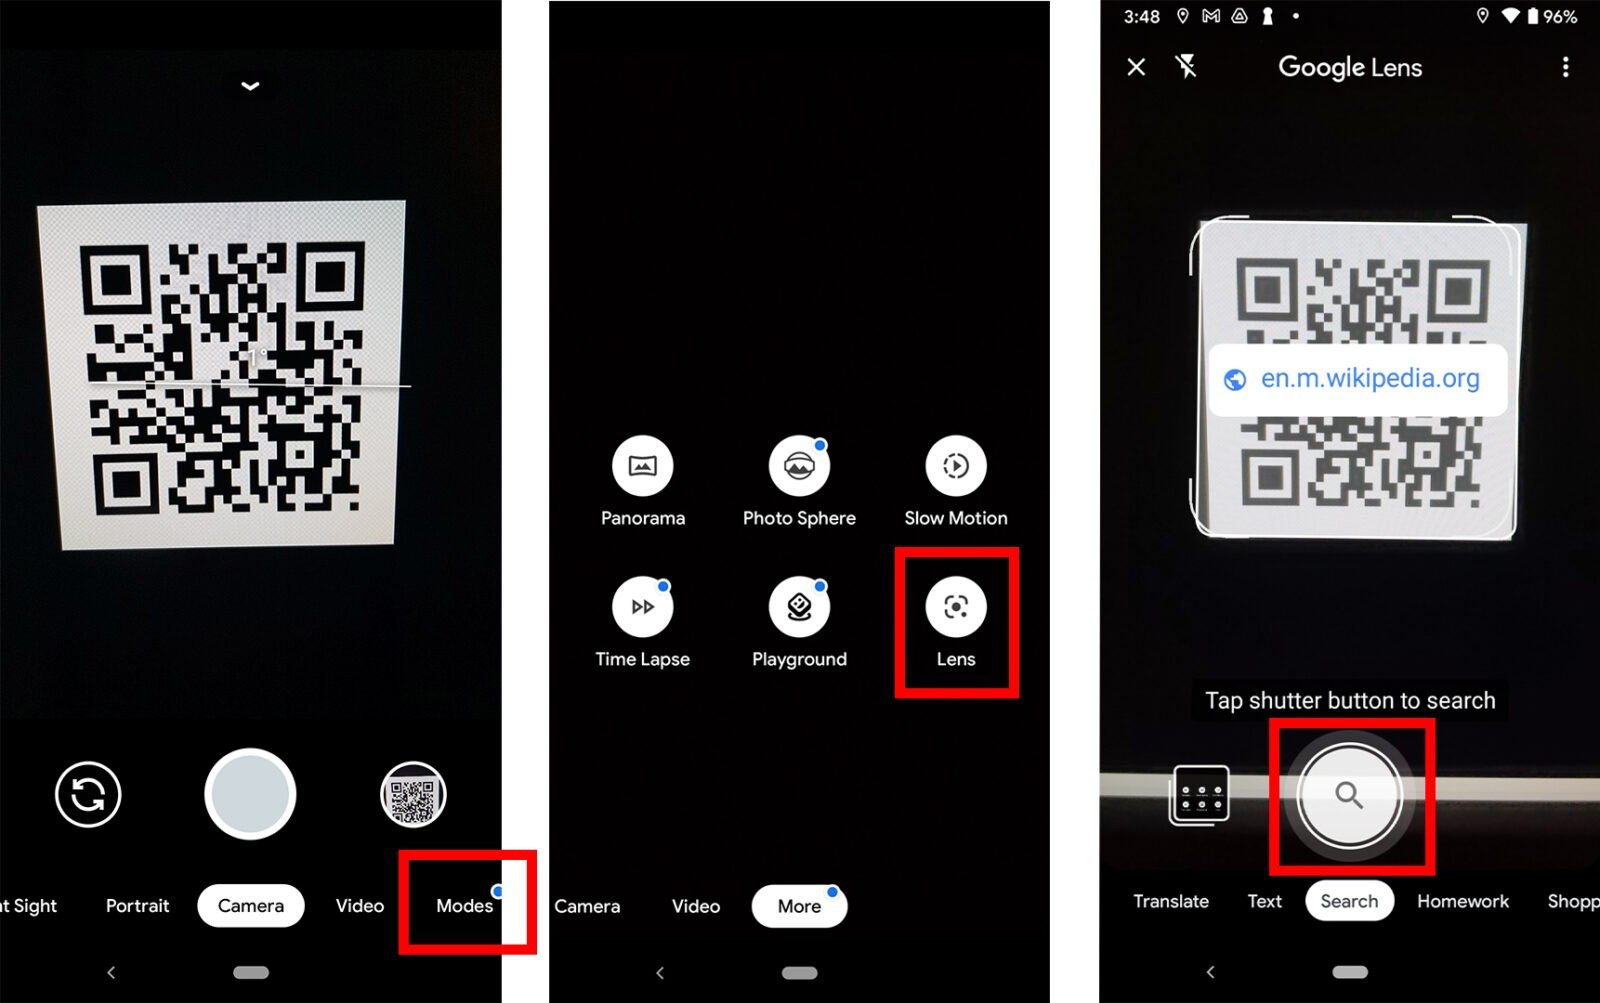
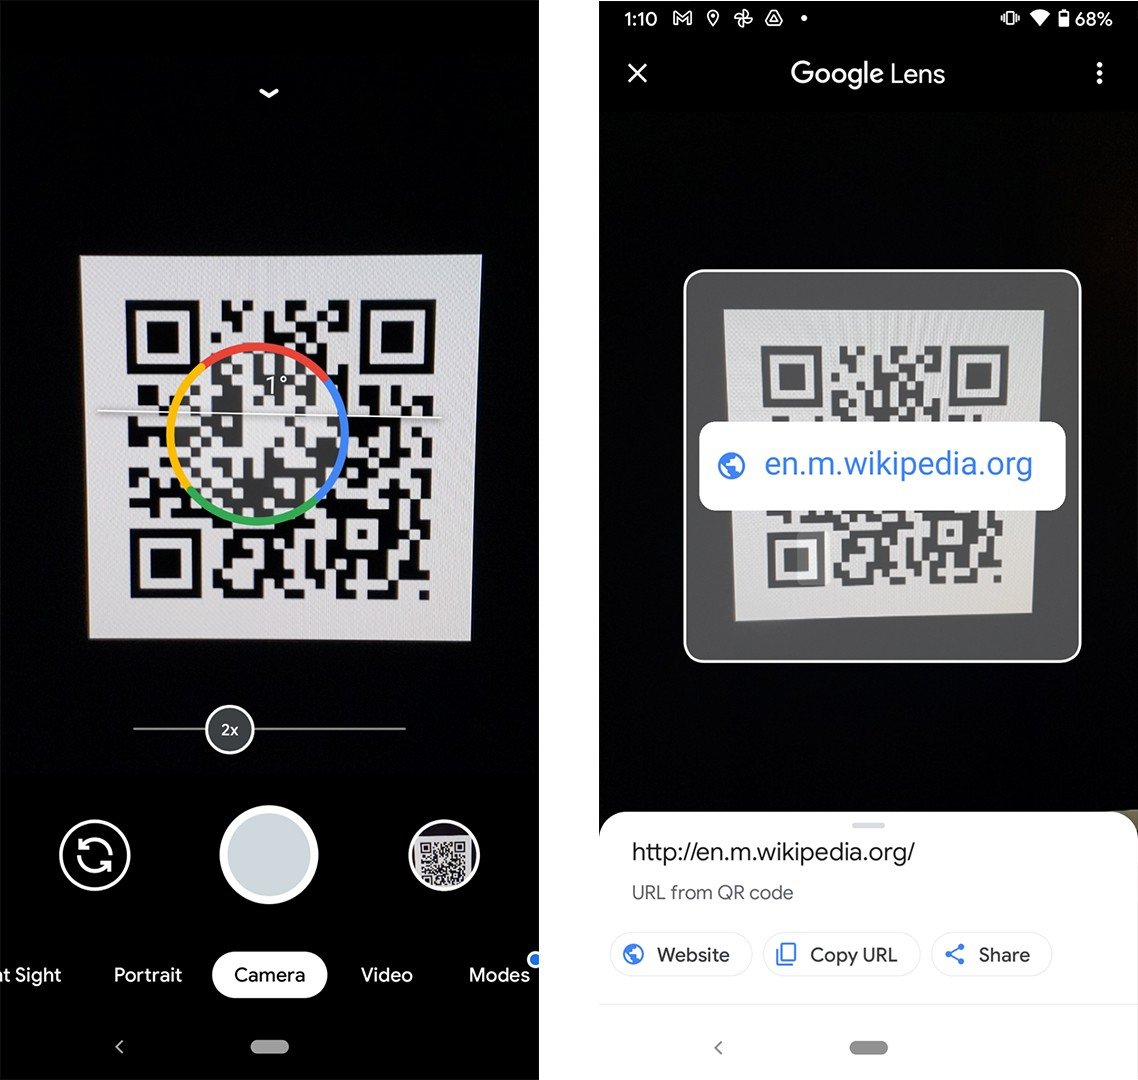
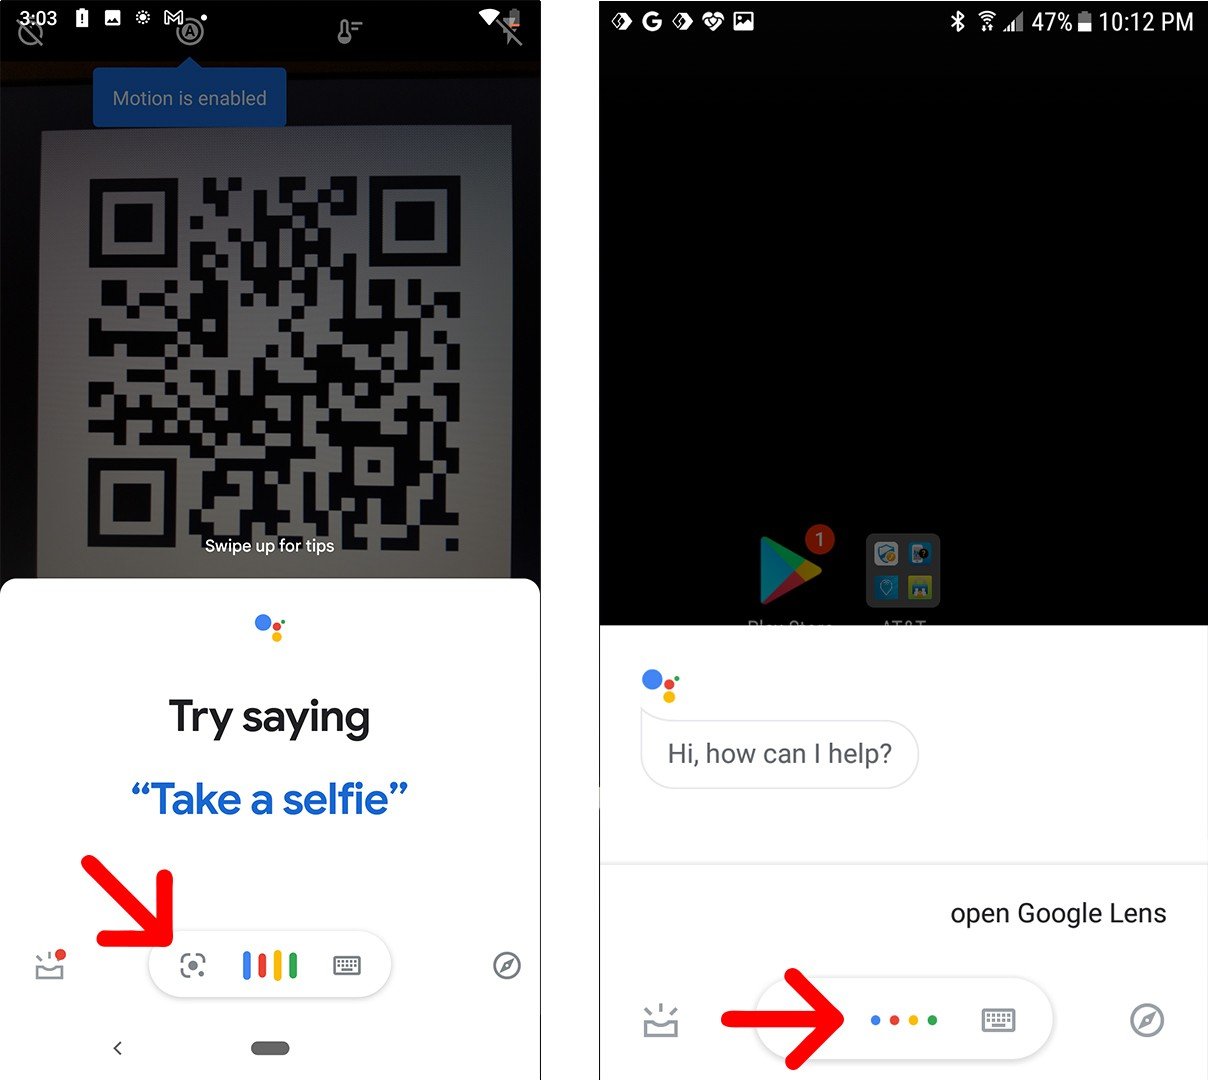
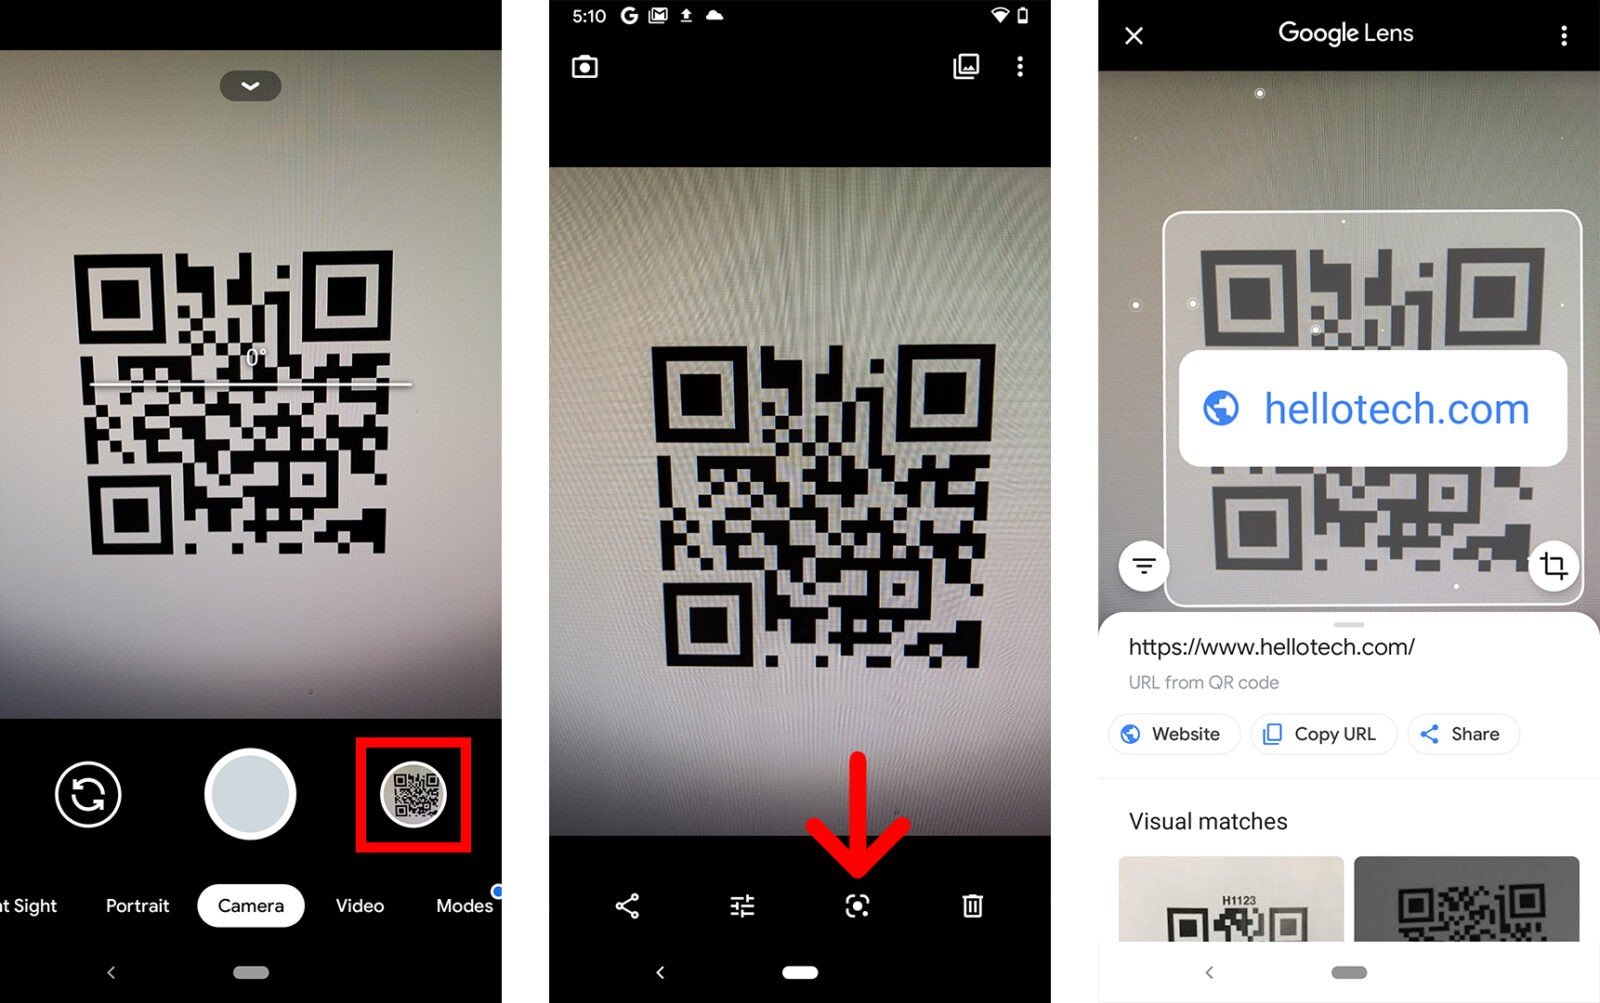
If you don’t see the banner appear, you can use Google Lens instead. You might see the Lens icon (which looks like a circle inside a broken box) somewhere on your screen. Or you might have to tap Modes (or More) in the bottom-right corner of the app and select Lens. Then place the QR code in the white lines and tap the magnifying glass icon to scan it.
You can also open Lens on some phones by tapping and holding the QR code on your screen until you see a multi-colored spinning wheel. Then tap the pop-up banner when it appears above the QR code.
If Google Lens isn’t working in your camera app, you might have to enable it in your settings. You can check your camera settings in the app or in the general settings on your Android. Then enable the Google Lens suggestions option.
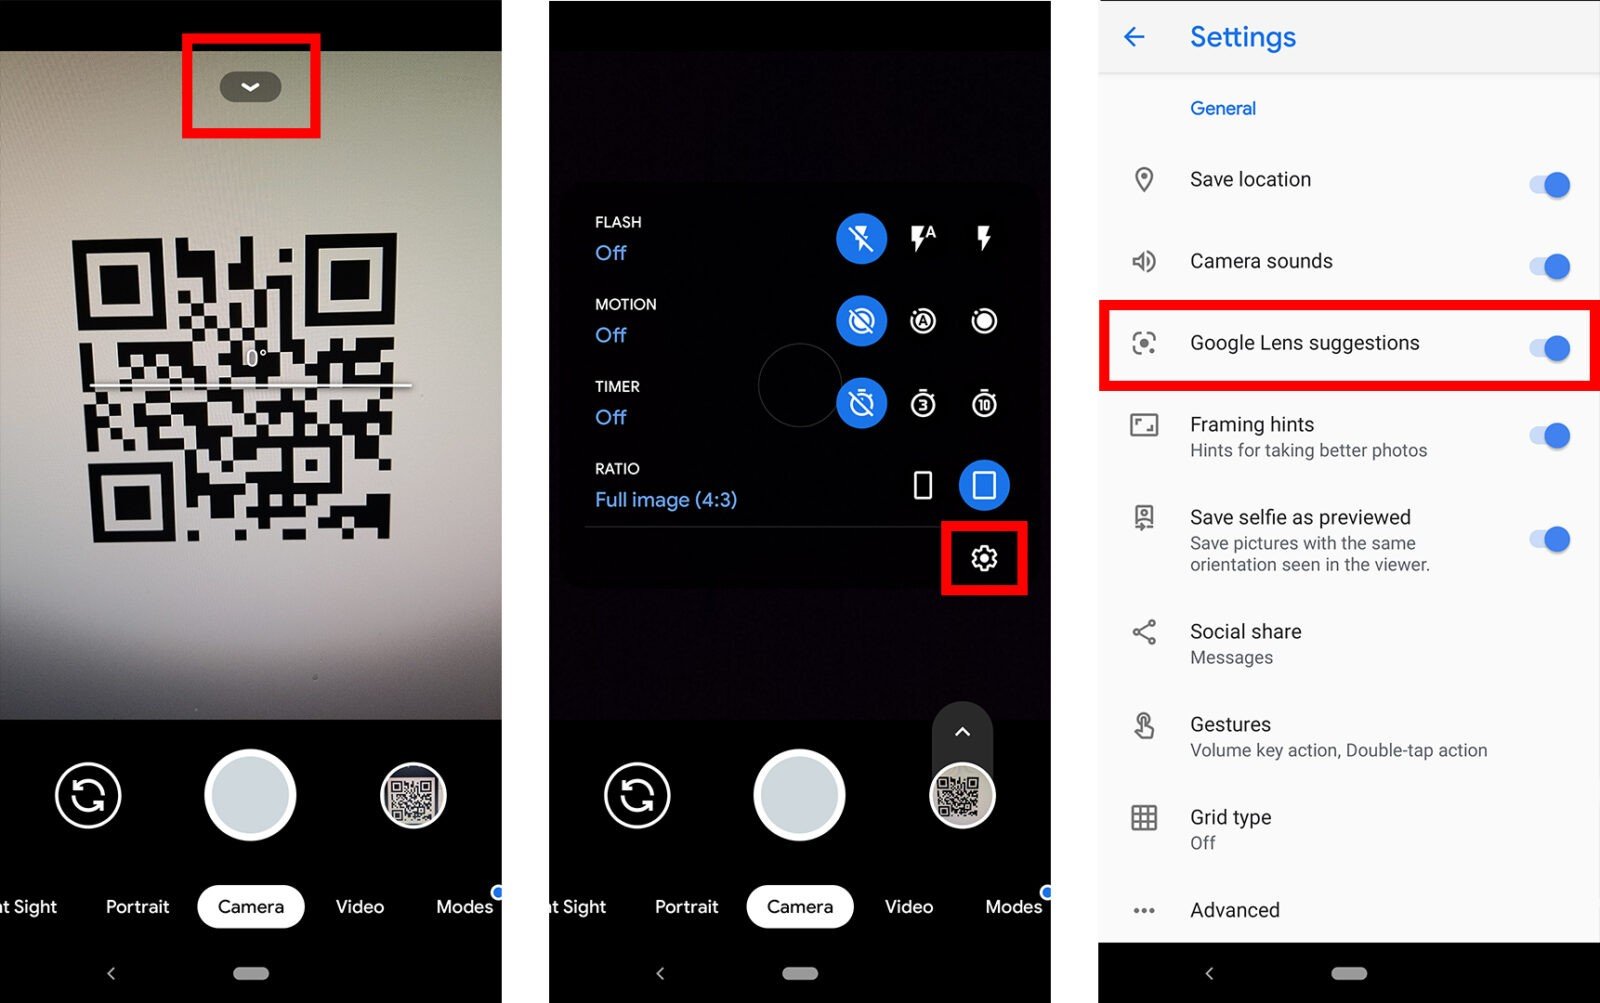
You can also download the Google Lens app from the Google Play Store. Once you open the app, move the QR code to the center of the viewfinder and tap the magnifying glass icon at the bottom of your screen to scan it.

If you are running Android 7 or earlier, your phone might not be compatible with the app, but you might already have the Google Lens feature on your Android device. To find out, press the Home button at the bottom of your device (or the line at the bottom of your screen) until the Google Assistant pops up. Then tap the Google Lens icon or select the microphone icons and say, “open Google Lens.”
If all else fails, you can take a picture or screenshot of the QR code, open the Google Photos app, and tap the Google Lens icon below that picture.
If you want to know how to take a screenshot on your Android phone, check out our step-by-step guide here.
Источник
How to Scan Documents With Your Android Phone
By: Waseem Patwegar
Apart from taking photos, the camera on your Android Phone can be used to Scan documents in PDF Format. This can be quite handy in situations where you do not have access to a document scanner or you simply do not want to use a scanner, since your Android Phone can also scan documents.
Scan Documents With Android Phone
Used in conjunction with the Google Drive App, your Android Phone is quite capable of doubling up as an impressive document scanner.
Scanning a document with an Android Phone is as simple as taking a snap with the back camera of your phone. Once the document has been scanned, you can crop, rotate, edit and enhance the document, before saving it to Google Drive.
The scanned document will be saved as a PDF file on Google Drive, from where you can Print, Share or Send the Scan to anyone using Gmail, WhatsApp, Skype and other sharing apps as available on your phone.
Steps to Scan Documents With Android Phone
As mentioned above, you will need the Google Drive App in order to turn your Android Phone into a Document Scanner. You should already have this app on your Android Phone, if not make sure that you download and install the Google Drive app from this link.
1. Open the Google Drive App on your Android Phone.
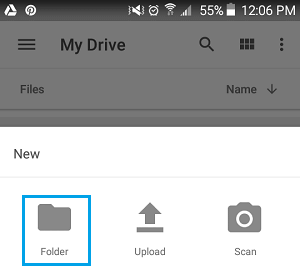
2. Next, tap on the large Plus button located at the bottom right corner of your screen (See image below).
3. On the next screen, tap on the Folder option to create a new folder on Google Drive for storing your scanned Documents.
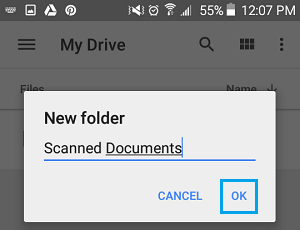
4. Next, you will see a popup asking you to provide a Name for the folder, name the folder as “Scanned Documents” or any other name that best suits your purpose.
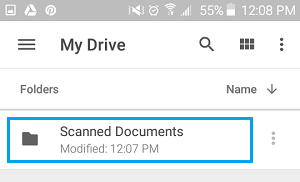
5. Next, tap on the Scanned Documents folder that you had just created.
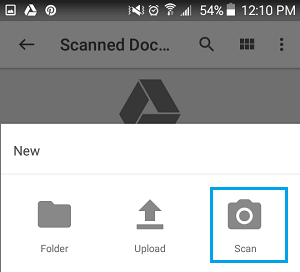
6. Once you are in the Scanned Documents Folder, tap on the large blue Plus button (See image below).
7. On the next screen, tap on the Scan option (this will activate or open the camera of your Android Phone).
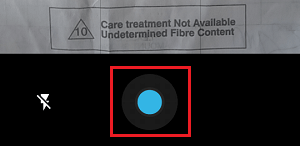
8. Place the document to be scanned on a flat surface (table) and simply take a picture of the document by tapping on the large blue circle located at the bottom of your screen (See image below).
9. Once you take a picture of the document, you will get to see a preview. In case the preview looks OK, you can save the scan as a PDF document by tapping on the Check mark icon (See image below)
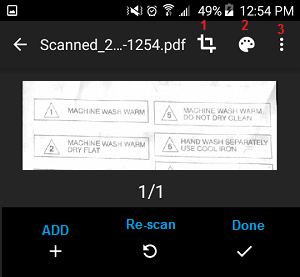
Tapping on the Plus button, located in the bottom menu allows you to scan the next page of the document (See image above).
If you are not satisfied with the scan, you can re-scan the document by tapping on the Redo icon in the bottom menu or you can make use of the Editing and Document Enhancing options from the top menu, as explained below.
1. Crop: Tapping on the crop option ( #1 in image above) allows you to crop the picture that you just shot with your camera.
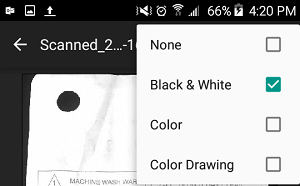
2. Color Palate: Tapping on the Color Palate icon ( #2 in image above) allows you to change the default “Black and White” scan to Color. (See image below).
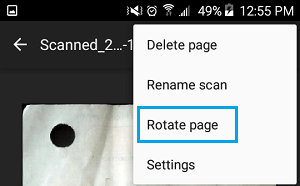
3. 3-dot Menu icon: Tapping on the 3-dots menu icon ( #3 ) allows you to Delete, Rename, Rotate the scanned document and also provides access to other Settings. (See image below)
The Settings menu allows you to choose the Paper Size, Image Quality, Orientation of the document and Automatic image enhancement.
Print, Share or Send Scanned Documents
Once you scan the document, it will be stored on Google Drive in Scanned Documents Folder or any other folder that you made the scan to.
The best part of storing Scanned documents on Google Drive is that you will be able to search the document by its name, Print, Share or Send the document to any one at any time.
1. Simply open the Google Drive App on your Android Phone.
2. Once you are in Google Drive, Open the scanned document that you want to print or send to someone.
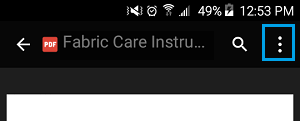
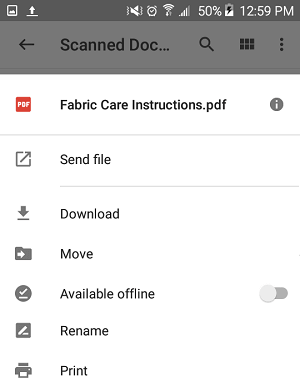
3. Once the document is open, tap on the 3-dot menu icon, located at the top right corner of your screen.
4. On the menu that appears, tap on Print in case you want to print the PDF file or tap on Send File , in case you want to send the scan to anyone. (See image below)
5. Once you tap on send, you will see a slide-up menu, providing you with Gmail, WhatsApp, Outlook and various other options to send the file (See image below).

Tip: Instead of taking pictures of Receipts, Flyers, Notes and others, you can save a ton of Storage space on your Android device by scanning such items and saving them as PDF files on Google Drive.
Источник
Как отсканировать документы телефоном: 8 способов для Android и iOS
Нужно срочно отправить копию договора или третью страничку паспорта, а сканера нет? Ну и не надо – первоклассные сканы, которые устроят бухгалтерию (а это непросто!), можно делать прямо с телефона.
Редактирование фото вручную (любой телефон)
Откройте камеру мобильного телефона и наведите ее на документ. Постарайтесь держать руки параллельно поверхности, на которой лежит бумага, чтобы не были видны тени и заломы. Если в кадр попадет стол или другой фон – не беда: потом отредактируете фото так, чтобы не было видно лишнего.
Заходите во встроенный редактор фото (такой есть на любом современном смартфоне). Скорее всего, там будут такие настройки: выдержка, светлые участки, тени, контраст, яркость, точка черного, насыщенность, резкость. На некоторых телефонах нет выдержки, но это не проблема, а еще параметры иногда имеют другие названия. Например, не «тени», а «темные участки», не «экспозиция», а «световой баланс», не «контраст», а «контрастность». Сути это не меняет.
Можете методом тыка потянуть разные настройки и посмотреть, как меняется фото. Вот какие настройки выбрали мы для этого фото:
- насыщенность – -100 – перевод фотографии в чб уже делает документ похожим на скан, а все остальные настройки нужны, чтобы убрать лишние тени и заломы;
- блеск – 100;
- светлые участки – 90 – это нужно, чтобы высветлить лишние тени;
- тени – 100;
- контраст – 82 – белый белеет, черный чернеет, а текст на фото становится четче;
- яркость – 100 – выбеливает фото;
- точка черного – 90 – делает черный цвет более насыщенным.
В зависимости от того, в каком освещении снято фото, вам может понадобиться увеличение резкости или понижение теплоты, чтобы документ был четким и не казался серым.
Повторили весь процесс на видео, чтобы вы могли посмотреть, как постепенно меняется фотография. На все про все потребовалось 54 секунды.
Вот что в итоге получилось:
Google Диск (Android)
Если вы используете телефон на Android и по каким-то причинам не готовы вручную редактировать фото, пора скачать приложение Google Диск.
Нажмите на крестик в правом нижнем углу экрана – кнопку «Добавить». Выберите «Сканировать» и сделайте фото документа.
Если в объектив попал фон, нажмите на значок «Кадрировать». Если все в порядке, нажмите «Готово».
Нужно отсканировать не одну, а несколько страниц сразу? Тогда после сканирования следующего фото выберите пункт «Сканировать страницу еще раз».
Заметки на iPhone (iOS)
Чтобы программно отсканировать документ на iPhone, откройте стандартное приложение «Заметки». Создайте новую заметку или зайдите в существующую.
Кликните на иконку камеры над клавиатурой и выберите «Отсканировать документы». Наведите камеру на документ и сделайте фото. Снимок будет обработан автоматически. Кадрируйте фото, если необходимо, и нажмите «Оставить». Фотография попадет в заметку, откуда вы сможете ее сохранить.
Весь процесс занял 20 секунд:
А вот итоговый результат:
iScanner (Android и iOS)
Это платное приложение. 1 неделя подписки на него обойдется вам в 269 руб., 1 месяц – в 399 руб. Мы воспользовались бесплатной пробной подпиской на 3 дня.
Чтобы отсканировать в нем документ, достаточно открыть приложение и нажать на фиолетовый кружок со знаком плюс, размещенный в нижней части экрана. Далее – «Камера». Когда откроется камера, нужно навести объектив на документ и подождать: приложение автоматически сделает снимок и обработает фото. Если это необходимо, вы сможете дополнительно обработать скан в приложении, кадрировать его и сохранить в формате PDF или JPG.
Приложение также предлагает сохранить документ в формате TXT, но эта опция подходит не всем документам: нашу инструкцию программа расшифровать не смогла.
FineReader (Android и iOS)
Премиум-подписка на это приложение стоит 399 руб. в месяц, однако первые пять документов можно обработать бесплатно. Чтобы это сделать, откройте приложение и нажмите на значок камеры в правом нижнем углу экрана. Затем наведите телефон на документ и немного подождите: приложение сделает фото автоматически. Если результат вас устроит, нажмите «Использовать» – «Готово».
Будьте аккуратны: эта реактивная программа делает снимок еще до того, как вы успеете адекватно навести объектив на документ. Если вы не готовы платить за подписку, потерять одну из бесплатных попыток будет обидно.
FineReader недостаточно хорошо справляется с удалением заломов с документа: там, где они были, после обработки остались черные точки. Только часть из них удалось удалить вручную прямо в программе
Microsoft Lens (Android и iOS)
Это бесплатное и простое приложение. Чтобы сделать скан с его помощью, наведите камеру на документ и сделайте фото. Приложение автоматически определит границы документа и вырежет его из фона. Далее вы можете самостоятельно наложить фильтры на документ, которые, впрочем, не дают толкового результата. Вот что получилось у нас:
Эта программа, по сути, не «сканирует» документ, а просто фотографирует его и повышает резкость
CamScanner (Android и iOS)
Это приложение тоже не бесплатно. Неделя подписки на него стоит 299 руб., месяц – 799 руб. Даже несмотря на активацию платной пробной подписки приложение постоянно показывает яркие раздражающие поп-апы.
Чтобы сделать скан через эту программу, нажмите на голубой кружок со знаком камеры внизу экрана, наведите камеру на документ и сделайте фото. Обратите внимание: над кнопкой «затвора» здесь тоже есть горизонтальное меню, в котором можно выбрать тип вашего документа.
«Одиночный режим» – для сканирования 1 страницы. «Пакетный режим» – для сканирования многостраничного документа. «Книга» – для сканирования разворота и автоматического разделения его на страницы.
Из всех платных программ CamScanner показала худший результат
Adobe Scan (Android и iOS)
Сканировать документы здесь можно бесплатно. Для этого необходимо открыть приложение, выбрать вкладку «Документ» в горизонтальном меню, навести телефон на документ и сделать фото. Далее программа автоматически «найдет» лист, вырежет его из фона и обработает. Вам останется только сохранить результат.
Результат обработки документа в этой программе кажется самым удачным: она не только убрала тени, но и выровняла строки
Несколько советов
- Чтобы скан получился качественным, держите руки параллельно поверхности, на которой лежит документ.
- Если документ помят, постарайтесь его выгладить до «сканирования»: потом убрать тени и изгиб линий на фото будет сложно.
- Качество итогового изображения после программной обработки, как правило, снижается. Если вам важна четкость скана, редактируйте фото вручную.
В Google и «Яндексе», соцсетях, рассылках, на видеоплатформах, у блогеров
Источник


