- 10 Best Screen Recording Apps for Android You Can Try
- Best Android Screen Recording Apps (Updated April 2021)
- 1. Native Screen Recorder
- 2. Screen Recorder by Kimcy929
- 3. AZ Screen Recorder
- 4. Screen Recorder by InShot (XRecorder)
- 5. Mobizen Screen Recorder
- 6. Screen Recorder V
- 7. Vidma Screen Recorder
- 8. Apowersoft Screen Recorder
- 9. Omlet Arcade: Best Screen Recorder App for Gaming
- 10. Google Play Games
- Go Ahead and Use the Best Screen Recording Apps
- How to record the screen on an Android device
- Recording your screen on an Android 11 device
- Recording your screen on an Android 10 device
- Recording from the Quick Settings bar on Samsung and LG devices
- Using the Android 10 screen recorder on OnePlus devices
- Screen recording with apps
- AZ Screen Recorder
- Google Play Games
- Screen Recorder & Video Recorder – XRecorder
- Mobizen Screen Recorder
10 Best Screen Recording Apps for Android You Can Try
While several Android skins already come with a built-in screen recorder, they lack some advanced features. For example, native screen recorders don’t let you adjust the frame rate or bitrate, add a selfie camera to the recording, choose a higher resolution, record internal audio, and more. If you are someone who wants all these features, then you have come to the right place. In this article, we bring you the 10 best screen recording apps for Android. We put special emphasis on screen recorders that don’t show too many ads, support internal audio, don’t add a watermark, and feature a light video editor, among other things. So without any delay, let’s check out the best apps for screen recording on Android.
Best Android Screen Recording Apps (Updated April 2021)
Here are the 10 best screen recording apps for Android and all of them are available for free. They will let you choose the frame rate and audio source, be it the microphone or internal audio. You can expand the table below and move to the app of your choice with ease.
1. Native Screen Recorder
Most of the users don’t need fancy features. All they want is a simple screen recorder that works well and supports all the basic features. So if you want a hassle-free screen recorder for Android, you don’t need to install a third-party app. As I have mentioned above, almost all Android skins come with a built-in screen recorder. Even Google brought a native screen recorder with Android 11, giving fans of stock Android phones this essential feature. Here is how you can use the native screen recorder on your Android device.
- Stock Android (Android 11 and above): If you are using a Pixel or an Android One smartphone from Motorola, Nokia, etc., open the Quick Settings panel and tap on the edit (pen) icon. Scroll down and look for “Screen Record”. Drag it to the Quick Settings panel. Now, tap on it whenever you want to start screen recording from the Quick Settings panel. It also supports internal audio, microphone, or both.
- MIUI: Xiaomi phones have had screen recording since the MIUI 8 days. You only need to open the Quick Settings panel to find the screen recording tile. If it’s not available, tap on “Edit” and move the “Screen Recorder” tile to the QS panel. Tap on it to start recording the screen. The best part about the MIUI screen recorder is that it supports many features such as frame rate selection, the ability to choose a sound source, and more.
- Realme UI and ColorOS: Realme UI and ColorOS also offer the screen recording option from the Quick Settings menu. If the tile is not available, tap on the edit icon and move Screen Recording to the QS section. For advanced options, tap and hold on the “Screen Recording” tile. Check out how to screen record with internal audio in Realme UI right here.
- One UI: Similar to other Android skins, One UI also comes with a built-in screen recorder. Again, open the Quick Settings panel to find the Screen recorder option. If the tile is missing, tap on the 3-dot icon and open “Quick Panel layout”. Here, scroll down and drag the screen recorder tile to the active QS panel.
- OxygenOS: Swipe down on the homescreen and find “Screen Recorder” under the Quick Settings menu. If the option is not available, as usual, tap on the edit button and drag the Screen Recorder tile to the QS menu. You can also tap the cogwheel icon to customize the advanced options.
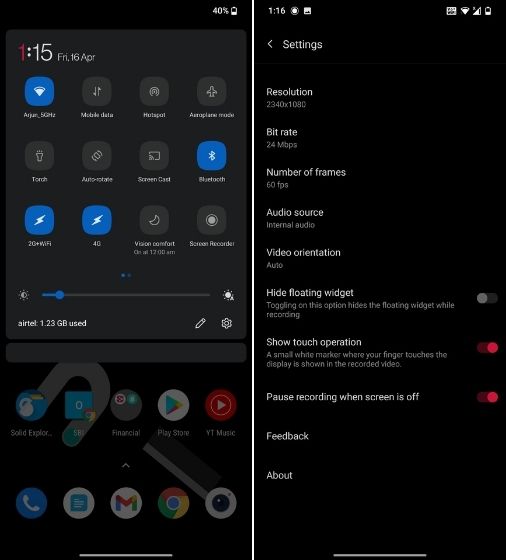
2. Screen Recorder by Kimcy929
When it comes to the best screen recording apps for Android, I always suggest Screen Recorder by Kimcy929. It is an ad-free screen recording app that offers many great features for free. To start, it lets you record with a resolution from 240p to 4K, bit rate from 2 Mbps to 60 Mbps, and frame rate from 24 FPS to 120 FPS. It also lets you record touches and any external audio, along with allowing you to set the audio bit rate up to 320 kbps. Not to mention, if you are on Android 10 or above, then you can also record the internal audio.
The app comes with a useful feature called Game Launcher. Here, you can add the games you have installed on your phone and then launch them directly to record their gameplay. That makes it one of the best screen recording app for gaming, be it PUBG or Call of Duty Mobile, on Android. To let you edit your recordings, you get a video trimmer with the ability to add text or a logo.
With that said, my favorite feature of the app is that it adds a toggle to the quick settings panel allowing you to initiate screen recording with just a tap. All you need to do is edit the quick settings page to make it easily accessible, and that’s all. This feature alone makes it one of the best recording apps for Android on the Play Store.
Install (Free, offers in-app purchases)
3. AZ Screen Recorder
AZ Screen Recorder is a well-known screen recorder for Android. You probably would have already heard of it. AZ Screen Recorder provides a lot of settings and features for recording your phone’s screen. The similarities include a selection of resolution from 240p to 1080p, bit rate from 1 Mbps to 12 Mbps, frame rate from 20 FPS to 60 FPS, recording external and internal audio, touches, and setting a countdown of up to 60 seconds.
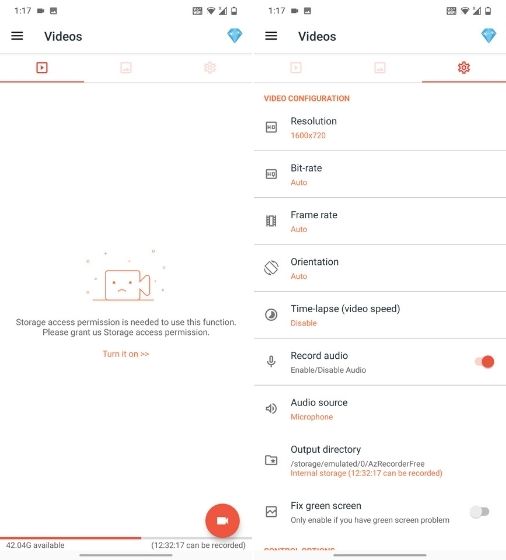
Apart from this, you can create a time-lapse video of your screen – ranging from 1/3rd speed up to 3x speed. Finally, in the app settings, you can configure multiple ways to stop the recording, like shaking the phone or turning the screen off.
You also get features such as merging videos, replacing the audio in the recording with custom audio, adding text to videos, exporting in GIF, etc. There is a premium version available as well that can be bought as an in-app purchase to unlock more features. I would recommend the premium version if you don’t want to experience ads while using the app.
Install (Free, offers in-app purchases)
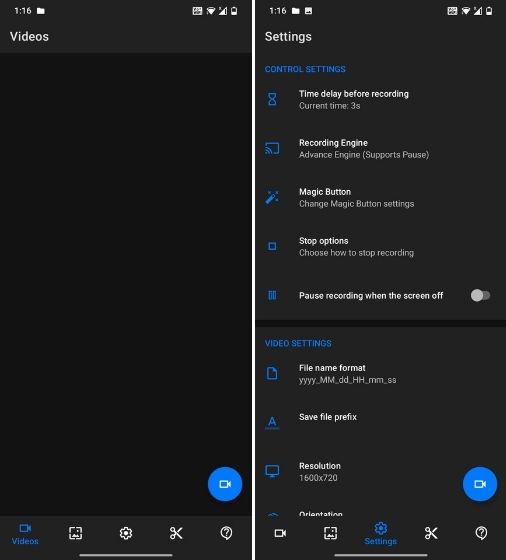
4. Screen Recorder by InShot (XRecorder)
InShot, which we have mentioned in our list of best Instagram Reels video editors, also has a popular and feature-packed screen recorder app on Android. It offers seamless controls that are pretty easy to use. The app comes with a paint tool that allows you to mark areas on your screen while recording the screen. This feature makes it one of the best Android screen recording apps on the market.
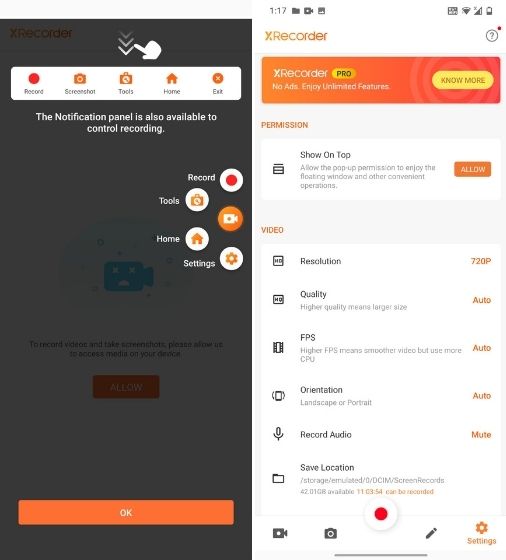
Coming to the features, you will also find that it gives you complete control over the recording quality. If you want a smaller video file, you can record the video at a lower resolution and bitrate. You can also go as high as 1080p and 60FPS. Not to mention, there is support for multiple audio sources as well. Overall, XRecorder is one of the best screen recording apps for Android, and you should check it out right away.
Install (Free, offers in-app purchases)
5. Mobizen Screen Recorder
Like most screen recording apps, Mobizen Screen Recorder offers many great features that make it a worthy screen recording app for Android smartphone users. With this app, you can choose any resolution from 240p – 1080p, bit rate from 0.5 Mbps to 12 Mbps, and frame rate from 5 FPS to 60 FPS. It may not come as a surprise to see options such as a video editor, touch recording, countdown, and face cam as well.
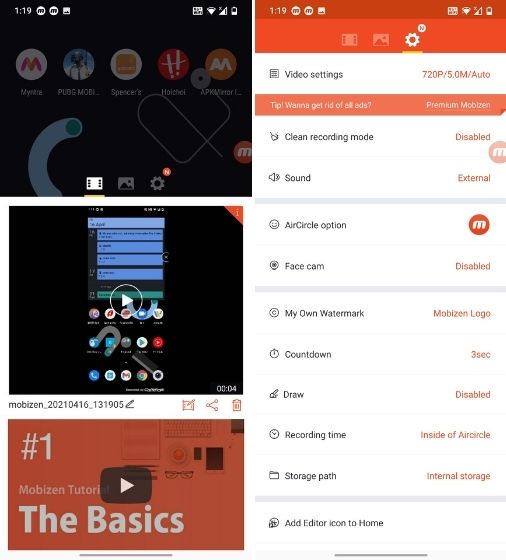
The app has a Clean Recording mode that, as you may have guessed, produces a screen recording without the watermark, air circle, and timer. When this mode is off, you can replace the Mobizen watermark with a custom one. Also, you can view the recording duration to keep track of time. Though all the features of the app are free, you may often see ads within the app. But you can remove these ads by buying the premium version.
Install (Free, offers in-app purchases)
6. Screen Recorder V
Screen Recorder V bears similarity to AZ Screen Recorder, especially in the settings it has to offer. It is also wildly popular on Android, with more than 50 million installs. The app lets you record your screen with a resolution that can range from 240p to 2K, bit rate from 2 Mbps to 15 Mbps, and frame rate from 24 FPS to 60 FPS.
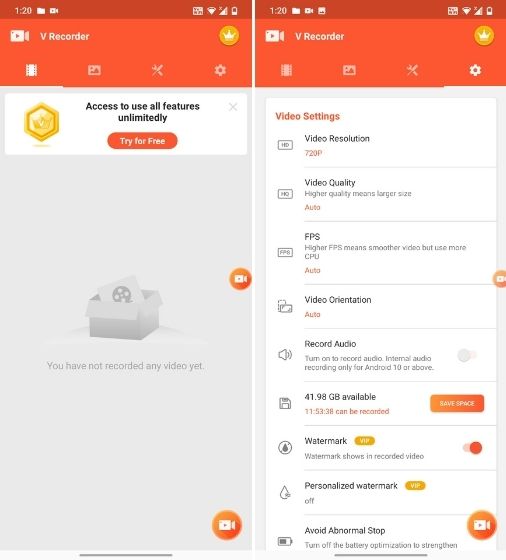
Keep in mind, screen recording at 1080p and 2K is available only to paid users. Besides that, the app allows you to include touch gestures and add a countdown of 3 seconds before starting the screen recording. And it goes without saying that it can record both external and internal audio, given that you are on Android 10 and above.
The screen recordings from this Android app do not contain a watermark, so you don’t need to be concerned about that. However, if you wish to include a logo in your recording, this app allows you to do just that by selecting an image from your device. Finally, you can stop the recording either from the notification drawer or from the overlay toolbox.
Install (Free, offers in-app purchases)
7. Vidma Screen Recorder
With Vidma Screen Recorder, you get a lot of advanced options and for free. The free version of the app offers custom resolution up to 1080p, custom bit rate, a predefined countdown timer of 10 seconds, and the option to include both internal and audio from the microphone. You also get access to advanced features, like shaking your device to stop the recording, hiding the ongoing notification, showing touches, customized timer, presets, and more.
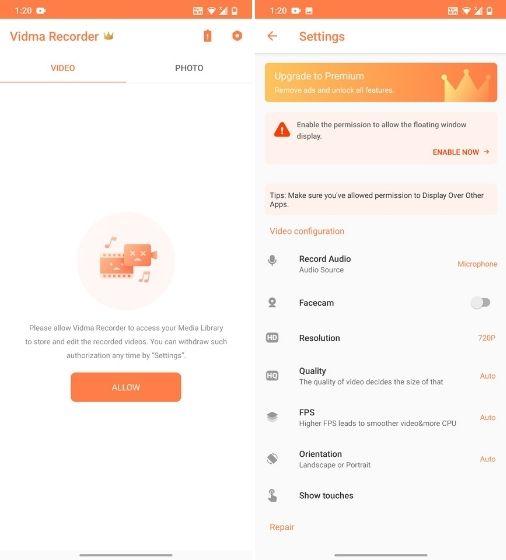
What I like about the screen recorder is that it has a no-nonsense approach. Simply install the app and start recording the screen without having to customize and grant too many permissions. So if you are looking for a simple and free screen recording app for Android, then the Vidma screen recorder might be a suitable pick for you.
Install (Free, offers in-app purchases)
8. Apowersoft Screen Recorder
Apowersoft Screen Recorder is one of the very few screen recorders that lets you record a 1440p screen recording. In fact, the lowest resolution that it offers is 360p as compared to 240p, which is on offer by most other apps. With Apowersoft Screen Recorder, you can choose a bit rate from 1 Mbps to 12 Mbps and a frame rate from 24 FPS to 60 FPS.
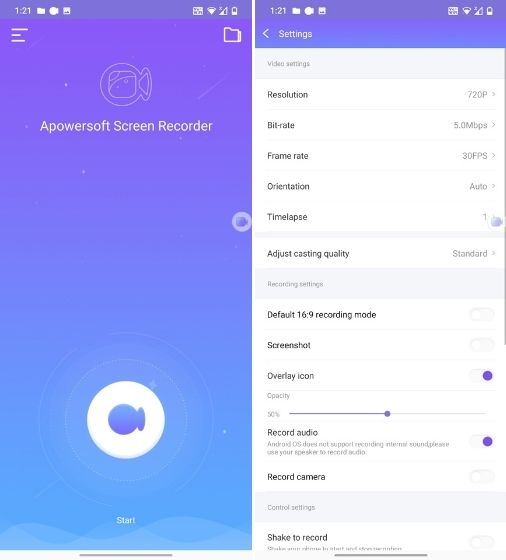
The recordings can be given a prefix name in the app settings to make them easier to locate in the phone’s storage. To minimize the clutter in your recorded video, you can also change the size of the floating icon. The app also lets you capture touch gestures, which is pretty good. With that said, the Apowersoft screen recorder lacks a basic feature, and that could be a dealbreaker. You can’t record the internal audio on Android 10 and above.
Install (Free, offers in-app purchases)
9. Omlet Arcade: Best Screen Recorder App for Gaming
If you are looking for an Android screen recorder for gaming or live streaming, then Omlet Arcade is perhaps the best app out there. It has integration with YouTube, Twitch, and more. The app supports screen recording of games such as PUBG, Call of Duty, Among Us, Fortnite, etc. Remember, it does not allow you to customize the streaming settings.
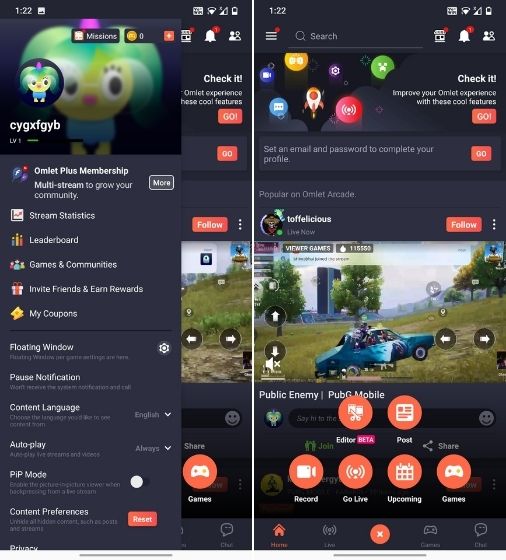
Based on the internet speed, it can automatically switch to lower or higher resolution and frame rate. Moreover, it supports audio recording both from an internal source and microphone, which is what you need while gaming. To sum up, if you are a gamer, Omlet Arcade is the best screen recording app for you.
Install (Free, offers in-app purchases)
10. Google Play Games
Most of the Android devices already come with the Google Play Games pre-installed. In case your device didn’t, I would highly recommend you to download it. Though it may not allow you to record everything on your Android device, it has a built-in screen recording feature. It enables you to screen record any game available on the Play Store along with a face-cam.
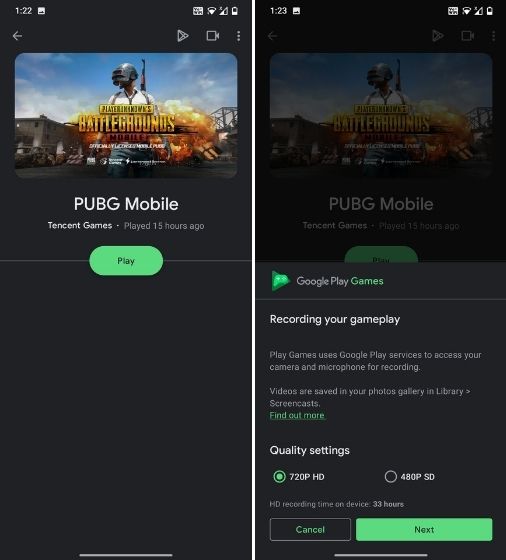
To record a game, search for the game in Google Play Games, tap on the recording icon at the top-right corner, and select the video quality. You can choose from either 480p or 720p resolution. Next, the app will ask you to launch the game, after which you can start the recording.
Go Ahead and Use the Best Screen Recording Apps
While Android 11 includes a native screen recorder, if you want to try out third-party screen recorder apps for Android in 2021, these are the best options. Also, I have tested out all of these are screen recording apps, and they all get the job done. So which screen recording app did you like the most? Do let me know in the comments section below. Also, don’t forget to check out our picks for best screen recording Google Chrome extensions. They come in quite handy when you want to create and share a screengrab quickly.
Источник
How to record the screen on an Android device


Want to snap a quick video or record your screen on an Android device? Whether you’re taking a recording for friends or creating a video for professional purposes, there are a number of ways to do it.
Taking screenshots is easy, but what about a longer, more complicated video recording of what’s happening on your phone? If that’s exactly what you need, here’s how to record the screen on an Android device, whether it’s by downloading an app, using the built-in screen recorder on Android 11, or using in-built tools available on some Android 10 devices.
Recording your screen on an Android 11 device


Having teased the option on previous versions of Android, Android 11 has finally added a native ability to record your phone’s screen. Having been a part of Android 11’s beta, Google’s developers finally decided to keep it, so now you can record your screen on any Android 11 phone.
In order to use the recording function, you need to add it to your phone’s Quick Settings menu. To do this, swipe down twice on the Notification Shade in order to open Quick Settings. Next, tap the Edit tile in the bottom-left corner of the panel (it usually looks like a pencil). Locate the Screen Recorder tile before dragging it into the Quick Settings area. Finally, tap the Back arrow or swipe from the edge of the screen to save the change.
You can now open the Quick Settings panel again to actually use the Screen Recorder. When using it for the first time, you’ll be asked whether you also want to record audio and show touches on the screen. Make your desired choices, and then tap Start to begin recording. A red recording icon will appear in the notification shade whenever your phone is recording. You can pull down on the shade and tap the Red icon to end the recording.
Recording your screen on an Android 10 device
Screen recording was a big addition to the Android 10 beta, but Google stripped the feature out before the final release. Thankfully, user interface (UI) designers from LG, OnePlus, and Samsung put it back in.
Recording from the Quick Settings bar on Samsung and LG devices


Samsung and LG phones on Android 10 can access a screen recording option from their Quick Settings bars. Swipe down twice on your notification shade to access the Quick Settings section, and then select Screen Recording (on an LG phone) or Screen Recorder (on a Samsung phone). Then, tap the Start button, and wait for the short countdown to complete to begin recording. You may need to allow the recorder some permissions before it will begin, and LG warns that any protected content — like Netflix — will be displayed as a black screen with audio. When you’re finished, tap the Stop button, and your recording will end.
Samsung goes a little further with its recording options, and you’ll be able to add a facecam to your footage. Just tap the Front Camera icon — it looks like a person’s silhouette — and a small window will show containing your front camera’s stream. If you’re recording on a Galaxy Note phone, you’ll also be able to use the S Pen to draw on the recording. Just tap the Pencil icon to get started. Be warned: You’ll need to turn it off to interact normally with the screen again.
Can’t find the screen recording option in Quick Settings? Make sure your phone is running Android 10, and ensure it’s also updated to the latest possible version. You’ll be able to find your updates in the Settings app.
Using the Android 10 screen recorder on OnePlus devices
If you have a OnePlus smartphone running Android 10, you’ll also be able to use a native screen recorder. However, it won’t initially be accessible from the Quick Settings bar. Instead, you’ll need to add it first as a shortcut. Here’s what you do:
Step 1: Swipe down on the status bar to open the notification drawer. Swipe down one more time to reveal all of the app tiles.
Step 2: Tap the Edit icon (it looks like a pencil), then swipe left to access the next page.
Step 3: Tap and hold the Screen Recorder app, then drag it to the Quick Settings menu.
Step 4: Tap the Back button in the top-left corner, which saves your changes.
Having done this, you’ll now be able to access the Screen Recorder when opening Quick Settings.
Screen recording with apps
Don’t have an Android 10 device from LG, OnePlus, or Samsung? Don’t worry, you don’t need to buy a new phone simply to record your screen — just download an app that’ll handle the hard work. Here are a couple of great screen recording apps.
AZ Screen Recorder


The AZ recorder is a pure recording app with no time limits or watermarks. Best of all, it’s simple to use, without much setup required.
Get started by downloading and launching the app. Once launched, it will display a series of circles on your screen, with options for recording, taking screenshots, live streaming, and more. Select the Record option, and you’ll be asked to confirm the screen recording. Once started, you can stop the recording by swiping down on your screen and tapping the Stop button in your notifications.
When you’re not recording, the app will keep its logo overlaid on your screen, so you can access it quickly if need be. Or if you’d rather it wasn’t there, drag it down to the X at the bottom of the screen to remove it. Relaunching the app will bring the floating button back.
You can access the app’s settings by tapping the floating button and hitting the gear-shaped icon. That will take you to a menu where you can adjust many aspects of video quality before you start recording, which is useful if you need a certain quality or want to save video file space.
The app also some minor editing tools and gives you the ability to draw on the screen while recording, making this a great option for professionals. The app also includes the option to cut and edit the video, crop the screen as necessary, replace the audio with whatever you want, and convert sections to GIFs as needed. Visit this area to make your final tweaks before you are ready to share.
Google Play Games


As the name implies, this game management app is all about using and recording the games you play on Android. That means your first step should be to register for Google Play Games and explore the service to find the games you want and enjoy. Make sure you do this before you start trying to record, as Play Games only lets you record supported games.
When you are ready to begin, open the app, and tap the game you want to record to open the Game details window. From there, tap the video camera-shaped icon to start recording. Select Next, then choose your video quality. When everything looks good, select Launch to start gaming.
After a few seconds, the game will start. You’ll have options once you’re here. By default, Play Games starts you off with a facecam using your front-facing selfie camera — but you can turn that off by tapping the video camera-shaped button. You can also mute by tapping the microphone button. Most importantly, tapping the red Record icon will start your recording. To stop recording, tap your facecam (or the Play Games logo, if you’re not using a facecam), and tap the red Stop square.
Your video will automatically be saved to your device once you stop. If you want to upload your video to YouTube, there’s an instant share option labeled Edit & Upload to YouTube. Note that editing abilities are limited, and that this app will record everything that appears on the device screen, so this step may take some time.
Screen Recorder & Video Recorder – XRecorder


Here’s another third-party screen and video recorder, just in case you don’t like the others featured above. Developed by InShot, it’s hugely popular with over 100 million downloads and over 2 million reviews (boasting a score of 4.5 stars out of 5). It’s simple enough to use, requiring you to simply choose Video from the bottom tab and then to tap the Record button to begin recording your screen.
You can bring up the Notification Shade at any point while recording to pause the recording, and you can obviously also reenter the app itself and press the Stop button. You can also use the app to share your recordings and to take screenshots, and it also provides a range of settings for you to tweak according to your own preferences. These include quality options, the ability to deactivate audio, and also the ability to change the orientation of your recordings.
XRecorder is downloadable and usable for free, but it’s free version does come with the occasional pop-up ad. You can remove ads by paying $6.
Mobizen Screen Recorder
Mobizen offers HD recording that’s very similar to the AZ app, so it’s a good option to try if AZ doesn’t work for you.
Download the app and launch it from the app menu. The app will prompt you through setting up an account, and then you will see a small “air circle” icon on your screen. Mobizen will walk you through how to use it. When you’re ready to record, click the record button to start. (Note that the camera icon only takes screenshots.) You will see a three-second countdown before the app starts recording.
While you’re recording, the air circle will be visible, but don’t worry—it won’t show on your final video. Select it again and hit the pause icon to pause the video whenever you need to. The upper button features a red stop button when recording, and you can select this at any time to stop the video.
When you’ve stopped recording, a pop-up will open to let you preview your video. From there, you can choose to edit if you want to make changes. You can also come back and make edits later if you save your video. You’ll see a pen-and-paper editing icon under the footage as you watch, and clicking this will let you edit your video. You can cut and split , add background music, add intros and outros, and get the video looking just how you want.
Источник


