- Использование Android Search Dialog. Пример простого приложения
- Немного теории
- Конфигурационный файл
- Создаем Activity
- Выполнение поиска
- Исходный код
- Creating a Search Interface
- In this document
- Key classes
- Related samples
- Downloads
- The Basics
- Creating a Searchable Configuration
- Creating a Searchable Activity
- Declaring a searchable activity
- Performing a search
- Receiving the query
- Searching your data
- About Adapters
- Presenting the results
- Using the Search Dialog
- Should I use the search dialog or the widget?
- Invoking the search dialog
- The impact of the search dialog on your activity lifecycle
- Passing search context data
- Using the Search Widget
- Configuring the search widget
- Other search widget features
- Using both the widget and the dialog
- Adding Voice Search
- Adding Search Suggestions
Использование Android Search Dialog. Пример простого приложения

Данная статья предназначена для тех, кто уже написал свой HelloWorld для Android и знает, что такое Activity и Intent, а так же где находится манифест, и зачем нужны layout’ы. В противном случае, можно ознакомиться с этим материалом, например, на developer.android.com.
В статье описывается создание несложного приложения, которое использует механизм реализации поиска, основанный на возможностях встроенного фреймворка. После прочтения вы также сможете настроить свое приложение таким образом, чтобы оно осуществляло поиск по данным, используя стандартный Android Search Dialog.
Немного теории
Android Search Dialog (далее — «диалог поиска») управляется с помощью поискового фреймворка. Это означает, что разработчику не нужно задумываться над тем как его нарисовать или как отловить поисковый запрос. За вас эту работу сделает SearchManager.
Итак, когда пользователь запускает поиск, SearchManager создает Intent, и направляет его к Activity, которое отвечает за поиск данных (при этом сам запрос помещается в экстры). То есть по сути в приложении должно быть хотя бы одно Activity, которое получает поисковые Intent’ы, выполняет поиск, и предоставляет пользователю результаты. Для реализации потребуется следующее:
- Конфигурационный xml файл (в нем содержится информация о диалоге)
- Activity, которое будет получать поисковые запросы, выполнять поиск и выводить результаты на экран
- Механизм вызова поискового диалога (так как не все устройства с Android на борту имеют на корпусе кнопку поиска)
Конфигурационный файл
xml version =»1.0″ encoding =»utf-8″ ? >
searchable xmlns:android =»http://schemas.android.com/apk/res/android»
android:label =»@string/app_name»
android:hint =»@string/search_hint»
>
searchable >
* This source code was highlighted with Source Code Highlighter .
Обязательным атрибутом является только android:label, причем он должен ссылаться на строку, которая является такой же, что и название приложения. Второй атрибут, android:hint используется для отображения строки в пустом диалоге. Например, это может быть «Поиск по Видео» или «Поиск контактов» и т.п. Этот атрибут указывает на то, по каким данным осуществляется поиск. Также важно знать, что элемент searchable поддерживает множество других атрибутов, подробнее можно прочесть Здесь.
Создаем Activity
Минимально, всё что нам нужно от пользовательского интерфейса Activity — это список для вывода результатов поиска и механизм вызова поискового диалога. Так и сделаем, добавив только поле для ввода текста и кнопку, чтобы мы сами могли заполнять базу. Забегая вперед, скажу, что данные будем хранить в БД SQLite.
Опишем интерфейс Activity следующим образом (файл находится в res/layout/main.xml).
xml version =»1.0″ encoding =»utf-8″ ? >
LinearLayout xmlns:android =»http://schemas.android.com/apk/res/android»
android:orientation =»vertical»
android:layout_width =»fill_parent»
android:layout_height =»fill_parent» >
LinearLayout
android:orientation =»horizontal»
android:layout_width =»fill_parent»
android:layout_height =»wrap_content»
android:gravity =»top» >
EditText
android:id =»@+id/text»
android:layout_width =»wrap_content»
android:layout_height =»wrap_content»
android:hint =»@string/text»
android:layout_weight =»100.0″/>
Button
android:id =»@+id/add»
android:layout_width =»wrap_content»
android:layout_height =»wrap_content»
android:text =»@string/add»/>
LinearLayout >
ListView
android:id =»@android:id/list»
android:layout_width =»fill_parent»
android:layout_height =»wrap_content»/>
TextView
android:layout_gravity =»left»
android:id =»@android:id/empty»
android:layout_width =»fill_parent»
android:layout_height =»fill_parent»
android:text =»@string/no_records»/>
LinearLayout >
* This source code was highlighted with Source Code Highlighter .
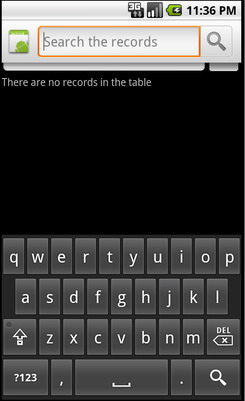
Выглядит следующим образом:

Также нам понадобится layout для вида элемента списка, опишем его простейшим образом (файл находится в res/layout/record.xml)
xml version =»1.0″ encoding =»utf-8″ ? >
TextView
android:id =»@+id/text1″
xmlns:android =»http://schemas.android.com/apk/res/android»
android:layout_width =»wrap_content»
android:layout_height =»wrap_content»
/>
* This source code was highlighted with Source Code Highlighter .
Также, не забываем про файл ресурсов, где хранятся наши строки (файл в res/values/strings.xml)
xml version =»1.0″ encoding =»utf-8″ ? >
resources >
string name =»app_name» > SearchExample string >
string name =»add» > Add string >
string name =»text» > Enter text string >
string name =»no_records» > There are no records in the table string >
string name =»search_hint» > Search the records string >
string name =»search» > Search string >
resources >
* This source code was highlighted with Source Code Highlighter .
xml version =»1.0″ encoding =»utf-8″ ? >
manifest xmlns:android =»http://schemas.android.com/apk/res/android»
package =»com.example.search»
android:versionCode =»1″
android:versionName =»1.0″ >
application android:icon =»@drawable/icon» android:label =»@string/app_name» >
activity android:name =».Main»
android:label =»@string/app_name» >
intent-filter >
action android:name =»android.intent.action.MAIN»/>
category android:name =»android.intent.category.LAUNCHER»/>
intent-filter >
intent-filter >
action android:name =»android.intent.action.SEARCH»/>
intent-filter >
meta-data
android:name =»android.app.searchable»
android:resource =»@xml/searchable»
/>
activity >
application >
uses-sdk android:minSdkVersion =»5″/>
* This source code was highlighted with Source Code Highlighter .
Сейчас, вы уже можете проверить, все ли вы сделали правильно. Вызвать диалог на эмуляторе можно, например, нажав кнопку поиска. Ну или если вы проверяете на девайсе, то зажав «Меню». Выглядеть должно примерно так:
Выполнение поиска
Получение запроса
Так как SearchManager посылает Intent типа Search нашему Activity, то всё что нужно сделать это проверить на Intent этого типа при старте Activity. Тогда, если мы получаем нужный Intent, то можно извлекать из него экстру и выполнять поиск.
Поиск данных
Так как тип структуры хранения данных для разных приложений может различаться, то и методы для них свои. В нашем случае, проще всего выполнить запрос по таблице БД SQLite запросом LIKE. Конечно, лучше использовать FTS3, он значительно быстрее, подробнее о FTS3 можно прочесть на сайте SQLite.org. В идеале, также нужно всегда рассчитывать, что поиск может занять продолжительное время, поэтому можно создать какой-нибудь ProgressDialog, чтобы у нас не завис интерфейс, и чтобы пользователь знал, что приложение работает.
Вывод результатов
Вообще вывод результатов — это проблема UI, но так как мы используем ListView, то для нас проблема решается простым обновлением адаптера.
Исходный код
Наконец, привожу полный исходный код двух классов с комментариями. Первый — Main, наследник ListActivity, он используется для наполнения БД и вывода результатов. Второй класс — RecordsDbHelper, он реализует интерфейс для взаимодействия с БД. Самые важные методы — добавление записей и поиск совпадений, с помощью запроса LIKE.
import android.app.ListActivity;
import android.app.SearchManager;
import android.content.Intent;
import android.database.Cursor;
import android.os.Bundle;
import android.view.Menu;
import android.view.MenuInflater;
import android.view.MenuItem;
import android.view.View;
import android.widget.Button;
import android.widget.EditText;
import android.widget.SimpleCursorAdapter;
public class Main extends ListActivity <
private EditText text;
private Button add;
private RecordsDbHelper mDbHelper;
@Override
public void onCreate(Bundle savedInstanceState) <
super.onCreate(savedInstanceState);
setContentView(R.layout.main);
//Создаем экземпляр БД
mDbHelper = new RecordsDbHelper( this );
//Открываем БД для записи
mDbHelper.open();
//Получаем Intent
Intent intent = getIntent();
//Проверяем тип Intent
if (Intent.ACTION_SEARCH.equals(intent.getAction())) <
//Берем строку запроса из экстры
String query = intent.getStringExtra(SearchManager.QUERY);
//Выполняем поиск
showResults(query);
>
add = (Button) findViewById(R.id.add);
text = (EditText) findViewById(R.id.text);
add.setOnClickListener( new View.OnClickListener() <
public void onClick(View view) <
String data = text.getText().toString();
if (!data.equals( «» )) <
saveTask(data);
text.setText( «» );
>
>
>);
>
private void saveTask( String data) <
mDbHelper.createRecord(data);
>
private void showResults( String query) <
//Ищем совпадения
Cursor cursor = mDbHelper.fetchRecordsByQuery(query);
startManagingCursor(cursor);
String [] from = new String [] < RecordsDbHelper.KEY_DATA >;
int [] to = new int [] < R.id.text1 >;
SimpleCursorAdapter records = new SimpleCursorAdapter( this ,
R.layout.record, cursor, from , to);
//Обновляем адаптер
setListAdapter(records);
>
//Создаем меню для вызова поиска (интерфейс в res/menu/main_menu.xml)
public boolean onCreateOptionsMenu(Menu menu) <
MenuInflater inflater = getMenuInflater();
inflater.inflate(R.menu.main_menu, menu);
return true ;
>
public boolean onOptionsItemSelected(MenuItem item) <
switch (item.getItemId()) <
case R.id.search_record:
onSearchRequested();
return true ;
default :
return super.onOptionsItemSelected(item);
>
>
>
* This source code was highlighted with Source Code Highlighter .
import android.content.ContentValues;
import android.content.Context;
import android.database.Cursor;
import android.database.SQLException;
import android.database.sqlite.SQLiteDatabase;
import android.database.sqlite.SQLiteOpenHelper;
import android.util.Log;
public class RecordsDbHelper <
public static final String KEY_DATA = «data» ;
public static final String KEY_ROWID = «_id» ;
private static final String TAG = «RecordsDbHelper» ;
private DatabaseHelper mDbHelper;
private SQLiteDatabase mDb;
private static final String DATABASE_CREATE = «CREATE TABLE records(_id INTEGER PRIMARY KEY AUTOINCREMENT, »
+ «data TEXT NOT NULL);» ;
private static final String DATABASE_NAME = «data» ;
private static final String DATABASE_TABLE = «records» ;
private static final int DATABASE_VERSION = 1;
private final Context mCtx;
private static class DatabaseHelper extends SQLiteOpenHelper <
DatabaseHelper(Context context) <
super(context, DATABASE_NAME, null , DATABASE_VERSION);
>
@Override
public void onCreate(SQLiteDatabase db) <
@Override
public void onUpgrade(SQLiteDatabase db, int oldVersion, int newVersion) <
Log.w(TAG, «Upgrading database from version » + oldVersion + » to »
+ newVersion + «, which will destroy all old data» );
db.execSQL( «DROP TABLE IF EXISTS tasks» );
onCreate(db);
>
>
public RecordsDbHelper(Context ctx) <
this .mCtx = ctx;
>
public RecordsDbHelper open() throws SQLException <
mDbHelper = new DatabaseHelper(mCtx);
mDb = mDbHelper.getWritableDatabase();
return this ;
>
public void close() <
mDbHelper.close();
>
//Добавляем запись в таблицу
public long createRecord( String data) <
ContentValues initialValues = new ContentValues();
initialValues.put(KEY_DATA, data);
return mDb.insert(DATABASE_TABLE, null , initialValues);
>
//Поиск запросом LIKE
public Cursor fetchRecordsByQuery( String query) <
return mDb.query( true , DATABASE_TABLE, new String [] < KEY_ROWID,
KEY_DATA >, KEY_DATA + » LIKE» + «‘%» + query + «%'» , null ,
null , null , null , null );
>
>
* This source code was highlighted with Source Code Highlighter .
Источник
Creating a Search Interface
In this document
Key classes
Related samples
Downloads
When you’re ready to add search functionality to your application, Android helps you implement the user interface with either a search dialog that appears at the top of the activity window or a search widget that you can insert in your layout. Both the search dialog and the widget can deliver the user’s search query to a specific activity in your application. This way, the user can initiate a search from any activity where the search dialog or widget is available, and the system starts the appropriate activity to perform the search and present results.
Other features available for the search dialog and widget include:
- Voice search
- Search suggestions based on recent queries
- Search suggestions that match actual results in your application data
This guide shows you how to set up your application to provide a search interface that’s assisted by the Android system to deliver search queries, using either the search dialog or the search widget.
The Basics

Figure 1. Screenshot of an application’s search dialog.
Before you begin, you should decide whether you’ll implement your search interface using the search dialog or the search widget. Both provide the same search features, but in slightly different ways:
- The search dialog is a UI component that’s controlled by the Android system. When activated by the user, the search dialog appears at the top of the activity, as shown in figure 1.
The Android system controls all events in the search dialog. When the user submits a query, the system delivers the query to the activity that you specify to handle searches. The dialog can also provide search suggestions while the user types.
The search widget is an instance of SearchView that you can place anywhere in your layout. By default, the search widget behaves like a standard EditText widget and doesn’t do anything, but you can configure it so that the Android system handles all input events, delivers queries to the appropriate activity, and provides search suggestions (just like the search dialog). However, the search widget is available only in Android 3.0 (API Level 11) and higher.
Note: If you want, you can handle all user input into the search widget yourself, using various callback methods and listeners. This document, however, focuses on how to integrate the search widget with the system for an assisted search implementation. If you want to handle all user input yourself, read the reference documentation for SearchView and its nested interfaces.
When the user executes a search from the search dialog or a search widget, the system creates an Intent and stores the user query in it. The system then starts the activity that you’ve declared to handle searches (the «searchable activity») and delivers it the intent. To set up your application for this kind of assisted search, you need the following:
- A searchable configuration
An XML file that configures some settings for the search dialog or widget. It includes settings for features such as voice search, search suggestion, and hint text for the search box.
A searchable activity
The Activity that receives the search query, searches your data, and displays the search results.
A search interface, provided by either:
- The search dialog
By default, the search dialog is hidden, but appears at the top of the screen when you call onSearchRequested() (when the user presses your Search button).
Using the search widget allows you to put the search box anywhere in your activity. Instead of putting it in your activity layout, you should usually use SearchView as an action view in the Action Bar.
The rest of this document shows you how to create the searchable configuration, searchable activity, and implement a search interface with either the search dialog or search widget.
Creating a Searchable Configuration
The first thing you need is an XML file called the searchable configuration. It configures certain UI aspects of the search dialog or widget and defines how features such as suggestions and voice search behave. This file is traditionally named searchable.xml and must be saved in the res/xml/ project directory.
Note: The system uses this file to instantiate a SearchableInfo object, but you cannot create this object yourself at runtime—you must declare the searchable configuration in XML.
The searchable configuration file must include the element as the root node and specify one or more attributes. For example:
The android:label attribute is the only required attribute. It points to a string resource, which should be the application name. This label isn’t actually visible to the user until you enable search suggestions for Quick Search Box. At that point, this label is visible in the list of Searchable items in the system Settings.
Though it’s not required, we recommend that you always include the android:hint attribute, which provides a hint string in the search box before users enters a query. The hint is important because it provides important clues to users about what they can search.
Tip: For consistency among other Android applications, you should format the string for android:hint as «Search «. For example, «Search songs and artists» or «Search YouTube».
The element accepts several other attributes. However, you don’t need most attributes until you add features such as search suggestions and voice search. For detailed information about the searchable configuration file, see the Searchable Configuration reference document.
Creating a Searchable Activity
A searchable activity is the Activity in your application that performs searches based on a query string and presents the search results.
When the user executes a search in the search dialog or widget, the system starts your searchable activity and delivers it the search query in an Intent with the ACTION_SEARCH action. Your searchable activity retrieves the query from the intent’s QUERY extra, then searches your data and presents the results.
Because you may include the search dialog or widget in any other activity in your application, the system must know which activity is your searchable activity, so it can properly deliver the search query. So, you must first declare your searchable activity in the Android manifest file.
Declaring a searchable activity
If you don’t have one already, create an Activity that will perform searches and present results. You don’t need to implement the search functionality yet—just create an activity that you can declare in the manifest. Inside the manifest’s element:
- Declare the activity to accept the ACTION_SEARCH intent, in an element.
- Specify the searchable configuration to use, in a element.
The element must include the android:name attribute with a value of «android.app.searchable» and the android:resource attribute with a reference to the searchable configuration file (in this example, it refers to the res/xml/searchable.xml file).
Note: The does not need a with the DEFAULT value (which you usually see in elements), because the system delivers the ACTION_SEARCH intent explicitly to your searchable activity, using its component name.
Performing a search
Once you have declared your searchable activity in the manifest, performing a search in your searchable activity involves three steps:
Traditionally, your search results should be presented in a ListView , so you might want your searchable activity to extend ListActivity . It includes a default layout with a single ListView and provides several convenience methods for working with the ListView .
Receiving the query
When a user executes a search from the search dialog or widget, the system starts your searchable activity and sends it a ACTION_SEARCH intent. This intent carries the search query in the QUERY string extra. You must check for this intent when the activity starts and extract the string. For example, here’s how you can get the search query when your searchable activity starts:
The QUERY string is always included with the ACTION_SEARCH intent. In this example, the query is retrieved and passed to a local doMySearch() method where the actual search operation is done.
Searching your data
The process of storing and searching your data is unique to your application. You can store and search your data in many ways, but this guide does not show you how to store your data and search it. Storing and searching your data is something you should carefully consider in terms of your needs and your data format. However, here are some tips you might be able to apply:
- If your data is stored in a SQLite database on the device, performing a full-text search (using FTS3, rather than a LIKE query) can provide a more robust search across text data and can produce results significantly faster. See sqlite.org for information about FTS3 and the SQLiteDatabase class for information about SQLite on Android. Also look at the Searchable Dictionary sample application to see a complete SQLite implementation that performs searches with FTS3.
- If your data is stored online, then the perceived search performance might be inhibited by the user’s data connection. You might want to display a spinning progress wheel until your search returns. See android.net for a reference of network APIs and Creating a Progress Dialog for information about how to display a progress wheel.
About Adapters
An Adapter binds each item from a set of data into a View object. When the Adapter is applied to a ListView , each piece of data is inserted as an individual view into the list. Adapter is just an interface, so implementations such as CursorAdapter (for binding data from a Cursor ) are needed. If none of the existing implementations work for your data, then you can implement your own from BaseAdapter . Install the SDK Samples package for API Level 4 to see the original version of the Searchable Dictionary, which creates a custom adapter to read data from a file.
Regardless of where your data lives and how you search it, we recommend that you return search results to your searchable activity with an Adapter . This way, you can easily present all the search results in a ListView . If your data comes from a SQLite database query, you can apply your results to a ListView using a CursorAdapter . If your data comes in some other type of format, then you can create an extension of BaseAdapter .
Presenting the results
As discussed above, the recommended UI for your search results is a ListView , so you might want your searchable activity to extend ListActivity . You can then call setListAdapter() , passing it an Adapter that is bound to your data. This injects all the search results into the activity ListView .
For more help presenting your results in a list, see the ListActivity documentation.
Also see the Searchable Dictionary sample for an a complete demonstration of how to search an SQLite database and use an Adapter to provide results in a ListView .
Using the Search Dialog
Should I use the search dialog or the widget?
The answer depends mostly on whether you are developing for Android 3.0 (API Level 11 or higher), because the SearchView widget was introduced in Android 3.0. So, if you are developing your application for a version of Android lower than 3.0, the search widget is not an option and you should use the search dialog to implement your search interface.
If you are developing for Android 3.0 or higher, then the decision depends more on your needs. In most cases, we recommend that you use the search widget as an «action view» in the Action Bar. However, it might not be an option for you to put the search widget in the Action Bar for some reason (perhaps there’s not enough space or you don’t use the Action Bar). So, you might instead want to put the search widget somewhere in your activity layout. And if all else fails, you can still use the search dialog if you prefer to keep the search box hidden. In fact, you might want to offer both the dialog and the widget in some cases. For more information about the widget, skip to Using the Search Widget.
The search dialog provides a floating search box at the top of the screen, with the application icon on the left. The search dialog can provide search suggestions as the user types and, when the user executes a search, the system sends the search query to a searchable activity that performs the search. However, if you are developing your application for devices running Android 3.0, you should consider using the search widget instead (see the side box).
The search dialog is always hidden by default, until the user activates it. Your application can activate the search dialog by calling onSearchRequested() . However, this method doesn’t work until you enable the search dialog for the activity.
To enable the search dialog, you must indicate to the system which searchable activity should receive search queries from the search dialog, in order to perform searches. For example, in the previous section about Creating a Searchable Activity, a searchable activity named SearchableActivity was created. If you want a separate activity, named OtherActivity , to show the search dialog and deliver searches to SearchableActivity , you must declare in the manifest that SearchableActivity is the searchable activity to use for the search dialog in OtherActivity .
For example, here is the declaration for both a searchable activity, SearchableActivity , and another activity, OtherActivity , which uses SearchableActivity to perform searches executed from its search dialog:
Because the OtherActivity now includes a element to declare which searchable activity to use for searches, the activity has enabled the search dialog. While the user is in this activity, the onSearchRequested() method activates the search dialog. When the user executes the search, the system starts SearchableActivity and delivers it the ACTION_SEARCH intent.
Note: The searchable activity itself provides the search dialog by default, so you don’t need to add this declaration to SearchableActivity .
With the search dialog now enabled for your activities, your application is ready to perform searches.
Invoking the search dialog
Although some devices provide a dedicated Search button, the behavior of the button may vary between devices and many devices do not provide a Search button at all. So when using the search dialog, you must provide a search button in your UI that activates the search dialog by calling onSearchRequested() .
For instance, you should add a Search button in your Options Menu or UI layout that calls onSearchRequested() . For consistency with the Android system and other apps, you should label your button with the Android Search icon that’s available from the Action Bar Icon Pack.
Note: If your app uses the action bar, then you should not use the search dialog for your search interface. Instead, use the search widget as a collapsible view in the action bar.
You can also enable «type-to-search» functionality, which activates the search dialog when the user starts typing on the keyboard—the keystrokes are inserted into the search dialog. You can enable type-to-search in your activity by calling setDefaultKeyMode ( DEFAULT_KEYS_SEARCH_LOCAL ) during your activity’s onCreate() method.
The impact of the search dialog on your activity lifecycle
The search dialog is a Dialog that floats at the top of the screen. It does not cause any change in the activity stack, so when the search dialog appears, no lifecycle methods (such as onPause() ) are called. Your activity just loses input focus, as input focus is given to the search dialog.
If you want to be notified when the search dialog is activated, override the onSearchRequested() method. When the system calls this method, it is an indication that your activity has lost input focus to the search dialog, so you can do any work appropriate for the event (such as pause a game). Unless you are passing search context data (discussed below), you should end the method by calling the super class implementation. For example:
If the user cancels search by pressing the Back button, the search dialog closes and the activity regains input focus. You can register to be notified when the search dialog is closed with setOnDismissListener() and/or setOnCancelListener() . You should need to register only the OnDismissListener , because it is called every time the search dialog closes. The OnCancelListener only pertains to events in which the user explicitly exited the search dialog, so it is not called when a search is executed (in which case, the search dialog naturally disappears).
If the current activity is not the searchable activity, then the normal activity lifecycle events are triggered once the user executes a search (the current activity receives onPause() and so forth, as described in the Activities document). If, however, the current activity is the searchable activity, then one of two things happens:
- By default, the searchable activity receives the ACTION_SEARCH intent with a call to onCreate() and a new instance of the activity is brought to the top of the activity stack. There are now two instances of your searchable activity in the activity stack (so pressing the Back button goes back to the previous instance of the searchable activity, rather than exiting the searchable activity).
- If you set android:launchMode to «singleTop» , then the searchable activity receives the ACTION_SEARCH intent with a call to onNewIntent(Intent) , passing the new ACTION_SEARCH intent here. For example, here’s how you might handle this case, in which the searchable activity’s launch mode is «singleTop» :
Compared to the example code in the section about Performing a Search, all the code to handle the search intent is now in the handleIntent() method, so that both onCreate() and onNewIntent() can execute it.
When the system calls onNewIntent(Intent) , the activity has not been restarted, so the getIntent() method returns the same intent that was received with onCreate() . This is why you should call setIntent(Intent) inside onNewIntent(Intent) (so that the intent saved by the activity is updated in case you call getIntent() in the future).
The second scenario using «singleTop» launch mode is usually ideal, because chances are good that once a search is done, the user will perform additional searches and it’s a bad experience if your application creates multiple instances of the searchable activity. So, we recommend that you set your searchable activity to «singleTop» launch mode in the application manifest. For example:
Passing search context data
In some cases, you can make necessary refinements to the search query inside the searchable activity, for every search made. However, if you want to refine your search criteria based on the activity from which the user is performing a search, you can provide additional data in the intent that the system sends to your searchable activity. You can pass the additional data in the APP_DATA Bundle , which is included in the ACTION_SEARCH intent.
To pass this kind of data to your searchable activity, override the onSearchRequested() method for the activity from which the user can perform a search, create a Bundle with the additional data, and call startSearch() to activate the search dialog. For example:
Returning «true» indicates that you have successfully handled this callback event and called startSearch() to activate the search dialog. Once the user submits a query, it’s delivered to your searchable activity along with the data you’ve added. You can extract the extra data from the APP_DATA Bundle to refine the search. For example:
Caution: Never call the startSearch() method from outside the onSearchRequested() callback method. To activate the search dialog in your activity, always call onSearchRequested() . Otherwise, onSearchRequested() is not called and customizations (such as the addition of appData in the above example) are missed.
Using the Search Widget

Figure 2. The SearchView widget as an «action view» in the Action Bar.
The SearchView widget is available in Android 3.0 and higher. If you’re developing your application for Android 3.0 and have decided to use the search widget, we recommend that you insert the search widget as an action view in the Action Bar, instead of using the search dialog (and instead of placing the search widget in your activity layout). For example, figure 2 shows the search widget in the Action Bar.
The search widget provides the same functionality as the search dialog. It starts the appropriate activity when the user executes a search, and it can provide search suggestions and perform voice search.
Note: When you use the search widget as an action view, you still might need to support using the search dialog, for cases in which the search widget does not fit in the Action Bar. See the following section about Using both the widget and the dialog.
Configuring the search widget
After you’ve created a searchable configuration and a searchable activity, as discussed above, you need to enable assisted search for each SearchView . You can do so by calling setSearchableInfo() and passing it the SearchableInfo object that represents your searchable configuration.
You can get a reference to the SearchableInfo by calling getSearchableInfo() on SearchManager .
For example, if you’re using a SearchView as an action view in the Action Bar, you should enable the widget during the onCreateOptionsMenu() callback:
That’s all you need. The search widget is now configured and the system will deliver search queries to your searchable activity. You can also enable search suggestions for the search widget.
Note: If you want to handle all user input yourself, you can do so with some callback methods and event listeners. For more information, see the reference documentation for SearchView and its nested interfaces for the appropriate event listeners.
For more information about action views in the Action Bar, read the Action Bar developer guide (which includes sample code for adding a search widget as an action view).
Other search widget features
The SearchView widget allows for a few additional features you might want:
A submit button By default, there’s no button to submit a search query, so the user must press the «Return» key on the keyboard to initiate a search. You can add a «submit» button by calling setSubmitButtonEnabled(true) . Query refinement for search suggestions When you’ve enabled search suggestions, you usually expect users to simply select a suggestion, but they might also want to refine the suggested search query. You can add a button alongside each suggestion that inserts the suggestion in the search box for refinement by the user, by calling setQueryRefinementEnabled(true) . The ability to toggle the search box visibility By default, the search widget is «iconified,» meaning that it is represented only by a search icon (a magnifying glass), and expands to show the search box when the user touches it. As shown above, you can show the search box by default, by calling setIconifiedByDefault(false) . You can also toggle the search widget appearance by calling setIconified() .
There are several other APIs in the SearchView class that allow you to customize the search widget. However, most of them are used only when you handle all user input yourself, instead of using the Android system to deliver search queries and display search suggestions.
Using both the widget and the dialog
If you insert the search widget in the Action Bar as an action view, and you enable it to appear in the Action Bar «if there is room» (by setting android:showAsAction=»ifRoom» ), then there is a chance that the search widget will not appear as an action view, but the menu item will appear in the overflow menu. For example, when your application runs on a smaller screen, there might not be enough room in the Action Bar to display the search widget along with other action items or navigation elements, so the menu item will instead appear in the overflow menu. When placed in the overflow menu, the item works like an ordinary menu item and does not display the action view (the search widget).
To handle this situation, the menu item to which you’ve attached the search widget should activate the search dialog when the user selects it from the overflow menu. In order for it to do so, you must implement onOptionsItemSelected() to handle the «Search» menu item and open the search dialog by calling onSearchRequested() .
For more information about how items in the Action Bar work and how to handle this situation, see the Action Bar developer guide.
Also see the Searchable Dictionary for an example implementation using both the dialog and the widget.
Adding Voice Search
You can add voice search functionality to your search dialog or widget by adding the android:voiceSearchMode attribute to your searchable configuration. This adds a voice search button that launches a voice prompt. When the user has finished speaking, the transcribed search query is sent to your searchable activity.
The value showVoiceSearchButton is required to enable voice search, while the second value, launchRecognizer , specifies that the voice search button should launch a recognizer that returns the transcribed text to the searchable activity.
You can provide additional attributes to specify the voice search behavior, such as the language to be expected and the maximum number of results to return. See the Searchable Configuration reference for more information about the available attributes.
Note: Carefully consider whether voice search is appropriate for your application. All searches performed with the voice search button are immediately sent to your searchable activity without a chance for the user to review the transcribed query. Sufficiently test the voice recognition and ensure that it understands the types of queries that the user might submit inside your application.
Adding Search Suggestions
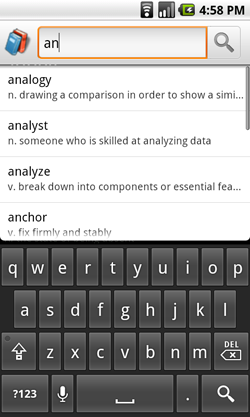
Figure 3. Screenshot of a search dialog with custom search suggestions.
Both the search dialog and the search widget can provide search suggestions as the user types, with assistance from the Android system. The system manages the list of suggestions and handles the event when the user selects a suggestion.
You can provide two kinds of search suggestions:
Recent query search suggestions These suggestions are simply words that the user previously used as search queries in your application.
Custom search suggestions These are search suggestions that you provide from your own data source, to help users immediately select the correct spelling or item they are searching for. Figure 3 shows an example of custom suggestions for a dictionary application—the user can select a suggestion to instantly go to the definition.
Источник


