- How to make a Search Box in Action Bar using Fragments In Android
- W hat are Fragments?
- Step 1:
- Android Spinner Searchable With Search Box Example
- 1. Android Spinner Searchable With Search Box Example
- Ending View
- Step 1. Defining Dependencies
- Step 2. Layout
- Step 3. Adding Options
- Step 4. Final Change
- Moving Deep in Above code
- 2. Android Spinner Search Hint Prompt Text And Background Color
- Last Look
- Implementing Drop Down
- Step 1. Add Code in Default Activity
- Making Prompt Search Hint
- Step 1. Write XML code
- Add text using strings.xml
- Add Prompt text programmatically
- Changing Prompt Text And Background Color
- One thought on “Android Spinner Searchable With Search Box Example”
- com.google.android.googlequicksearchbox: Google Quick Search Box
- What is googlequicksearchbox?
- What is com.google.android.googlequicksearchbox?
- How to fix the com.google.android.googlequicksearchbox error?
- Uninstalling quick search
- Disabling auto-update
- Turning off voice assistant
- Removing mic access
- Wiping the cache data from the app
- Removing Gapps
How to make a Search Box in Action Bar using Fragments In Android

Apr 27, 2019 · 3 min read

W hat are Fragments?
A Fragment represents a behavior or a portion of a user interface in a FragmentActivity . You can combine multiple fragments in a single activity to build a multi-pane UI and reuse a fragment in multiple activities. Fragments are to encapsulate state within your UI components and to create the layout that scale and adapt to accommodate a variety of device types, screen sizes, and resolutions.
Official Docs on Fragments.
What I will do in this article are:
- First, I will create snippet_view_contact_toolbar.xml :

2. Create snippet_search_toolbar.xml :

3. After creating t h e above two snippets we have to merge/combine those two XML files into a single fragment layout called fragment_viewcontacts.xml.
4. Now in activity_main.xml, we need to change the parent view group to CoordinatorLayout & inside this, add a FrameLayout which will have an id of fragment_container(android: id = ”@+id /fragment_container”).
Now the XML part is done. We have to work on the Java code.
5. Create ToolbarFragment.java file which will extend the Fragment class and need to include the fragment code and logic in it.
6. In the final part, we need to initialize the ToolbarFragment.java in MainActivity.java.
So that’s the above 6 steps where I mentioned briefly what I gonna do. So let’s jump into writing the code:
Step 1:
Go to: res > values > style.xml and change this:
B efore creating XML, create the icon from Drawable (right click) > new > Image Asset and select icon to the Action bar and Tab bar. Select the asset type to Clip Art. Create the back button and search icon separately. In case of back button choose a custom color to blue and for search icon choose white custom color as you can see in the gif above in the article.
Источник
Android Spinner Searchable With Search Box Example

We will make two examples of Android Spinner Searchable in this post.
1. Android Spinner Searchable With Search Box Example
Learn to create Android Spinner Searchable With Search Box Example.
In this article, we will create filterable drop down of spinner in android studio.
We can put a search box at the top of the spinner drop down to filter the options.
This feature gives us the same result as we get from the searchview.
Android’s in-built system do not give us chance to put searchview in the spinner in any way.
You may find any library on github regarding using searchview in spinner the you can use them easily.
In today’s article, I will use github library but it is not using searchview.
We just need to use the desired XML version of spinner in layout file.
Rest of the things are very easy and smooth.
Ending View
Step 1. Defining Dependencies
I am going to use this github library in this example.
So add the following line in your build.gradle(Module:app) file
- Above line will download all the required classes from repository.
- Then we can use this library’s sentences easily.
Step 2. Layout
Add the following coding lines in activity_main.xml file
As you can see that I have taken instead of classical tag.
This new tag will implement a spinner from the github library.
So this spinner will react according to the classes written in the library instead of traditional spinner.
Step 3. Adding Options
Generally, we define spinner options name in string array variable. We also define this variable in java class only.
But in current scenario, we will add spinner options in strings.xml file.
strings.xml file is created automatically in every android studio project.
You can find this file under res->values directory.
Add the below code lines in strings.xml file.
Traditionally, we create string array in java files but in this case we have define it as above.
We will use this variable “Animals”, in the JAVA file to populate the spinner.
Step 4. Final Change
Let us make a last change to make searchable spinner.
Write down the below coding lines in MainActivity.java file
Moving Deep in Above code
Below line is creating a string array variable.
- I have written this line before the onCreate() method, so that we can use this variable (options) through out the whole class.
Now consider the below source code
First line is finding the spinner with use of it’s ID from the activity_main.xml file
Second line is creating an object of the ArrayAdapter class.
This object will get the strings from the string array variable (Animals) of the strings.xml file
simple_spinner_item from the above code is in-built file to represent the front view of the spinner.
Read the below coding lines
Above line will specify a file to be used to generate a view of drop down.
simple_spinner_dropdown_item is also a system generated file of android structure.
Let us understand the below lines
These lines will first set the adapter to our spinner.
Then compiler will set the onItemSelected Listener for the spinner.
Following line will generate string array from the strings.xml file
Now we can use the options variable anywhere in the class as a string array.
It contains all the spinner options in string format.
When the user selects the option from the spinner, compiler will call the below method.
When user have selects a specific options then compiler will call onItemSelected() method.
If user do not choose any option then compiler will call onNothingSelected() method.
onItemSelected() method will simply show a toast that will say that which value is selected by the user.
Thus, we have make android searchable spinner with very little coding lines.
That is the only purpose of DemoNuts to create quality apps with efficient and time saving code structure.
2. Android Spinner Search Hint Prompt Text And Background Color
Android Spinner Search Hint Prompt Text And Background Color Example is for you.
You will learn to set prompt programmatically and to change prompt text and background color.
In android app, developer uses spinner to ask user to select any one choice from drop down menu or pop up dialog.
Here, you may want to give some hint or information to the user about your spinner options.
For example, if your spinner contains fruits as an options. Here, you can use some text like “Select Fruit” as a search hint.
Setting a search hint or prompt text in android spinner is not a tough task.
But customizing them like changing text color, changing background color need little tricks.
We will use two methods to implement search hint.
First by creating a drop down menu and second by using prompt dialog.
Last Look
Implementing Drop Down
Step 1. Add Code in Default Activity
First of all, make a new project in the android studio.
Choose “Empty Activity” after you have given project name and SDK version.
Add the below source code in activity_main.xml
I have taken one spinner in main layout file.
Set the spinner mode as a dropdown or just don’t write this line.
By default, system will create drop down spinner only.
Write down the following coding lines in MainActivity.java file
Consider the below code snippet
First line is creating a boolean variable. By default it has true value.
Then, I have make one string array which contains the names of the fruits.
In this string array, set your search hint at the first position.
Look at the following code
Now above code will first set the adapter to the spinner.
I have also implemented onItemSelectedListener for this spinner. Here, we will use that boolean variable (first).
When the app is loaded for the first time on device, this compiler call this onItemSelectedListener. So it shows toast everytime when app is opened for fist time.
This case is not ideal for user experience or user satisfaction.
So that, boolean variable (first) will help us to overcome this problem.
Making Prompt Search Hint
Step 1. Write XML code
Add the following code in activity_main.xml
So the final code for activity_main.xml is something like
Here, I have taken three spinners to give them prompt text.
All these spinners must have the following line
Now you can add prompt text using two methods.
- Directly add your text in strings.xml and use that string in activity_main.xml
- Add ans set the prompt text programmatically in spinner.
Add text using strings.xml
Write the below line in res->values->strings.xml file
Following snippet from activity_main.xml file using this text reference
Now add the below code in MainActivity.java
Write Above code before onCreate() method and write below code inside the onCreate() method
Add Prompt text programmatically
Add the spinner in the activity_main.xml
Now add the following in MAinActivity.java
Write above code above the onCreate() method and below inside onCreate()
Changing Prompt Text And Background Color
Below code from activity_main.xml will get prompt text programmatically.
Now we will learn how to change the color of prompt text and background.
For this, we need to create a custom adapter and some layout files.
We will create separate layout files for prompt text and drop down items (spinner options).
So create a new xml layout file under res->layout directory
Give it a name like “vehicle_spinner.xml”
Code for “vehicle_spinner.xml” is as the following
This file will create the layout interface for main spinner’s main or first look.
Create another layout file under same directory named “vehicle_prompt.xml”
Write the below lines in it
This file will generate the view structure for the prompt text.
You can change the prompt text size, color, padding, margin etc. in this file.
Make another layout file with the name vehicle_dropdown.xml
Source code for vehicle_dropdown.xml is as the following
This will create a view for spinner options.
Prepare a new java class named “CustomApinnerAdapter.java”
Write the below source code in “CustomApinnerAdapter.java”
In the above code, getView() method creates a layout for default spinner look.
In the getDropDownView() method, there are two scenarios.
I have used two files to generate two different views.
When the position is 0, means that for the very first time, we will use it as a prompt text creation.
At this time, we will generate view using vehicle_prompt.xml file.
In all other cases, (when position is not 0) we will generate drop down items which are spinner options, from which user will choose his desired option.
Following lines of coding are making a spinner with custom adapter
So the final code for MainActivity.java is as below
One thought on “Android Spinner Searchable With Search Box Example”
Thanks, works just as I needed.
How can I change the default keyboard to numberDecimal|numberSigned as I need only numeric input
Источник
com.google.android.googlequicksearchbox: Google Quick Search Box
You have came across com.google.android.googlequicksearchbox some time it is searched as com google android googlequicksearchbox, Fix google quick search box error in 2 minutes with minimal efforts. Are you stuck with googlequicksearch error? Do you want to remove or disable the voice assistant from your device then we got you covered. We included various different ways on how you can resolve the issue. Learn what is a quick search box on your smartphone and what it does. If you want to take a short way in then check out your video.
What is googlequicksearchbox?
Let’s first clear the confusion, break the term googlequicksearchbox into parts. So “Google” is the search engine, “quick” we all understand, “search-box” we all have seen. So it is the little search box on top of your home screen on Android. iPhones don’t have the quick-search bar, as Apple wants people to use Safari more aka their browser. If you are still confused then look at the screenshot. 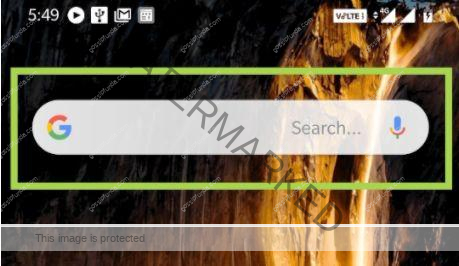
This quick search bar was first launched in September 2020 and is the position of the bar is there by default. You can move or change the location of the quick-search bar. This is very profitable for Google as the traffic on their search engine increased dramatically. Now, this helped increase the direct traffic on the engine but also blurred the difference in organic difference.
If you are wondering why it is written backward. The reason behind this is the way how apps are named on the Play Store. For example, the URL for our Gossipfunda page is: https://play.google.com/store/apps/details?id=com.gossipfunda.gossipfunda&hl=en
Notice that is starts with “play google” and then comes “.com” followed by “store/apps”. And as you can see what there are several components, for example, com.android.notepad.NoteEditor.
Now many sites use this backward format, popular websites like twitter will have a “com.twitter.android” and Facebook will have a “com.facebook.katana”. There is another example of the Gmail service by Google: https://play.google.com/store/apps/details?id=com.google.android.gm.
What is com.google.android.googlequicksearchbox?
As we just saw, it refers to the small quick search box that is located at the top of your smartphone or tablet screen. This has created a mess for several people and companies, as the difference between quick search has drastically increased while the quality of organic searches has gone down. This is very good news for Google, as more traffic on their search engine means more money from them. Over the last few years, website owners and network handlers and site managers must have seen a sharp rise in “com.google.android.googlequicksearchbox”. This shows that people are searching from the quick search bar of google. Now, this creates the issue of blocking browser referrer and this creates a problem for the community and business. But we can’t argue that it makes the work of the user a lot easier and increase the traffic dramatically as compensation.
Google has tried to tackle the problem, but it was not the best solution we all were hoping for. But as your users, you are not concerned with this particular problem.
How to fix the com.google.android.googlequicksearchbox error?
Now let’s see how to solve the error with com.google.android.googlequicksearchbox what can occur randomly. Or when you are using another application and you suddenly receive this annoying message. If you are trying to go live on Instagram and suddenly get an error for things you are not even doing. The error will look like “interactor is unable to register”.
Uninstalling quick search
Our first solution will be to uninstall the latest version of the quick search with the help of the Play Store. This removes any bug that might have come along with a software update. Follow these steps to do the same:
- Wake up your smartphone and navigate to “settings”.
- Open “settings” and find “apps”.
- Once you open “apps” locate the “Google” app.
- Once you find the app, tap on “uninstall the latest update”.
Disabling auto-update
This will solve your error with the quick-search bar, but the problem arises if the app being auto-updated. To resolve this problem, follow these simple steps:
- Open the GooglePlay store
- Tap on the 3 dots or bars.
- Tap on “settings” and look for “Automatic Update”.
- If you can not find it, search for it in the search box.
- And set the app to “Do not auto-update”, one you disable this setting, the problem will be resolved.
Now whenever there is a new update for the app, the play store will ask you for updating and you will have to manually update it. And if you wish to update, you will most probably not face the same issue. In case, you face the same error, follow the process again and removing the latest update.
Turning off voice assistant
Another cause of the issue may be the “ok! Google” feature, removing or disabling the feature may solve the issue.
- Open the Google search bar and tap on the 3 lines.
- Find and open “Settings”.
- Search for the voice assistant or search in the bar inside settings.
- Now disable the voice assistant, and let it stay inactive.
- To make sure that the feature is disabled, trying saying “Ok! Google”.
This should resolve the issue when you are in the camera app and the error message pop-up. Now you can use your beloved camera app without the annoying error message.
Removing mic access
You can remove the mic accessibility from the google app itself, this will cause the voice assistant to inactive. This is the most probable solution to the error problem. To remove the mic access from the Google app, follow these steps. But keep in mind that after doing so, you will no longer be able to use the voice feature, even when you are trying to use the in-app voice feature. But it is the best decision for your privacy as this will reduce the chances of companies or hackers eave-dropping you.
- Open the “settings” (we do not mean google app settings).
- Find and open “apps” in the settings.
- Find the “Google app” at the bottom of the screen. (It will be arranged in alphabetical order)
- Open the Google app and tap on “permissions”.
- Tap on “mic” and disable the permission.
This is not the best solution, but it has the potential to solve the issue. So it deserves a chance to be tried and see the results.
Wiping the cache data from the app
Another solution to the problem is wiping the cache data from the app. This is the best solution so far after the first one, as it mostly solves the error. It is a very good solution for people who don’t want to stop using the voice assistant. However, this will change all the settings of the app to its default stage, so you should remember what settings you have changed. Now to achieve this just follow few simple steps and you are all set and done.
- Boot down your device.
- Boot into the recovery mode, by pressing and holding the Volume Up Button + Power Button simultaneously. But if you have a physical home button, then press Volume Up Button + Power Button + Home button.
- Once done, use the volume keys to navigate and the power button to select “Wipe Cache Partition”. All these steps are happening in the recovery mode.
- Wipe clear the cache from your device, make sure that the process was successful and the cache is cleared.
This will surely do the trick and resolve the error from occurring again, but you will lose your settings and your login info, Moreover, you will be logged out of all your accounts, no matter if it is a Google account or Amazon account.
Removing Gapps
Now another alternative is to remove the google app itself if you are willing to stop using it. Maybe you a busy person who doesn’t Google much if not at all, or you like to use another search engine. But do know that this will stop Google services such as Google Maps, Youtube, PlayStore. Now if you are all good for removing the Google app, then follow these steps:
- You need to root your device to get started with the guide. If you are not knowing how to achieve this, then read our article about rooting before you can proceed.
- How to root Galaxy S7?
- How to flash a phone?
- Create a backup of your device, to avoid losing any data while rooting. We would recommend you back up the SIM Toolkit data, to be on the safe side. Download apk export to create a backup, download the app from here. Remember that Google is a system application, to locate it on the app choose the “System app”.
- Now once you complete the previous steps, use an apk remover to remove the Google app. You can use a root uninstaller for this purpose, download it from here.
- Now once you are done, reboot your device for all changes to appear and we have successfully removed the Google app from our device.
Now since you have the backup image saved, you can restore your device to what it was before. And remember to restart your device after the removal of the app.
Note: We are not responsible for any of your data loss or device damage, as you should know what you are doing before you attempt it.
Источник


