- How to View and Locate SQLite Database in Android Studio?
- Step by Step Procedures
- Полнотекстовый поиск в Android
- Подходы к реализации поиска в мобильном приложении
- Подготовка данных
- Наполнение базы данных
- Базовый вариант
- Добавляем акценты
- Резюме
- Android SQLite CRUD and Search Filter
- Example 1: Android SQLite Database – ListView – Filter/Search and CRUD
- Constants.java
- DBHelper.java
- DBAdapter.java
- CustomAdapter.java
- MainActivity.java
- Download
- Example 2: Android SQLite CRUD – RecyclerView – Serverside Search/Filter
- 1. Create Basic Activity Project
- 2. Add Dependencies
- 3. Create User Interface
- 4. Java Classes
- Our POJO
- Our SQLite Classes
- Our RecyclerView Classes
- Our Activity Class
- Download
- Oclemy
How to View and Locate SQLite Database in Android Studio?
SQLite is an open-source relational database that is used to perform database operations on android devices such as storing, manipulating, or retrieving persistent data from the database. In this article, we will learn how to view and locate SQLite database in Android Studio using device file explorer.
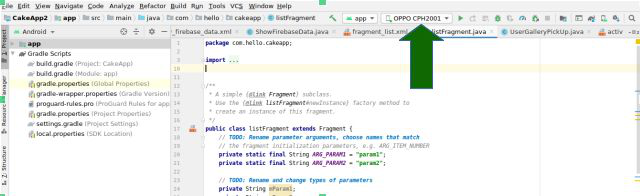
Note: Package name is found at the top of any class e.g. in MainActivity.java class it is found at the top by the syntax.
package package_name;
Step by Step Procedures
Step 1: Open android studio project which has SQLite database connection
Open existing android studio project which has connected to SQLite database and already having some saved records.
Step 2: Connect a device
Connect external device or emulator with android studio make sure the name of the device must be shown on android studio screen.
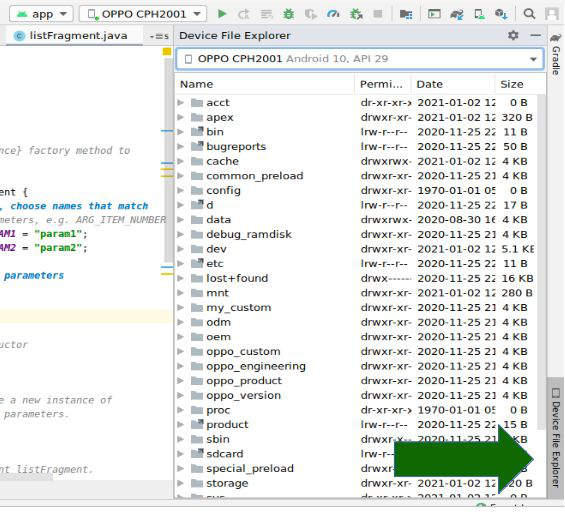
Step 3: Search for Device File Explorer in android studio
Device file explorer can be found in the bottom-right corner of the android studio screen. Click on Device file explorer.
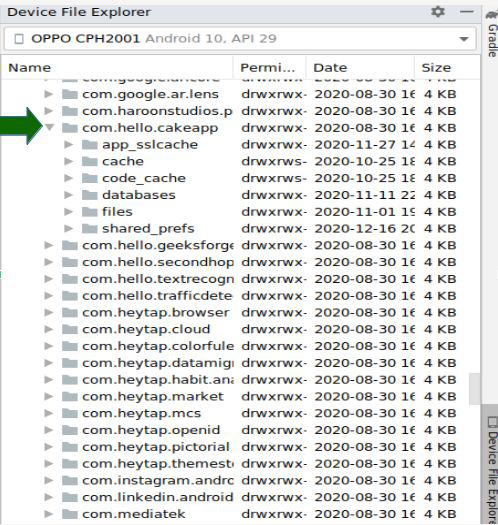
Step 4: Search application package name
To search your package name go to data > data> package name. Click on package name.
Step 5: Download the database
Now, select database and download database whose extension will be .sqlite, for that right-click on the database name and save file at any desired location but remember the location then click on ok in Save As dialog box.

Step 6: Download SQLite browser
Now to view the database we required SQLite browser, you can download SQLite browser from https://sqlitebrowser.org/dl/. Download a suitable SQLite browser for your device from the above link and open it.
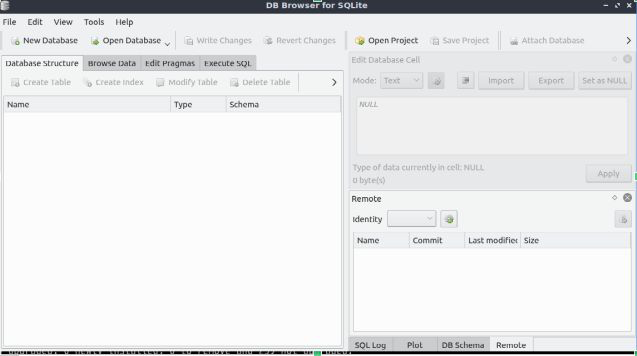
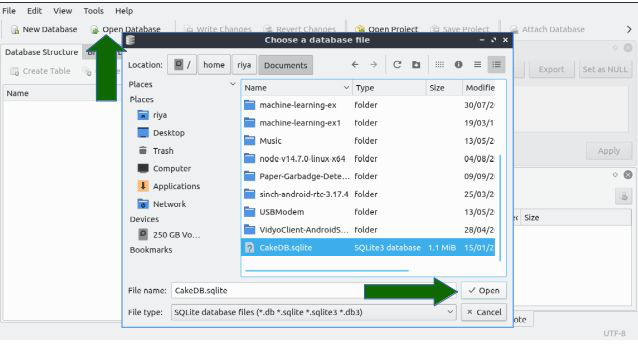
Step 7: Search saved database file
Click on the open database this will open a dialog box choose a database file. Now go to that location where you have saved the database previously and then select the database file and click on open.
Step 8: View saved data in tables
To view data saved in the table click on Browse data, now that’s it we have completed our today’s task.
Источник
Полнотекстовый поиск в Android
В мобильных приложениях очень востребована функция поиска. И если в небольших продуктах ею можно пренебречь, то в приложениях, которые предоставляют доступ к большому количеству информации, без поиска не обойтись. Сегодня я расскажу, как правильно реализовать эту функцию в программах под Android.
Подходы к реализации поиска в мобильном приложении
- Поиск как фильтр данных
Обычно это выглядит как строка поиска над каким-нибудь списком. То есть мы просто фильтруем уже готовые данные.
Серверный поиск
В этом случае мы отдаём всю реализацию на откуп серверу, а приложение выступает в роли тонкого клиента, от которого требуется лишь показать данные в нужном виде.
Комплексный поиск
- приложение содержит в себе большое количество данных разного типа;
- приложение работает оффлайн;
- поиск нужен как единая точка доступа к разделам/контенту приложения.
В последнем случае на помощь приходит встроенный в SQLite полнотекстовый поиск (Full-text search). С его помощью можно очень быстро находить совпадения в большом объёме информации, что позволяет нам делать несколько запросов в разные таблицы без снижения производительности.
Рассмотрим реализацию такого поиска на конкретном примере.
Подготовка данных
Допустим, нам необходимо реализовать приложение, которое показывает список фильмов с сайта themoviedb.org. Для упрощения (чтобы не ходить в сеть), возьмём список фильмов и сформируем из него JSON-файл, положим его в assets и локально будем наполнять нашу базу данных.
Пример структуры JSON-файла:
Наполнение базы данных
Для реализации полнотекстового поиска в SQLite используются виртуальные таблицы. Внешне они выглядят как обычные таблицы SQLite, но при любом обращении к ним выполняется некая закулисная работа.
Виртуальные таблицы позволяют нам ускорить поиск. Но, помимо преимуществ, у них есть и недостатки:
- нельзя создать триггер на виртуальной таблице;
- нельзя выполнять команды ALTER TABLE и ADD COLUMN для виртуальной таблицы;
- каждый столбец в виртуальной таблице индексируется, а это значит, что могут впустую тратиться ресурсы на индексацию столбцов, которые не должны участвовать в поиске.
Для решения последней проблемы можно использовать дополнительные таблицы, которые будут содержать часть информации, а в виртуальной таблице хранить ссылки на элементы обычной таблицы.
Создание таблицы немного отличается от стандартного, у нас появились ключевые слова VIRTUAL и fts4 :
Наполнение же ничем не отличается от обычного:
Базовый вариант
При выполнении запроса используется ключевое слово MATCH вместо LIKE :
Для реализация обработки ввода текста в интерфейсе будем использовать RxJava :
Получился базовый вариант поиска. В первом элементе нужное слово нашлось в описании, а во втором элементе — и в заголовке, и в описании. Очевидно, что в таком виде не совсем понятно, что мы нашли. Давайте это исправим.

Добавляем акценты
Для улучшения очевидности поиска воспользуемся вспомогательной функцией SNIPPET . Она используется для отображения отформатированного фрагмента текста, в котором найдено совпадение.
- movies — название таблицы;
- Алгоритм Портера
После этого преобразования фраза «дворы и призраки» выглядит как «двор* OR призрак*».
Символ «*» означает, что поиск будет вестись по вхождению данного слова в другие слова. Оператор «OR» означает, что будут показаны результаты, которые содержат хотя бы одно слово из поисковой фразы. Смотрим:
Резюме
Полнотекстовый поиск не такой сложный, как может показаться с первого взгляда. Мы разобрали конкретный пример, который вы быстро и легко сможете реализовать у себя в проекте. Если вам нужно что-то сложнее, то стоит обратиться к документации, благо она есть и довольно хорошо написана.
Источник
Android SQLite CRUD and Search Filter
This tutorial is dedicated to looking at how to search or filter data in SQLite database. When we talk about server-side or database-level or connected search what we mean is that we search data at the database level using SQL statements rather than downloading data into an arraylist and then filtering the arraylist.
Many a times you need to filter or search data. That data may be contained in an SQLite database.
- Clientside Search/Filter – Retrieving everything from database,populating arraylist, then searching the arraylist.
- Serverside Search/Filter – Applying search/filter at the database level and returning only data matching the search term.
The second option is the faster one since we take advantage of the heavily optimized SQL databases.
We use the second approach in this tutorial. But first we need to insert data into database and populate the ListView. So we do all those.We use the SearchView as our search input widget.
Example 1: Android SQLite Database – ListView – Filter/Search and CRUD
Android SQLite Database – ListView – Filter/Search and CRUD Tutorial.
How to Perform Search and Filter againts SQLite Database. The data is rendered on a ListView. But first we have to insert data to SQLite so we perform basic CRUD to populate the sqlite database. We use SearchView to searc/filter.
In today’s tutorial,we cover how to filter/search data from SQLite database.As we always do here at ProgrammingWizards,we start from scratch.So we first create our table programmatically,Insert data,select that data from database while applying a search.We are performing a server side filter if you like,at the database level. In short this is what we do :
- INSERT data to our SQlite database table.
- SELECT while performing a dynamic filter,using a searchterm specified in our SearchView.
- Handle ItemClicks of filtered items.
![]()
![]()
We want to search/filter SQLite database using a SearchView.Our component is ListView. First we will insert data to SQLite,then retrieve then filter in realtime as user searches via a SearchView. Lets jump straight in.
Constants.java
The first class is our Constants class which will hold all our SQlite database constants.
DBHelper.java
Our DBHelper class below is responsible for upgrading our SQlite database table :
![]()
DBAdapter.java
Then the DBAdapter class here is responsible for all our CRUD operations including searching.Now for searching we search/filter our data at the server side,at the database level via our SQL statements.
CustomAdapter.java
Our customAdapter class below shall be responsible for binding our filtered data to our ListView.
![]()
MainActivity.java
Then finally we have our MainActivity class :
Download
Here are the resources related to this project.
| No. | Location | Link |
|---|---|---|
| 1. | GitHub | Direct Download |
| 2. | GitHub | Browse |
| 3. | YouTube | Video Tutorial |
| 4. | YouTube | Our YouTube Channel |
Example 2: Android SQLite CRUD – RecyclerView – Serverside Search/Filter
Android SQLite CRUD – RecyclerView – Serverside Search/Filter
This tutorial helps us explore Android SQLite database searching or filtering data.
We are covering how to search/filter data against our SQLite database.Take note we are filtering at the SQlite side,not in java but in SQL,at the server side if you like.Our widget today is RecyclerView.We of course start from scratch,inserting,then selecting while applying a search.
First we have to save data and retrieve data from that database.
We render the data in our RecyclerView.
We will be searching/filtering data at the sqlite server level as opposed to fetching all data and filtering via Java.
This is what we do short:
- INSERT data to our SQlite database.
- SELECT that particular data,while applying a dynamic filter.
- Our search term is dynamically entered by the user via a searchview.
![]()
1. Create Basic Activity Project
- First create a basic project in android studio. You can see how to do so here.
2. Add Dependencies
Lets add support library dependencies in our app level build.gradle:
3. Create User Interface
User interfaces are typically created in android using XML layouts as opposed by direct java coding.
Here are our layouts for this project:
(a). activity_main.xml
- This layout gets inflated to MainActivity user interface.
- It includes the content_main.xml.
(b). content_main.xml
This layout gets included in your activity_main.xml.
You define your UI widgets right here.
In this case we will have a SearchView right on top of a RecyclerView.
(c). dialog_layout.xml
This is the input dialog layout.
We will need to insert to and retrieve data from SQlite database so we will use this dialog as our input form. At the root we have a CardView. Then a LinearLayout with vertical orientation. Inside the LinearLayout we have TextInputLayout, which wraps our EditText.
(d). model.xml
This will define the template for each RecyclerView Viewitem. This layout will get inflated in our recycleview adapter class.
At the root we have a CardView.
4. Java Classes
Here are our Java classes.
Our POJO
(a) Planet.java
Our data object.
Represents a single planet with several properties.
We will be saving planets in our SQLite database.
Our SQLite Classes
(a) Constants.java
First here’s our Constants class that’s going to hold all our SQlite database constants.
This class contains our SQLite database constants. These include: databse table name, database name, database version, column names, SQLite table creation and deletion statements.
(b) DBHelper.java
This is our SQLiteHelper class.
We call it DBHelper and it is the class that shall be responsible for upgrading and creating our database table.
It Allows us to create table and upgrade it.
![]()
(c) DBAdapter.java
Our database adapter class.
Basically responsible for performing CRUD activities like inserting and selecting to and from SQLite database.
We also open and close the SQLite database.
We also search here as part our data retrieval from sqlite database using a searchTerm passed to us.
Our DBAdapter class below is responsible for performing our CRUD operations including searching our database.We said we do the search at the server side or database level instead of via Java code :
Our RecyclerView Classes
(a) MyHolder.java
Our RecyclerView.ViewHolder class.
Holds a simple TextView.
(b) MyAdapter.java
Our RecyclerView.Adapter class.
Will inflate model.xml into a RecyclerView view item.
Will then bind data to those viewitems.
Below now is our RecyclerView adapter.It shall be bind our filtered data to the RecyclerView.
Our Activity Class
(a) MainActivity.java
Our launcher and only activity.
Provides us with the UI for our application.
Shows a RecyclerView and searchview. Listens to searchview change events to filter.
Also defines us an input dialog for data entry.
![]()
Download
Download code below.
If you prefer more explanations or want to see the demo then the video tutorial is here.
| No. | Location | Link |
|---|---|---|
| 1. | GitHub | Direct Download |
| 2. | GitHub | Browse |
| 3. | YouTube | Video Tutorial |
| 4. | YouTube | Our YouTube Channel |
 report this ad
Oclemy
Thanks for stopping by. My name is Oclemy(Clement Ochieng) and we have selected you as a recipient of a GIFT you may like ! Together with Skillshare we are offering you PROJECTS and 1000s of PREMIUM COURSES at Skillshare for FREE for 1 MONTH. To be eligible all you need is by sign up right now using my profile .
Источник


