- Implement Android RecyclerView list of checkboxes with “select all” option — double tier!
- Android CheckBox with Examples
- Create CheckBox in XML Layout File
- Create CheckBox Control in Activity File
- Handle Android CheckBox Click Events
- Define CheckBox Click Event in XML Layout File
- Define CheckBox Click Event in Activity File
- Android CheckBox Control Attributes
- Android CheckBox Control Example
- activity_main.xml
- MainActivity.java
- Output of Android CheckBox Example
Implement Android RecyclerView list of checkboxes with “select all” option — double tier!
Mar 16 · 4 min read
Creating a list of checkboxes isn’t a difficult mission. Adding a “select all” is arguably not too complicated as well.
But… what if we wanted to add subcategories? And… implement this in….. a recyclerView? Now this becomes a bit more complicated and confusing, and what is easier than finding a code that does exactly that with a simple explanation? So here we go…
Let’s start from the end, this is what we are trying to achieve:
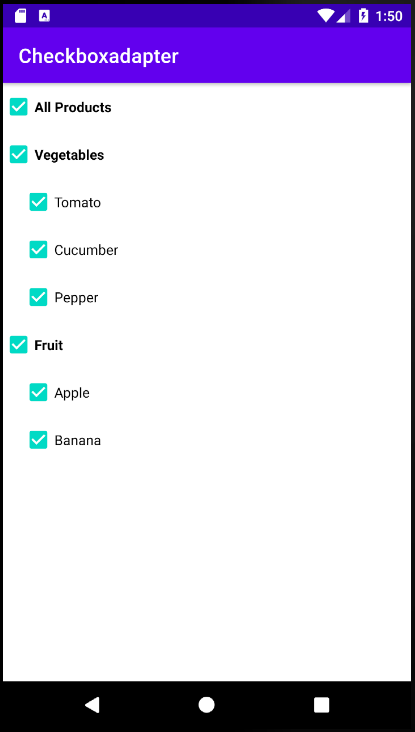
A list of items, with sub categories and a “select all” option.
(Yeah, yeah, I know tomato is actually a fruit…)
Let ’ s define the row types so we are on the same page:
Here are the different scenarios we need to cover:
- If TopHeader is checked or unchecked => Update state of ALL the other items accordingly
- If CatHeader is checked or unchecked => Update state of the child items accordingly AND check if the TopHeader needs to be updated
- if a ProductRow is checked or unchecked => Check if CatHeader or TopHeader need to be updated
When would the parent need to be updated?
- If all it’s children are now checked , the parent must be checked as well
- If at least one of it’s children is unchecked, the parent must be unchecked
In this example we are passing a list of type RowModel, which includes the
- rowType
- productName for the product rows
- category — just a String in this example
- isChecked — which determines the state of the checkbox, so we can control a checkbox while computing (onBindViewHolder) a different row (holder)
[This is all simplified for the example, it probably makes more sense that the products and categories are objects]
Here is the list I created for the example:
The recyclerView is defined in mainActivity, where each row is a checkbox defined in row_layout.xml:
The adapter is where everything happens, let’s break it into pieces and see how we cover all the scenarios listed above.
[Again, this is simplified for the example, using different view types for the recyclerView is probably better practice]
In onBindViewHolder we set the text according to the view type in (holder.checkBox. text = … ) and add a few design lines, which I won’t elaborate on in this article.
Now, at the top we add:
If the data item isChecked == true , we check the UI checkbox accordingly, and if necessary, grey out lines that aren’t checked, which will look like this:

The setCheckboxTextColor method is implemented in the adapter:
Now it is time to set the listener:
The first two lines, common for any view type, change the data item for the current holder and the text color.
Now let’s look at each view type separately:
These lines change the “isChecked” data for all the other items in the list. In IndexList we keep the positions that need to be notified to update when calling notifyItemChanged( it).
Note: from experience, updating the table with notifyDataSetChanged() can cause issues as it will be updating the header again
So very similar to the top header code, we update all the children according to the father, but here we also filter on the category so we only change the correct items. After updating the children we need to see if the parent (top header in this case) must be updated as well, which is done in isAllItemsSameStatus() which we’ll get to soon
Product row does not need to update any fellow rows, but might affect the top and category checkboxes which are implemented in isAllItemsSameStatus()
In order to update the headers we need 3 parameters:
- row: RowModel — the row data to be updated. For Top header it is always productList[0]. As to category row, we need to find it by calling:
2. isChecked: Boolean — the state of the checkbox to be updated. For Top header we check if the number of rows that are checked equal the number of rows in total (minus the top header):
For category row we do the same on the children only:
3. position: Int — to determine which holder needs to be update, for top header it is always row 0
For category holder we find it:
And finally update the header row:
Important! Checkboxes in recyclerView can cause issues, since the recyclerView, true to it’s name, recycles the views and the checkbox listener gets messed up. Therefore we add:
at the top, removing the listener that was already assigned to this holder. Be sure to add it before the checkbox is assigned.
And… That’s it! I hope this was clear, please ask post any questions in the comments and best of luck!
Источник
Android CheckBox with Examples
In android, CheckBox is a two-states button that can be either checked (ON) or unchecked (OFF) and it will allow users to toggle between the two states (ON / OFF) based on the requirements.
Generally, we can use multiple CheckBox controls in android application to allow users to select one or more options from the set of values.
Following is the pictorial representation of using CheckBox control in android applications.

By default, the android CheckBox will be in the OFF (Unchecked) state. We can change the default state of CheckBox by using android:checked attribute.
In case, if we want to change the state of CheckBox to ON (Checked), then we need to set android:checked = “true” in our XML layout file.
In android, we can create CheckBox control in two ways either in the XML layout file or create it in the Activity file programmatically.
Create CheckBox in XML Layout File
Following is the sample way to define CheckBox control in XML layout file in android application.
If you observe above code snippet, here we defined CheckBox control and setting CheckBox state ON using android:checked attribute in xml layout file.
Create CheckBox Control in Activity File
In android, we can create CheckBox control programmatically in activity file based on our requirements.
Following is the example of creating a CheckBox control dynamically in an activity file.
LinearLayout layout = (LinearLayout)findViewById(R.id. l_layout );
CheckBox cb = new CheckBox( this );
cb.setText( «Tutlane» );
cb.setChecked( true );
layout.addView(cb);
This is how we can define CheckBox in XML layout file or programmatically in activity file based on our requirements.
Handle Android CheckBox Click Events
Generally, whenever the user clicks on CheckBox to Select or Deselect the CheckBox object will receive an on-click event.
In android, we can define the CheckBox click event in two ways either in the XML layout file or create it in the Activity file programmatically.
Define CheckBox Click Event in XML Layout File
We can define a click event handler for button by adding the android:onClick attribute to the element in our XML layout file.
The value of android:onClick attribute must be the name of method which we need to call in response to a click event and the Activity file which hosting XML layout must implement the corresponding method.
Following is the example of defining a CheckBox click event using android:onClick attribute in XML layout file.
android :onClick= «onCheckBoxClick»/>
LinearLayout >
In Activity that hosts our XML layout file, we need to implement click event method like as shown below.
public void onCheckboxClicked(View view) <
// Is the view now checked?
boolean checked = ((CheckBox) view).isChecked();
// Check which checkbox was clicked
switch (view.getId()) <
case R.id.chk1:
if (checked)
// Do your coding
else
// Do your coding
break ;
// Perform your logic
>
>
Define CheckBox Click Event in Activity File
In android, we can define CheckBox click event programmatically in Activity file rather than XML layout file.
To define checkbox click event programmatically, create View.OnClickListener object and assign it to the button by calling setOnClickListener(View.OnClickListener) like as shown below.
This is how we can handle CheckBox click events in android applications based on our requirements.
Android CheckBox Control Attributes
The following are some of the commonly used attributes related to CheckBox control in android applications.
| Attribute | Description |
|---|---|
| android:id | It is used to uniquely identify the control |
| android:checked | It is used to specify the current state of checkbox |
| android:gravity | It is used to specify how to align the text like left, right, center, top, etc. |
| android:text | It is used to set the text for a checkbox. |
| android:textColor | It is used to change the color of text. |
| android:textSize | It is used to specify the size of text. |
| android:textStyle | It is used to change the style (bold, italic, bolditalic) of text. |
| android:background | It is used to set the background color for checkbox control. |
| android:padding | It is used to set the padding from left, right, top and bottom. |
| android:onClick | It’s the name of the method to invoke when the checkbox clicked. |
| android:visibility | It is used to control the visibility of control. |
Android CheckBox Control Example
Following is the example of defining multiple CheckBox controls and one Button control in LinearLayout to get the selected values of CheckBox controls when we click on Button in the android application.
Create a new android application using android studio and give names as CheckBoxExample. In case if you are not aware of creating an app in android studio check this article Android Hello World App.
Now open an activity_main.xml file from \res\layout path and write the code like as shown below
activity_main.xml
xml version= «1.0» encoding= «utf-8» ?>
LinearLayout xmlns: android = «http://schemas.android.com/apk/res/android»
android :orientation= «vertical» android :layout_width= «match_parent»
android :layout_height= «match_parent» >
CheckBox
android :id= «@+id/chkJava»
android :layout_width= «wrap_content»
android :layout_height= «wrap_content»
android :padding= «10dp»
android :layout_marginTop= «150dp»
android :layout_marginLeft= «100dp»
android :text= «Java»
android :onClick= «onCheckboxClicked»/>
CheckBox
android :id= «@+id/chkPython»
android :layout_width= «wrap_content»
android :layout_height= «wrap_content»
android :padding= «10dp»
android :layout_marginLeft= «100dp»
android :text= «Python»
android :onClick= «onCheckboxClicked»/>
CheckBox
android :id= «@+id/chkAndroid»
android :layout_width= «wrap_content»
android :layout_height= «wrap_content»
android :padding= «10dp»
android :layout_marginLeft= «100dp»
android :text= «Android»
android :onClick= «onCheckboxClicked»/>
CheckBox
android :id= «@+id/chkAngular»
android :layout_width= «wrap_content»
android :layout_height= «wrap_content»
android :padding= «10dp»
android :layout_marginLeft= «100dp»
android :text= «AngularJS»
android :onClick= «onCheckboxClicked»/>
Button
android :id= «@+id/getBtn»
android :layout_width= «wrap_content»
android :layout_height= «wrap_content»
android :layout_marginLeft= «100dp»
android :text= «Get Details»/>
LinearLayout >
If you observe above code we created a multiple CheckBox controls and one Button control in XML Layout file.
Once we are done with the creation of layout with required controls, we need to load the XML layout resource from our activity onCreate() callback method, for that open main activity file MainActivity.java from \java\com.tutlane.checkboxexample path and write the code like as shown below.
MainActivity.java
package com.tutlane.checkboxexample;
import android.support.v7.app.AppCompatActivity;
import android.os.Bundle;
import android.view.View;
import android.widget.Button;
import android.widget.CheckBox;
import android.widget.Toast;
public class MainActivity extends AppCompatActivity <
CheckBox android , java , angular , python ;
@Override
protected void onCreate(Bundle savedInstanceState) <
super .onCreate(savedInstanceState);
setContentView(R.layout. activity_main );
android = (CheckBox)findViewById(R.id. chkAndroid );
angular = (CheckBox)findViewById(R.id. chkAngular );
java = (CheckBox)findViewById(R.id. chkJava );
python = (CheckBox)findViewById(R.id. chkPython );
Button btn = (Button)findViewById(R.id. getBtn );
btn.setOnClickListener( new View.OnClickListener() <
@Override
public void onClick(View v) <
String result = «Selected Courses» ;
if ( android .isChecked()) <
result += » \n Android» ;
>
if ( angular .isChecked()) <
result += » \n AngularJS» ;
>
if ( java .isChecked()) <
result += » \n Java» ;
>
if ( python .isChecked()) <
result += » \n Python» ;
>
Toast.makeText(getApplicationContext(), result, Toast. LENGTH_SHORT ).show();
>
>);
>
public void onCheckboxClicked(View view) <
boolean checked = ((CheckBox) view).isChecked();
String str= «» ;
// Check which checkbox was clicked
switch (view.getId()) <
case R.id. chkAndroid :
str = checked? «Android Selected» : «Android Deselected» ;
break ;
case R.id. chkAngular :
str = checked? «AngularJS Selected» : «AngularJS Deselected» ;
break ;
case R.id. chkJava :
str = checked? «Java Selected» : «Java Deselected» ;
break ;
case R.id. chkPython :
str = checked? «Python Selected» : «Python Deselected» ;
break ;
>
Toast.makeText(getApplicationContext(), str, Toast. LENGTH_SHORT ).show();
>
>
If you observe above code we are calling our layout using setContentView method in the form of R.layout.layout_file_name in our activity file. Here our xml file name is activity_main.xml so we used file name activity_main and we are getting the status of CheckBox controls when they Select / Deselect and getting the selected CheckBox control values on Button click.
Generally, during the launch of our activity, onCreate() callback method will be called by android framework to get the required layout for an activity.
Output of Android CheckBox Example
When we execute the above example using the android virtual device (AVD) we will get a result like as shown below.

If you observe above result, we are able to get the status of checkboxes while selecting / deselecting and getting all the selected CheckBox values on button click.
This is how we can use CheckBox control in android applications to allow users to select one or more options based on our requirements.
Источник


