- Different Ways to Fix “Select Android SDK” Error in Android Studio
- What’s the Error?
- Method 1
- Method 2
- Method 3
- Method 4
- Install and configure the NDK and CMake
- Install NDK and CMake automatically
- Install the NDK and CMake
- Configure a specific version of CMake
- Groovy
- Kotlin
- Install a specific version of the NDK
- Configure specific versions of the NDK in your project
- Groovy
- Kotlin
- Default NDK version per AGP version
- Debugging with Android Studio
- In this document
- See also
- Run your App in Debug Mode
- Attach the debugger to a running process
- Use the System Log
- Write log messages in your code
- View the system log
- Work with Breakpoints
- View and configure breakpoints
- Debug your app with breakpoints
- Track Object Allocation
- Analyze Runtime Metrics to Optimize your App
- Capture Screenshots and Videos
Different Ways to Fix “Select Android SDK” Error in Android Studio
Android SDK is one of the most useful components which is required to develop Android Applications. Android SDK is also referred to as the Android Software Development Kit which provides so many features which are required in Android which are given below:
- A sample source code.
- An Emulator.
- Debugger.
- Required set of libraries.
- Required APIs for Android development with their documentation.
- Tutorials required for Android OS development.
What’s the Error?
Sometimes when the developer import an Eclipse-Android-Project into Android Studio then there may be a possibility of getting the following error
Now the point that comes here is how we can f ix the “Select Android SDK” error in Android Studio . So in this article, we are going to discuss four different methods to f ix the “Select Android SDK” error in Android Studio.
Method 1
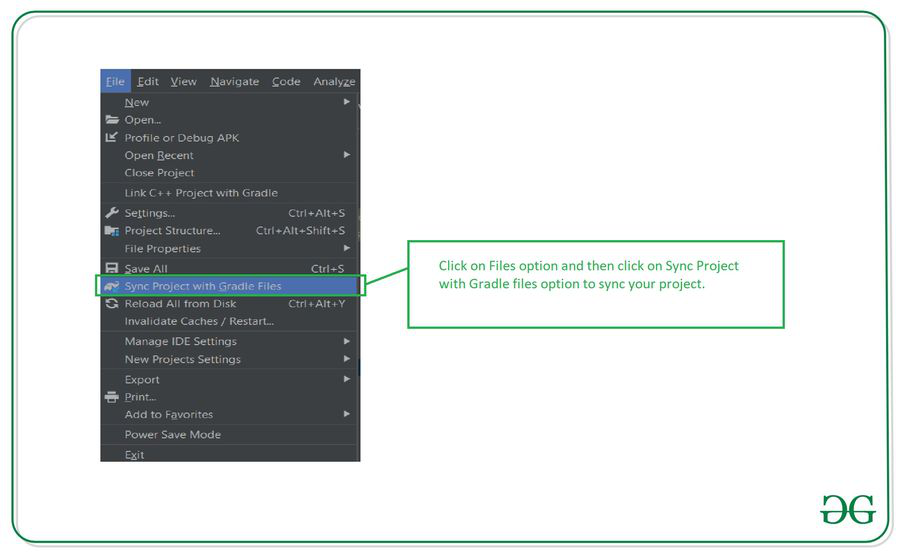
Sync your project with Gradle files
When you open your project now simply sync your project. To sync your project. Click on the Files option. In that option, you will get to see the option as Sync Project with Gradle Files. Click on that option to sync your project. After your project sync, this issue will be resolved. Please refer to the below screenshot.
Method 2
Step 1: Opening project structure
Navigate to the File > Click on Project structure which is shown in the list and click on the Project structure option. After clicking that option you will get to see the below screen.
Inside the above screen, click on the SDK Location option you will get to see the below screen.
In the above image, you will get to see the current SDK location for your Android Studio. To change this SDK location you have to click on the 3 dots which are being displayed and then select your SDK location folder. After selecting this folder click on the OK option to save your SDK path.
Step 2: Sync your project after adding your SDK path
Now sync your project with Gradle files to check that SDK is working fine. To do this click on File > you will get to see the option as Sync Project With Gradle files option click on that option and sync your project. On successful sync of your project, your SDK location is set perfectly and now you are good to go in developing Android Applications.
Method 3
Step 1: Opening Android Studio Settings
Navigate to the File > Settings option you will get to see below dialog screen. Inside that screen. Click on Appearance and Behavior option > System Settings options and then click on the Android SDK option to get to see the below screen.
Inside this screen, you will get to see your SDK path. You can update your SDK path by clicking on the Edit option. After that select your SDK path, then click on Apply option, and then click on the OK option.
Step 2: Sync your project after adding your SDK path
Now sync your project with Gradle files to check that SDK is working fine. To do this click on File > you will get to see the option as Sync Project With Gradle files option click on that option and sync your project. On successful sync of your project, your SDK location is set perfectly and now you are good to go in developing Android Applications.
Method 4
Step 1: Opening project structure
Inside your Android Studio in the top right corner, You can get to see the icon below the image for opening the project structure. Click on that option to open your project structure option. You will get to see the below screen. For opening this Project Structure we can also use a shortcut key as:
| Windows | Ctrl + Alt + Shift + S |
| Mac OS | Command + ; (semi-colan) |
| Linux | Ctrl + Alt + Shift + S |
After clicking on this option we simply have to follow Step 1 to update our Android SDK.
Inside the above screen, click on the SDK Location option you will get to see the below screen.
In the above image, you will get to see the current SDK location for your Android Studio. To change this SDK location you have to click on the 3 dots which are being displayed and then select your SDK location folder. After selecting this folder click on the OK option to save your SDK path.
Step 2: Sync your project after adding your SDK path
Now sync your project with Gradle files to check that SDK is working fine. To do this click on File > you will get to see the option as Sync Project With Gradle files option click on that option and sync your project. On successful sync of your project, your SDK location is set perfectly and now you are good to go in developing Android Applications. On successful sync of your project, your SDK location is set perfectly and now you are good to go in developing Android Applications.
Источник
Install and configure the NDK and CMake
To compile and debug native code for your app, you need the following components:
- The Android Native Development Kit (NDK): a set of tools that allows you to use C and C++ code with Android.
- CMake: an external build tool that works alongside Gradle to build your native library. You do not need this component if you only plan to use ndk-build.
- LLDB: the debugger Android Studio uses to debug native code. By default, LLDB will be installed alongside Android Studio.
This page describes how to install these components automatically, or by using Android Studio or the sdkmanager tool to download and install them manually.
Install NDK and CMake automatically
Android Gradle Plugin 4.2.0+ can automatically install the required NDK and CMake the first time you build your project if their licenses have been accepted in advance. If you’ve already read and agree to the license terms, then you can pre-accept the licenses in scripts with the following command:
Install the NDK and CMake
When you install the NDK, Android Studio selects the latest available NDK. For most projects, installing this default version of the NDK is sufficient. If your project needs one or more specific versions of the NDK, though, you can download and configure specific versions. Doing so helps you ensure reproducible builds across projects that each depend on a specific version of the NDK. Android Studio installs all versions of the NDK in the android-sdk /ndk/ directory.
To install CMake and the default NDK in Android Studio, do the following:
With a project open, click Tools > SDK Manager.
Click the SDK Tools tab.
Select the NDK (Side by side) and CMake checkboxes.
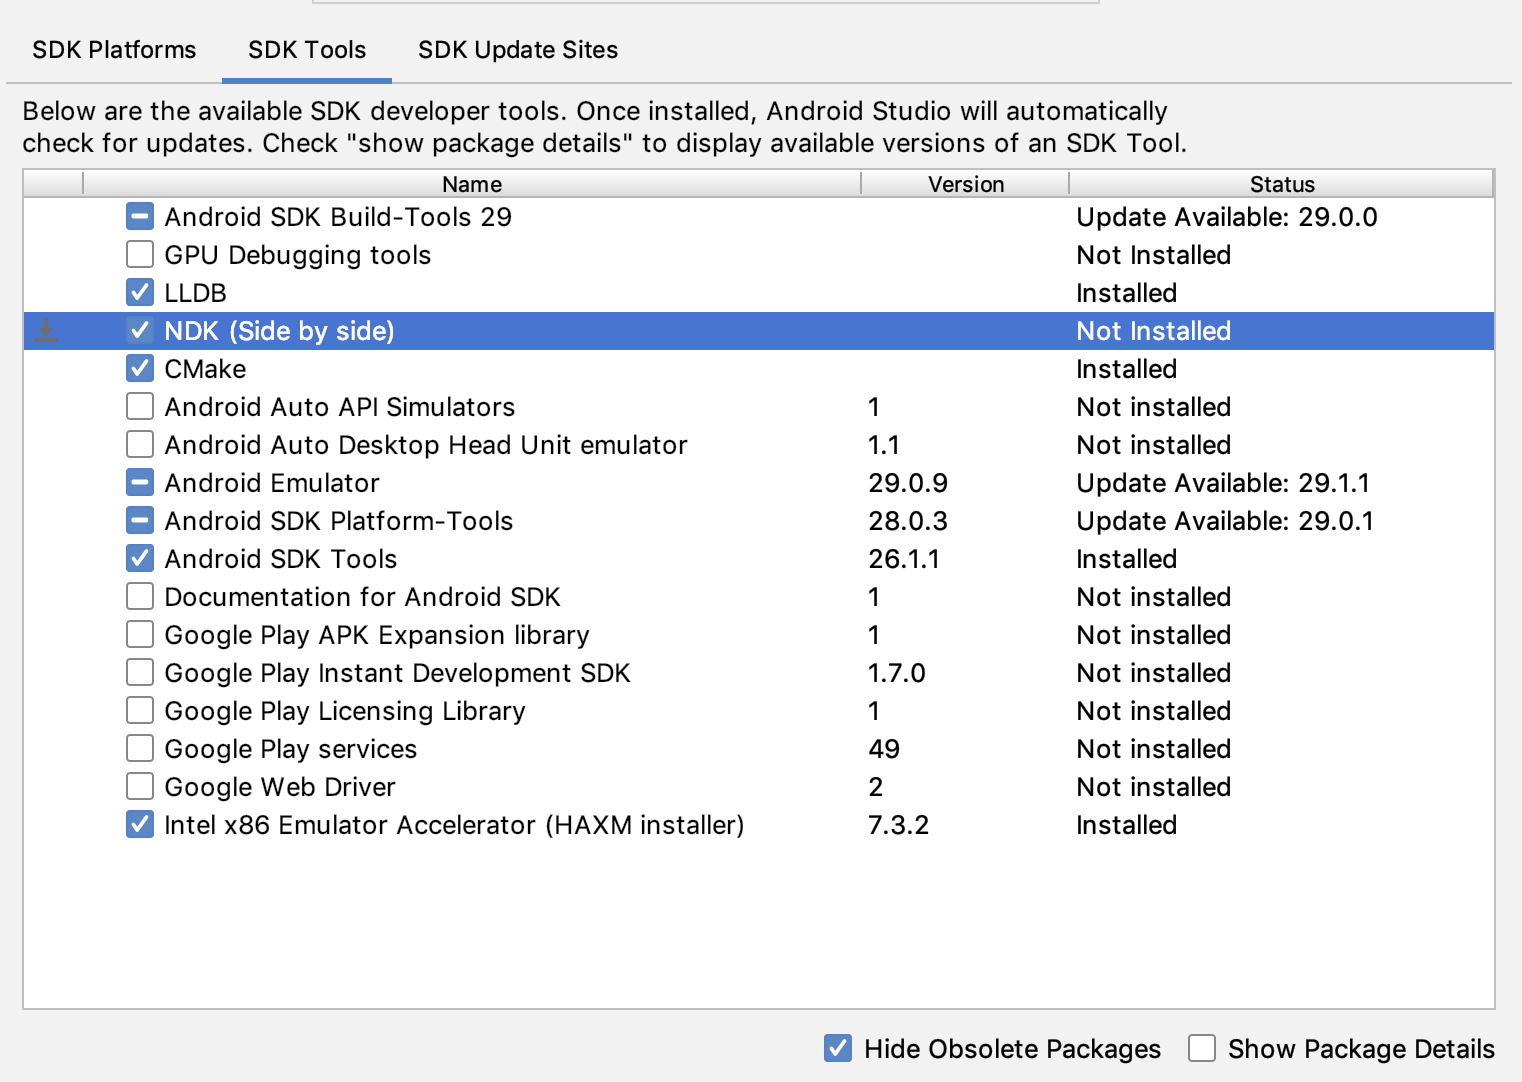 Figure 1: The SDK Tools window showing the NDK (Side by side) option
Click OK.
A dialog box tells you how much space the NDK package consumes on disk.
Click OK.
When the installation is complete, click Finish.
Your project automatically syncs the build file and performs a build. Resolve any errors that occur.
Configure a specific version of CMake
The SDK Manager includes the 3.6.0 forked version of CMake and version 3.10.2. Projects that don’t set a specific CMake version are built with CMake 3.10.2. To set the CMake version, add the following to your module’s build.gradle file:
Groovy
Kotlin
If you want to use a CMake version that is not included by the SDK Manager, follow these steps:
- Download and install CMake from the official CMake website.
- Specify the CMake version you want Gradle to use in your module’s build.gradle file.
Either add the path to the CMake installation to your PATH environment variable or include it in your project’s local.properties file, as shown. If Gradle is unable to find the version of CMake you specified in your build.gradle file, you get a build error.
If you don’t already have the Ninja build system installed on your workstation, go to the official Ninja website, and download and install the latest version of Ninja available for your OS. Make sure to also add the path to the Ninja installation to your PATH environment variable.
Install a specific version of the NDK
To install a specific version of the NDK, do the following:
With a project open, click Tools > SDK Manager.
Click the SDK Tools tab.
Select the Show Package Details checkbox.
Select the NDK (Side by side) checkbox and the checkboxes below it that correspond to the NDK versions you want to install. Android Studio installs all versions of the NDK in the android-sdk /ndk/ directory.
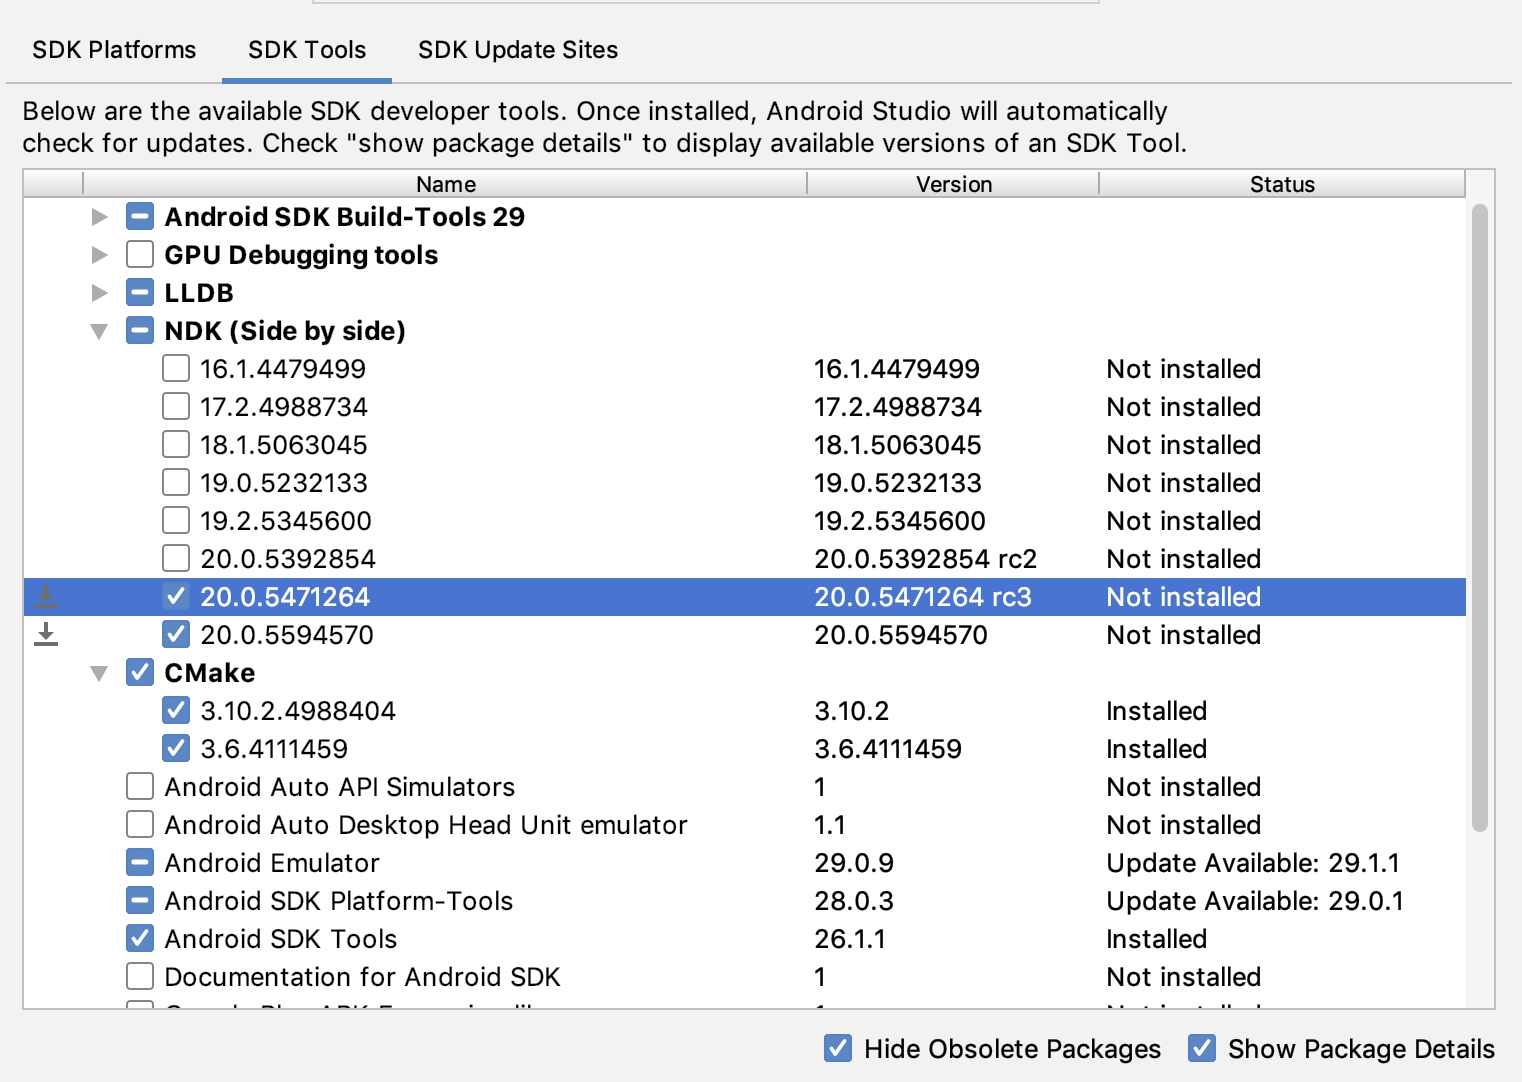 Figure 2: The SDK Tools window showing the NDK (Side by side) options
Click OK.
A dialog box tells you how much space the NDK package(s) consumes.
Click OK.
When the installation is complete, click Finish.
Your project automatically syncs the build file and performs a build. Resolve any errors that occur.
Configure each module with the version of the NDK you want it to use. When using Android Studio 3.6 or higher, if you do not specify the version, the Android Gradle plugin chooses a version that it is known to be compatible with.
Configure specific versions of the NDK in your project
You may need to configure the version of the NDK in your project if one of the following is true:
- Your project is inherited and you need to use specific versions of the NDK and the Android Gradle plugin (AGP). For more information, see Configure the NDK for the Android Gradle plugin.
You have multiple versions of the NDK installed and you want to use a specific one. In this case, specify the version using the android.ndkVersion property in the module’s build.gradle file, as shown in the following code sample.
Groovy
Kotlin
Default NDK version per AGP version
Before release, each AGP version is thoroughly tested with the latest stable NDK release at that time. For AGP version 3.6 and above, that NDK version will be used to build your projects if you do NOT specify an NDK version in the build.gradle file. The default NDK version is documented inside the AGP release notes. The current default NDK versions are listed in the following table:
| Android Studio/Gradle Plugin Version | |||||||
|---|---|---|---|---|---|---|---|
| 7.0 | 4.2 | 4.1 | 4.0 | 3.6 | 3.5 | 3.4 | |
| Default NDK version specified for the version of AGP | 21.4.7075529 | 21.4.7075529 | 21.1.6352462 | 21.0.6113669 | 20.0.5594570 | No default specified | |
Content and code samples on this page are subject to the licenses described in the Content License. Java is a registered trademark of Oracle and/or its affiliates.
Источник
Debugging with Android Studio
In this document
See also
Android Studio enables you to debug apps running on the emulator or on an Android device. With Android Studio, you can:
- Select a device to debug your app on.
- View the system log.
- Set breakpoints in your code.
- Examine variables and evaluate expressions at run time.
- Run the debugging tools from the Android SDK.
- Capture screenshots and videos of your app.
To debug your app, Android Studio builds a debuggable version of your app, connects to a device or to the emulator, installs the app and runs it. The IDE shows the system log while your app is running and provides debugging tools to filter log messages, work with breakpoints, and control the execution flow.
Run your App in Debug Mode

Figure 1. The Choose Device window enables you to select a physical Android device or a virtual device to debug your app.
To run your app in debug mode, you build an APK signed with a debug key and install it on a physical Android device or on the Android emulator. To set up an Android device for development, see Using Hardware Devices. For more information about the emulator provided by the Android SDK, see Using the Emulator.
To debug your app in Android Studio:
- Open your project in Android Studio.
- Click Debug in the toolbar.
- On the Choose Device window, select a hardware device from the list or choose a virtual device.
- Click OK. Your app starts on the selected device.
Figure 1 shows the Choose Device window. The list shows all the Android devices connected to your computer. Select Launch Emulator to use an Android virtual device instead. Click the ellipsis  to open the Android Virtual Device Manager.
Android Studio opens the Debug tool window when you debug your app. To open the Debug window manually, click Debug . This window shows threads and variables in the Debugger tab, the device status in the Console tab, and the system log in the Logcat tab. The Debug tool window also provides other debugging tools covered in the following sections.

Figure 2. The Debug tool window in Android Studio showing the current thread and the object tree for a variable.
Attach the debugger to a running process
You don’t always have to restart your app to debug it. To debug an app that you’re already running:
- Click Attach debugger to Android proccess
 .
. - In the Choose Process window, select the device and app you want to attach the debugger to.
- To open the Debug tool window, click Debug .
 .
.Use the System Log
The system log shows system messages while you debug your app. These messages include information from apps running on the device. If you want to use the system log to debug your app, make sure your code writes log messages and prints the stack trace for exceptions while your app is in the development phase.
Write log messages in your code
To write log messages in your code, use the Log class. Log messages help you understand the execution flow by collecting the system debug output while you interact with your app. Log messages can tell you what part of your application failed. For more information about logging, see Reading and Writing Logs.
The following example shows how you might add log messages to determine if previous state information is available when your activity starts:
During development, your code can also catch exceptions and write the stack trace to the system log:
Note: Remove debug log messages and stack trace print calls from your code when you are ready to publish your app. You could do this by setting a DEBUG flag and placing debug log messages inside conditional statements.
View the system log
Both the Android DDMS (Dalvik Debug Monitor Server) and the Debug tool windows show the system log; however, the Android DDMS tool window lets you view only log messages for a particular process. To view the system log on the Android DDMS tool window:
- Start your app as described in Run your App in Debug Mode.
- Click Androidto open the Android DDMS tool window.
- If the system log is empty in the Logcat view, click Restart.
 to open the Android DDMS tool window.
Figure 4. The system log in the Android DDMS tool window.
The Android DDMS tool window gives you access to some DDMS features from Android Studio. For more information about DDMS, see Using DDMS.
The system log shows messages from Android services and other Android apps. To filter the log messages to view only the ones you are interested in, use the tools in the Android DDMS window:
- To show only log messages for a particular process, select the process in the Devices view and then click Only Show Logcat from Selected Process. If the Devices view is not available, click Restore Devices Viewon the right of the Android DDMS tool window. This button is only visible when you hide the Devices window.
- To filter log messages by log level, select a level under Log Level on the top of the Android DDMS window.
- To show only log messages that contain a particular string, enter the string in the search box and press Enter.
 . If the Devices view is not available, click Restore Devices View
 on the right of the Android DDMS tool window. This button is only visible when you hide the Devices window.
Work with Breakpoints
Breakpoints enable you to pause the execution of your app at a particular line of code, examine variables, evaluate expressions, and continue the execution line by line. Use breakpoints to determine the causes of run-time errors that you can’t fix by looking at your code only. To debug your app using breakpoints:
- Open the source file in which you want to set a breakpoint.
- Locate the line where you want to set a breakpoint and click on it.
- Click on the yellow portion of the side bar to the left of this line, as shown in figure 5.
- Start your app as described in Run your App in Debug Mode.
Android Studio pauses the execution of your app when it reaches the breakpoint. You can then use the tools in the Debug tool window to identify the cause of the error.

Figure 5. A red dot appears next to the line when you set a breakpoint.
View and configure breakpoints
To view all the breakpoints and configure breakpoint settings, click View Breakpoints on the left side of the Debug tool window. The Breakpoints window appears, as shown in figure 6.

Figure 6. The Breakpoints window lists all the current breakpoints and includes behavior settings for each.
The Breakpoints window lets you enable or disable each breakpoint from the list on the left. If a breakpoint is disabled, Android Studio does not pause your app when it hits that breakpoint. Select a breakpoint from the list to configure its settings. You can configure a breakpoint to be disabled at first and have the system enable it after a different breakpoint is hit. You can also configure whether a breakpoint should be disabled after it is hit. To set a breakpoint for any exception, select Exception Breakpoints in the list of breakpoints.
Debug your app with breakpoints
After you set breakpoints in your code, click Rerun  to start the app again. When a breakpoint is hit, Android Studio pauses the app and highlights the breakpoint in the source code. The Debug tool window lets you examine variables and control the execution step by step:
To examine the object tree for a variable, expand it in the Variables view. If the Variables view is not visible, click Restore Variables View .
To evaluate an expression at the current execution point, click Evaluate Expression .
To advance to the next line in the code (without entering a method), click Step Over .
To advance to the first line inside a method call, click Step Into .
To advance to the next line outside the current method, click Step Out .
To continue running the app normally, click Resume Program .

Figure 7. The Variables view in the Debug tool window.
Track Object Allocation
Android Studio lets you track objects that are being allocated on the Java heap and see which classes and threads are allocating these objects. This allows you to see the list of objects allocated during a period of interest. This information is valuable for assessing memory usage that can affect application performance.
To track memory allocation of objects:
- Start your app as described in Run Your App in Debug Mode.
- Click Androidto open the Android DDMS tool window.
- On the Android DDMS tool window, select the Devices | logcat tab.
- Select your device from the dropdown list.
- Select your app by its package name from the list of running apps.
- Click Start Allocation Tracking
- Interact with your app on the device.
- Click Stop Allocation Tracking


Android Studio shows the objects that the system allocated with the following information:
- Allocation order
- Allocated class
- Allocation size
- Thread ID
- Allocation method, class, and line number
- Stack trace at the point of allocation

Figure 8. Object allocation tracking in Android Studio.
Analyze Runtime Metrics to Optimize your App
Even if your application does not generate runtime errors, this does not mean it is free of problems. You should also consider the following issues:
- Does your app use memory efficiently?
- Does your app generate unnecessary network traffic?
- What methods should you focus your attention on to improve the performance of your app?
- Does your app behave properly when the user receives a phone call or a message?
The Android Device Monitor is a stand-alone tool with a graphical user interface for serveral Android application debugging and analysis tools, including the Dalvik Debug Monitor Server (DDMS). You can use the Android Device Monitor to analyze memory usage, profile methods, monitor network traffic and simulate incoming calls and messages.
To open the Android Device Monitor from Android Studio, click Monitor on the toolbar. The Android Device Monitor opens in a new window.
For more information about the Android Device Monitor and DDMS, see Device Monitor and Using DDMS.
Capture Screenshots and Videos
Android Studio enables you to capture a screenshot or a short video of the device screen while your app is running. Screenshots and videos are useful as promotional materials for your app, and you can also attach them to bug reports that you send to your development team.
To take a screenshot of your app:
- Start your app as described in Run your App in Debug Mode.
- Click Androidto open the Android DDMS tool window.
- Click Screen Captureon the left side of the Android DDMS tool window.
- Optional: To add a device frame around your screenshot, enable the Frame screenshot option.
- Click Save.
 on the left side of the Android DDMS tool window.
To take a video recording of your app:
- Start your app as described in Run your App in Debug Mode.
- Click Androidto open the Android DDMS tool window.
- Click Screen Recordon the left side of the Android DDMS tool window.
- Click Start Recording.
- Interact with your app.
- Click Stop Recording.
- Enter a file name for the recording and click OK.
 on the left side of the Android DDMS tool window.
Источник


