- Now send the package you want to apply to the device with Adb Sideload что это значит?
- Устранение ошибки в устройстве Android
- Что нужно для работы с Adb Sideload
- Инструкция, как работать с Adb Sideload
- Android — Sending SMS
- Example
- Using Built-in Intent to send SMS
- Intent Object — Action to send SMS
- Intent Object — Data/Type to send SMS
- Intent Object — Extra to send SMS
- Example
- Dr.Fone — Phone Manager (Android):
- Supported Android Version & Device
- How to Connect Your Android Device with A USB Cable?
- How to Enable USB Debug on Android?
- For Android 6.0+
- For Android 4.2-5.1
- For Android 3.0-4.1
- For Android 2.0-2.3
- How to set the proper connection method?
Now send the package you want to apply to the device with Adb Sideload что это значит?
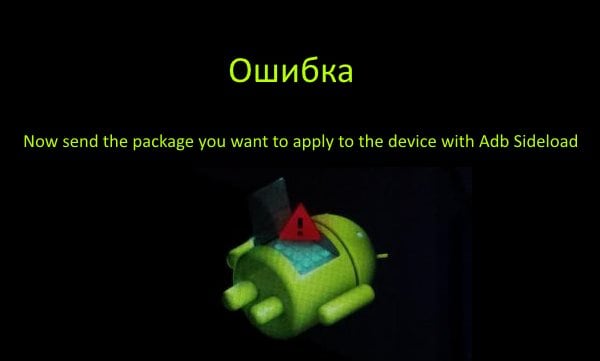
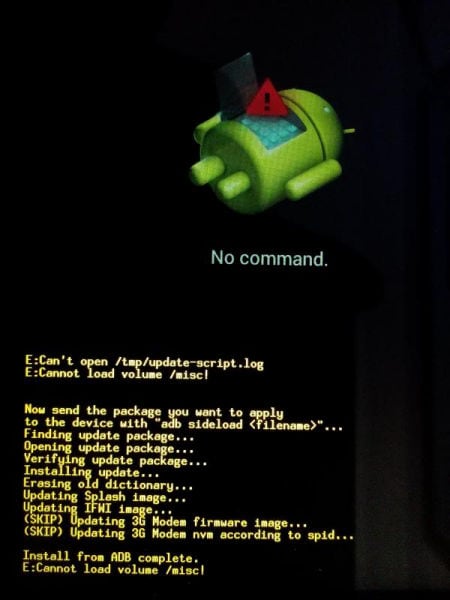
Ошибка «Now send the package you want to apply to the device with Adb Sideload» возникает на устройствах под управлением Android, когда в нем возникают сбои и оно не может самостоятельно запуститься. Ошибка переводится с английского как «Отправьте пакет, который желаете задействовать на устройстве при помощи Adb Sideload». Обычно, вы видите на экране телефона или планшетного ПК изображения робота, который является неисправным и показывает знак восклицания в красном треугольнике. Что в этом случае необходимо предпринять? Давайте в этом разбираться.
Устранение ошибки в устройстве Android
Большинство пользователей сразу впадают в панику из-за того, что не знают, что делать в этой ситуации. В первую очередь попытайтесь сделать сброс (hard reset).
- Для этого выключите свой телефон или планшет, затем нажмите кнопку «Power» (включение) и прибавление громкости (плюсик на качельке звука).
- Подождите немного до того момента, пока не возникнет надпись на экране.
- Выберите из списка «Recovery». Чтобы передвигать курсором, используйте прибавление громкости, для выбора одного из пунктов используйте уменьшение громкости.
В тексте ошибки идет речь об утилите Adb Sideload – это специальная утилита, которая предоставляет возможность управлять устройством Android с помощью компьютера. Аббревиатура Adb означает Android Debug Bridge (т.е. мост отладки для Андроид). Это значит, что утилита является мостом между компьютером и устройствами под управлением Android.
Что нужно для работы с Adb Sideload
Архив с обновлением лежит в папке с программой Adb. Для начала нужно на устройстве активировать режим «Recovery» или «Bootloader», что мы уже сделали. Далее запускаем нашу программу и пишем команду в строке «adb sideload .zip», после архив переформатируется в Android и прошивается.
Что для этого нужно:
- Прошиваемое устройство должно быть заряжено как минимум на 40% и более.
- Оригинальный рабочий кабель с MicroUSB.
- Компьютер, ноутбук с операционной системой Windows, не ниже 7 версии.
- Если ваше устройство не поддерживается ОС, необходимо на компьютер установить соответствующий драйвер, который позволит «понимать» мобильное устройство.
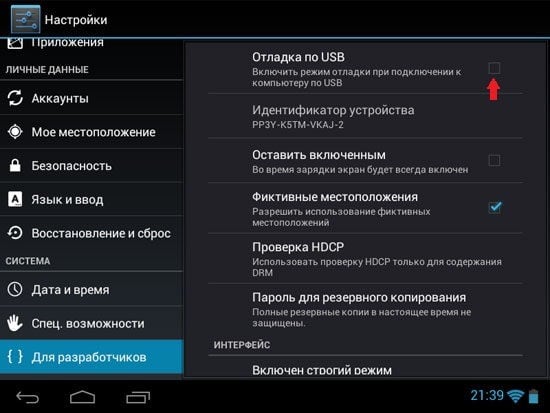
- Активировать отладку на устройстве Android.
- Архив с обновлением в zip.
Инструкция, как работать с Adb Sideload
Если вы столкнулись с ошибкой «Now send the package you want to apply to the device with Adb Sideload», следуйте пошаговой инструкции, описанной ниже.
- Подключите мобильный телефон к своему компьютеру через USB.

- Архив с обновлением разместите по следующему пути на вашем ПК – C:\adb\progbin.
- Запустите нашу утилиту Adb Run или откройте в меню Manual Command, Adb.
- Теперь необходимо проверить обнаружила ли программа Adb ваше устройство, для этого введите строку «adb devices».
- Если все в порядке, телефон обнаруживается, то вы должны наблюдать следующий ответ программы: C:\adb\adb\progbin> adb devisec list of devices attached namef112xxxx, если нет, то в конце ответа после иксов вы увидите слово «Offline».
- Чтобы избежать ошибок, необходимо открывать программу от имени администратора.
- Далее переведите свое Android гаджет в режим Recovery или Bootload.
- Версии Recovery бывают разные, в некоторых необходимо активировать на своем телефоне или планшете Sideload. Стандартное может иметь название: «Install zip from sideload», «apply update from ADB» или «ADB Sideload».
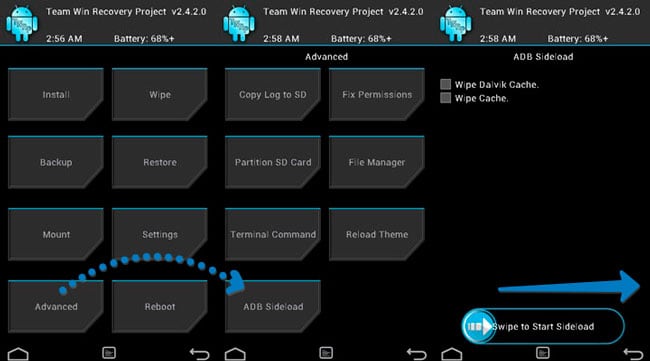
- Если Recovery TWRP вида, то чтобы активировать Sideload пройдите в Advanced, Adb Sideload и перетащите нижний ползунок вправо. После этого все остальные манипуляции отображаются на компьютере.
- В Adb Run введите следующую строку – «adb sideload xxxxxxxx.zip. Вместо иксов напишите свое название прошиваемого архива обновления. Обратите внимание, что регистр здесь имеет значение, если ввести вместо большой буквы – маленькую, будет ошибка.
Если вы все выполнили правильно, то начнется перезапись пакета обновлений в устройство Android, а затем процесс обновления. В случае возникновения ошибки «error: closed», значит Sideload на Android не активирован. Если возникло сообщение «error: device not found», в этом случае программа не видит устройство, необходимо попытаться перезапустить его, попробовать снова выйти и зайти в режим Recovery, поменять ядро.
В некоторых ситуациях проблема с ошибкой «Now send the package you want to apply to the device with adb sideload» решается простым перезапуском устройства. Если у вас возникают какие-либо проблемы по пути выполнения метода, описанного выше, и вы не можете продолжить выполнять восстановление, обратитесь в сервис технической поддержки, чтобы получить квалифицированную помощь специалистов.
Источник
Android — Sending SMS
In Android, you can use SmsManager API or devices Built-in SMS application to send SMS’s. In this tutorial, we shows you two basic examples to send SMS message −
Built-in SMS application
Of course, both need SEND_SMS permission.
Apart from the above method, there are few other important functions available in SmsManager class. These methods are listed below −
| Sr.No. | Method & Description | |||||||||||||||||||||||||||
|---|---|---|---|---|---|---|---|---|---|---|---|---|---|---|---|---|---|---|---|---|---|---|---|---|---|---|---|---|
| 1 |
| Step | Description |
|---|---|
| 1 | You will use Android Studio IDE to create an Android application and name it as tutorialspoint under a package com.example.tutorialspoint. |
| 2 | Modify src/MainActivity.java file and add required code to take care of sending sms. |
| 3 | Modify layout XML file res/layout/activity_main.xml add any GUI component if required. I’m adding a simple GUI to take mobile number and SMS text to be sent and a simple button to send SMS. |
| 4 | No need to define default string constants at res/values/strings.xml. Android studio takes care of default constants. |
| 5 | Modify AndroidManifest.xml as shown below |
| 6 | Run the application to launch Android emulator and verify the result of the changes done in the application. |
Following is the content of the modified main activity file src/com.example.tutorialspoint/MainActivity.java.
Following will be the content of res/layout/activity_main.xml file −
Here abc indicates about tutorialspoint logo
Following will be the content of res/values/strings.xml to define two new constants −
Following is the default content of AndroidManifest.xml −
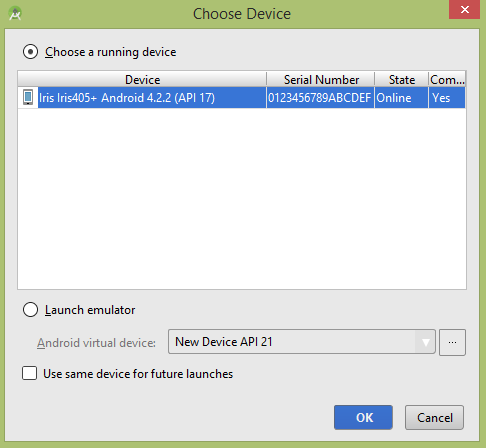
Let’s try to run your tutorialspoint application. I assume you have connected your actual Android Mobile device with your computer. To run the app from Android studio, open one of your project’s activity files and click Run  icon from the toolbar. Before starting your application, Android studio installer will display following window to select an option where you want to run your Android application.

Now you can enter a desired mobile number and a text message to be sent on that number. Finally click on Send SMS button to send your SMS. Make sure your GSM/CDMA connection is working fine to deliver your SMS to its recipient.
You can take a number of SMS separated by comma and then inside your program you will have to parse them into an array string and finally you can use a loop to send message to all the given numbers. That’s how you can write your own SMS client. Next section will show you how to use existing SMS client to send SMS.
Using Built-in Intent to send SMS
You can use Android Intent to send SMS by calling built-in SMS functionality of the Android. Following section explains different parts of our Intent object required to send an SMS.
Intent Object — Action to send SMS
You will use ACTION_VIEW action to launch an SMS client installed on your Android device. Following is simple syntax to create an intent with ACTION_VIEW action.
Intent Object — Data/Type to send SMS
To send an SMS you need to specify smsto: as URI using setData() method and data type will be to vnd.android-dir/mms-sms using setType() method as follows −
Intent Object — Extra to send SMS
Android has built-in support to add phone number and text message to send an SMS as follows −
Here address and sms_body are case sensitive and should be specified in small characters only. You can specify more than one number in single string but separated by semi-colon (;).
Example
Following example shows you in practical how to use Intent object to launch SMS client to send an SMS to the given recipients.
To experiment with this example, you will need actual Mobile device equipped with latest Android OS, otherwise you will have to struggle with emulator which may not work.
| Step | Description |
|---|---|
| 1 | You will use Android studio IDE to create an Android application and name it as tutorialspoint under a package com.example.tutorialspoint. |
| 2 | Modify src/MainActivity.java file and add required code to take care of sending SMS. |
| 3 | Modify layout XML file res/layout/activity_main.xml add any GUI component if required. I’m adding a simple button to launch SMS Client. |
| 4 | No need to define default constants.Android studio takes care of default constants. |
| 5 | Modify AndroidManifest.xml as shown below |
| 6 | Run the application to launch Android emulator and verify the result of the changes done in the application. |
Following is the content of the modified main activity file src/com.example.tutorialspoint/MainActivity.java.
Following will be the content of res/layout/activity_main.xml file −
Here abc indicates about tutorialspoint logo
Following will be the content of res/values/strings.xml to define two new constants −
Following is the default content of AndroidManifest.xml −
Let’s try to run your tutorialspoint application. I assume you have connected your actual Android Mobile device with your computer. To run the app from Android studio, open one of your project’s activity files and click Run icon from the toolbar. Before starting your application, Android studio will display following window to select an option where you want to run your Android application.
Select your mobile device as an option and then check your mobile device which will display following screen −
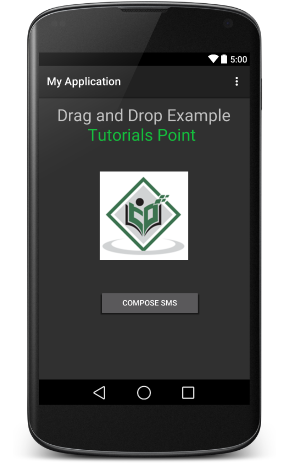
Now use Compose SMS button to launch Android built-in SMS clients which is shown below −
You can modify either of the given default fields and finally use send SMS button to send your SMS to the mentioned recipient.
Источник
Dr.Fone — Phone Manager (Android):
Dr.Fone — Phone Manager (Android) enables you to connect your Android phone or tablet with a USB cable. In order to simplify the process, please follow the steps below to make yourself on the right track.
![]()
Supported Android Version & Device
1. Fully compatible with Android 2.2 and later.
2. Support over 3000 Android devices produced by Samsung Google, LG, Motorola, Sony, HTC, and more.
How to Connect Your Android Device with A USB Cable?
Step 1. Enable USB Debug on your Android device. How to>>
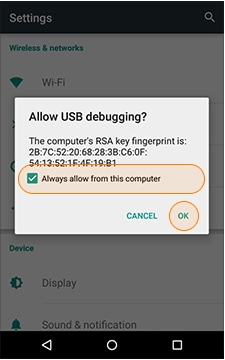
Step 2. Allow USB debugging on your Android device.
![]()
Then a popup will show on your Android phone, tap to check the Always allow this computer, and then tap OK to allow your phone to trust the computer it is connected to. If the popup is not showing up, click Show Again button on Dr.Fone.
Note: Checking the Always allow this computer checkbox to ensure that you are not prompted with the same message every time you connect your phone to the PC. However, for security reasons, you should NOT check this checkbox if the PC is used at public places or is not your personal property and is insecure.
Step 3. Allow MTP connection on the connected Android device. How to >>
Note: For LG and Sony devices, select Send images (PTP) mode.
Step 4. Then you will find the connected Android device displayed on Dr.Fone — Phone Manager (Android). For more detailed information about the connected device, you can click Details on the main interface.
![]()
How to Enable USB Debug on Android?
Check Android version in your device: Setting > About device > (Software info) > Android version.
For Android 6.0+
On your Android device, tap Settings > About device > Software info > Build number (tap 7 times) > Develop Options > USB Debugging
![]()
For Android 4.2-5.1
On your Android device, tap Settings > About Phone > Build number (tap 7 times) > Develop Options > USB Debugging
![]()
For Android 3.0-4.1
On your Android device, tap Settings > Develop Options > USB Debugging
![]()
For Android 2.0-2.3
On your Android device, tap Settings > Applications > Development > USB Debugging
![]()
How to set the proper connection method?
To connect Android devices run 4.4 and above to the product, you need to:
1. Connect your device to your computer via USB cable and drag down the dropdown menu.
2. Click the Connected for charging option and then select the Media device (MTP) or Camera (PTP) / Send images (PTP) option. Allow MTP connection on the connected Android device.

Note:
For LG and Sony devices, they can be connected under Camera (PTP) / Send images (PTP) mode ONLY.
Источник


