- Android — Notifications
- Create and Send Notifications
- Step 1 — Create Notification Builder
- Step 2 — Setting Notification Properties
- Step 3 — Attach Actions
- Step 4 — Issue the notification
- The NotificationCompat.Builder Class
- Example
- Big View Notification
- Полный список
- Обновление старого или новое уведомление
- Удаление
- Вибра
- Индикатор
- Число
- Флаги
Android — Notifications
A notification is a message you can display to the user outside of your application’s normal UI. When you tell the system to issue a notification, it first appears as an icon in the notification area. To see the details of the notification, the user opens the notification drawer. Both the notification area and the notification drawer are system-controlled areas that the user can view at any time.
Android Toast class provides a handy way to show users alerts but problem is that these alerts are not persistent which means alert flashes on the screen for a few seconds and then disappears.
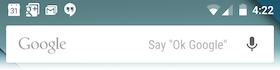
To see the details of the notification, you will have to select the icon which will display notification drawer having detail about the notification. While working with emulator with virtual device, you will have to click and drag down the status bar to expand it which will give you detail as follows. This will be just 64 dp tall and called normal view.
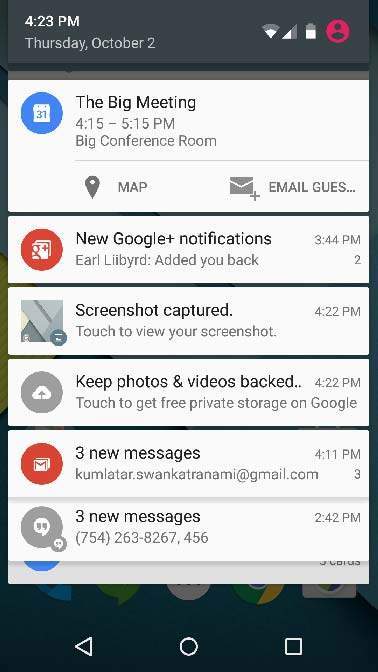
Above expanded form can have a Big View which will have additional detail about the notification. You can add upto six additional lines in the notification. The following screen shot shows such notification.
Create and Send Notifications
You have simple way to create a notification. Follow the following steps in your application to create a notification −
Step 1 — Create Notification Builder
As a first step is to create a notification builder using NotificationCompat.Builder.build(). You will use Notification Builder to set various Notification properties like its small and large icons, title, priority etc.
Step 2 — Setting Notification Properties
Once you have Builder object, you can set its Notification properties using Builder object as per your requirement. But this is mandatory to set at least following −
A small icon, set by setSmallIcon()
A title, set by setContentTitle()
Detail text, set by setContentText()
You have plenty of optional properties which you can set for your notification. To learn more about them, see the reference documentation for NotificationCompat.Builder.
Step 3 — Attach Actions
This is an optional part and required if you want to attach an action with the notification. An action allows users to go directly from the notification to an Activity in your application, where they can look at one or more events or do further work.
The action is defined by a PendingIntent containing an Intent that starts an Activity in your application. To associate the PendingIntent with a gesture, call the appropriate method of NotificationCompat.Builder. For example, if you want to start Activity when the user clicks the notification text in the notification drawer, you add the PendingIntent by calling setContentIntent().
A PendingIntent object helps you to perform an action on your applications behalf, often at a later time, without caring of whether or not your application is running.
We take help of stack builder object which will contain an artificial back stack for the started Activity. This ensures that navigating backward from the Activity leads out of your application to the Home screen.
Step 4 — Issue the notification
Finally, you pass the Notification object to the system by calling NotificationManager.notify() to send your notification. Make sure you call NotificationCompat.Builder.build() method on builder object before notifying it. This method combines all of the options that have been set and return a new Notification object.
The NotificationCompat.Builder Class
The NotificationCompat.Builder class allows easier control over all the flags, as well as help constructing the typical notification layouts. Following are few important and most frequently used methods available as a part of NotificationCompat.Builder class.
| Sr.No. | Constants & Description | |||||||||||||||
|---|---|---|---|---|---|---|---|---|---|---|---|---|---|---|---|---|
| 1 |
| Step | Description |
|---|---|
| 1 | You will use Android studio IDE to create an Android application and name it as tutorialspoint under a package com.example.notificationdemo. |
| 2 | Modify src/MainActivity.java file and add the code to notify(«»), if user click on the button,it will call android notification service. |
| 3 | Create a new Java file src/NotificationView.java, which will be used to display new layout as a part of new activity which will be started when user will click any of the notifications |
| 4 | Modify layout XML file res/layout/activity_main.xml to add Notification button in relative layout. |
| 5 | Create a new layout XML file res/layout/notification.xml. This will be used as layout file for new activity which will start when user will click any of the notifications. |
| 6 | No need to change default string constants. Android studio takes care of default string constants |
| 7 | Run the application to launch Android emulator and verify the result of the changes done in the application. |
Following is the content of the modified main activity file src/com.example.notificationdemo/MainActivity.java. This file can include each of the fundamental lifecycle methods.
Following will be the content of res/layout/notification.xml file −
Following is the content of the modified main activity file src/com.example.notificationdemo/NotificationView.java.
Following will be the content of res/layout/activity_main.xml file −
Following will be the content of res/values/strings.xml to define two new constants −
Following is the default content of AndroidManifest.xml −
Let’s try to run your tutorialspoint application. I assume you had created your AVD while doing environment set-up. To run the APP from Android Studio, open one of your project’s activity files and click Run  icon from the toolbar. Android Studio installs the app on your AVD and starts it and if everything is fine with your setup and application, it will display following Emulator window −
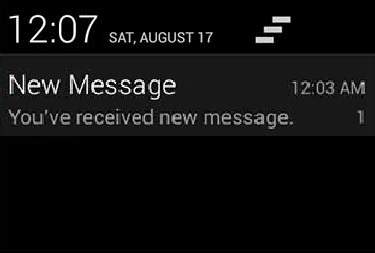
Now click button, you will see at the top a message «New Message Alert!» will display momentarily and after that you will have following screen having a small icon at the top left corner.
Now lets expand the view, long click on the small icon, after a second it will display date information and this is the time when you should drag status bar down without releasing mouse. You will see status bar will expand and you will get following screen −
Big View Notification
The following code snippet demonstrates how to alter the notification created in the previous snippet to use the Inbox big view style. I’m going to update displayNotification() modification method to show this functionality −
Now if you will try to run your application then you will find following result in expanded form of the view −
Источник
Полный список
— шлем уведомление из сервиса
14.11.2017
Урок устарел и был заменен серией новых уроков, первый из которых — Урок 184.
В принципе, уведомления – отдельная от сервисов тема. Но чаще всего уведомления используются именно в сервисах, поэтому я решил дать эту тему сейчас.
В андроид есть строка вверху экрана. Называется она статус-бар. Туда обычно в виде иконок сваливаются различные уведомления для пользователя (новые письма, смс и прочие). Пользователь открывает статус бар – видит там чуть более подробную инфу о событии. Дальше он может либо стереть это уведомление, либо нажать на него и перейти непосредственно к событию.
В этом уроке научимся все это проделывать. Для начала разберем уведомление на логические составляющие, чтобы проще было понять как его создавать и отправлять.
Первая часть – то, что видно в статус-баре, когда уведомление только приходит – иконка и текст. Текст потом исчезает и остается только иконка.
Вторая часть – то, что мы видим, когда открываем статус бар (тянем вниз). Там уже полноценный View с иконкой и двумя текстами, т.е. более подробная информация о событии.
Третья часть – то, что произойдет, если мы нажмем на View из второй части. Тут обычно идет вызов Activity, где мы можем просмотреть полную информацию и обработать событие.
Кроме этого есть еще несколько возможностей, по которым совсем кратко пробежимся в конце урока.
Создадим приложение и сервис. Сервис, как будто загружает файл и посылает уведомление, по нажатию на которое будет открываться приложение и отображать имя файла.
Project name: P0991_ServiceNotification
Build Target: Android 2.3.3
Application name: ServiceNotification
Package name: ru.startandroid.develop.p0991servicenotification
Create Activity: MainActivity
Добавим в strings.xml строки:
Кнопки для старт/стопа сервиса и TextView для отображения результата
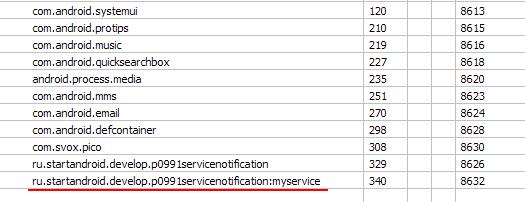
Создаем сервис MyService.java и прописываем его в манифесте. В манифесте же настроим сервис так, чтобы он работал в отдельном процессе. Для этого надо в его атрибуте process написать двоеточие и какое-нить слово.
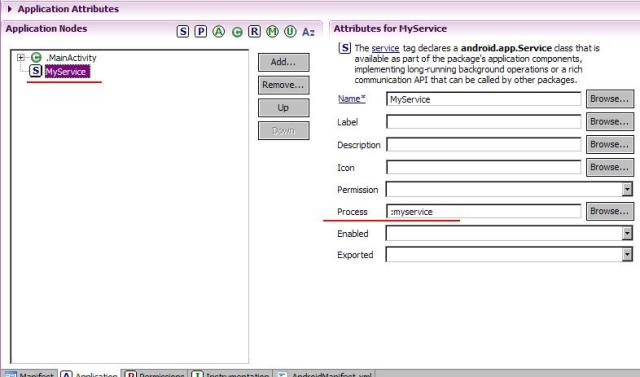
Система эту строку добавит к package сервиса и, тем самым, получит название нового процесса, в котором и запустит сервис
В onCreate мы вытаскиваем из intent и кладем в TextView текст. Этот текст мы будем отправлять из сервиса через уведомление.
onClickStart и onClickStop – это обработчики кнопок. Стартуют и останавливают сервис.
В onCreate получаем менеджер уведомлений – NotificationManager. Он нам понадобится, чтобы отправить уведомление.
В onStartCommand запускаем паузу на 5 секунд (эмулируем закачку файла) и после этого отправляем уведомление. Именно из-за этой паузы мы и используем другой процесс, чтобы не тормозило основное приложение.
В sendNotif мы создаем и отправляем уведомление. Правда, немного в иной последовательности, что я описывал выше. Сначала первая часть, потом третья, потом вторая.
Первая часть – создаем Notification. В конструкторе указываем иконку и текст, которые будут видны в статус-баре. Также мы здесь указываем время. Обычно это текущее время. Но можно указать и прошлое и будущее. По этому времени уведомления будут отсортированы в статус-баре и в его раскрытой части.
Третья часть – создаем Intent, который мы бы использовали для вызова нашего Activity. Туда помещаем имя загруженного файла. Activity его достанет и поместит в TextView. Далее мы оборачиваем этот Intent в PendingIntent, с помощью метода getActivity. На вход ему передаем контекст и Intent. Второй параметр не используется (так написано в хелпе). А четвертый – это флаги, влияющие на поведение PendingIntent. Они не относятся к теме урока, мы их не используем.
Теперь этот созданный PendingIntent содержит информацию о том, что надо вызывать Activity, а также объект Intent, который для этой цели надо использовать. Это будет использовано при нажатии на уведомлении.
Вторая часть – вызываем метод setLatestEventInfo. Передаем на вход контекст, текст-заголовок, подробный текст и PendingIntent. Теперь, когда мы откроем статус-бар, мы увидим два этих текста (заголовок и подробный). А, когда нажмем на уведомление, система использует PendingIntent для запуска Activity.
Далее мы для созданного уведомления ставим флаг FLAG_AUTO_CANCEL, чтобы оно исчезло из статус-бара после нажатия. По умолчанию оно не исчезает и продолжает висеть.
Далее вызываем метод notify для менеджера уведомлений и передаем туда ID и созданное уведомление. ID используется, если мы хотим изменить или удалить уведомление.
Все сохраним, запустим.

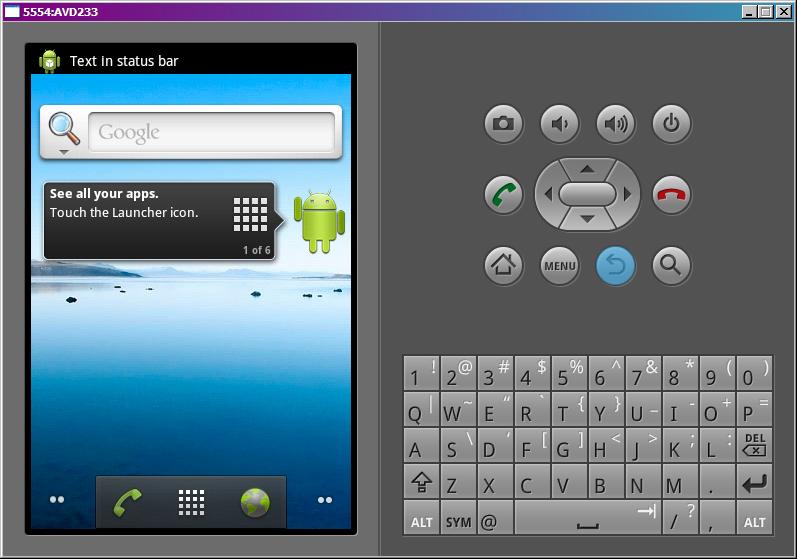
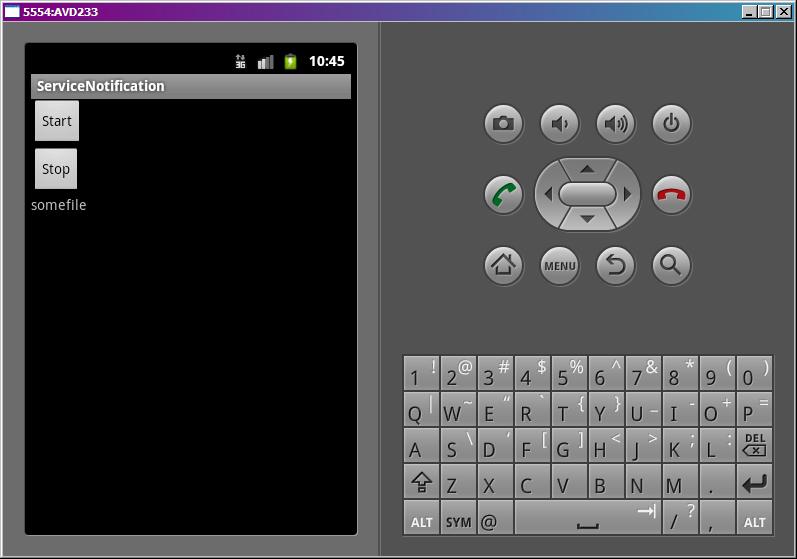
Жмем Start и сразу закрываем приложение кнопкой Назад.
Проходит 5 сек и появляется уведомление (первая часть)
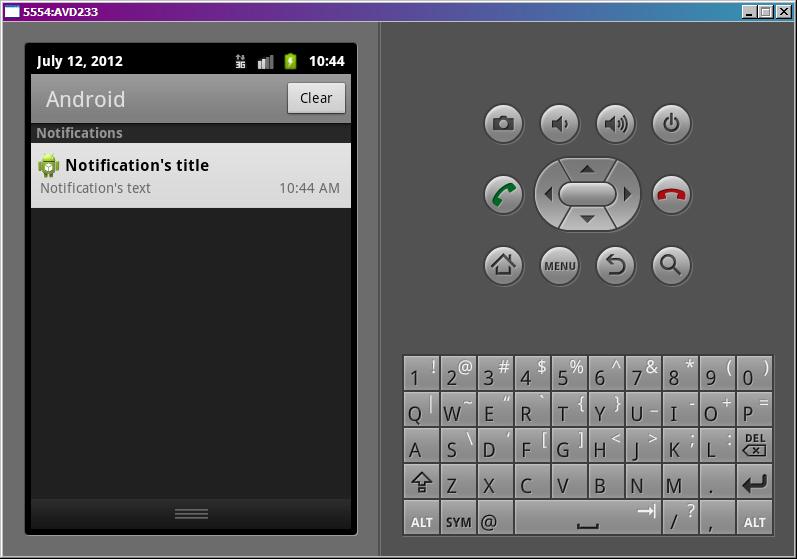
Открываем статус-бар и видим более подробную инфу (вторая часть)
Жмем на уведомление.
Открывается наше приложение (третья часть) и в TextView появляется текст, переданный из сервиса.
Теперь вкратце пробежимся по остальным интересным возможностям уведомлений.
Обновление старого или новое уведомление
Если вы создадите новое уведомление и отправите его (notify) с тем же ID, что и у уже существующего уведомления, то новое заменит старое. Таким образом, вы можете уведомления обновлять.
Если же надо показать новое уведомление, то используйте другой ID.
Удаление
Чтобы убрать уведомление из статус-бара, используется метод cancel у менеджера уведомлений. На вход подается ID. Либо используйте метод cancelAll, чтобы удалить все уведомления.
Если хотите, чтобы уведомление появилось со стандартным звуком, добавьте флаг Notification.DEFAULT_SOUND в поле уведомления defaults.
А для использования своих звуков используется поле sound.
Чтобы проиграть файл с SD:
Чтобы использовать какую-либо из стандартных мелодий, используем Content Provider:
notif.sound = Uri.withAppendedPath(Audio.Media.INTERNAL_CONTENT_URI, «6»);
Вибра
Если хотите, чтобы уведомление появилось со стандартной виброй, добавьте флаг Notification.DEFAULT_VIBRATE в поле уведомления defaults.
А для использования своей комбинации вибры используется поле vibrate. В это поле помещается массив long-чисел. Первое – длительность паузы (в миллисекундах) перед началом вибрирования, второе – длительность вибрирования, третье – длительность паузы, четвертое – длительность вибрирования … и т.д. Т.е. создаете свою комбинацию пауз и вибрирования. И мобила при получении уведомления вам ее провибрирует.
Для работы вибры необходимо прописать права VIBRATE в манифесте.
Индикатор
Если хотите, чтобы уведомление появилось с миганием индикатора, добавьте флаг Notification.DEFAULT_LIGHTS в поле уведомления defaults.
А для использования своей комбинации мигания индикатора используются поля
ledARGB – здесь задается цвет
ledOffMS – время «не горения»
В итоге индикатор будет мигать с заданными значениями и с заданным цветом. В хелпе написано, что не все девайсы поддерживают разные цвета. Поэтому выбранный вами цвет не гарантируется.
Число
У Notification есть поле number. Вы можете поместить туда число больше нуля и оно отобразится на уведомлении.
Например, при notif.number = 3 уведомление будет выглядеть так:

Флаги
Добавляются в поле flags
FLAG_INSISTENT – звук уведомления будет повторяться, пока не откроют статус-бар
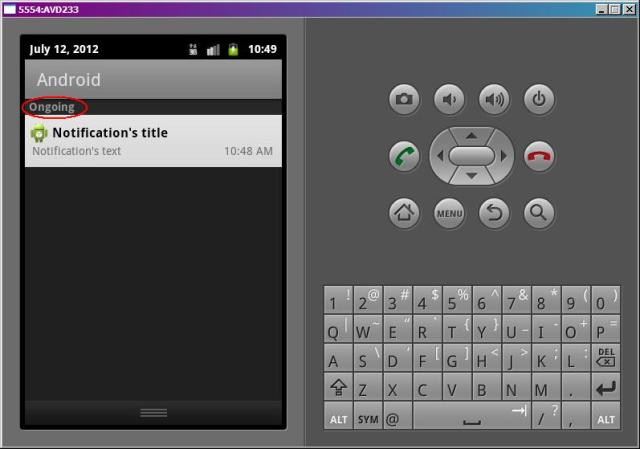
FLAG_ONGOING_EVENT – уведомление появляется не в обычной секции, а в ongoing (постоянные). Уведомления из этой секции не удаляются при нажатии кнопки очистки уведомлений.
FLAG_NO_CLEAR – уведомление не удалится при очистке всех уведомлений
Не очень понимаю, в чем разница между ongoing и тем, что уведомление не удалится после нажатия на кнопку очистки всех уведомлений. Но флаги такие есть, и я о них упомянул.
На следующем уроке:
— изучаем IntentService
— включаем режим Foreground для сервиса
— помещаем сервис в автозагрузку
Присоединяйтесь к нам в Telegram:
— в канале StartAndroid публикуются ссылки на новые статьи с сайта startandroid.ru и интересные материалы с хабра, medium.com и т.п.
— в чатах решаем возникающие вопросы и проблемы по различным темам: Android, Kotlin, RxJava, Dagger, Тестирование
— ну и если просто хочется поговорить с коллегами по разработке, то есть чат Флудильня
— новый чат Performance для обсуждения проблем производительности и для ваших пожеланий по содержанию курса по этой теме
Источник


