- 4 ways to send links from computer browser to Android phone
- Ways to send links/URL from computer browser to Android phone
- Pushbullet
- Handover
- AirDroid
- QR Code Reader
- Android HttpURLConnection Example
- 1. HttpURLConnection use steps.
- 2. HttpURLConnection Examples.
- 2.1 Main Activity.
- 2.2 Main Layout Xml File.
- 2.3 Android Manifest Xml File.
- Add Android App Links
- Add intent filters
- Handle incoming links
- Kotlin
- Kotlin
- Associate your app with your website
- Test your App Links
- Sharing Content with Intents
4 ways to send links from computer browser to Android phone
Often when we are working back and forth between computer and Android phone, we want to transfer links vice versa. Copying them from one and pasting them to another can be time consuming. Also, if the links are long and ugly then you may just want to give up. But, wait! there are ways to make it easier.
There are several apps which helps you to send links/URL from computer browser to Android phone. These apps have generally Chrome extensions or web apps, which makes it easier for you to easily push any URL to Android phone over the same network.
Most of these apps do multiple functions. However, sole purpose of this article is to show you different ways to send links between computer and Android phone. Lets have a look.

Ways to send links/URL from computer browser to Android phone
Pushbullet
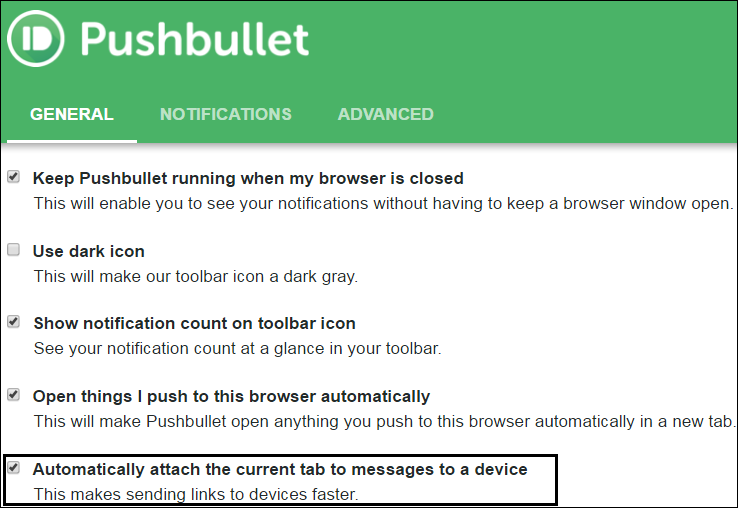
Pushbullet is probably the most famous and convenient way to perform any cross-device transfers. Install Pushbullet in Android and also in Chrome browser. Create an account and add devices. Every time you want to send your current URL to Android phone, you can do so by clicking its chrome extension. You can send any text or links to the devices you have added.
You can also do the vice versa i.e. sending links from mobile browser to your computer. It is also useful for other file transfers between computer and Android over the same Wi-Fi network. It is the most easiest and fastest way out there.
Handover
Handover is developed by a XDA member called hamzahrmalik. You will need to download this small app which will require Java 8 or later on your PC. Next, you will need its Android app. Open its desktop app and set up connection with Android app by scanning QR code. You will have to enable debug once to setup connection successfully.
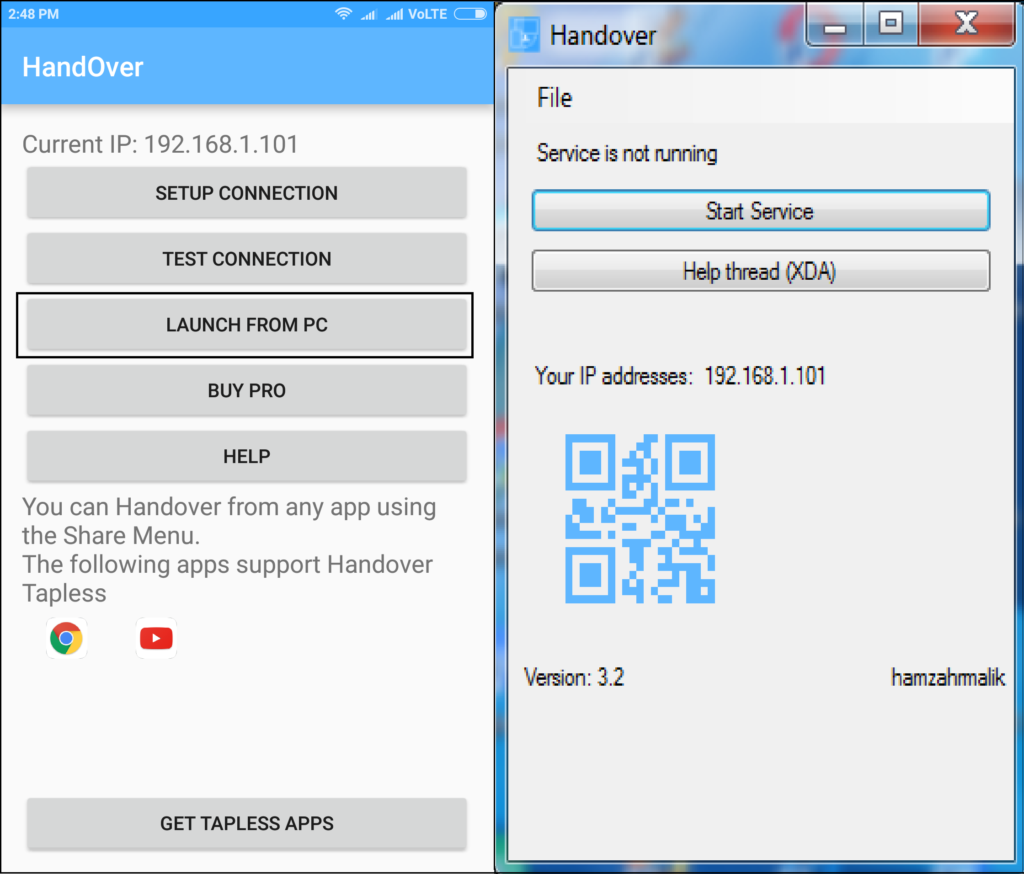
Once done, you can seamlessly receive any of your current URL on phone using “launch from pc” option. The app is basically built around to share stuff from phone to PC. However, the other way around works perfectly fine. It also supports apps like YouTube.
AirDroid
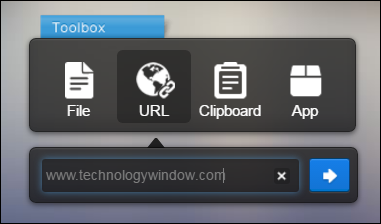
AirDroid is another popular app with which you can manage your Android phone on PC. There are multiple useful features of AirDroid. However, one of its such feature is “URL”. Once you establish connection between its web app and Android app, you can use this feature to push any URL from computer to Android phone browser. Its a small yet very useful if you frequently perform cross device actions using AirDroid.
QR Code Reader
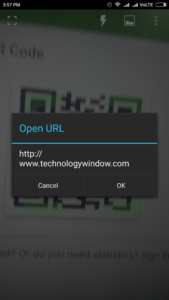
This is the most simplest yet often ignored way to open exact same URL as on your PC. Simply download an app QR Code Reader or any similar app on your Android phone. Go to free QR code generator website (plenty of them). Paste your URL there and generate a static QR code. Now you can simply scan the QR code to open the same link on your Android phone. You can do this on different networks too. So its not necessary that your phone should be connected to the same Wi-Fi network.
There are multiple ways to send links to Android phone. However, these are some of the effortless ways where in you can directly push URL without the need to copy-paste or rewrite.
We often want to send links from computer browser to Android phone in order to download files. We do this because we want to avoid that extra step of transferring downloaded files. In such cases, sending links through any of the above methods is quick and less time consuming.
Источник
Android HttpURLConnection Example
This article will tell you how to use java.net.HttpURLConnection class to send http request and get http server response in android application.
1. HttpURLConnection use steps.
- Create a URL instance.
- Open url connection and cast it to HttpURLConnection.
- Set request method. The request method can be GET, POST, DELETE etc. Request method must be uppercase, otherwise below exception will be thrown. java.net.ProtocolException: Expected one of [OPTIONS, GET, HEAD, POST, PUT, DELETE, TRACE, PATCH] but was get
- If request method is GET, then use below code to open input stream and read server response data.
- For POST request method, use below code to open output stream to the server url and write post data to it. After post, open the input stream again to get server response.
- After use HttpURLConnection, do not forget close related reader or writer and call HttpURLConnection’s disconnect() method to close the connection to release network resources.
2. HttpURLConnection Examples.
If you can not watch the above video, you can see it on the youtube URL https://youtu.be/cCvEVf-OUU4
In this example, read server response process is occurred in a child thread. The child thread send a message to activity main thread’s Handler object to update the response data in TextView.
This is because child thread can not update UI controls in activity directly, otherwise an error will happen.
2.1 Main Activity.
2.2 Main Layout Xml File.
2.3 Android Manifest Xml File.
Because this example will connect network resources, so you need to declare below permission in android manifest xml file.
Источник
Add Android App Links
Android App Links are HTTP URLs that bring users directly to specific content in your Android app. Android App Links can drive more traffic to your app, help you discover which app content is used most, and make it easier for users to share and find content in an installed app.
To add support for Android App Links:
- Create intent filters in your manifest.
- Add code to your app’s activities to handle incoming links.
- Associate your app and your website with Digital Asset Links.
The App Links Assistant in Android Studio 2.3 and higher simplifies the process in a step-by-step wizard, as described below.
For more information about how app links work and the benefits they offer, read Handling Android App Links.
Add intent filters
The App Links Assistant in Android Studio can help you create intent filters in your manifest and map existing URLs from your website to activities in your app. The App Links Assistant also adds template Java code in each corresponding activity to handle the intent.
To add intent filters and URL handling, follow these steps:
- Select Tools > App Links Assistant.
- Click Open URL Mapping Editor and then click Add at the bottom of the URL Mapping list to add a new URL mapping.
- Add details for the new URL mapping:

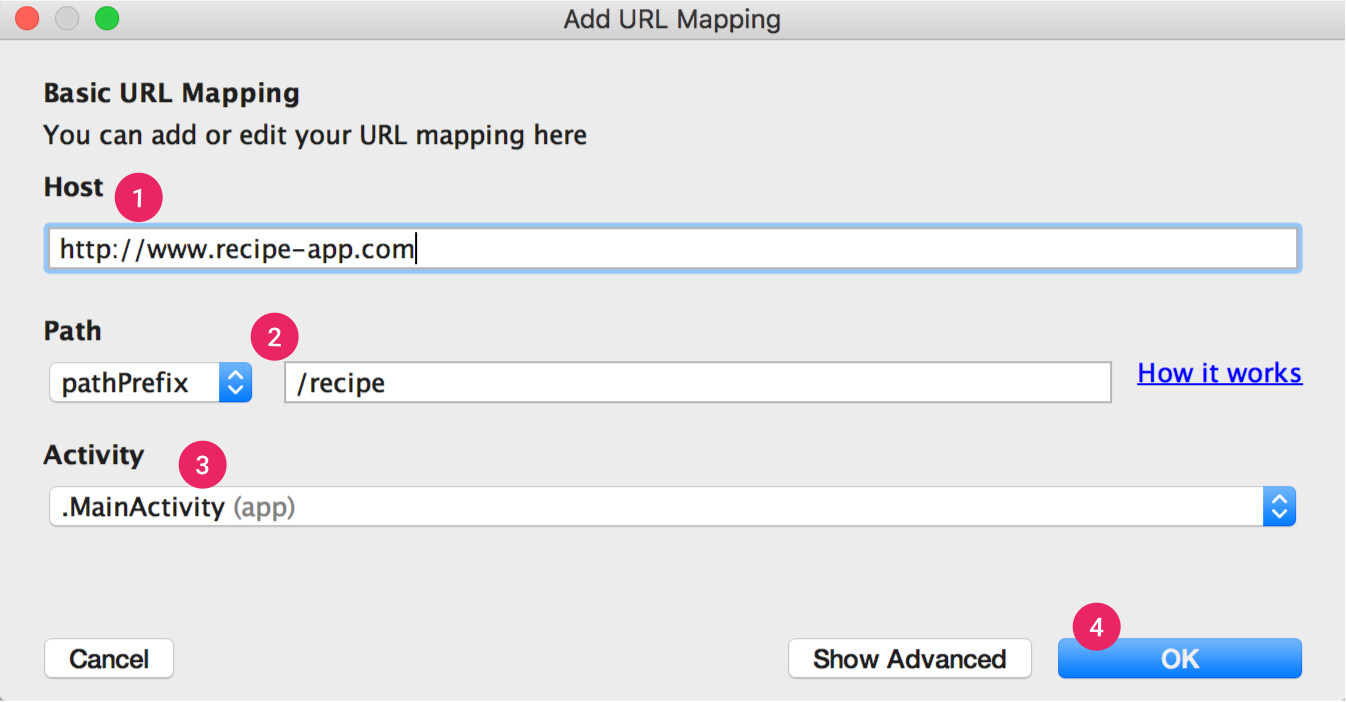
Figure 1. Add basic details about your site’s link structure to map URLs to activities in your app.
- Enter your website’s URL in the Host field.
- Add a path, pathPrefix, or pathPattern for the URLs you want to map. For example, if you have a recipe-sharing app, with all the recipes available in the same activity, and your corresponding website’s recipes are all in the same /recipe directory, use pathPrefix and enter /recipe. This way, the URL http://www.recipe-app.com/recipe/grilled-potato-salad maps to the activity you select in the following step.
- Select the Activity the URLs should take users to.
- Click OK.
Note: To support more links without updating your app, you should define a URL mapping that supports URLs that you’ll add in the future. Also, remember to include a URL for your app home screen so it’s included in search results.
Handle incoming links
Once you’ve verified that your URL mapping is working correctly, add logic to handle the intent you created.
- Click Select Activity from the App Links Assistant.
- Select an activity from the list and click Insert Code.
The App Links Assistant adds code to your activity’s Java file, similar to the following ( Please note: Currently the App Links Assistant does not support Kotlin so you will need to add this code manually):
Kotlin
However, this code isn’t complete on its own. You must now take an action based on the URI in appLinkData , such as display the corresponding content. For example, for the recipe-sharing app, your code might look like the following sample:
Kotlin
Associate your app with your website
After setting up URL support for your app, the App Links Assistant generates a Digital Asset Links file you can use to associate your website with your app.
As an alternative to using the Digital Asset Links file, you can associate your site and app in Search Console.
To associate your app and your website using the App Links Assistant, click Open Digital Asset Links File Generator from the App Links Assistant and follow these steps:
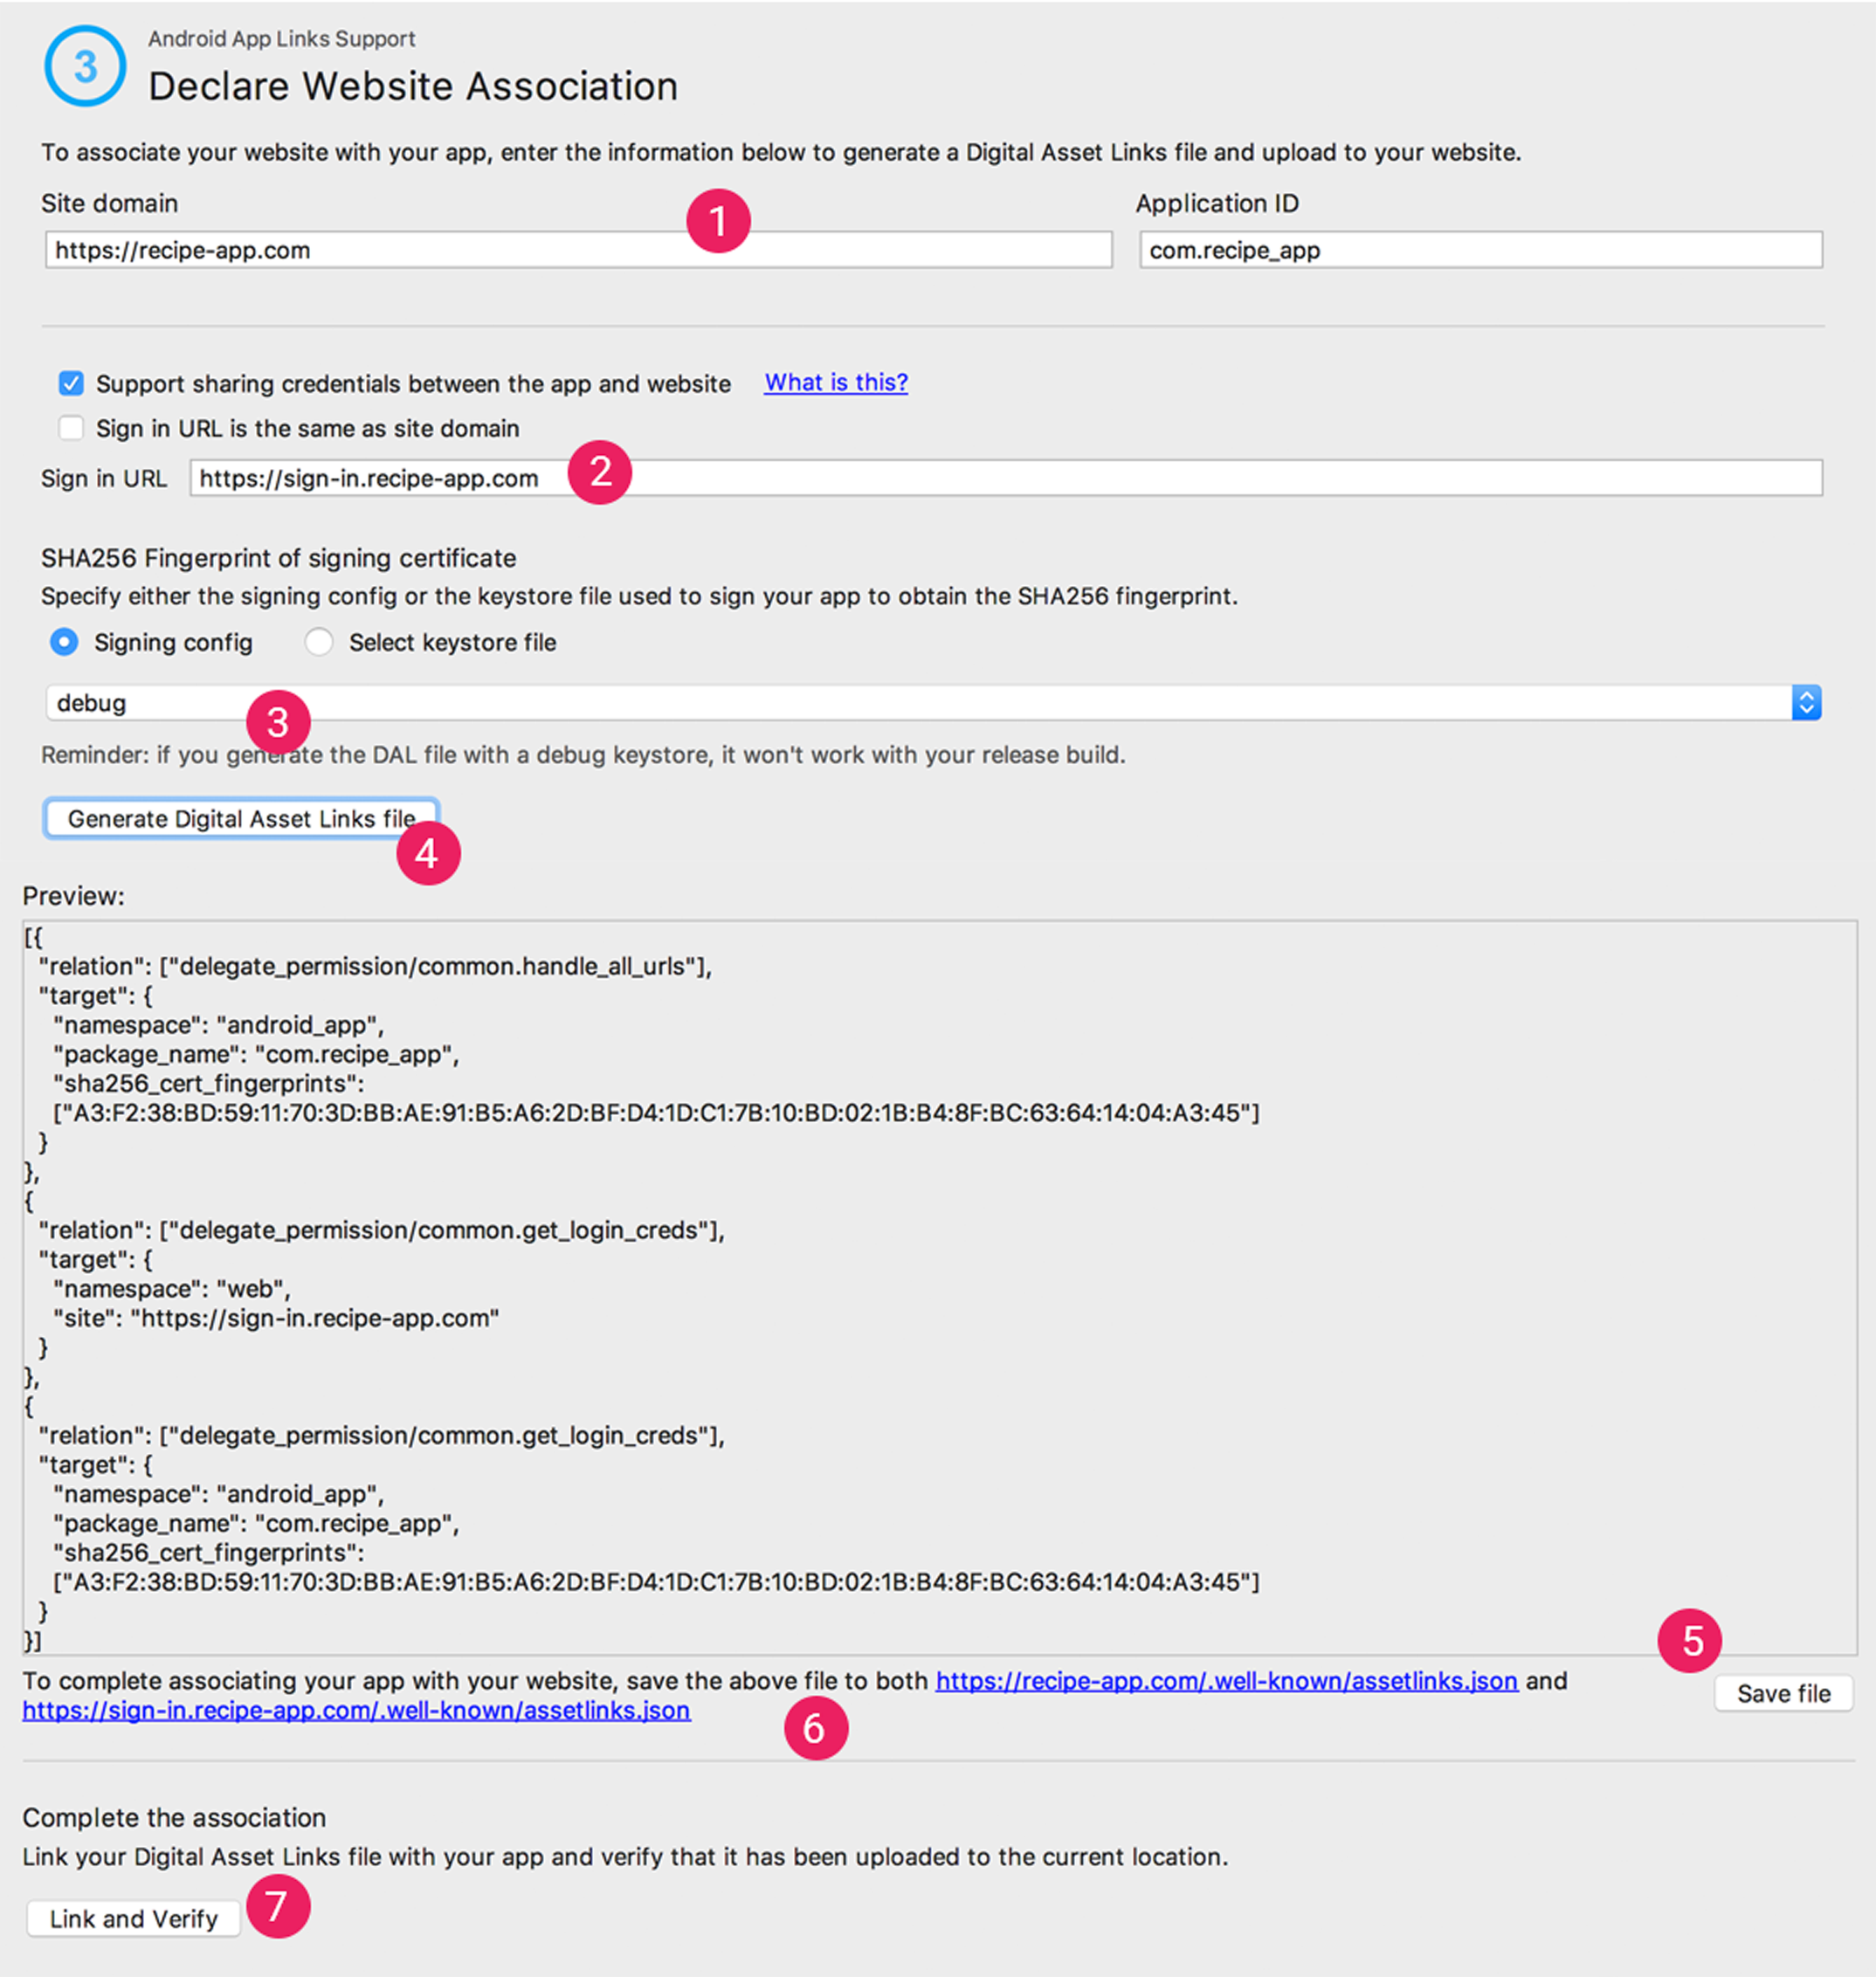
Figure 2. Enter details about your site and app to generate a Digital Asset Links file.
- Enter your Site domain and your Application ID.
- To include support in your Digital Asset Links file for Smart Lock for Passwords, select Support sharing credentials between the app and the website and enter your site’s login URL. This adds the following string to your Digital Asset Links file declaring that your app and website share sign-in credentials: delegate_permission/common.get_login_creds . Learn more about supporting Smart Lock for Passwords in your app.
- Specify the signing config or select a keystore file. Make sure you select the right config or keystore file for either the release build or debug build of your app. If you want to set up your production build, use the release config. If you want to test your build, use the debug config.
- Click Generate Digital Asset Links file.
- Once Android Studio generates the file, click Save file to download it.
- Upload the assetlinks.json file to your site, with read-access for everyone, at https:// /.well-known/assetlinks.json .
Important: The system verifies the Digital Asset Links file via the encrypted HTTPS protocol. Make sure that the assetlinks.json file is accessible over an HTTPS connection, regardless of whether your app’s intent filter includes https .
Learn more about associating your website with your app through the Digital Asset Links file in Declare Website Associations.
Test your App Links
To verify that your links open the correct activity, follow these steps:
- Click Test App Links in the App Links Assistant.
- Enter the URL you want to test in the URL field, for example, http://recipe-app.com/recipe/grilled-potato-salad.

Figure 3. The App Links Assistant displays a success message and opens your app to the specified content when the URL you’re testing successfully maps to an activity in your app.
To test Android App Links through the App Links Assistant, you must have a device connected or a virtual device available running Android 6.0 (API level 23) or higher. For more information, see how to connect a device or create an AVD.
Content and code samples on this page are subject to the licenses described in the Content License. Java is a registered trademark of Oracle and/or its affiliates.
Источник
Sharing Content with Intents
Intents allow us to communicate data between Android apps and implicit intents can also accept actions. One of those actions is the ACTION_SEND command which indicates we want to send data across apps. To send data, all you need to do is specify the data and its type, and the system will identify compatible receiving activities and display them to the user.
Sending and receiving data between applications with intents is most commonly used for social sharing of content. Intents allow users to share information quickly and easily, using their favorite applications.
You can send content by invoking an implicit intent with ACTION_SEND .
To send images or binary data:
Sending URL links should simply use text/plain type:
In certain cases, we might want to send an image along with text. This can be done with:
Sharing multiple images can be done with:
See this stackoverflow post for more details.
Note: Facebook does not properly recognize multiple shared elements. See this facebook specific bug for more details and share using their SDK.
Facebook doesn’t work well with normal sharing intents when sharing multiple content elements as discussed in this bug. To share posts with facebook, we need to:
- Create a new Facebook app here (follow the instructions)
- Add the Facebook SDK to your Android project
- Share using this code snippet:
You may want to send an image that were loaded from a remote URL. Assuming you are using a third party library like Glide, here is how you might share an image that came from the network and was loaded into an ImageView. There are two ways to accomplish this. The first way, shown below, takes the bitmap from the view and loads it into a file.
and then later assuming after the image has completed loading, this is how you can trigger a share:
Make sure to setup the «SD Card» within the emulator device settings:

Note that if you are using API 24 or above, see the section below on using a FileProvider to work around new file restrictions.
If you are targeting Android API 24 or higher, private File URI resources (file:///) cannot be shared. You must instead wrap the File object as a content provider (content://) using the FileProvider class.
First, you must declare this FileProvider in your AndroidManifest.xml file within the tag:
Next, create a resource directory called xml and create a fileprovider.xml . Assuming you wish to grant access to the application’s specific external storage directory, which requires requesting no additional permissions, you can declare this line as follows:
Finally, you will convert the File object into a content provider using the FileProvider class:
If you see a INSTALL_FAILED_CONFLICTING_PROVIDER error when attempting to run the app, change the string com.codepath.fileprovider in your Java and XML files to something more unique, such as com.codepath.fileprovider.YOUR_APP_NAME_HERE .
Note that there are other XML tags you can use in the fileprovider.xml , which map to the File directory specified. In the example above, we use Context.getExternalFilesDir(Environment.DIRECTORY_PICTURES) , which corresponded to the XML tag in the declaration with the Pictures path explicitly specified. Here are all the options you can use too:
| XML tag | Corresponding storage call | When to use |
|---|---|---|
| Context.getFilesDir() | data can only be viewed by app, deleted when uninstalled ( /data/data/[packagename]/files ) | |
| Context.getExternalFilesDir() | data can be read/write by the app, any apps granted with READ_STORAGE permission can read too, deleted when uninstalled ( /Android/data/[packagename]/files ) | |
| Context.getCacheDir() | temporary file storage | |
| Environment.getExternalStoragePublicDirectory() | data can be read/write by the app, any apps can view, files not deleted when uninstalled | |
| Context.getExternalCacheDir() | temporary file storage with usually larger space |
If you are using API 23 or above, then you’ll need to request runtime permissions for Manifest.permission.READ_EXTERNAL_STORAGE and Manifest.permission.WRITE_EXTERNAL_STORAGE in order to share the image as shown above since newer versions require explicit permisions at runtime for accessing external storage.
Note: There is a common bug on emulators that will cause MediaStore.Images.Media.insertImage to fail with E/MediaStore﹕ Failed to insert image unless the media directory is first initialized as described in the link.

This is how you can easily use an ActionBar share icon to activate a ShareIntent. The below focuses on the support ShareActionProvider for use with AppCompatActivity .
Note: This is an alternative to using a sharing intent as described in the previous section. You either can use a sharing intent or the provider as described below.
First, we need to add an ActionBar menu item in res/menu/ in the XML specifying the ShareActionProvider class.
Next, get access to share provider menu item in the Activity so we can attach the share intent later:
Note: ShareActionProvider does not respond to onOptionsItemSelected() events, so you set the share action provider as soon as it is possible.
Now, once you’ve setup the ShareActionProvider menu item, construct and attach the share intent for the provider but only after image has been loaded as shown below using the RequestListener for Glide .
Note: Be sure to call attachShareIntentAction method both inside onCreateOptionsMenu AND inside the onResourceReady for Glide to ensure that the share attaches properly.
We can use a similar approach if we wish to create a share action for the current URL that is being loaded in a WebView:
Check out the official guide for easy sharing for more information.
Источник


