- Android — Sending SMS
- Example
- Using Built-in Intent to send SMS
- Intent Object — Action to send SMS
- Intent Object — Data/Type to send SMS
- Intent Object — Extra to send SMS
- Example
- 2.2: Part 2 — Sending and Receiving SMS Messages
- Task 3. Receive SMS messages with a broadcast receiver
- 3.1 Add permission and create a broadcast receiver
- 3.2 Register the broadcast receiver
- 3.3 Implement the onReceive() method
- 3.4 Run the app and send a message
- Solution Code
- Coding challenge
- Отправка E-Mail средствами Android
- Часть 1. Mail, просто Mail
- Часть 2. Mail, анонимус Mail
Android — Sending SMS
In Android, you can use SmsManager API or devices Built-in SMS application to send SMS’s. In this tutorial, we shows you two basic examples to send SMS message −
Built-in SMS application
Of course, both need SEND_SMS permission.
Apart from the above method, there are few other important functions available in SmsManager class. These methods are listed below −
| Sr.No. | Method & Description | |||||||||||||||||||||||||||
|---|---|---|---|---|---|---|---|---|---|---|---|---|---|---|---|---|---|---|---|---|---|---|---|---|---|---|---|---|
| 1 |
| Step | Description |
|---|---|
| 1 | You will use Android Studio IDE to create an Android application and name it as tutorialspoint under a package com.example.tutorialspoint. |
| 2 | Modify src/MainActivity.java file and add required code to take care of sending sms. |
| 3 | Modify layout XML file res/layout/activity_main.xml add any GUI component if required. I’m adding a simple GUI to take mobile number and SMS text to be sent and a simple button to send SMS. |
| 4 | No need to define default string constants at res/values/strings.xml. Android studio takes care of default constants. |
| 5 | Modify AndroidManifest.xml as shown below |
| 6 | Run the application to launch Android emulator and verify the result of the changes done in the application. |
Following is the content of the modified main activity file src/com.example.tutorialspoint/MainActivity.java.
Following will be the content of res/layout/activity_main.xml file −
Here abc indicates about tutorialspoint logo
Following will be the content of res/values/strings.xml to define two new constants −
Following is the default content of AndroidManifest.xml −
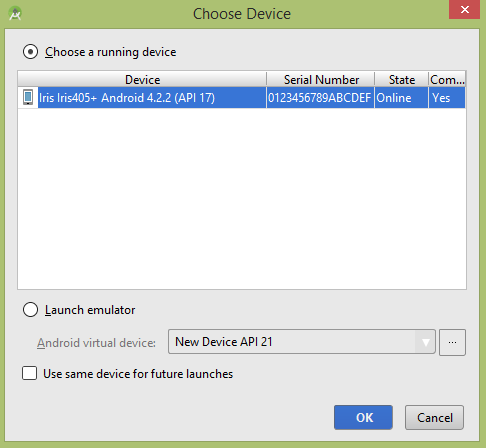
Let’s try to run your tutorialspoint application. I assume you have connected your actual Android Mobile device with your computer. To run the app from Android studio, open one of your project’s activity files and click Run  icon from the toolbar. Before starting your application, Android studio installer will display following window to select an option where you want to run your Android application.

Now you can enter a desired mobile number and a text message to be sent on that number. Finally click on Send SMS button to send your SMS. Make sure your GSM/CDMA connection is working fine to deliver your SMS to its recipient.
You can take a number of SMS separated by comma and then inside your program you will have to parse them into an array string and finally you can use a loop to send message to all the given numbers. That’s how you can write your own SMS client. Next section will show you how to use existing SMS client to send SMS.
Using Built-in Intent to send SMS
You can use Android Intent to send SMS by calling built-in SMS functionality of the Android. Following section explains different parts of our Intent object required to send an SMS.
Intent Object — Action to send SMS
You will use ACTION_VIEW action to launch an SMS client installed on your Android device. Following is simple syntax to create an intent with ACTION_VIEW action.
Intent Object — Data/Type to send SMS
To send an SMS you need to specify smsto: as URI using setData() method and data type will be to vnd.android-dir/mms-sms using setType() method as follows −
Intent Object — Extra to send SMS
Android has built-in support to add phone number and text message to send an SMS as follows −
Here address and sms_body are case sensitive and should be specified in small characters only. You can specify more than one number in single string but separated by semi-colon (;).
Example
Following example shows you in practical how to use Intent object to launch SMS client to send an SMS to the given recipients.
To experiment with this example, you will need actual Mobile device equipped with latest Android OS, otherwise you will have to struggle with emulator which may not work.
| Step | Description |
|---|---|
| 1 | You will use Android studio IDE to create an Android application and name it as tutorialspoint under a package com.example.tutorialspoint. |
| 2 | Modify src/MainActivity.java file and add required code to take care of sending SMS. |
| 3 | Modify layout XML file res/layout/activity_main.xml add any GUI component if required. I’m adding a simple button to launch SMS Client. |
| 4 | No need to define default constants.Android studio takes care of default constants. |
| 5 | Modify AndroidManifest.xml as shown below |
| 6 | Run the application to launch Android emulator and verify the result of the changes done in the application. |
Following is the content of the modified main activity file src/com.example.tutorialspoint/MainActivity.java.
Following will be the content of res/layout/activity_main.xml file −
Here abc indicates about tutorialspoint logo
Following will be the content of res/values/strings.xml to define two new constants −
Following is the default content of AndroidManifest.xml −
Let’s try to run your tutorialspoint application. I assume you have connected your actual Android Mobile device with your computer. To run the app from Android studio, open one of your project’s activity files and click Run icon from the toolbar. Before starting your application, Android studio will display following window to select an option where you want to run your Android application.
Select your mobile device as an option and then check your mobile device which will display following screen −
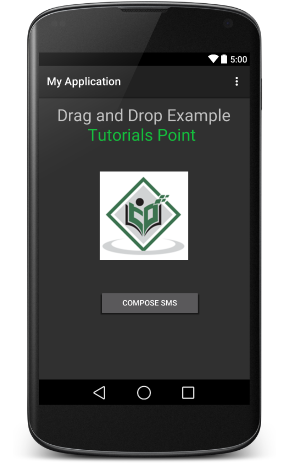
Now use Compose SMS button to launch Android built-in SMS clients which is shown below −
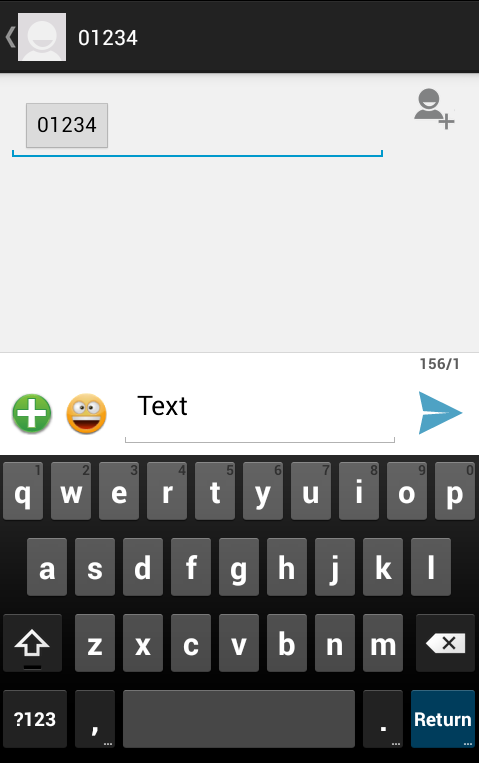
You can modify either of the given default fields and finally use send SMS button to send your SMS to the mentioned recipient.
Источник
2.2: Part 2 — Sending and Receiving SMS Messages
Contents:
Task 3. Receive SMS messages with a broadcast receiver
To receive SMS messages, use the onReceive() method of the BroadcastReceiver class. The Android framework sends out system broadcasts of events such as receiving an SMS message, containing intents that are meant to be received using a BroadcastReceiver. You need to add the RECEIVE_SMS permission to your app’s AndroidManifest.xml file.
3.1 Add permission and create a broadcast receiver
To add RECEIVE_SMS permission and create a broadcast receiver, follow these steps:
Open the AndroidManifest.xml file and add the android.permission.RECEIVE_SMS permission below the other permission for SMS use:
Receiving an SMS message is permission-protected. Your app can’t receive SMS messages without the RECEIVE_SMS permission line in AndroidManifest.xml.
Name the class «MySmsReceiver» and make sure «Exported» and «Enabled» are checked.
The «Exported» option allows your app to respond to outside broadcasts, while «Enabled» allows it to be instantiated by the system.
3.2 Register the broadcast receiver
In order to receive any broadcasts, you must register for specific broadcast intents. In the Intent documentation, under «Standard Broadcast Actions», you can find some of the common broadcast intents sent by the system. In this app, you use the android.provider.Telephony.SMS_RECEIVED intent.
Add the following inside the tags to register your receiver:
3.3 Implement the onReceive() method
Once the BroadcastReceiver intercepts a broadcast for which it is registered ( SMS_RECEIVED ), the intent is delivered to the receiver’s onReceive() method, along with the context in which the receiver is running.
- Open MySmsReceiver and add under the class declaration a string constant TAG for log messages and a string constant pdu_type for identifying PDUs in a bundle:
- Delete the default implementation inside the supplied onReceive() method.
In the blank onReceive() method:
Add the @TargetAPI annotation for the method, because it performs a different action depending on the build version.
Retrieve a map of extended data from the intent to a bundle .
Define the msgs array and strMessage string.
Get the format for the message from the bundle .
As you enter SmsMessage[] , Android Studio automatically imports android.telephony.SmsMessage .
Initialize the msgs array, and use its length in the for loop:
Use createFromPdu(byte[] pdu, String format) to fill the msgs array for Android version 6.0 (Marshmallow) and newer versions. For earlier versions of Android, use the deprecated signature createFromPdu(byte[] pdu).
Build the strMessage to show in a toast message:
Get the originating address using the getOriginatingAddress() method.
Get the message body using the getMessageBody() method.
Add an ending character for an end-of-line.
The complete onReceive() method is shown below:
3.4 Run the app and send a message
Run the app on a device. If possible, have someone send you an SMS message from a different device.
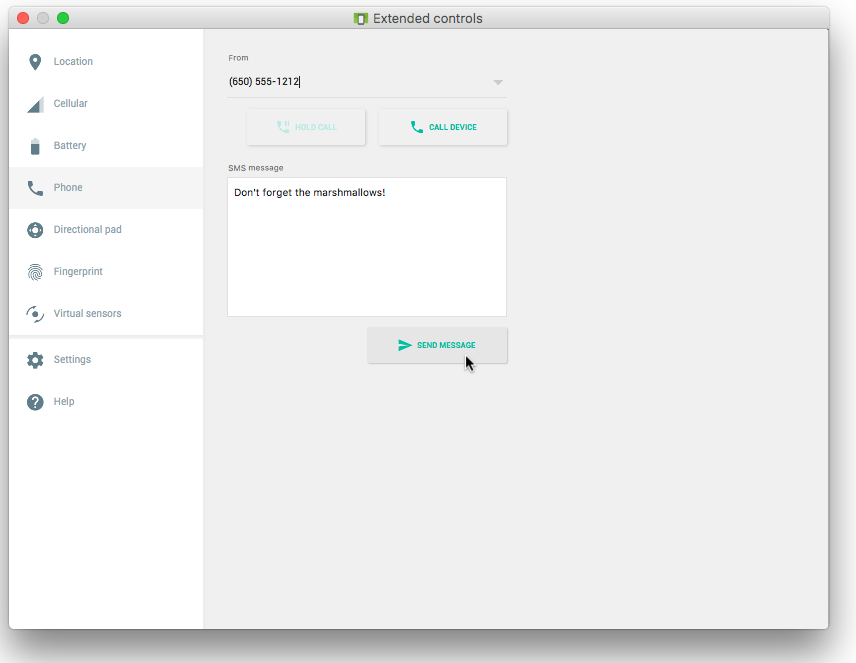
You can also receive an SMS text message when testing on an emulator. Follow these steps:
- Run the app on an emulator.
Click the … (More) icon at the bottom of the emulator’s toolbar on the right side, as shown in the figure below:

Solution Code
Android Studio project: SmsMessaging
Coding challenge
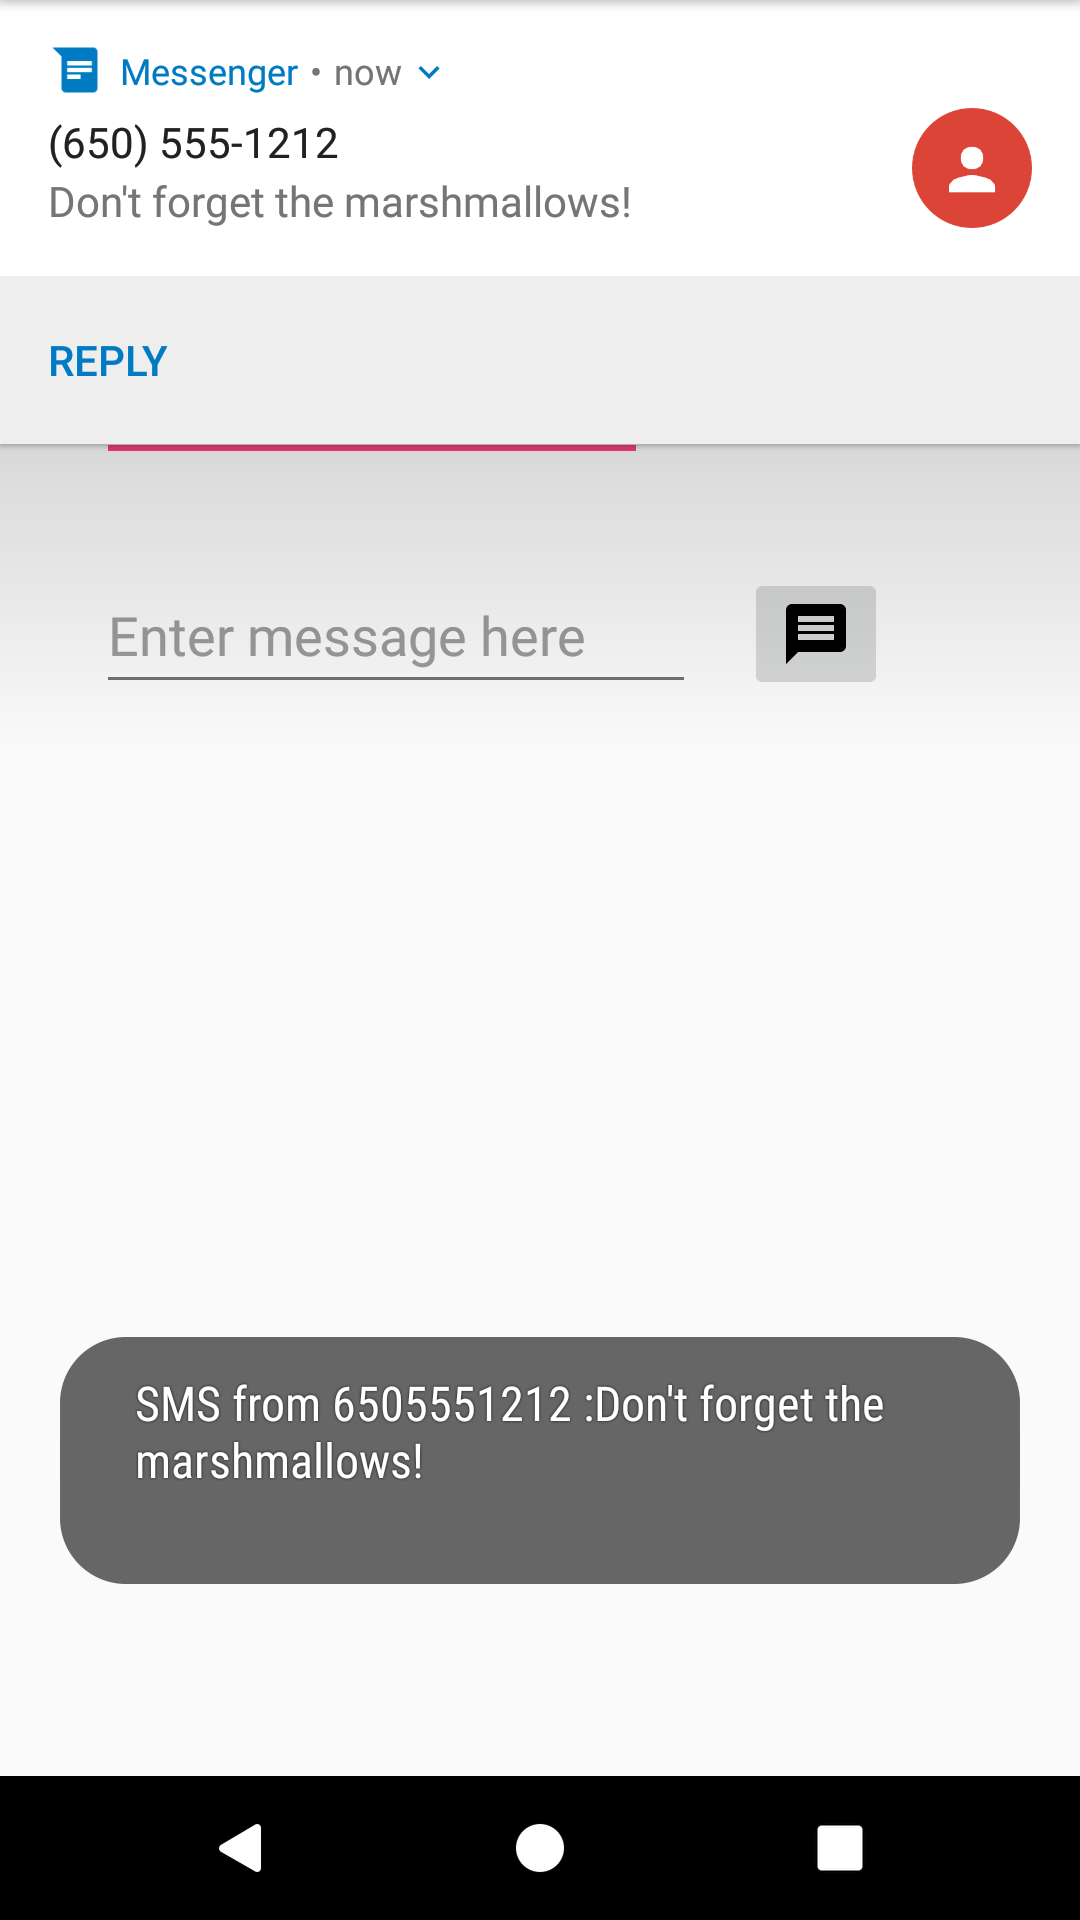
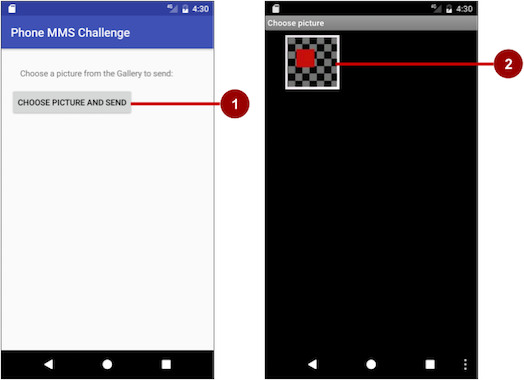
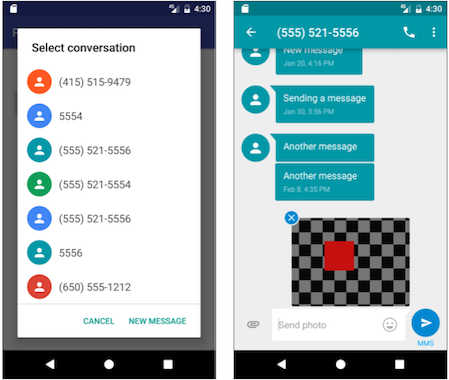
Challenge: Create a simple app with one button, Choose Picture and Send, that enables the user to select an image from the Gallery and send it as a Multimedia Messaging Service (MMS) message. After tapping the button, a choice of apps may appear, including the Messenger app. The user can select the Messenger app, and select an existing conversation or create a new conversation, and then send the image as a message.
The following are hints:
- To access and share an image from the Gallery, you need the following permission in the AndroidManifest.xml file:
- To enable the above permission, follow the model shown previously in this chapter to check for the READ_EXTERNAL_STORAGE permission, and request permission if necessary.
- Use the following intent for picking an image:
- Override the onActivityResult method to retrieve the intent result, and use getData() to get the Uri of the image in the result:
- Set the image’s Uri, and use an intent with ACTION_SEND , putExtra() , and setType() :
- Android Studio emulators can’t pass MMS messages to and from each other. You must test this app on real Android devices.
- For more information about sending multimedia messages, see Sending MMS with Android.
Android Studio project: MMSChallenge
Источник
Отправка E-Mail средствами Android
Привет хабр и привет всем!
В данной статье я покажу как реализуется отправка писем средствами самого Android, а также ещё один более интересный способ, но уже с применением внешней библиотеки, которая позволяет нам отсылать письма более приемлимыми для программиста способами.
Часть 1. Mail, просто Mail
- public class SimpleEMail extends Activity <
- Button send;
- EditText address, subject, emailtext;
- @Override
- public void onCreate(Bundle savedInstanceState) <
- super.onCreate(savedInstanceState);
- setContentView(R.layout.simple_email);
- // Наши поля и кнопка
- send = (Button) findViewById(R.id.emailsendbutton);
- address = (EditText) findViewById(R.id.emailaddress);
- subject = (EditText) findViewById(R.id.emailsubject);
- emailtext = (EditText) findViewById(R.id.emailtext);
- send.setOnClickListener( new OnClickListener() <
- @Override
- public void onClick(View v) <
- final Intent emailIntent = new Intent(android.content.Intent.ACTION_SEND);
- emailIntent.setType( «plain/text» );
- // Кому
- emailIntent.putExtra(android.content.Intent.EXTRA_EMAIL,
- new String [] < address.getText().toString() >);
- // Зачем
- emailIntent.putExtra(android.content.Intent.EXTRA_SUBJECT,
- subject.getText().toString());
- // О чём
- emailIntent.putExtra(android.content.Intent.EXTRA_TEXT,
- emailtext.getText().toString());
- // С чем
- emailIntent.putExtra(
- android.content.Intent.EXTRA_STREAM,
- Uri .parse( «file://»
- + Environment.getExternalStorageDirectory()
- + «/Клипы/SOTY_ATHD.mp4» ));
- emailIntent.setType( «text/video» );
- // Поехали!
- SimpleEMail. this .startActivity(Intent.createChooser(emailIntent,
- «Отправка письма. » ));
- >
- >);
- >
- >
* This source code was highlighted with Source Code Highlighter .
Вот, код до безобразия прост. Правда можно еще проще: если нам лень создавать дополнительное Activity для ввода наших полей, то можно было бы просто запустить наш Intent.
Плюсы: Простая реализация, достаточно удобно для обратной связи.
Минусы: У пользователя должна быть настроенная программа приёма-передачи почтовых сообщений, без неё обрабатывать данный Intent будет некому.
Часть 2. Mail, анонимус Mail
Данный метод я использовал в своём проекте, обозначим для начала плюсы:
- Не требует от пользователя настроенного клиента
- Может быть полностью анонимным
- Можно передавать все (в пределах разумного, конечно)
Для работы необходимы дополнительные библиотеки javamail-android.
Качаем их, и встраиваем в проект: Контекстное меню проекта > «Build Path» > «Add External Archives. » > «Наши файлы additional, mail, activation»
Для настройки нам также понадобится почтовый ящик зарегистрированный на gmail.com (или любом другом yandex, mail и.т.п.) настройки вы можете посмотреть здесь. В данном случае он будет выступать в виде шлюза через которые будут проходить наши письма.
Начинаем настраивать:
MailSenderClass.java
В данном классе записаны настройки того сервера, через который будет передаваться ваше сообщение. Здесь у нас есть несколько методов:
- public MailSenderClass(String user, String password) — Конструктор. В качестве аргументов передаются логин и пароль от нашего промежуточного ящика на gmail.com. Здесь же прописываются параметры smtp-подключения к серверу.
- protected PasswordAuthentication getPasswordAuthentication() — Аутентификация для сервера.
- public synchronized void sendMail(String subject, String body, String sender, String recipients, String filename) — Основной метод, в который передаются наши данные для отправки.
Рассмотрим код последнего метода чуть ближе:
- public synchronized void sendMail( String subject, String body, String sender, String recipients, String filename) throws Exception <
- try <
- MimeMessage message = new MimeMessage(session);
- // Кто
- message.setSender( new InternetAddress(sender));
- // О чем
- message.setSubject(subject);
- // Кому
- if (recipients.indexOf( ‘,’ ) > 0)
- message.setRecipients(Message.RecipientType.TO,
- InternetAddress.parse(recipients));
- else
- message.setRecipient(Message.RecipientType.TO,
- new InternetAddress(recipients));
- // Хочет сказать
- BodyPart messageBodyPart = new MimeBodyPart();
- messageBodyPart.setText(body);
- _multipart.addBodyPart(messageBodyPart);
- // И что показать
- if (!filename.equalsIgnoreCase( «» )) <
- BodyPart attachBodyPart = new MimeBodyPart();
- DataSource source = new FileDataSource(filename);
- attachBodyPart.setDataHandler( new DataHandler(source));
- attachBodyPart.setFileName(filename);
- _multipart.addBodyPart(attachBodyPart);
- >
- message.setContent(_multipart);
- Transport.send(message);
- > catch (Exception e) <
- Log.e( «sendMail» , «Ошибка отправки функцией sendMail! » );
- >
- >
* This source code was highlighted with Source Code Highlighter .
Метод также прост. Используя объект класса MimeMessage составляем наше письмо и для отправки передаём методу send, класса Transport.
JSSEProvider.java
Провайдер протокола безопасности для нашей почты. Линк.
VideoSelect.java
Код был взят из ApiDemos, которые поставляются в комплекте с Android SDK, и был чуть подправлен для выполнения с помощью метода startActivityForResult.
После выполнения возвращается строка, содержащая путь к файлу на карте памяти. Код можно будет посмотреть в проекте, он в конце статьи.
ExtendedMail.java
Основной метод отправления сообщения выполняется в функции sitv_sender_mail_async, представляющей класс AsyncTask:
- private class sender_mail_async extends AsyncTask String , Boolean><
- ProgressDialog WaitingDialog;
- @Override
- protected void onPreExecute() <
- // Выводим пользователю процесс загрузки
- WaitingDialog = ProgressDialog.show(ExtendedMail. this , «Отправка данных» , «Отправляем сообщение. » , true );
- >
- @Override
- protected void onPostExecute(Boolean result) <
- // Прячем процесс загрузки
- WaitingDialog.dismiss();
- Toast.makeText(mainContext, «Отправка завершена. » , Toast.LENGTH_LONG).show();
- ((Activity)mainContext).finish();
- >
- @Override
- protected Boolean doInBackground(Object. params ) <
- try <
- // Получаем данные с наших полей
- title = ((EditText)findViewById(R.id.screen_sendnews_et_title)).getText().toString();
- text = ((EditText)findViewById(R.id.screen_sendnews_et_text)).getText().toString();
- from = «from_post_msg@gmail.com» ;
- where = «where_post_msg@yandex.ru» ;
- // Вызываем конструктор и передаём в него наши логин и пароль от ящика на gmail.com
- MailSenderClass sender = new MailSenderClass( «mypostmail@gmail.com» , «password» );
- // И вызываем наш метод отправки
- sender.sendMail(title, text, from , where , attach);
- > catch (Exception e) <
- Toast.makeText(mainContext, «Ошибка отправки сообщения!» , Toast.LENGTH_SHORT).show();
- >
- return false ;
- >
- >
* This source code was highlighted with Source Code Highlighter .
- public void onClick(View v) <
- sender_mail_async async_sending = new sender_mail_async();
- async_sending.execute();
- >
* This source code was highlighted with Source Code Highlighter .
Таким образом создав небольшой класс-поток, можно спокойно слать необходимую информацию от клиента к себе на ящик.
Источник


