- Android — Session Management
- Shared Preferences
- Session Management through Shared Preferences
- Example
- Android — Управление сессиями
- Общие настройки
- Управление сессиями через общие настройки
- пример
- Session Management in Android with Example
- Example
- Step by Step Implementation
- Android User Session Management using Shared Preferences
- Initialization
- Storing Data
- Retrieving Data
- Clearing / Deleting Data
- User Session Management using Shared Preferences
Android — Session Management
Session help you when want to store user data outside your application, so that when the next time user use your application, you can easily get back his details and perform accordingly.
This can be done in many ways. But the most easiest and nicest way of doing this is through Shared Preferences.
Shared Preferences
Shared Preferences allow you to save and retrieve data in the form of key,value pair. In order to use shared preferences, you have to call a method getSharedPreferences() that returns a SharedPreference instance pointing to the file that contains the values of preferences.
You can save something in the sharedpreferences by using SharedPreferences.Editor class. You will call the edit method of SharedPreference instance and will receive it in an editor object. Its syntax is −
Apart from the putString method, there are methods available in the editor class that allows manipulation of data inside shared preferences. They are listed as follows −
| Sr.No | Mode & description | ||||||||||||||||||||||||||||||
|---|---|---|---|---|---|---|---|---|---|---|---|---|---|---|---|---|---|---|---|---|---|---|---|---|---|---|---|---|---|---|---|
| 1 |
| Steps | Description |
|---|---|
| 1 | You will use android studio IDE to create an Android application under a package com.example.sairamkrishna.myapplication. |
| 2 | Modify src/MainActivity.java file to add progress code to add session code. |
| 3 | Create New Activity and it name as second.java.Edit this file to add progress code to add session code. |
| 4 | Modify res/layout/activity_main.xml file to add respective XML code. |
| 5 | Modify res/layout/second_main.xml file to add respective XML code. |
| 7 | Run the application and choose a running android device and install the application on it and verify the results. |
Here is the content of MainActivity.java.
Here is the content of second_main.java.
Here is the content of activity_main.xml.
Here is the content of second_main.xml.
Here is the content of Strings.xml.
Here is the content of AndroidManifest.xml.
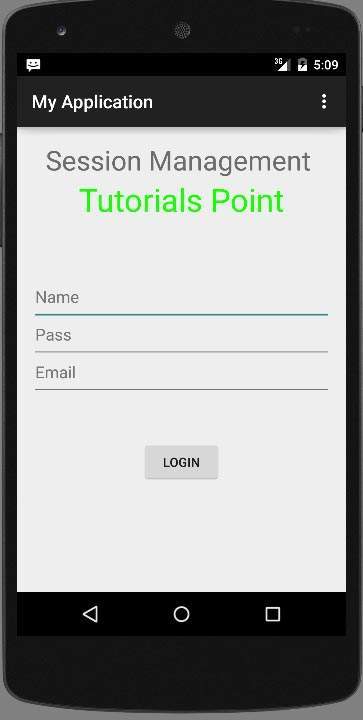
Let’s try to run your application. I assume you had created your AVD while doing environment setup. To run the app from Android studio, open one of your project’s activity files and click Run  icon from the tool bar. Android studio installs the app on your AVD and starts it and if everything is fine with your set-up and application, it will display following Emulator window −

Type in your username and password (type anything you like, but remember what you type), and click on login button. It is shown in the image below −
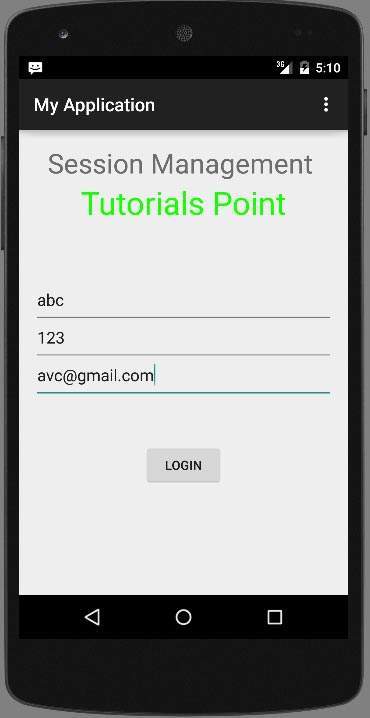
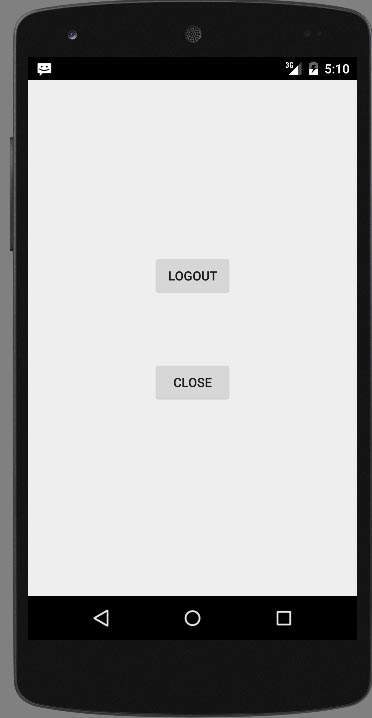
As soon as you click on login button, you will be brought to this Welcome screen. Now your login information is stored in shared preferences.

Now click on Exit without logout button and you will be brought back to the home screen and in preference file out put would be as shown below image

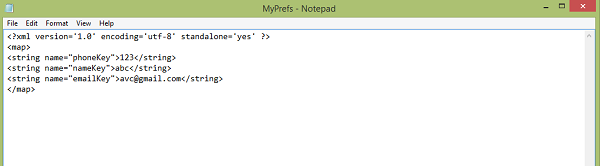
If you open myPref.xml file as note file, it would be as follows
If you click on logout button, it will erase preference values. and if you entered different values as inputs,it will enter those values as preference in XML.
Источник
Android — Управление сессиями
Сеанс поможет вам, когда вы захотите сохранить пользовательские данные за пределами вашего приложения, чтобы при следующем использовании пользователем вашего приложения вы могли легко вернуть его данные и выполнить соответствующие действия.
Это можно сделать разными способами. Но самый простой и приятный способ сделать это — через Shared Preferences .
Общие настройки
Общие настройки позволяют сохранять и извлекать данные в виде пары ключ-значение. Чтобы использовать общие предпочтения, вы должны вызвать метод getSharedPreferences (), который возвращает экземпляр SharedPreference, указывающий на файл, который содержит значения предпочтений.
Вы можете сохранить что-то в общих настройках с помощью класса SharedPreferences.Editor. Вы вызовете метод edit экземпляра SharedPreference и получите его в объекте редактора. Его синтаксис —
Помимо метода putString в классе редактора есть методы, которые позволяют манипулировать данными внутри общих настроек. Они перечислены следующим образом —
| Sr.No | Режим и описание | |||||||||||||
|---|---|---|---|---|---|---|---|---|---|---|---|---|---|---|
| 1 |
| меры | Описание |
|---|---|
| 1 | Вы будете использовать Android Studio IDE для создания приложения Android в пакете com.example.sairamkrishna.myapplication. |
| 2 | Измените файл src / MainActivity.java, чтобы добавить код прогресса для добавления кода сеанса. |
| 3 | Создайте новую активность и назовите ее second.java. Измените этот файл, чтобы добавить код прогресса для добавления кода сеанса. |
| 4 | Измените файл res / layout / activity_main.xml, чтобы добавить соответствующий код XML. |
| 5 | Измените файл res / layout / second_main.xml, чтобы добавить соответствующий код XML. |
| 7 | Запустите приложение и выберите работающее устройство Android, установите на него приложение и проверьте результаты. |
Вот содержание MainActivity.java .
Вот содержание second_main.java .
Вот содержание activity_main.xml .
Вот содержание second_main.xml .
Вот содержимое Strings.xml .
Вот содержимое AndroidManifest.xml .
Давайте попробуем запустить ваше приложение. Я предполагаю, что вы создали свой AVD во время настройки среды. Чтобы запустить приложение из студии Android, откройте один из файлов деятельности вашего проекта и нажмите «Выполнить».  значок из панели инструментов. Android-студия устанавливает приложение на AVD и запускает его, и если все в порядке с настройкой и приложением, оно отобразится в следующем окне эмулятора —
Введите свое имя пользователя и пароль (введите все, что вам нравится, но помните, что вы вводите) , и нажмите кнопку входа. Это показано на рисунке ниже —

Как только вы нажмете кнопку входа, вы попадете на этот экран приветствия. Теперь ваша информация для входа хранится в общих настройках.
Теперь нажмите кнопку « Выход без выхода» , и вы вернетесь на главный экран, а в файле настроек будет показано, как показано на рисунке ниже.
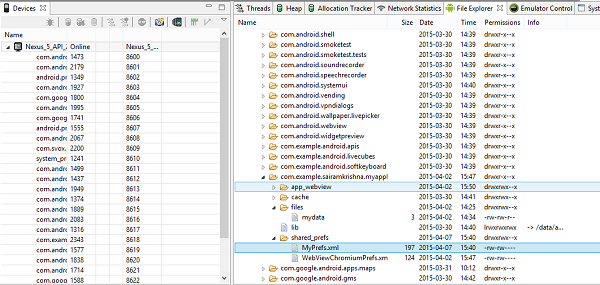
Если вы откроете файл myPref.xml как файл заметок, это будет выглядеть следующим образом

Если вы нажмете кнопку выхода, это приведет к удалению значений предпочтений. и если вы ввели разные значения в качестве входных данных, они будут вводиться как предпочтения в XML.
Источник
Session Management in Android with Example
Session Management is one of the most important features that are to be used in the Android App when you are integrating the login feature in Android. In your android app if you are using a feature of Login then you should have to save the state if the user has signed the first time. Then when the user closes his app and reopens it then he should redirect to our Home screen, rather than opening a login screen. So in this article, we will implement Session Management functionality in our Android app. For implementing this functionality we are creating a simple login form and a home screen. In our login form, the user has to enter his credentials and login into the app. After login, the user’s credentials will be saved inside the app, and whenever he reopens the app the user will be redirected to the home screen. For session management inside our app, we will be using Shared Preferences to store users’ credentials. Now we will move towards the implementation part.
Example
We will be creating a simple Login app as mentioned above for storing user session. A sample GIF is given below in which we will get to see what we will be building in our app. Note that we will be implementing this project using Java language.
Attention reader! Don’t stop learning now. Get hold of all the important Java Foundation and Collections concepts with the Fundamentals of Java and Java Collections Course at a student-friendly price and become industry ready. To complete your preparation from learning a language to DS Algo and many more, please refer Complete Interview Preparation Course.

Step by Step Implementation
Step 1: Create a New Project
To create a new project in Android Studio please refer to How to Create/Start a New Project in Android Studio. Note that select Java as the programming language.
Источник
Android User Session Management using Shared Preferences
Session are useful when you want to store user data globally through out the application. This can be done in two ways. One is storing them in a global variables and second is storing the data in shared preferences. The problem with storing data in global variable is data will be lost once user closes the application, but storing the data in shared preferences will be persistent even though user closes the application.

Application shared preferences allows you to save and retrieve key, value pair data. Before getting into tutorial, I am giving basic information needed to work with shared preferences.
Initialization
Application shared preferences can be fetched using getSharedPreferences() method.You also need an editor to edit and save the changes in shared preferences. The following code can be used to get application shared preferences.
Storing Data
You can save data into shared preferences using editor. All the primitive data types like booleans, floats, ints, longs, and strings are supported. Call editor.commit() in order to save changes to shared preferences.
Retrieving Data
Data can be retrived from saved preferences by calling getString() (For string) method. Remember this method should be called on Shared Preferences not on Editor.
Clearing / Deleting Data
If you want to delete from shared preferences you can call remove(“key_name”) to delete that particular value. If you want to delete all the data, call clear()
Following will clear all the data from shared preferences
The following is a simple tutorial which will have a login form and a dashboard screen. At first user will login using login details and once he successfully logged in his credentials (name, email) will be stored in shared preferences.
User Session Management using Shared Preferences
1. Create a new project in Eclipse IDE File ⇒ New ⇒ Android Application Project and fill all the required details
2. I am adding alert dialog manager class to show alert messages while validating the login form. Create a new class and name it as AlertDialogManager.java and paste the following code.
3. I am writing all session related functions in one class to make them available in all activities. Create a new class named SessionManagement.java and add following lines of code
4. In this example i am storing login status, name, email in shared preferences, so i added a function called createLoginSession(String name, String email) to SessionManagement class. Add the following function to SessionManagement.java.
> This function simply stores login status(true), name, email in shared preferences.
5.In order to get the stored preferences data, I added a function called getUserDetails() with the following code.
> The following function will read shared preferences and returns user data in HashMap
6. To check whether user logged in or not i added a function checkLogin() which you can call in all Activities to check user login status.
> This function simply check user login status from shared preferences and if user is not login it will redirect user to LoginActivity
7. Add a function called logoutUser() to clear all the data from shared preferences. Call this function when you want to logout the user.
> This function clears all session data and redirect the user to LoginActivity
Final Code
8. Until now we are done creating Session Management class and now we are going to learn how to use this class in your application. For this create a simple login form asking username, password.
Create a layout xml file and a class to create login form. Name the xml file as activity_login.xml and class name as LoginActivity.java
For testing purpose i am checking username, password as test, test.
Once the user enters correct login details a session will be created by calling session.createLoginSession(“Android Hive”, “[email protected]”) and user is redirected to MainActivity.


9. After user redirected to MainActivity, I am getting stored session data by calling getUserDetails() and displayed in textviews.
> session.checkLogin() is called to check user login status. Here if user is not login he will be redirected to LoginActivity.java
> If user is logged in, user details are fetched by calling session.getUserDetails() and displayed in textviews.
> Also I have logout button which invokes a function session.logoutUser() to clear the session data.
Layout code for activity_main.xml
Code for MainActivity.java

10. Open AndroidManifest.xml file, add the following code and run the project.
Hi there! I am Founder at androidhive and programming enthusiast. My skills includes Android, iOS, PHP, Ruby on Rails and lot more. If you have any idea that you would want me to develop? Let’s talk: [email protected]
Источник


