- Set android ndk root
- Install and configure the NDK and CMake
- Install NDK and CMake automatically
- Install the NDK and CMake
- Configure a specific version of CMake
- Groovy
- Kotlin
- Install a specific version of the NDK
- Configure specific versions of the NDK in your project
- Groovy
- Kotlin
- Default NDK version per AGP version
- Set android ndk root
- Android
- Using android-ndk package (build require)
- Use built-in Conan toolchain
- Using Docker images
- Using existing NDK
- Using toolchain from Android NDK
- Using CMake build-in Android NDK support
Set android ndk root
I have some trouble to cross compile a small Qt programm and load it into a Samsung Tab 4 device.
First of all this is my configuration:
Ubuntu 15.04
Processor Intel Core 2 Duo CPU T7500 @ 2.20GHz*2
OS type 32 bit
Qt 5.5.0
So I download all what I needed (ant, java, ndk and sdk).
I did all the configuration part inside Qt in tools/options following several tutorials
On Android configuration, it found 8 compilation toolchains and ticked the box to create them automatically
In Compile and Run, I found the 8 ones under the compiler tab.
I have created a kit manually (only the desktop one was auto detected) and getting this warning:
the compiler . cannot produce code for the Qt version Qt 5.5.0 32 bits
When I open a project I get this message:
/bin/sh: 1: /toolchains/x86-4.9/prebuilt/linux-x86/bin/i686-linux-android-gcc: not found
Project ERROR: You need to set the ANDROID_NDK_ROOT environment variable to point to your Android NDK.
Could not read qmake configuration file /home/damien/Qt5.5.0/5.5/gcc/mkspecs/android-g++/qmake.conf.
So far what I have done that trying to solve the problem:
1°) on bashrc I added the following export path:
export ANDROID_HOME=/home/damien/android-sdk-linux
export PATH=$PATH:$ANDROID_HOME/tools:$ANDROID_HOME/platform-tools
export ANDROID_HOME=/home/damien/android-ndk-r10e
export ANDROID_SDK_ROOT=/home/damien/android-sdk-linux
export ANDROID_NDK_ROOT=/home/damien/android-ndk-r10e
export PATH=$PATH:$ANDROID_SDK_ROOT/platform-tools
export PATH=$PATH:$ANDROID_SDK_ROOT/tools
export PATH=$PATH:$ANDROID_NDK
2°) I gave all the rights to NDK by using chmod 777
I still have the same problem and I passed at least 2 days to find on Internet what’s going on.
Does anyone have a shrink idea how to solve this problem?
Thanks in advance,
Damien

@Garfield Hi, I documented this error some time ago while using Qt for Android and it looks like setting ANDROID_NDK_ROOT was enough.
I checked again my dev environment, and the only variables set are:
ANDROID_NDK_ROOT=C:\devtools\android-ndk-r9c
.
JAVA_HOME=C:\Program Files\Java\jdk1.7.0_25
.
Path=C:\Windows\system32;C:\Windows;C:\Windows\System32\Wbem;C:\Program Files\Ja
va\jdk1.7.0_25\bin;C:\Program Files\TortoiseGit\bin;C:\Program Files\Java\jdk1.7
.0_25\jre\bin\server;C:\Python27\Lib\site-packages\PyQt4;C:\Python27;C:\Python2
7\Scripts;C:\Perl\site\bin;C:\Perl\bin;C:\devtools\android-sdk-windows\platform-
tools;C:\Users\pablo\AppData\Roaming\Python\Scripts;C:\Ruby200\bin
@Pablo-J.-Rogina Hello Thanks for your quick reply;
Actually, I added so many paths on bashrc to be sure to resolve the problem.
It didn’t work even by just adding one.
Do you have any others idea?
Well, I’ll start from scratch. I first install Android SDK, Android NDK, Ant and Java and set the required environment variables, as few as possible. Then I’ll install Qt so Qt Creator will find (hopefully) everything automatically and you ‘ll have the kits set in Qt Creator with the proper values. Just my two cents.
@Pablo-J.-Rogina
So you think that installing SDK and NDK before Qt creator has an impact?
What should I do then? uninstall Qt and install it again?
I guess that having the Android components in place before installing Qt may help you.
Yes, uninstall Qt and install it only after you have installed all required components (Android SDJ, NDK, Ant and Java) and setting the required environment variables.
Ok I will do that exactly now. thanks in advance
So I uninstalled Qt and removed all the files in the folder.
Nevertheless, when I reinstall it, I still get the same results and Qt creator kept also the old config. i.e the manual kit I’ve created
Hi and welcome to devnet,
IIRC, the Android SDK/NDK doesn’t install the x86 compilers by default, you have to add them yourself using their management tool
Hi thanks for your reply,
I guess I have installed all the compilers availaible using SDK manager.
8 toolchains were found by Qt.
I reinstalled everything from scratch (ubuntu, sdk, ndk, qt etc. ) and it did not solve the problem.
I know that my problem must be a stupid thing but I just don»t get it and it frustrates me a lot.
do you have any other idea how to proceed?
Thanks in advance,
damien
By the way, I found that the Intel Core 2 Duo CPU T7500 is a 64 bits one.
I have installed Ubuntu 32 bits because there was no added value for me to install a 64 bits one.
for some compatibility reasons I kept also a 32 bits one when I started to use Ubuntu 4 years ago
Do you think that it could potential be the source of the problem or it doesn’t matter?
Источник
Install and configure the NDK and CMake
To compile and debug native code for your app, you need the following components:
- The Android Native Development Kit (NDK): a set of tools that allows you to use C and C++ code with Android.
- CMake: an external build tool that works alongside Gradle to build your native library. You do not need this component if you only plan to use ndk-build.
- LLDB: the debugger Android Studio uses to debug native code. By default, LLDB will be installed alongside Android Studio.
This page describes how to install these components automatically, or by using Android Studio or the sdkmanager tool to download and install them manually.
Install NDK and CMake automatically
Android Gradle Plugin 4.2.0+ can automatically install the required NDK and CMake the first time you build your project if their licenses have been accepted in advance. If you’ve already read and agree to the license terms, then you can pre-accept the licenses in scripts with the following command:
Install the NDK and CMake
When you install the NDK, Android Studio selects the latest available NDK. For most projects, installing this default version of the NDK is sufficient. If your project needs one or more specific versions of the NDK, though, you can download and configure specific versions. Doing so helps you ensure reproducible builds across projects that each depend on a specific version of the NDK. Android Studio installs all versions of the NDK in the android-sdk /ndk/ directory.
To install CMake and the default NDK in Android Studio, do the following:
With a project open, click Tools > SDK Manager.
Click the SDK Tools tab.
Select the NDK (Side by side) and CMake checkboxes.
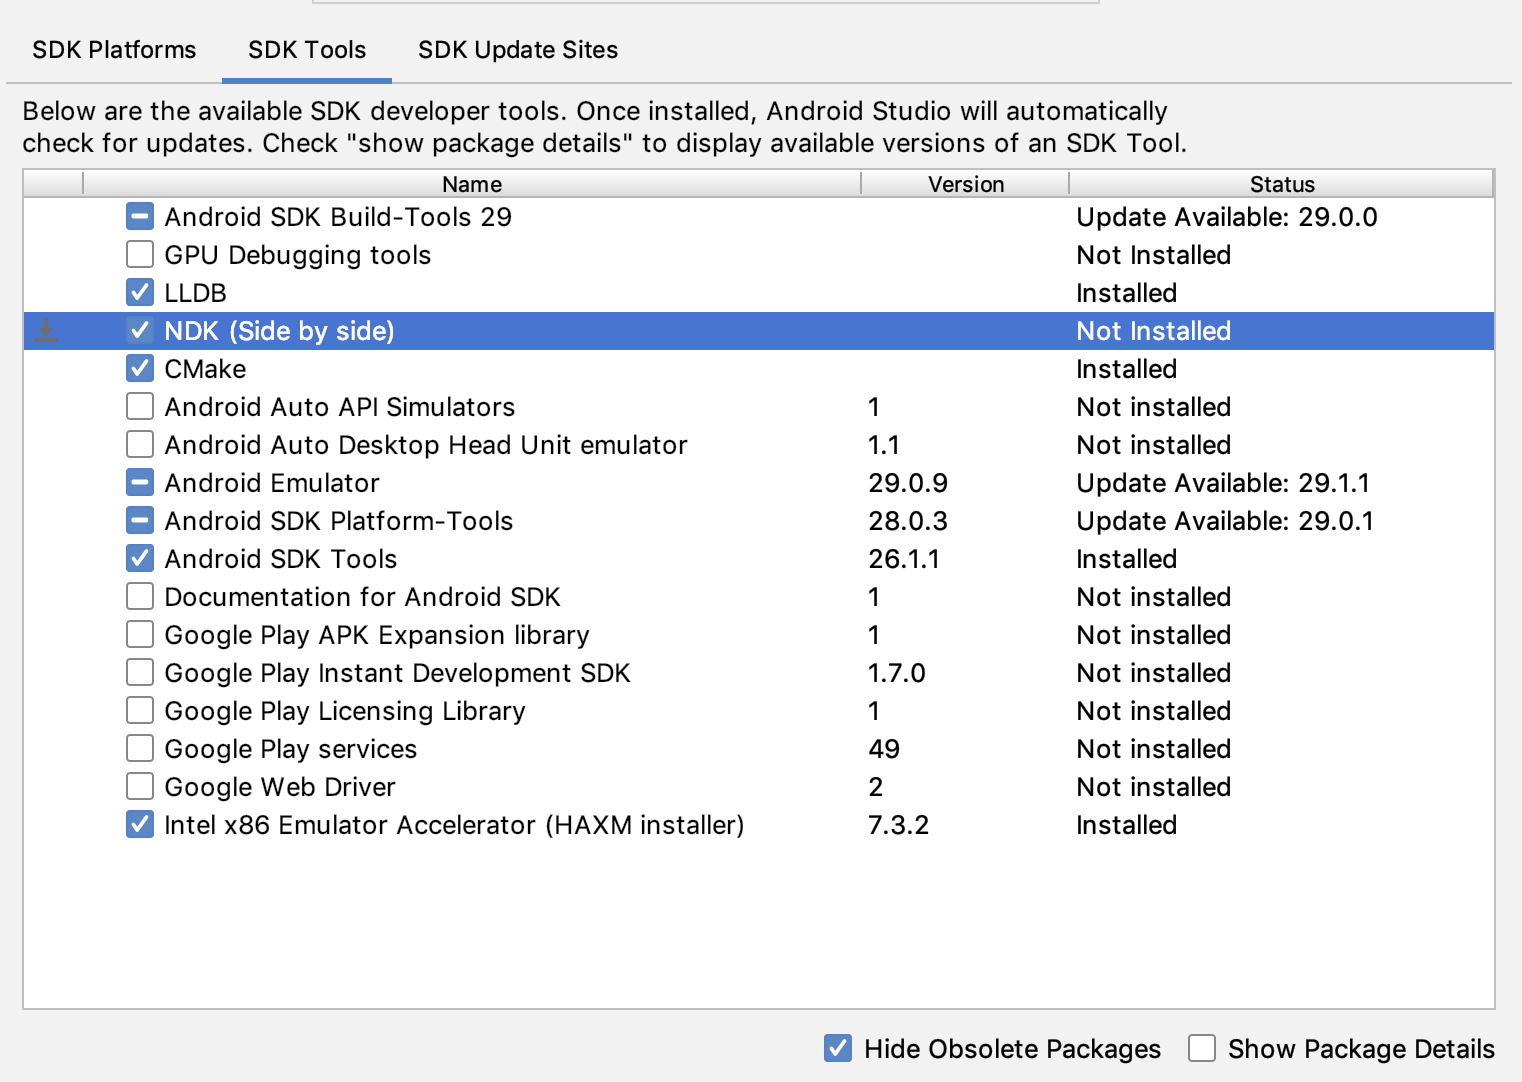 Figure 1: The SDK Tools window showing the NDK (Side by side) option
Click OK.
A dialog box tells you how much space the NDK package consumes on disk.
Click OK.
When the installation is complete, click Finish.
Your project automatically syncs the build file and performs a build. Resolve any errors that occur.
Configure a specific version of CMake
The SDK Manager includes the 3.6.0 forked version of CMake and version 3.10.2. Projects that don’t set a specific CMake version are built with CMake 3.10.2. To set the CMake version, add the following to your module’s build.gradle file:
Groovy
Kotlin
If you want to use a CMake version that is not included by the SDK Manager, follow these steps:
- Download and install CMake from the official CMake website.
- Specify the CMake version you want Gradle to use in your module’s build.gradle file.
Either add the path to the CMake installation to your PATH environment variable or include it in your project’s local.properties file, as shown. If Gradle is unable to find the version of CMake you specified in your build.gradle file, you get a build error.
If you don’t already have the Ninja build system installed on your workstation, go to the official Ninja website, and download and install the latest version of Ninja available for your OS. Make sure to also add the path to the Ninja installation to your PATH environment variable.
Install a specific version of the NDK
To install a specific version of the NDK, do the following:
With a project open, click Tools > SDK Manager.
Click the SDK Tools tab.
Select the Show Package Details checkbox.
Select the NDK (Side by side) checkbox and the checkboxes below it that correspond to the NDK versions you want to install. Android Studio installs all versions of the NDK in the android-sdk /ndk/ directory.
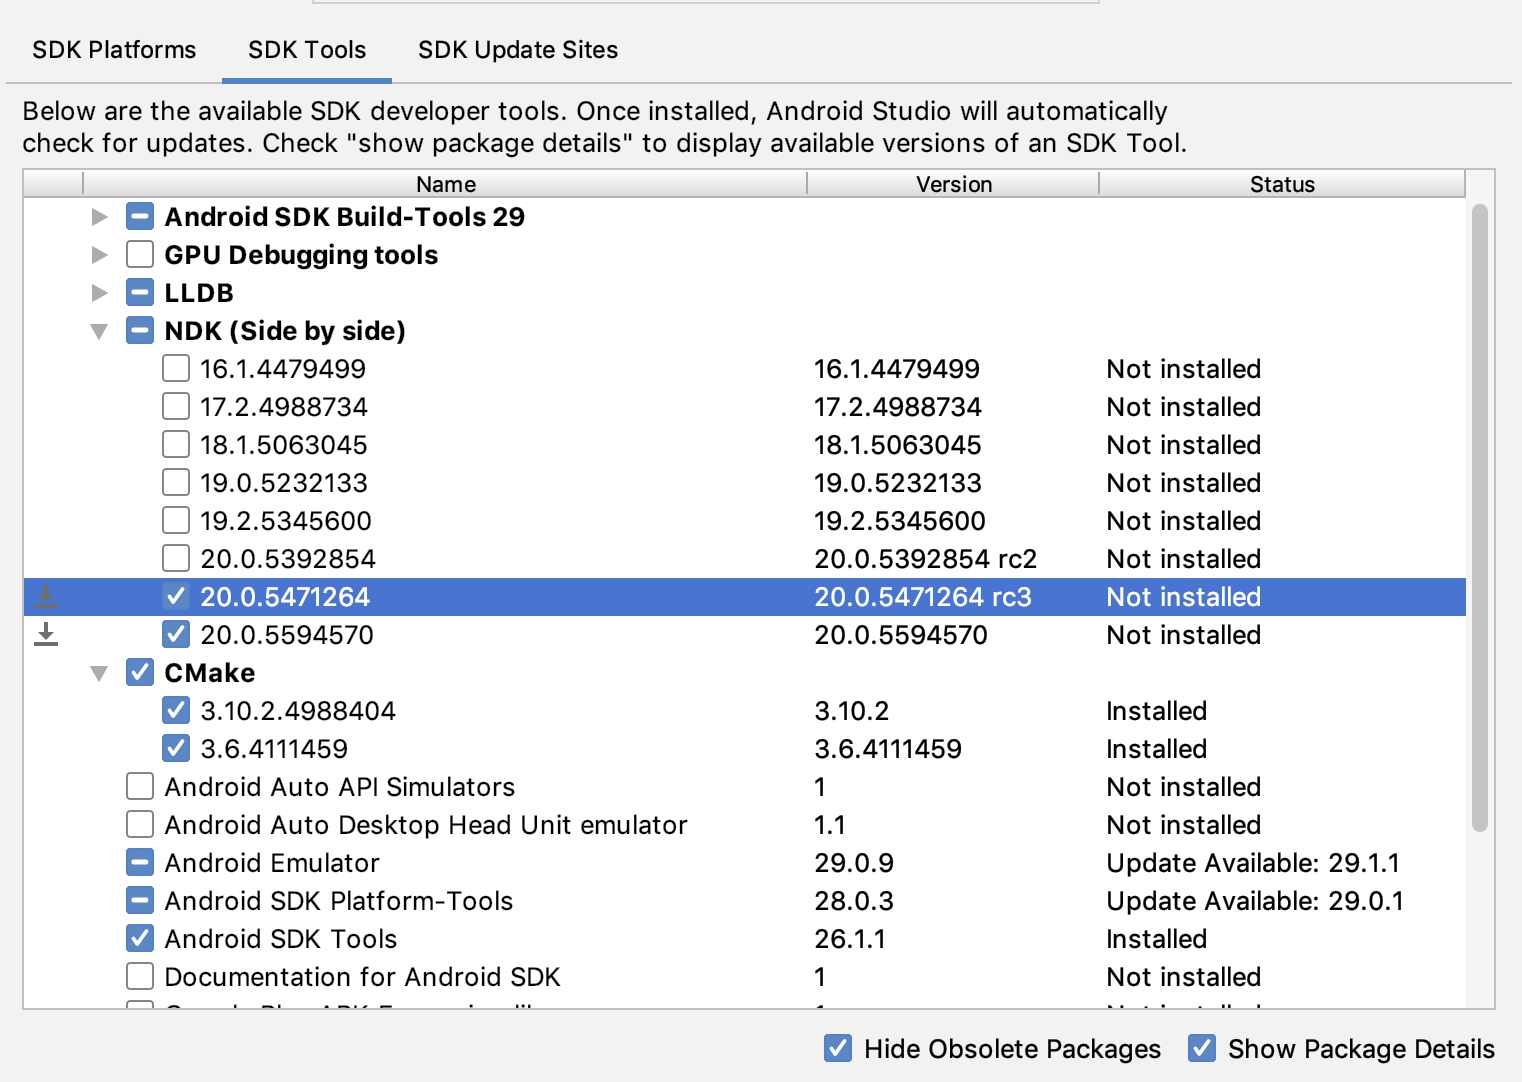 Figure 2: The SDK Tools window showing the NDK (Side by side) options
Click OK.
A dialog box tells you how much space the NDK package(s) consumes.
Click OK.
When the installation is complete, click Finish.
Your project automatically syncs the build file and performs a build. Resolve any errors that occur.
Configure each module with the version of the NDK you want it to use. When using Android Studio 3.6 or higher, if you do not specify the version, the Android Gradle plugin chooses a version that it is known to be compatible with.
Configure specific versions of the NDK in your project
You may need to configure the version of the NDK in your project if one of the following is true:
- Your project is inherited and you need to use specific versions of the NDK and the Android Gradle plugin (AGP). For more information, see Configure the NDK for the Android Gradle plugin.
You have multiple versions of the NDK installed and you want to use a specific one. In this case, specify the version using the android.ndkVersion property in the module’s build.gradle file, as shown in the following code sample.
Groovy
Kotlin
Default NDK version per AGP version
Before release, each AGP version is thoroughly tested with the latest stable NDK release at that time. For AGP version 3.6 and above, that NDK version will be used to build your projects if you do NOT specify an NDK version in the build.gradle file. The default NDK version is documented inside the AGP release notes. The current default NDK versions are listed in the following table:
| Android Studio/Gradle Plugin Version | |||||||
|---|---|---|---|---|---|---|---|
| 7.0 | 4.2 | 4.1 | 4.0 | 3.6 | 3.5 | 3.4 | |
| Default NDK version specified for the version of AGP | 21.4.7075529 | 21.4.7075529 | 21.1.6352462 | 21.0.6113669 | 20.0.5594570 | No default specified | |
Content and code samples on this page are subject to the licenses described in the Content License. Java is a registered trademark of Oracle and/or its affiliates.
Источник
Set android ndk root
Hello! I am trying to install the mqtt module to android_armv7. To do this, I create a folder named build and run this:
/Qt/5.12.4/android_armv7/bin/qmake qmake -r .. . Unfortunately I recieve this error:
I have tried going to tools->External->Configure->Environment->External Tools->Update Translations and wrote:
ANDROID_NDK_ROOT=/home/stefan/Downloads/android-ndk-r19c/android-ndk-r19c
PATH=
in the Environment Change section. It didn’t work. A strange thing (for me) is that I can deploy an application (without mqtt) on android_armv7. I am using Linux. What should I do now?
It looks like you are trying to do that in a terminal and modify settings in an application. What exactly are you doing ?
Since you have it working in Qt Creator as it seems, just define these environment variable for the terminal you want to build qtmqtt in.

If you want to install mqtt module, you have to install it inside lib of android, and they will make for all architecture.
You can refer this link to install it.
https://forum.qt.io/topic/107020/how-to-use-mqtt-client-class-in-qml/9
It looks like you are trying to do that in a terminal and modify settings in an application. What exactly are you doing ?
Since you have it working in Qt Creator as it seems, just define these environment variable for the terminal you want to build qtmqtt in.
Hi and thank you for the reply. It works in the Qt Creator, but only for gcc_64. How should I define the environment variables?

How should I define the environment variables?
In the same way they are set in Build Environment in QtCreator: «Projects/Build & Run/Build/Build Environment».
@jsulm Thank you! But the ANDROID_NDK_ROOT variable points my Android NDK.
Источник
Android
There are several ways to cross-compile packages for Android platform via conan.
Using android-ndk package (build require)
The easiest way so far is to use android-ndk conan package (which is in conancenter repository).
Using the android-ndk package as a build requirement will do the following steps:
- Download the appropriate Android NDK archive.
- Set up required environment variables, such as CC , CXX , RANLIB and so on to the appropriate tools from the NDK.
- In case of using CMake, it will inject the appropriate toolchain file and set up the necessary CMake variables.
For instance, in order to cross-compile for ARMv8 , the following conan profile might be used:
In addition to the above, Windows users may need to specify CONAN_MAKE_PROGRAM , for instance from the existing MinGW installation (e.g. C:\MinGW\bin\mingw32-make.exe ), or use make from the mingw_installer/1.0@conan/stable .
Similar profile might be used to cross-compile for ARMv7 (notice the arch change):
By adjusting arch setting, you may cross-compile for x86 and x86_64 Android as well (e.g. if you need to run code in a simulator).
os.api_level is an important setting which affects compatibility — it defines the minimum Android version supported. In other words, it is the same meaning as minSdkVersion.
Use built-in Conan toolchain
This is an experimental feature subject to breaking changes in future releases.
Conan will generate a toolchain for Android if the recipe is using a CMakeToolchain . In that case all you need is to provide the path to the Android NDK and working profiles . This approach can also use the Android NDK package referenced in the previous section.
Use a regular profile for the host context:
and add Android NDK to the PATH or populate the CONAN_CMAKE_ANDROID_NDK environment variable.
Together with the files created by the generators that make it possible to find and link the requirements, conan install command will generate a toolchain file like the following one:
With this toolchain file you can execute CMake’s command to generate the binaries:
Using Docker images
If you’re using Docker for builds, you may consider using docker images from the Conan Docker Tools repository.
Currently, Conan Docker Tools provide the following Android images:
- conanio/android-clang8
- conanio/android-clang8-x86
- conanio/android-clang8-armv7
- conanio/android-clang8-armv8
All above mentioned images have corresponding Android NDK installed, with required environment variables set and with default conan profile configured for android cross-building. Therefore, these images might be especially useful for CI systems.
Using existing NDK
It’s also possible to use an existing Android NDK installation with conan. For instance, if you’re using Android Studio IDE, you may already have an NDK at
You have to specify different environment variables in the Conan profile for make-based projects. For instance:
However, when building CMake projects, there are several approaches available, and it’s not always clear which one to follow.
Using toolchain from Android NDK
This is the official way recommended by Android developers.
For this, you will need a small CMake toolchain file:
This toolchain file only sets up the required CMake variables, and then includes the default toolchain file supplied with Android NDK.
And then, you may use the following profile:
In the profile, CONAN_CMAKE_TOOLCHAIN_FILE points to the CMake toolchain file listed above.
Using CMake build-in Android NDK support
This workflow is not supported by Android and is often broken with new NDK releases or when using older versions of CMake. This workflow is strongly discouraged and will not work with Gradle.
For this approach, you don’t need to specify CMake toolchain file at all. It’s enough to indicate os is Android and Conan will automatically set up all required CMake variables for you.
Therefore, the following conan profile could be used for ARMv8 :
The only way you have to configure is ANDROID_NDK_ROOT which is a path to the Android NDK installation.
Once profile is configured, you should see the following output during the CMake build:
It means native CMake integration has successfully found Android NDK and configured the build.
© Copyright 2016-2021, JFrog. Last updated on Dec 03, 2021. Cookies Settings
Источник


