- Use a passcode with your iPhone, iPad, or iPod touch
- Set up a passcode
- Change your passcode or passcode settings
- Get help
- If an alert says to change your passcode or you can’t adjust your passcode settings
- If you forgot your passcode
- About eSIM on iPhone
- What you need
- How to set up an eSIM
- Scan a QR code
- Install an assigned cellular plan
- Use a carrier app
- Enter the information manually
- Transfer an eSIM from your previous iPhone
- If you can’t set up an eSIM
- Erase your eSIM
- If you forgot your iPhone passcode
- Step 1: Make sure that you have a computer (Mac or PC)
- Step 2: Turn off your iPhone
- Step 3: Put your iPhone in recovery mode
- Step 4: Restore your iPhone
- Need more help?
- Design+Code 4+
- Coding course for designers
- Shadowness Inc.
- Designed for iPad
- Screenshots
- Description
Use a passcode with your iPhone, iPad, or iPod touch
Learn how to set, use, and change a passcode on your iPhone, iPad, or iPod touch.
Set a passcode on your device to help protect your data. If your device supports Touch ID, you can often use your fingerprint instead of your passcode. If your device supports Face ID, you can use face recognition instead of your passcode. Your device will require your passcode when you do the following:
- Turn on or restart your device
- Press the Home button or swipe up to unlock your device (you can change this)
- Update your software
- Erase your device
- View or change passcode settings
- Install iOS or iPadOS Configuration profiles
![]()
Set up a passcode
Change your settings
Get help with passcode
Set up a passcode
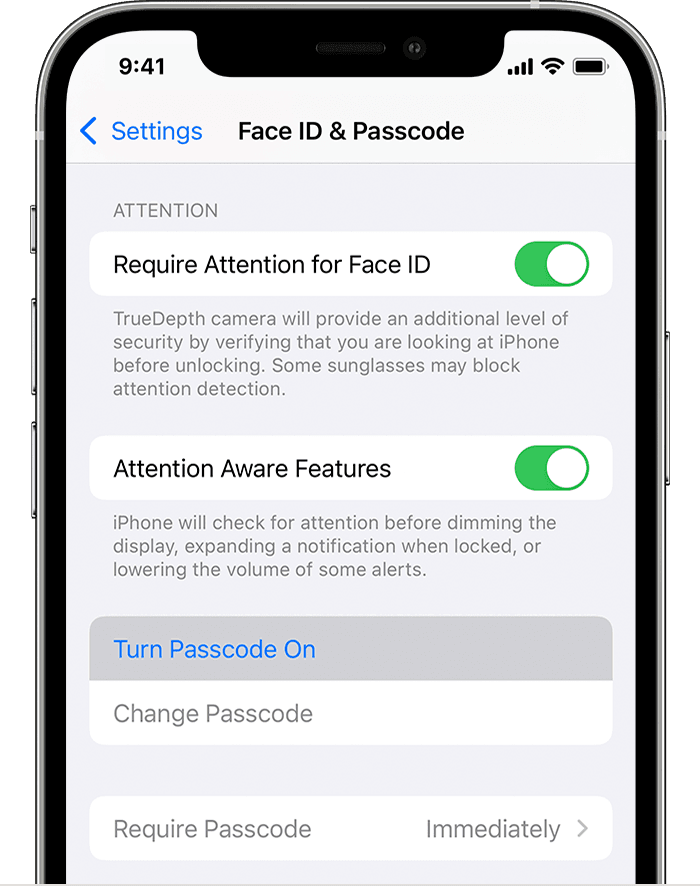
- On iPhone X and later, or iPad with Face ID, go to Settings > Face ID & Passcode. On earlier iPhone models, go to Touch ID & Passcode. On devices without Touch ID, go to Settings > Passcode.
- Tap Turn Passcode On.

- Enter a six-digit passcode. Or tap Passcode Options to switch to a four-digit numeric code, a custom numeric code, or a custom alphanumeric code.
- Enter your passcode again to confirm it and activate it.

Change your passcode or passcode settings
On iPhone X and later, or iPad with Face ID, go to Settings > Face ID & Passcode. On earlier iPhone models, go to Settings > Touch ID & Passcode. On devices without Touch ID, go to Settings > Passcode.
You’ll find several settings and options:
- Turn Passcode Off: Tap this option to turn off your passcode.
- Change Passcode: Enter a new six-digit passcode. Or tap Passcode Options to switch to a four-digit numeric code, a custom numeric code, or a custom alphanumeric code.
- Require Passcode: As soon as you lock your screen, the default for this setting will ask you to enter your passcode to unlock. If you don’t want an immediate passcode requirement, change this setting. (For your own security, if you use Touch ID or Apple Pay, you can’t change the immediate passcode requirement).
- Allow Access When Locked: Use this option to allow access to some features when your device is locked, including Today View, Notification Center, Control Center on iPhone and iPod touch or iPad, Siri, Reply with Message, Home Control, Wallet, Return Missed Calls, and USB accessories.
- Erase Data: Choose whether to erase your device automatically after ten failed passcode attempts. If you don’t enable this option, your device will need to be restored on a computer after ten failed attempts.
Get help
Follow the steps in this section for help with things like passcode settings, alerts, and forgotten passwords.
If an alert says to change your passcode or you can’t adjust your passcode settings
Configuration profiles and email accounts based on Microsoft Exchange (common with business or education devices) sometimes have passcode policies that cause issues like this:
- You can’t turn off your passcode.
- You can’t change passcode settings because they’re unavailable, gray, or dimmed.
- You see an alert about a Passcode Requirement. For example, you might see a message that says you must change your iPhone unlock passcode within 60 minutes.
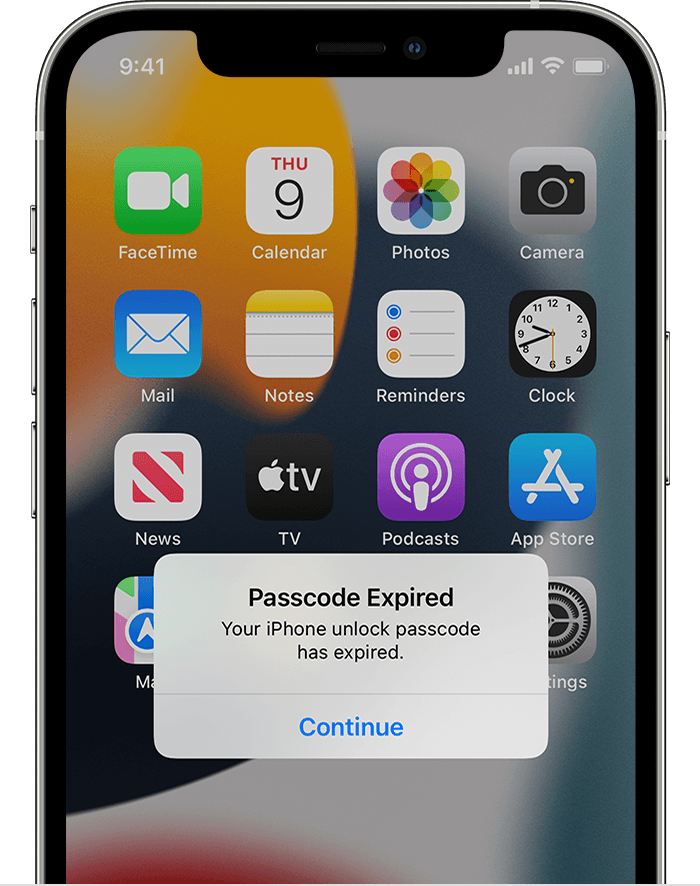
Contact your IT administrator for help. If you don’t use a configuration profile or Microsoft Exchange account, or if your device is personally owned, make sure you update your device to the latest version of iOS or iPadOS.
If you forgot your passcode
If you or someone else enters the wrong passcode too many times, your device will disable itself temporarily. If so, get help with a forgotten passcode or disabled device. If you forgot your Restrictions passcode, learn what to do.
Источник
About eSIM on iPhone
An eSIM is a digital SIM that allows you to activate a cellular plan from your carrier without having to use a physical nano-SIM. Learn about setting up an eSIM, transferring your SIM, what to do if you can’t set one up, and how to erase an eSIM, if you ever need to.
You can install multiple eSIM profiles on an iPhone that supports eSIM. If your iPhone is unlocked, you can subscribe to several cellular plans.
What you need
- An iPhone XS, iPhone XS Max, iPhone XR, or later
- A wireless carrier that supports eSIM
eSIM on iPhone is not offered in mainland China. In Hong Kong and Macao, iPhone 13 mini, iPhone 12 mini, iPhone SE (2nd generation), and iPhone XS feature eSIM. Learn about using Dual SIM with two nano-SIM cards in mainland China, Hong Kong, and Macao.
How to set up an eSIM
If you purchased an iPhone 13 model from an Apple Retail Store or Apple Online Store in the United States, your iPhone won’t arrive with a SIM card installed. To activate your iPhone, turn it on, connect to a Wi-Fi network, and follow the onscreen instructions.
Otherwise, if you do need to set up an eSIM, you can scan the QR code your carrier gave you, use your carrier’s iPhone app, install an assigned plan, enter the information manually, or transfer an eSIM from your previous iPhone:
Scan a QR code
- Open the Camera app and scan your QR code.
- When the Cellular Plan Detected notification appears, tap it.
- Tap Continue, at the bottom of the screen.
- Tap Add Cellular Plan.
If you’re asked to enter a confirmation code to activate the eSIM, enter the number that your carrier provided.
Install an assigned cellular plan
With iOS 13 and later, some carriers can assign a cellular plan for you to install. Contact your carrier for more information.
If a plan was assigned to you, follow these steps:
- When a notification appears that says Carrier Cellular Plan Ready to Be Installed, tap it.
- In the Settings app, tap Carrier Cellular Plan Ready to Be Installed.
- Tap Continue, at the bottom of the screen.
If you’re asked to «Transfer Cellular Plan» while setting up your iPhone, learn how to transfer your eSIM.
Use a carrier app
- Go to the App Store and download your carrier’s app.
- Use the app to purchase a cellular plan.
Enter the information manually
If necessary, you can manually enter your plan information. To enter your plan information manually, follow these steps:
- Go to Settings.
- Tap either Cellular or Mobile Data.
- Tap Add Cellular Plan.
- Tap Enter Details Manually, at the bottom of your iPhone screen.
Transfer an eSIM from your previous iPhone
To transfer an eSIM to your new iPhone, you can scan the QR code your carrier gave you, use your carrier’s iPhone app, or install an assigned cellular plan. When your cellular plan is activated on your new iPhone, the plan on your previous iPhone will deactivate.
If you can’t set up an eSIM
- Make sure that carrier or carriers support eSIM.
- Open Control Center: Swipe down from the upper-right corner of the screen. Then make sure that your carrier appears in the status bar. If not, try turning Airplane Mode on and off.
- Go to Settings > General > About and look for any numbers under EID. If there are no numbers, contact Apple Support.
- If you still can’t set up your eSIM, contact your carrier.
Erase your eSIM
If you need to erase your eSIM, follow these steps:
- Go to Settings.
- Tap either Cellular or Mobile Data.
- Tap the plan you want to erase.
- Tap Remove Cellular Plan.
If you erase all content and settings from your iPhone, you can choose to erase your eSIM as well or keep it. If you want to cancel your cellular plan, you still need to contact your carrier.
Источник
If you forgot your iPhone passcode
Forgot your iPhone passcode? Learn how to get your iPhone into recovery mode so you can erase it and set it up again.
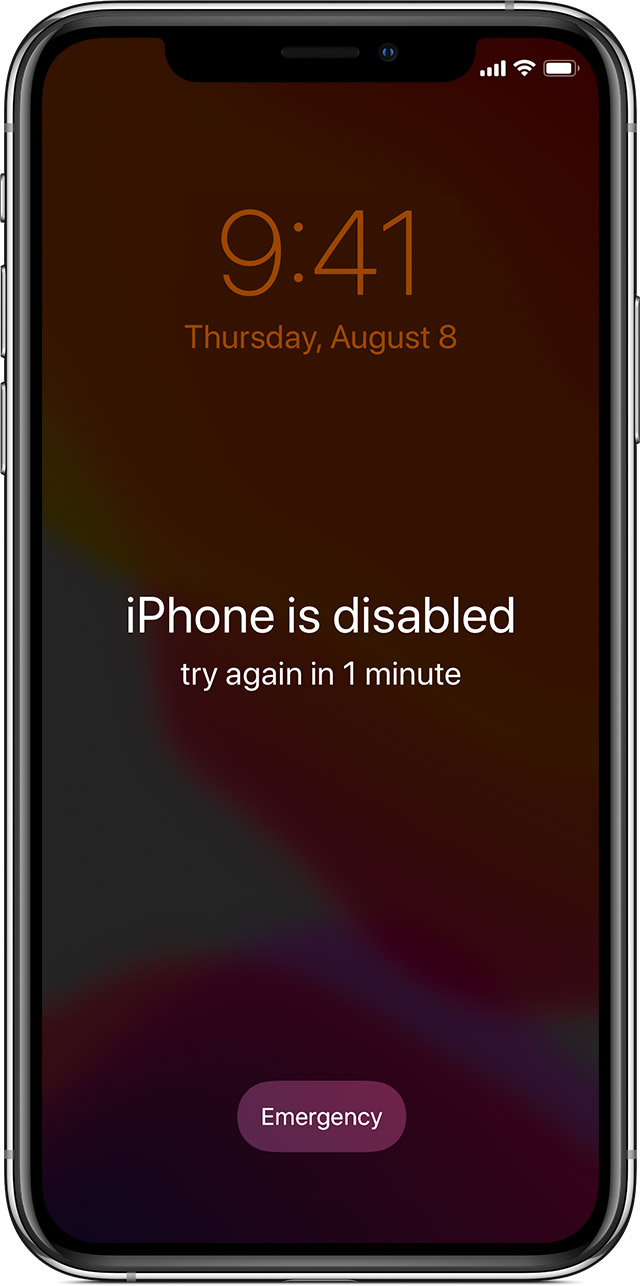
If you enter the wrong passcode on your iPhone Lock Screen too many times, an alert lets you know that your iPhone is disabled. If you can’t remember your passcode when you try again, you need to use a computer to put your iPhone in recovery mode. This process deletes your data and settings, including your passcode, giving you access to set up your iPhone again.
After you erase your iPhone, you can restore your data and settings from backup. If you didn’t back up your iPhone, you can set it up as a new device and then download any data that you have in iCloud.
![]()
Step 1: Make sure that you have a computer (Mac or PC)
This process requires a Mac or PC. If you’re using a PC, make sure that it has Windows 8 or later, and that iTunes is installed. You also need the cable that came with your iPhone, or another compatible cable, to connect your iPhone to the computer.
If you don’t have a computer and you can’t borrow one, you need to go to an Apple Retail Store or Apple Authorized Service Provider for help.
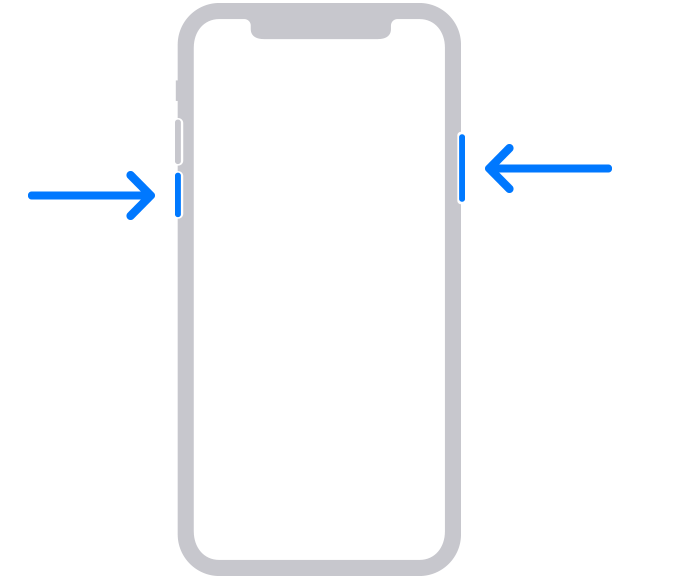
Step 2: Turn off your iPhone
- Unplug your iPhone from the computer if it’s connected.
- Turn off your iPhone using the method for your iPhone model:
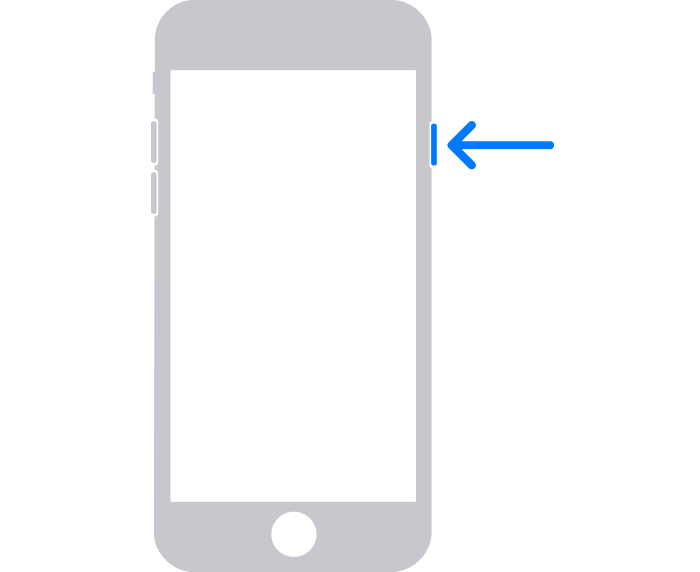
- iPhone X or later, iPhone SE (2nd generation), iPhone 8, and iPhone 8 Plus: Press and hold both the Side button and the Volume down button until the power off slider appears.
- iPhone 7 and iPhone 7 Plus: Press and hold the Side button until the power off slider appears.
- iPhone SE (1st generation), and iPhone 6s and earlier: Press and hold the Side (or Top) button until the power off slider appears.
- iPhone X or later, iPhone SE (2nd generation), iPhone 8, and iPhone 8 Plus: Press and hold both the Side button and the Volume down button until the power off slider appears.
- Drag the slider to turn off your iPhone, then wait a minute to make sure that it turns off completely.

Step 3: Put your iPhone in recovery mode
- Get ready by finding the button on your iPhone that you’ll need to hold in the next step:
- iPhone X or later, iPhone SE (2nd generation), iPhone 8, and iPhone 8 Plus use the Side button.
- iPhone 7 and iPhone 7 Plus use the Volume down button.
- iPhone SE (1st generation), and iPhone 6s and earlier use the Home button.
- Press and hold the correct button for your iPhone while immediately connecting your iPhone to the computer. Don’t let go of the button.
- Keep holding the button until you see the recovery mode screen on your iPhone, then let go.
If you see the passcode screen, you need to turn off your iPhone and start again.
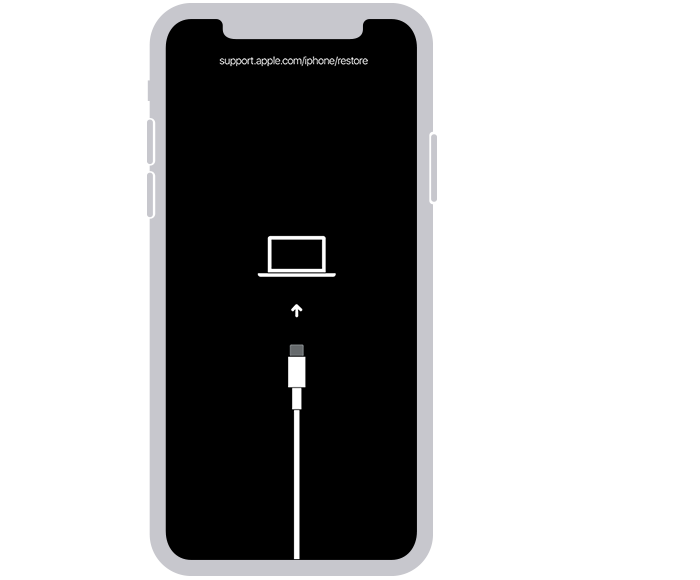
If you can’t get your iPhone to show the recovery mode screen and you need help, contact Apple Support.
Step 4: Restore your iPhone
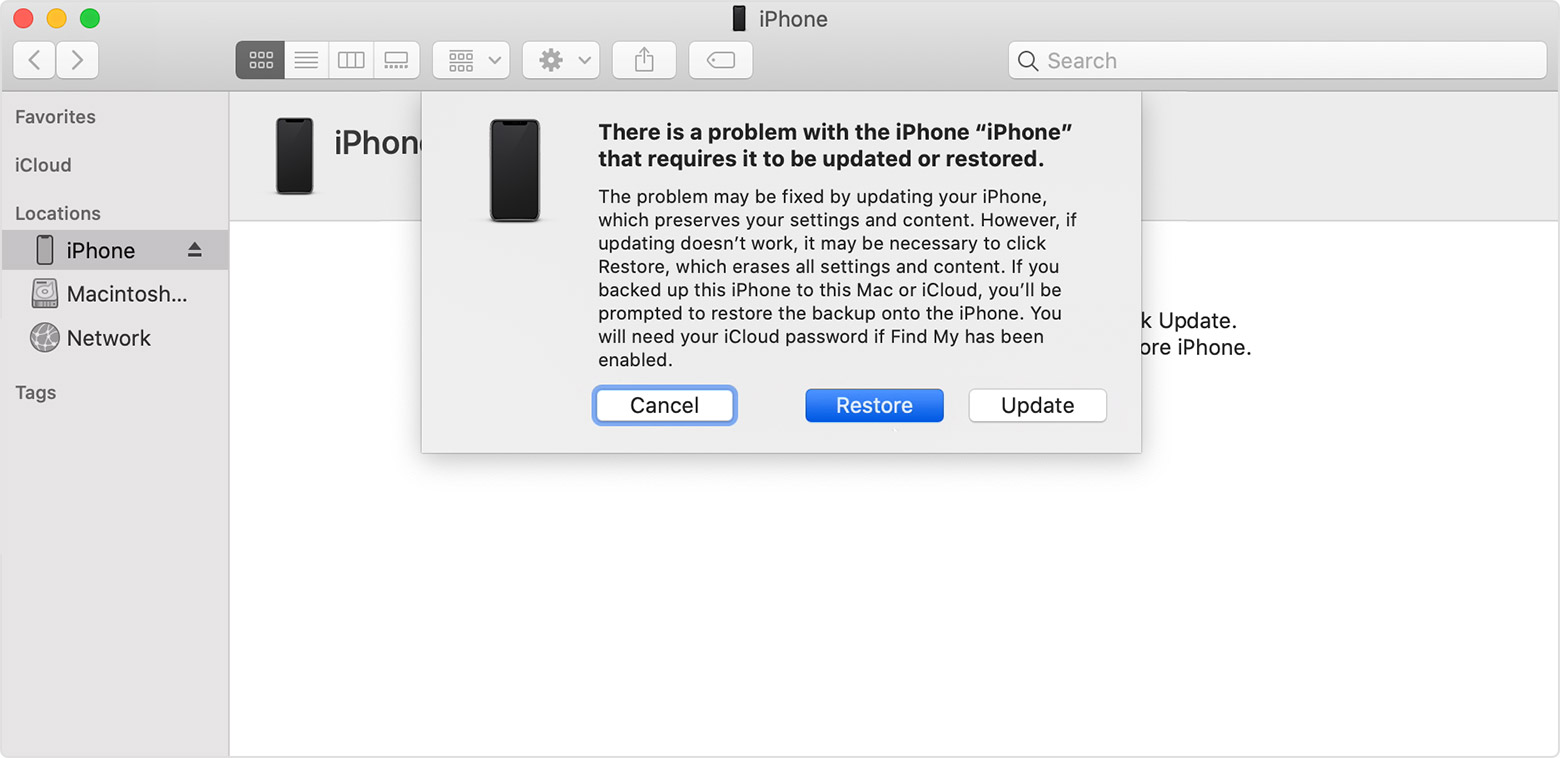
- Locate your iPhone in the Finder or in iTunes on the computer that it’s connected to. (Learn how to find your connected iPhone.)
- Choose Restore when you see the option to Restore or Update. Your computer downloads software for your iPhone and begins the restore process. If the download takes more than 15 minutes and your device exits the recovery mode screen, let the download finish, then turn off your iPhone and start again.
- Wait for the process to finish.
- Disconnect your iPhone from the computer, then set up and use your iPhone.
Need more help?
If you can’t complete any of these steps, if you’re still prompted for a passcode, or if you need any other assistance, contact Apple Support.
Источник
Design+Code 4+
Coding course for designers
Shadowness Inc.
Designed for iPad
-
- 4.7 • 1.1K Ratings
-
- Free
- Offers In-App Purchases
Screenshots
![]()
![]()
![]()
![]()
![]()
Description
Learn to design and code by building iOS and web apps. We have complete courses that teach UI design, mobile & web development using Figma, CSS, React Hooks and Xcode. Watch, download, gain certificates and check your progress all in one app. Join over 80,000 people who learned from Design+Code.
— Watch over 120 hours of video, with captions.
— Download source files to ensure that you start on the right foot or compare progress.
— Available on iPhone, iPad, and Web.
— Learn design-centric coding courses using the latest tools in the industry.
— Get tips and tricks from short tutorials.
— Track course and section progress so you can continue where you left off.
— Save your favorite courses, livestreams and tutorials.
— Access your history of sections visited.
— Download content to watch without an internet connection.
— Earn certificates after completing tests.
Design+Code offers 3 subscription plans:
— $21.99 USD/month for 1 month, billed monthly
— $14.99 USD/month for 6 months, billed every 6 months
— $11.67 USD/month for 12 months, billed every 12 months
Prices are in US dollars, may vary in countries other than the US, and are subject to change without notice. Payment will be charged to iTunes Account at confirmation of purchase. Subscriptions automatically renew unless auto-renew is turned off no later than 24 hours before the end of the current period. Subscriptions and auto-renewal can be managed/turned off in the Manage Subscription in the account settings.
Источник


