- Android и кастомные шрифты или «Да здравствует API 26»
- Как было раньше. Краткий обзор
- view.xml
- CustomFontTextView.class
- Но все изменилось в API 26
- Using Custom and Downloadable Fonts in Android
- The Older way of using Fonts
- Using Custom Font in Android
- Downloadable Fonts
- Fonts in XML
- Creating a font family
- Using fonts in XML layouts
- Adding fonts to a TextView
- Adding fonts to style
- Using fonts programmatically
- Kotlin
- Using the support library
- Kotlin
- Custom Fonts on Android — Dynamic Font Selection via XML
- Moonshoot
- Custom Fonts on Android Series Overview
- Different Fonts
- Preparing a Custom XML Property
- Using the font-Property
- Implementation of CustomFontTextView
- Reviewing the Results
- Next Steps
- Resources
- Get Notified on New Future Studio Content and Platform Updates
Android и кастомные шрифты или «Да здравствует API 26»
Как было раньше. Краткий обзор
Если было много view где требовались нестандартные шрифты, то мы использовали что-то вроде такого:
view.xml
CustomFontTextView.class
И это я пропустил огромный кусок который отвечает за то, чтобы не писать каждый раз путь к шрифту, а указывать
Ну, или шли на гитхаб и в результате находили Calligraphy (7000 звезд!)
Ни для кого не секрет что этот подход содержал много минусов как в огромном количестве boilerplate кода, так и в том, чтобы сделать это эффективно и где-нибудь не утечь по памяти запрашивая каждый раз Typeface.
Но все изменилось в API 26
Похоже, гугл наконец-то сдался и решил отказаться от навязывания Roboto и сделал удобное подключение сторонних шрифтов, за что ему огромное спасибо.
Линк для тех, кто любит читать в оригинале.
Теперь подключение состоит всего из нескольких несложных шагов:
1. Создаем папку font в res
Resource type выбираем font

2. Перетаскиваем в новую папку все нужные нам в проекте шрифты
3. Создаем файл для семейства шрифтов.
Обратите внимание: я сразу добавил в пример то как должен выглядеть файл, если вы хотите поддерживать и более старые версии Андроида. (Начиная с 14). Если вам повезло и у вас таргет только на супер-новые девайсы, то ваш файл сократится в 2 раза
Ну а дальше остается только наслаждаться сборкой
Использование в TextView
Используем в стилях
И у вас больше не болит голова об эффективности 🙂
Источник
Using Custom and Downloadable Fonts in Android
At the Google I/O 2017, Android O or simple Android Oreo was launched and it came with a lot of cool features. One of the really interesting features for developers was the new way to apply fonts right in your XML files. Yeah, you heard it right. Now there is no need of writing some piece of code for using the fonts. Also, you can choose from any of the thousands of fonts on Google Fonts and use them in your app.
So, in this blog, you will understand how to use Custom and Downloadable Fonts in Android?
The Older way of using Fonts
Before we move forward to look for the new or the latest way of using the font, let’s revise the older way of using fonts. Before the release of Android O, fonts can be used in the following 2 ways :
- Using Typeface: One would typically need a custom view that extends the equivalent view were trying to apply a font to. In the custom view, one would create a Typeface and then call setTypeface (or a similar method, that, sets the typeface). One would also need to have the font file placed in the assets folder. The code in the custom view typically looks like:
- Calligraphy Library : You can use some existing libraries for various fonts used in Android. One of them is Calligraphy Library.
Using Custom Font in Android
To work with Custom Font, you need to install the latest version of Android Studio 3.x. This is important as some of the features are not supported on Android Studio 2.x — for example, the font resource directory. Once you are done with the installation of the latest version of Android Studio, create a project and add a text view in any of the activity(This is the text view on which we are going to apply custom font). Then follow the below steps :
- Add a font directory to your project: In the Android View, right click on the resfolder and go to New -> Android Resource Directory. Type fontas the name of the font and select fontas the resource type. Then click on Ok.
- Add the downloaded font to the font directory: Copy and Paste your font into res/font.I am using Pacifico font. You can get this font from FontSqirrel.
- Create a font-family XML file: You can create font families which contain a set of font files with their style and weight details. To create a new font family you need to create a new XML font resource. The benefit is that you can access it as a single unit instead of referencing individual font files for each style and weight. To create a font-family, right click on res/fontand choose New -> Font Resource File and give any name. In my case, I am using my_custom_font.xml.
Note: A really important thing to note is that we had to define attributes using both android and app namespaces. The app namespace is what ensures that the feature is backward compatible.
- Set the font in the XML: Now you can use the font-familyattribute to set the font in XML.
Below is the preview of the above code :
Downloadable Fonts
Now that we have seen how custom fonts work, let’s jump onto another novality — downloadable font . Android 8.0 (API level 26) and Android Support Library 26 introduce support for APIs to request fonts from a provider application instead of bundling files into APK or letting the APK download fonts. A font provider application retrieves fonts and caches them locally so that other apps can request and share fonts. How cool is that!
The feature is available on devices running Android API version 14 and higher through the Support Library 26.
Picture courtesy : Android Developer website

As you can see in the image above, apps using Downloadable Fonts make a FontRequest using the FontsContract API which retrieves the Typeface from the Font Provider. The Font Provider does not need to download fonts if it already exists in the Font Cache.
Benefits of downloadable fonts :
- Reduces the APK size
- Increase the app installation success rate
- Improves the overall system health as multiple APKs can share the same font through a provider. This saves users cellular data, phone memory, and disk space. In this model, the font is fetched over the network when needed.
In order to use the downloadable font in android studio, follow the below steps :
- If you want to use Android Studio to generate the required files, then you’ll need version 3.0+. Add the following (version 26+) to your module’s build.gradle:
- Select a text view in your app that you want to apply the font to and click on the fontFamily attribute under Attributes in the graphical layout

Select the “More Fonts…” at the bottom, which will open the dialog below.

- Make sure to have “ Create downloadable font” selected. This results in three files being downloaded — lato.xml, font_certs.xml and preloaded_fonts.xml.
This file contains the font attributes for loading a Typeface from the Google Fonts Provider Application.
The system uses these certificates to verify the font provider’s identity, to avoid getting fonts from an unknown source. If using the steps above, Android Studio should have automatically generated the string certificates for dev and prod in font_certs.xml below.
preloaded-fonts.xml
This file is referenced in the Android manifest which helps the framework pre-load fonts to avoid delays when the app is launched.
- Make sure this line is added to your app’s Manifest file, Android Studio should have done this automatically:
- Great, now you are ready to apply the fonts in XML!
All I had to do was set the font family in the app’s theme to get TextViews throughout the app to change to Lato, including parts that were bold or italicized. However, if you want to configure the weights, you can follow the same steps to get Lato Bold using Android Studio, and change the weight manually in lato_bold.xml that you can then apply in XML layouts:
That’s all about the custom and downloadable fonts in android. Hope you like the blog.
Источник
Fonts in XML
Android 8.0 (API level 26) introduces a new feature, Fonts in XML, which lets you use fonts as resources. You can add the font file in the res/font/ folder to bundle fonts as resources. These fonts are compiled in your R file and are automatically available in Android Studio. You can access the font resources with the help of a new resource type, font . For example, to access a font resource, use @font/myfont , or R.font.myfont .
To use the Fonts in XML feature on devices running Android 4.1 (API level 16) and higher, use the Support Library 26. For more information on using the support library, refer to the Using the support library section.
To add fonts as resources, perform the following steps in the Android Studio:
- Right-click the res folder and go to New > Android resource directory.
The New Resource Directory window appears.
In the Resource type list, select font, and then click OK.
Note: The name of the resource directory must be font.

Figure 1. Adding the font resource directory
Add your font files in the font folder.
The folder structure below generates R.font.dancing_script , R.font.lobster , and R.font.typo_graphica .

Figure 2. Adding the font files in the resource directory
Double-click a font file to preview the file’s fonts in the editor. 
Figure 3. Previewing the font file
Creating a font family
A font family is a set of font files along with its style and weight details. In Android, you can create a new font family as an XML resource and access it as a single unit, instead of referencing each style and weight as separate resources. By doing this, the system can select the correct font based on the text style you are trying to use.
To create a font family, perform the following steps in the Android Studio:
- Right-click the font folder and go to New > Font resource file. The New Resource File window appears.
- Enter the file name, and then click OK. The new font resource XML opens in the editor.
- Enclose each font file, style, and weight attribute in the element. The following XML illustrates adding font-related attributes in the font resource XML:
Using fonts in XML layouts
Use your fonts, either a single font file or a font from a font family, in a TextView object or in styles. To add fonts to the TextView or in styles, use the fontFamily attribute.
Note: When you use a font family, the TextView switches on its own, as needed, to use the font files from that family.
Adding fonts to a TextView
To set a font for the TextView , do one of the following:
- In the layout XML file, set the fontFamily attribute to the font file you want to access.
- Open the Properties window to set the font for the TextView .
- Select a view to open the Properties window.
Note: The Properties window is available only when the design editor is open. Select the Design tab at the bottom of the window.

Figure 4. Selecting the font from the Properties window
The Android Studio layout preview, shown in the rightmost pane of Figure 5, allows you to preview the font set in the TextView .
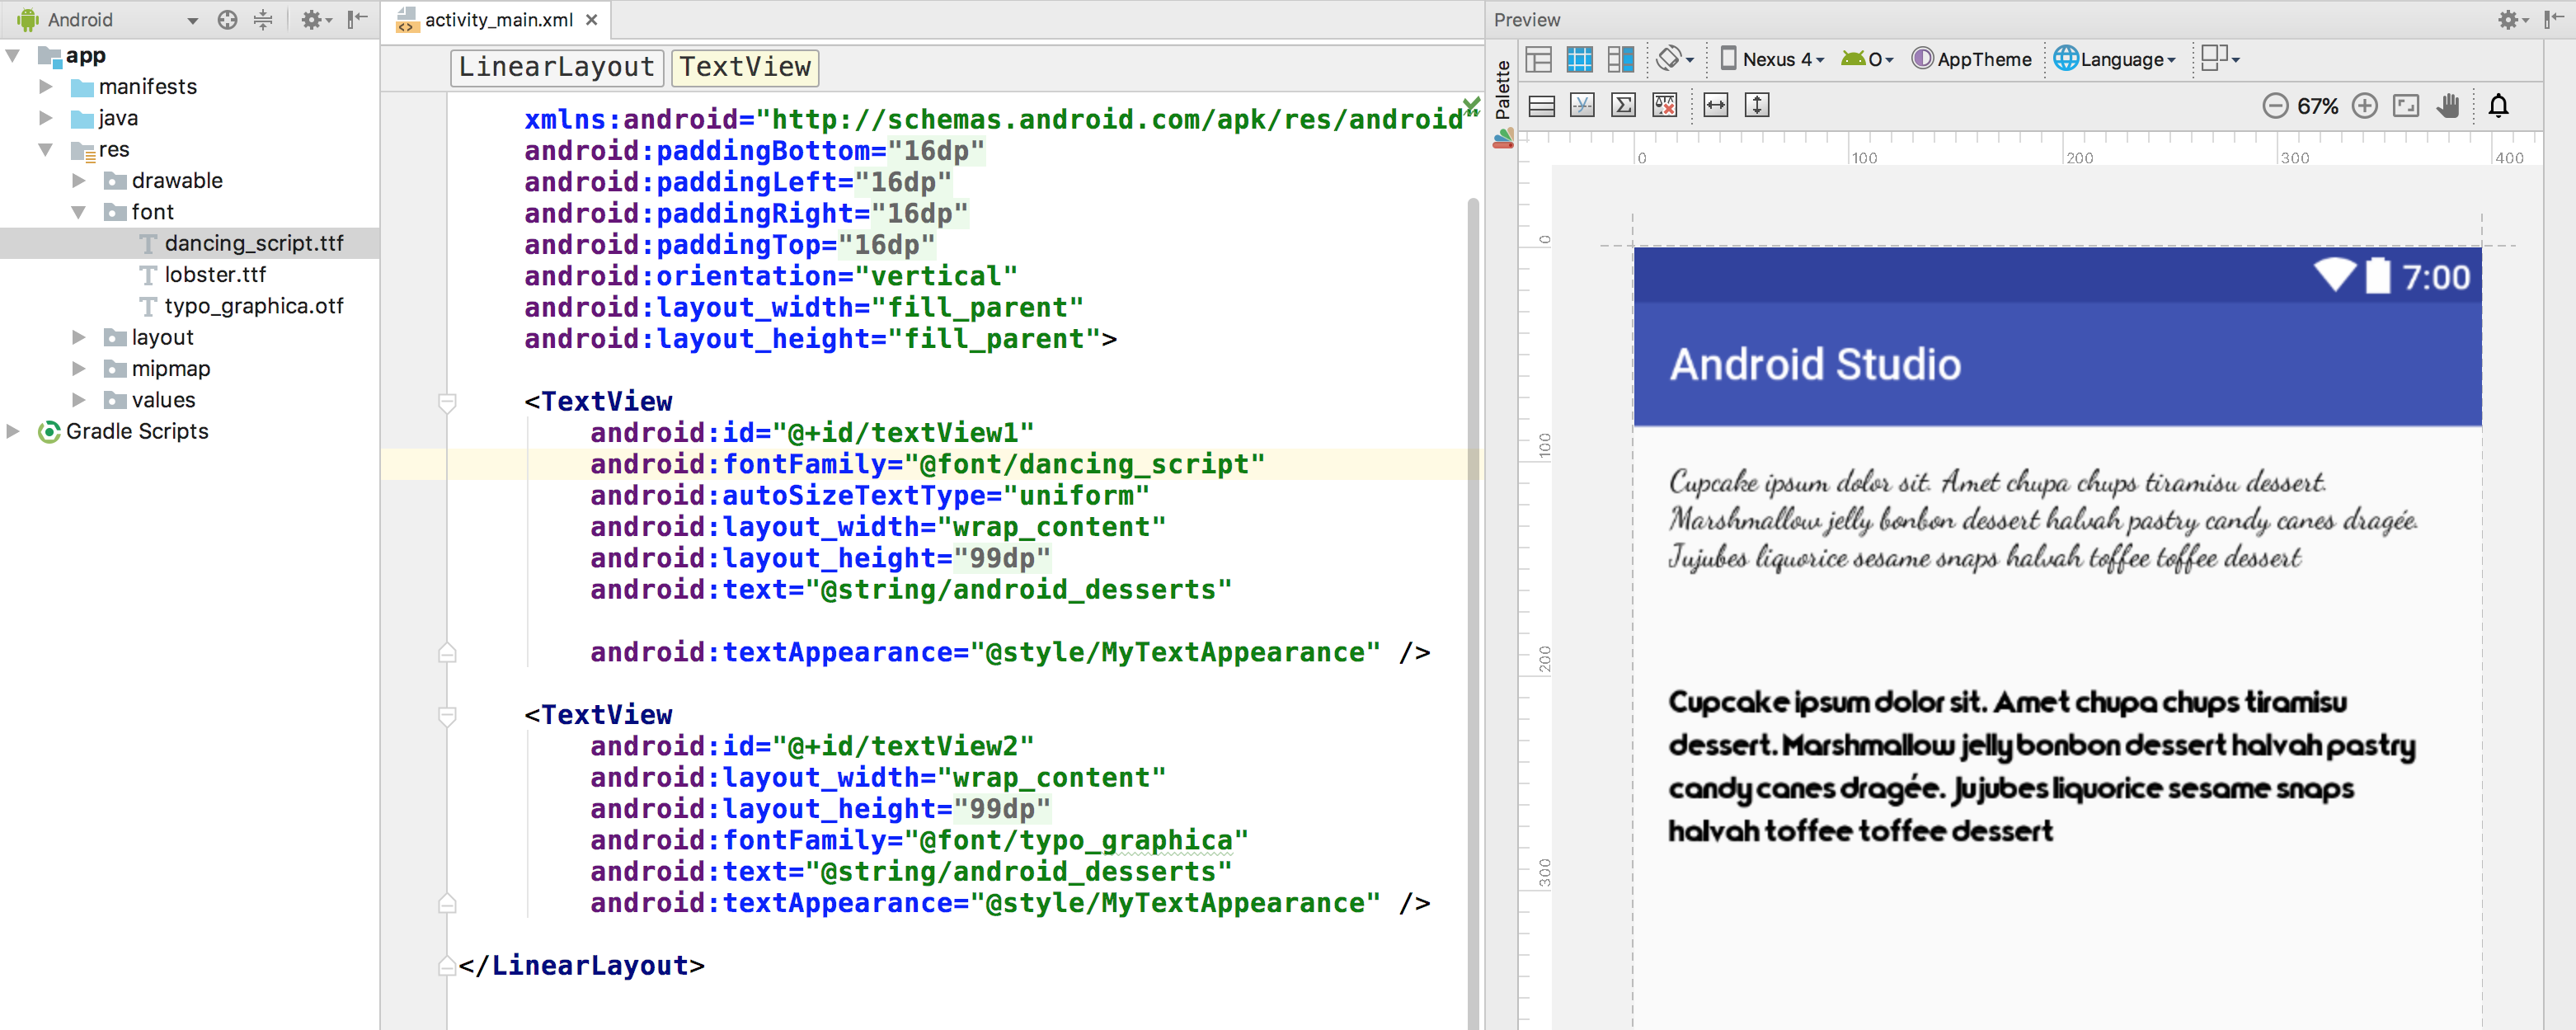
Figure 5. Previewing fonts in layout preview
Adding fonts to style
Open the styles.xml , and set the fontFamily attribute to the font file you want to access.
Using fonts programmatically
To retrieve fonts programmatically, call the getFont(int) method and provide the resource identifier of the font you want to retrieve. This method returns a Typeface object. Although the system picks the best style for you from the fonts information, you can use the setTypeface(android.graphics.Typeface, int) method to set the typeface with specific styles.
Note: The TextView already does this for you.
Kotlin
Using the support library
The Support Library 26.0 provides support to the Fonts in XML feature on devices running Android 4.1 (API level 16) and higher.
Note: When you declare font families in XML layout through the support library, use the app namespace to ensure your fonts load.
To retrieve fonts programmatically, call the ResourceCompat.getFont(Context, int) method and provide an instance of Context and the resource identifier.
Kotlin
Content and code samples on this page are subject to the licenses described in the Content License. Java is a registered trademark of Oracle and/or its affiliates.
Источник
Custom Fonts on Android — Dynamic Font Selection via XML
Moonshoot
Moonshoot is a
Student Feature.
This is the fourth post in our series of custom fonts on Android. In the last few weeks, we’ve seen how to use custom fonts and apply different styles to a TextView . This week, we’ll show an advanced solution on adding a font parameter to the TextView XML in order to set the font dynamically — without any code!
If you haven’t read the previous blog posts, you should do so. It might help your understanding since they’re all based on each other.
Also, feel free to take a look at the entire example project on Github.
Custom Fonts on Android Series Overview
- Getting Started Font Family Programmatic Use
- Downloadable Fonts
Using Font Styles
Dynamic Font Selection via XML
Providing Build-Variant-depending Fonts
Custom Fonts on Other Standard Views
Adding Support for Extra Bold, Extra Light and More
- Quick & Dirty
- Extending TextView
- Using Font Styles
- Dynamic Font Selection via XML
- Providing Build-Variant-depending Fonts
- Custom Fonts on Other Standard Views
- Adding Support for Extra Bold, Extra Light and More
- Library Recommendations
Different Fonts
Generally, we like using other beautiful fonts besides Roboto as a way to let the app stand out, be different and rememberable to the user. While we explain in this post an easy way to use multiple fonts, proceed with caution. Any UI with too many fonts just gets messy and distracting!
Of course, you might have your reason for adding more than one custom font. For example, we love using FontAwesome for well-designed icons, customizable in size and color. It’s very convenient to set the font directly via XML without an additional line of Java code. Before we get to that, we’ll need to do some small preparations.
Preparing a Custom XML Property
Since we want to set the font via XML and Android has no appropriate TextView property we can hijack (similar like we did in our previous blog post), we’ve to add a custom property we call font . The first step is to add a attrs.xml in your /values/ folder. The content should look like this:
All this does is let the system know we’ve a custom property with the name font belonging to the class CustomFontTextView . From now on we can access that property in code and in XML.
Let’s go one step further and add the name of the fonts we want to use as a String resource in /values/strings.xml :
This will make some things easier for us down the road. Our preparations are done, onto the important parts .
Using the font-Property
Let’s look at the XML to learn how to use the newly added property font . First thing you’ve to do is add this line
to your highest view hierarchy element. For example, if your view is nested in a LinearLayout , it’d look like this:
That one line allows you to access the font parameter by prefacing it with app: . Of couse, you can freely change the app: to anything you like.
As already mentioned, you now can set your custom XML property via app:font , for example:
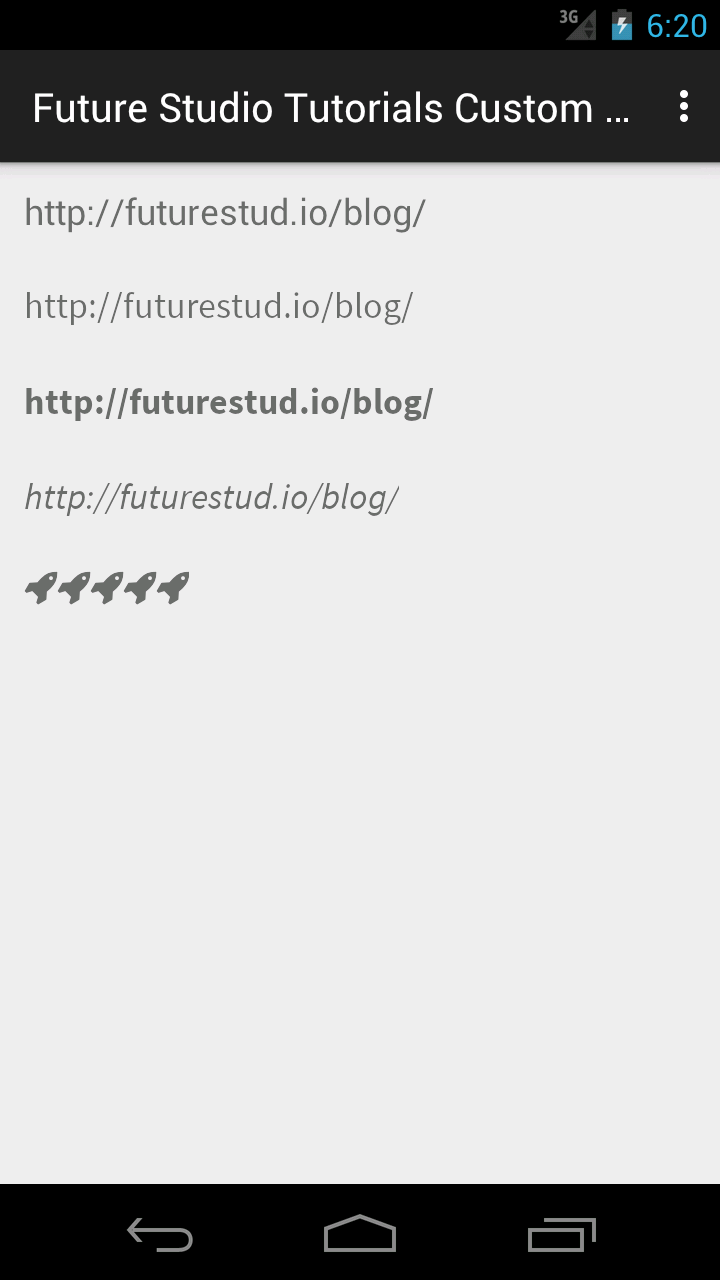
The code above would display the link to our blog in Source Sans Pro. Our other font, FontAwesome, is rather for single character use. We looked at the FontAwesome CheatSheet and used the code for the rocket icon ( ) five times:
This should display the rocket item fives times, since the FontAwesome font will be applied. However, before that works, we’ve to go one last step.
Implementation of CustomFontTextView
We’ve seen in the previous blog post how to obtain the value of an XML property. However, since we use a custom property this time, the code is a little more complex. First, we’ve to get an array with all properties with calling obtainStyledAttributes() :
The last parameter is a reference to the attrs.xml file we created as the first step! Now we just need to use the getString() function on the attributeArray to get the specified font name:
Lastly, we’ve to extend our logic in our CustomFontTextView to set the font correctly. The important changes happened in applyCustomFont() and selectTypeface() . The entire class now looks like this:
If the function cannot find an appropriate font, we’ll return null so Android just uses Roboto as a default.
Reviewing the Results
As always, we’ll demonstrate the functionality in our example activity, now with another line for FontAwesome:
The view of the activity would look like this:
Next Steps
This is everything you’ve to do to specify custom fonts via XML! Feel free to add or change fonts according to your needs. At this point, we’re technically done with the series. However, we’ll add two more blog posts on how to change the standard font for each build variant and how to apply the custom fonts to other standard views (for example Button ).
Let us know if everything works well for you in the comments or on twitter @futurestud_io.
Resources
Get Notified on New Future Studio
Content and Platform Updates
Get your weekly push notification about new and trending
Future Studio content and recent platform enhancements
Источник


