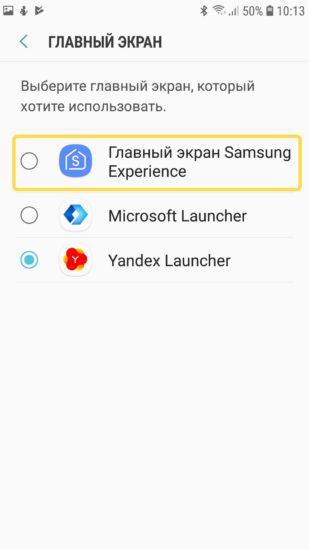
- How to change the default launcher in Android Lollipop
- Take control of your home screens
- Samsung needs to bring back its iPod competitor
- VoLTE: How to use it and why you should care
- PlayStation reportedly planning service to compete with Xbox Game Pass
- These are the best USB-C cables you can find for Android Auto
- Как сменить лаунчер по-умолчанию на смартфоне под Андроид
- Меняем лаунчер на смартфоне
- На Самсунг
- На Xiaomi
- Set Default Launcher with App Manager
- Overview
- Downloading required Launcher Applications:
- Creating The Project
- Adding The AppManager Profile
- Enabling Android Permissions
- Adding Some Code
- Running the Application
- Important Programming Tips
- What’s Next
How to change the default launcher in Android Lollipop
Take control of your home screens
One of the coolest things about Android is the way we, as users, can take control of core parts of the operating system and change them up. We’ve seen it with keyboards, messaging apps, and of course, the launcher itself.
There are some really great third-party launchers for Android. Apps like Nova Launcher or Action Launcher are extremely popular, and proof that those of us using Android relish having a choice to do things a different way. These apps have hundreds of thousands of downloads for a reason. Having said that, it’s important to know just how to manage your launcher(s) on your phone or tablet. Have a look at setting defaults (and removing any defaults) in Android Lollipop.

If you can’t see the video, the process is dead simple.
- Install any of the great third-party launchers from Google Play. In fact, install as many as you like!
- Tap your home button. Choose the launcher you want to use from the list you’re provided. If you want choose «just once» you’ll get the same choice the next time you hit the home button. If you choose «Always» you’ll use the launcher you chose by default each time you go back home.
- To choose a different default, go to Settings > Home and pick from the list.
- To clear any defaults and get a choice again, go to Settings > Apps and find the list entry for the launcher you’ve set as default. Tap the entry to open the app settings, and chose to Clear Defaults.
There are plenty of other tips and tricks in Android Lollipop, and we’ll be bringing them to you one at a time. While some may feel basic, inclusion of everything makes for the best set of help and how-to docs — especially for those new to the world of Android. Stay tuned!
![]()
Samsung needs to bring back its iPod competitor
I don’t want to buy an iPod Touch. Since I want a reasonably priced PMP with acceptable audio hardware that can install a few crucial apps, I might have to.
![]()
VoLTE: How to use it and why you should care
VoLTE — or Voice over LTE — is the new standard for calling throughout the U.S., Canada, and parts of Europe. Not only does it facilitate much higher call quality between cell phones, but it allows devices to stay connected to LTE while on a call, improving data speeds for everyone.
![]()
PlayStation reportedly planning service to compete with Xbox Game Pass
Sony is planning to create a service similar to Xbox Game Pass, according to a new report. The service could launch as early as sometime in the spring of 2022, with multiple tiers.
![]()
These are the best USB-C cables you can find for Android Auto
Android Auto is an absolute necessity when driving, regardless of whether you’re headed out to the grocery store or for a long road trip. These cables will ensure your phone stays protected and charged, no matter what.
Источник
Как сменить лаунчер по-умолчанию на смартфоне под Андроид
Нередко возникает ситуация, когда пользователь скачивает и устанавливает лаунчер для смартфона под Андроид, а результат его не устраивает. Главный экран выглядит не так, как хочется, не нравится интерфейс, возникают зависания и торможения. В этой статье рассмотрен быстрый способ смены лаунчера на телефоне за два шага.

Меняем лаунчер на смартфоне
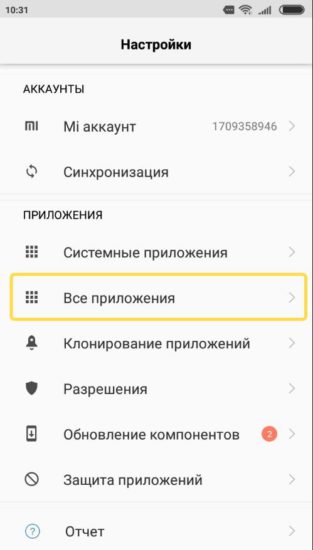
На Самсунг
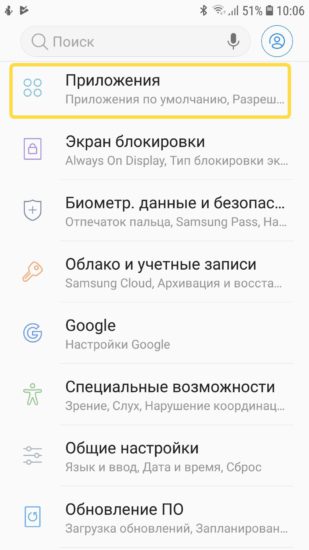
Открываем пункт Настроек, который называется Приложения.
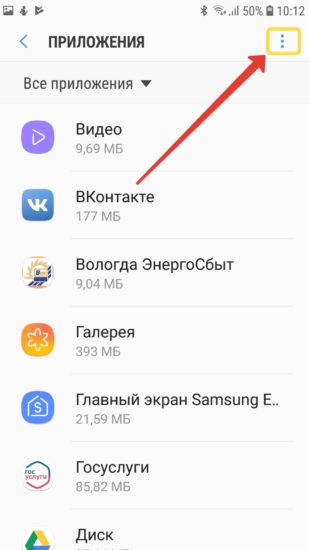
Теперь нажимаем кнопку с тремя точками в правом верхнем углу для вызова меняю дополнительных опций.
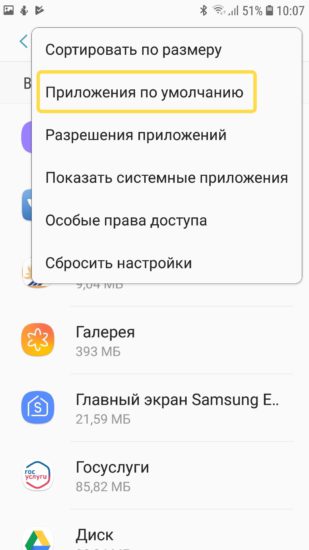
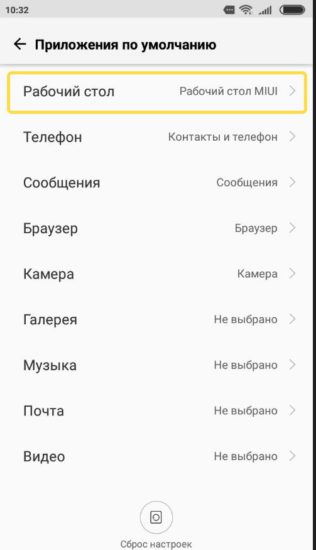
Выбираем пункт Приложения по-умолчанию.
В данном разделе настройки собраны приложения для открытия страниц интернета, обмена сообщениями и работы в качестве главного экрана смартфона. В заводских настройках телефона стоит лаунчер от Google или фирменный: Samsung Expirience у Самсунгов, Рабочий стол MIUI у смартфонов Xiaomi.
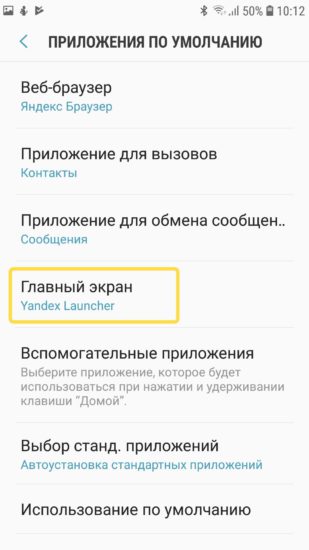
Выберите подходящий Рабочий стол и поставьте напротив него галочку.
После выхода из настроек, главный экран уже будет работать под управлением новой программы.
На Xiaomi
На телефонах Сяоми в пункте Приложения нужно выбрать Все приложения.
Затем отображается экран выбора умолчаний аналогичен вышеописанному.
Аналогичным способом можно выбрать браузер по-умолчанию и мессендждер, который будет использоваться для обмена сообщениями. Также можно поменять штатную звонилку.
Источник
Set Default Launcher with App Manager
EMDK For Android 7.6
Overview
This guide will walk you through creating an EMDK For Android application that will use MX features introduced in EMDK for Android API to perform device configurations. MX represents a suite of Enterprise Features on top of standard, commercially available Android Open Source Project. So this tutorial will focus on one of the functions of App Manager API, which allows user to set any launcher application as a default launcher application using App Manager API.
The tutorial would enable user to set an application as default launcher using:
1. EMDK Profile Manager wizard:
Initially, we will configure EHS (Enterprise Home Screen) launcher application as the default launcher application using Profile Manager wizard. Enterprise Home Screen (EHS) is a replacement application launcher, for Zebra Android devices, designed to allow only specified applications to be launched. So this launcher will replace the existing launcher application in the device.
2. App Manager API:
Once the EHS has been set as the default launcher application, we will modify this setting by setting another application as default launcher through the code using App Manager API for default launcher. You can use any applicable launcher application. We will use Galaxy Launcher application to set as default launcher application through code in this tutorial.
This allows you to understand how to configure parameters using Profile Manager and modify it using App Manager API.
Downloading required Launcher Applications:
As discussed above, we will now download and install the two launcher applications (EHS and Galaxy Launcher).
- You can download Enterprise Home Screen application here. Unzip the file to get the APK to install.
- You can download Galaxy Launcher application here.
Once downloaded, you can put them in SD card of the the device and install both of these launcher applications.
The App Manager API requires the Android package name of the application that you want to set as default launcher. If we know the package name then we can specify it in the field, but in this case we don’t know as we have downloaded theses APK files from different sources.
Note: Android device does not provide package names of the installed applications.
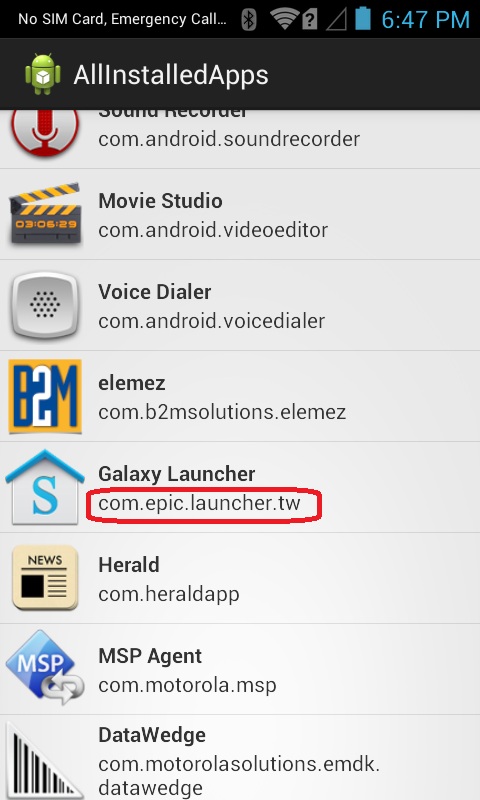
So we have created an application that finds all the installed applications programmatically and displays their package names along with the application name in a list.
You can download the application and install it — or modify the source to your liking. Once installed, open the app and you can find the package names of both the applications.
So, the Package name for EHS Launcher App is com.motorolasolutions.enterprisehomescreen
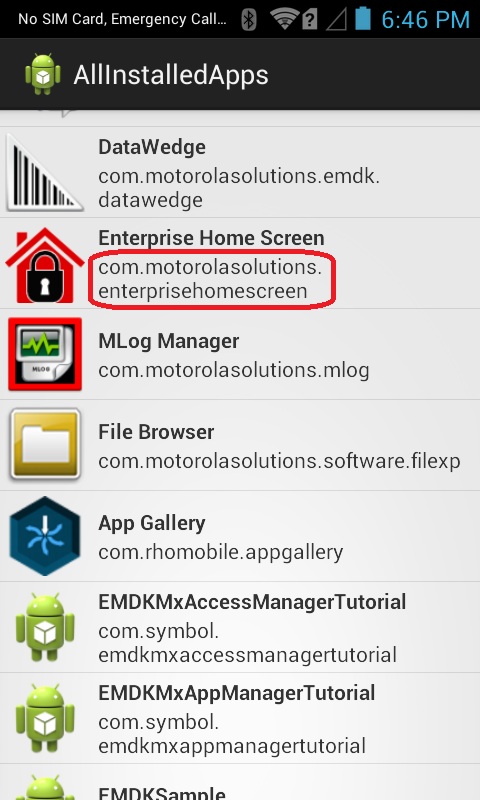
Package name for Galaxy Launcher App is com.epic.launcher.tw
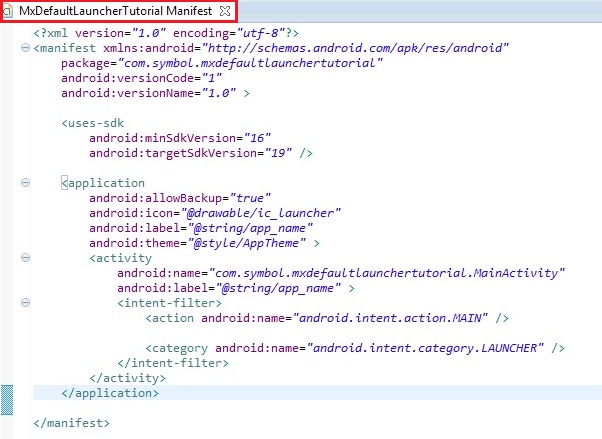
Creating The Project
Note: Provide «MxDefaultLauncherTutorial» as the project name for this tutorial.
Start by creating a new Android Studio project.
Adding The AppManager Profile
Click here to see how to add a specific feature to the Profile Manager.
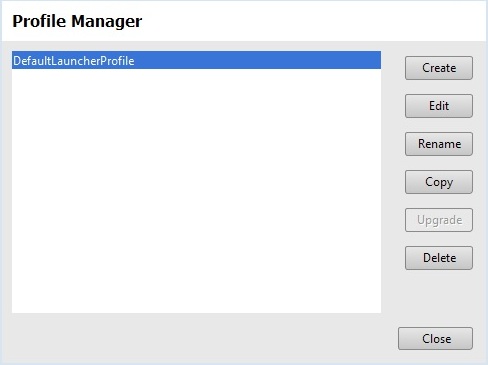
Provide «DefaultLauncherProfile» as the Profile Name for this tutorial.
Note: You can provide any Profile Name but make sure to access it with the similar name in the Android code.
Now, you can see all these MX features on the left hand side of the Profile Editor window. Select the «App Manager» feature from the list and click «Right Arrow». Using this feature you can perform various operations in your apps on the Zebra Android device. These operations could be installing apps, uninstalling apps, upgrading apps and setting specific app as default launcher. We will be concentrating on Default Launcher feature in this tutorial.
Click on the App Manager feature. The parameter list will be populated.
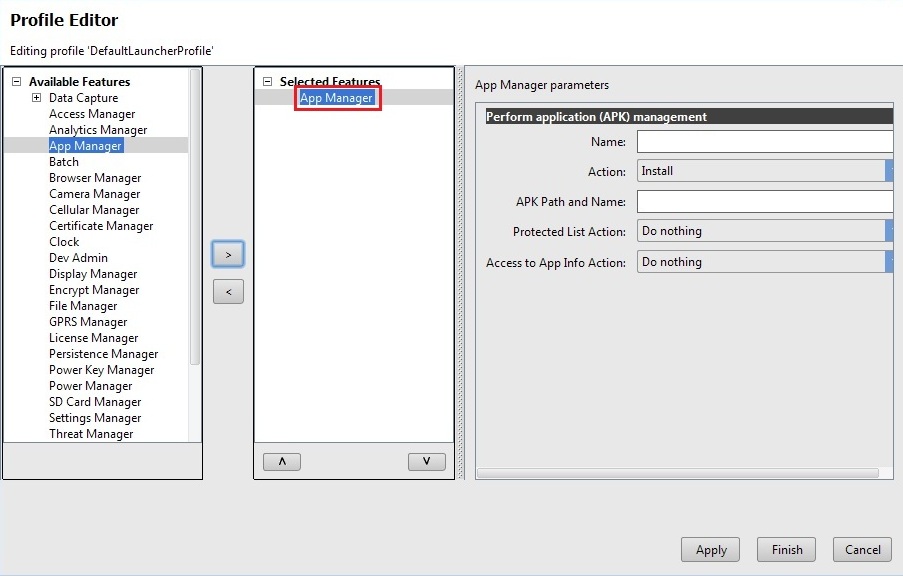
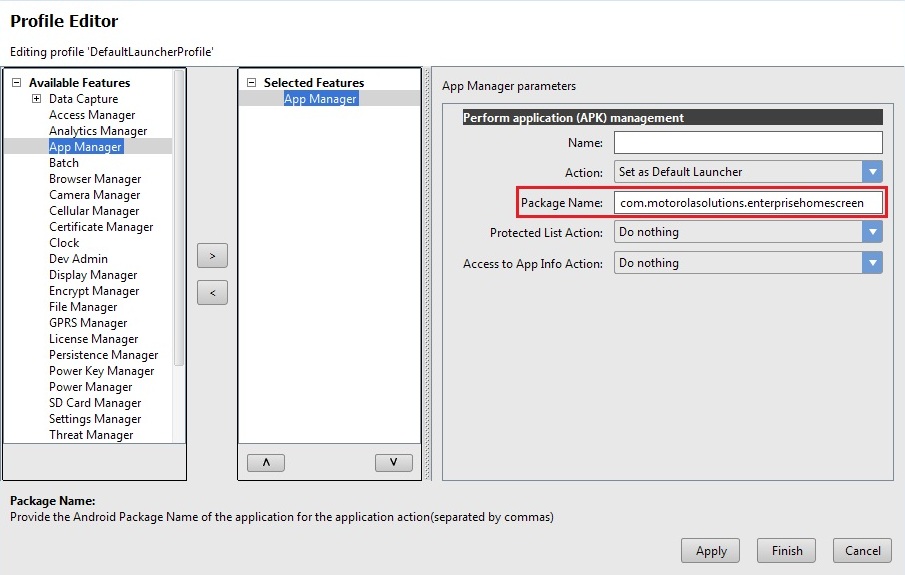
Now Click on the drop-down of the action field to see the supported features by App Manager. Select «Set as Default Launcher» feature.


Keep the ‘Name’ field empty. Now let us set earlier installed EHS launcher application as default launcher application. So provide the previously found package name of EHS application (com.motorolasolutions.enterprisehomescreen) in the field «Package Name». Keep the last to «Action» fields as it is.
Note: If you have a different launcher application then provide the package name accordingly.
Click Apply and Finish.
Note:
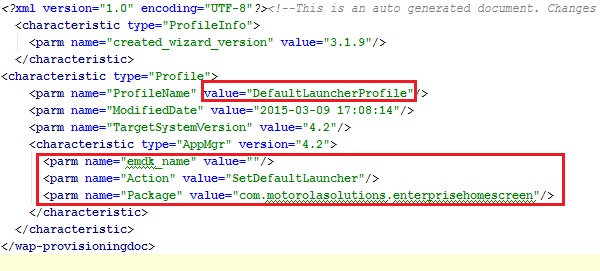
Now the «EMDKConfig.xml» is created under «\assets» folder. This file will contain a definition of all of your profiles that you create.
You can inspect the «EMDKConfig.xml» to see it is reflecting the changes made to the parameters via EMDK Profile Manager GUI earlier. However, it is advised that this file not be manually updated and only be controlled via the Profile Manager. So you can see the entry of the ‘Set Default Launcher’ feature of App Manager and the package name of the launcher application that we entered earlier in the profile creation.
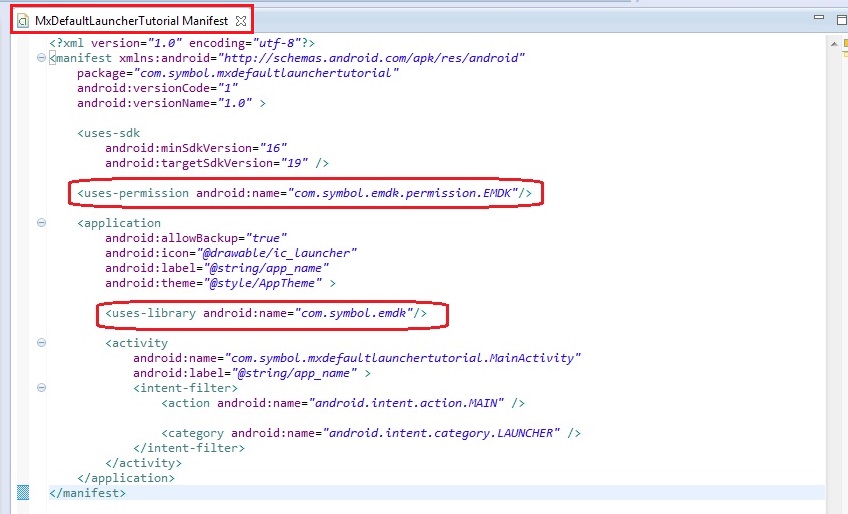
Enabling Android Permissions
Modify the Application’s Manifest.xml to use the EMDK library and to set permission for the EMDK.
You must first enable permissions for ‘com.symbol.emdk.permission.EMDK’:
Then you must enable the library:
When done, your manifest.xml should look like:
Adding Some Code
Now we will start to add some code.
First you must add references to the libraries:
Then you must extend the activity to implement EMDKListener.
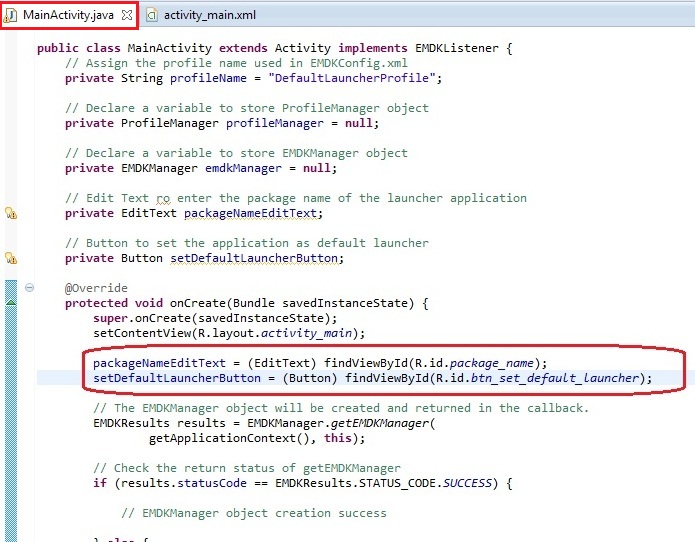
We will now create some global variables to hold the profile name as well as instance objects of EMDKManager and ProfileManager with a status variable while applying the profile. Some of the variables are used to hold the name, type and description in case of any errors. These variables would be used throughout the code.
Note: Verify the Profile name in the code with the one created in the Profile Manager. They both should be identical.
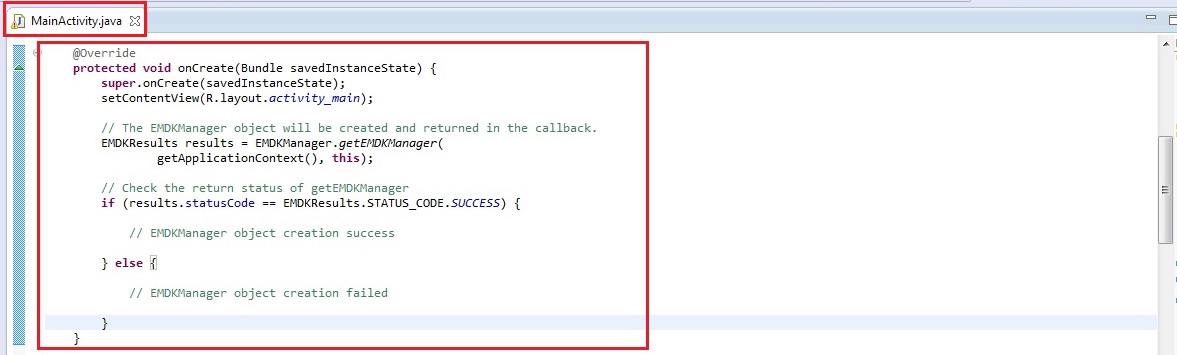
In the onCreate method, we call getEMDKManager so that the EMDK can be initialized and checked to see if it is ready.
So far your code should look like:
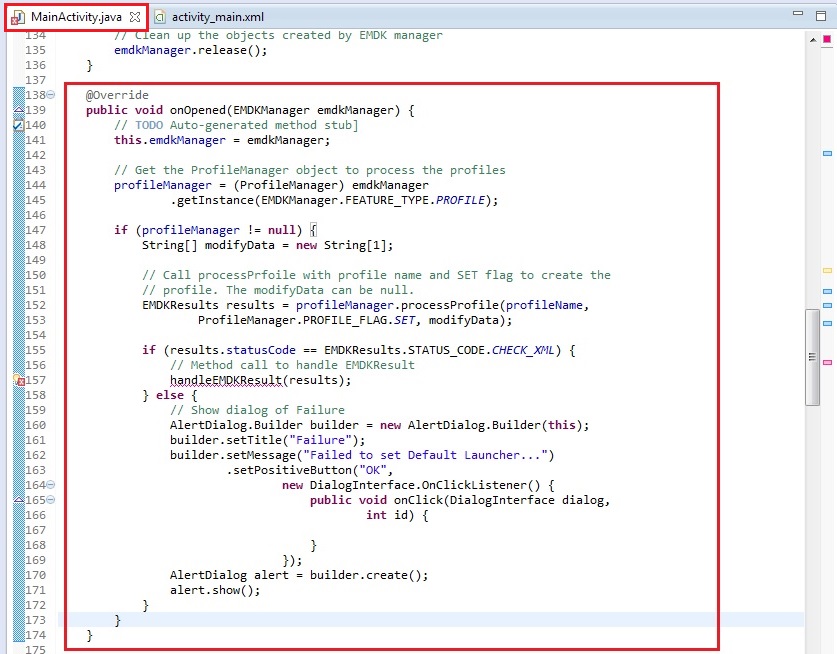
Now we need to use the onOpened method to get a reference to the EMDKManager. The EMDKListener interface will trigger this event when the EMDK is ready to be used. This must be implemented in order to get a reference to the EMDKManager APIs. This event will pass the EMDKManager instance and we assign it to the global variable emdkManager that we created in the previous steps. We then use that instance object to get an instance of ProfileManager and assign it to the global variable profileManager . This is how we will interface with the APIs in the rest of the code:
Note: Set the name of the method argument to emdkManager
Now that we have a reference to ProfleManager, we use it to install and activate the profile we built earlier using the processProfile method. We could have also performed this action at a different time, say when someone pressed a button, but we chose to do it as soon as the EMDK was ready:
This processProfile method returns the result of applying a particular profile that we set using EMDK Profile Wizard in EMDKResults reference. If the profile is successfully processed, it retuns the status as CHECK_XML and then we go on and parse the response to get further details whether the profile was applied successfully or not. Otherwise we display a Failure message in a dialog.
Note: 1. There is a difference between processing a profile successfully and applying a profile successfully.
Note: 2. If the status is other than CHECK_XML , we are simply displaying a failure message. You can actually go ahead and check different types of status and display the appropriate message accordingly, which is not in the scope of this sample tutorial.
In case of CHECK_XML status, We retrieve XML response string from the result using getStatusString method. So we will call a method handleEMDKResult to handle this EMDKResults, which we will create in the next step.
Your onOpened method should now look like this:
It shows error as we have not yet declared handleEMDKResult method. So let us create this method, which would get the XML String response from EMDKResults, call the parseXML method to parse it and eventually call displayResults method to display output in a dialog, which we would be declaring in coming steps.
Your handleEMDKResult method should now look like this:
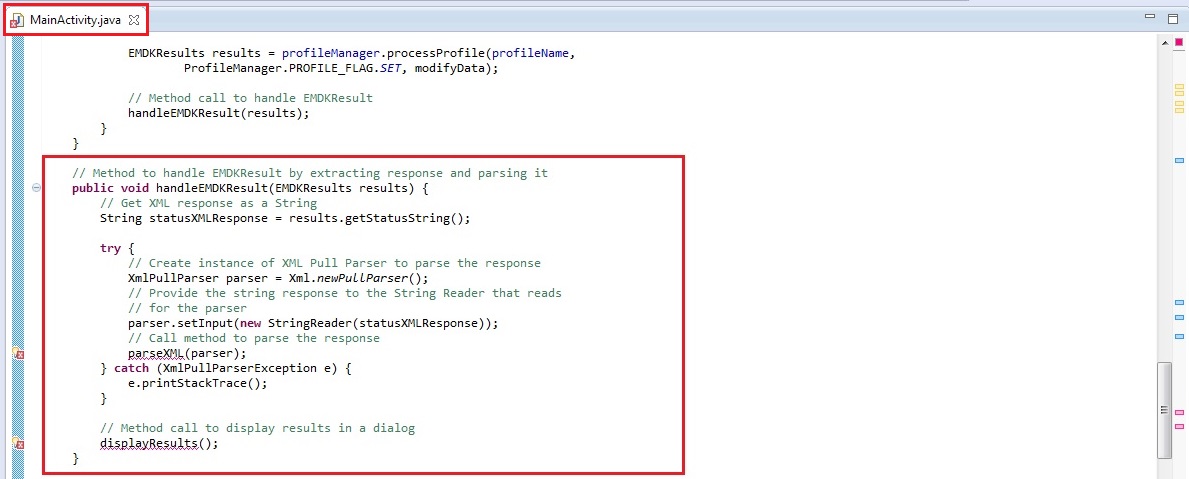
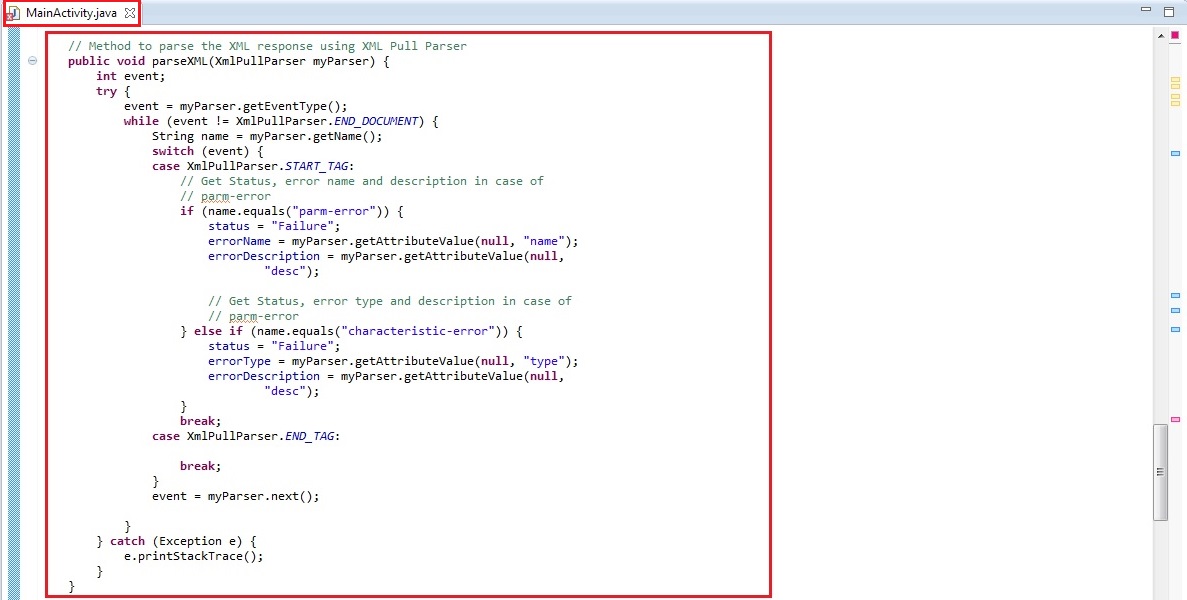
You will see few errors as we have not declared the respective methods to parse the response and display result. Lets do it one by one. In this step, we will create a method parseXML that uses XML Pull Parser to parse the XML string response and set the status and error parameters if any.
In the reponse, we are supposed to capture name and desc for parm-error tag, type and desc for characteristic-error tag in case of any errors.
Your complete parseXML method should now look like:
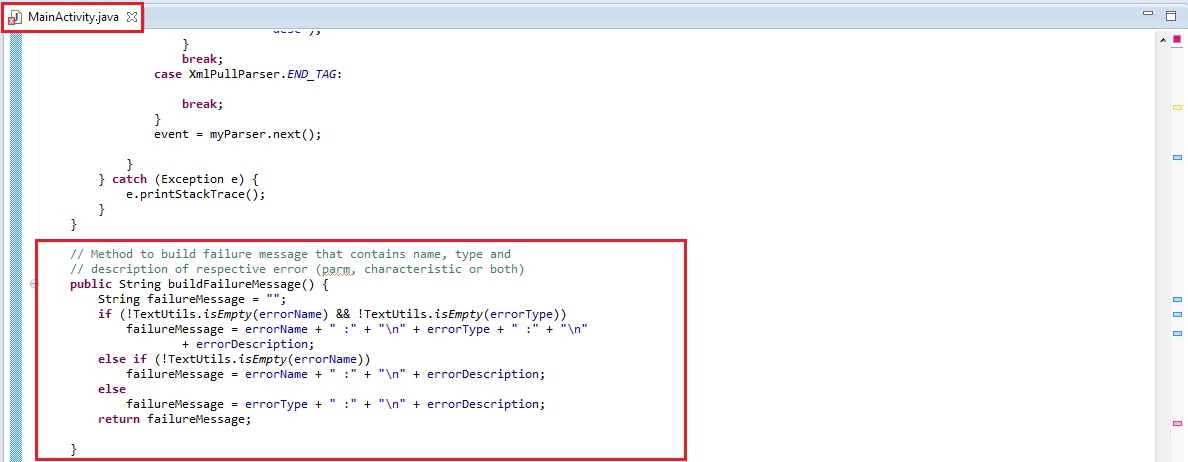
You will still see one error as we need to declare displayResults method to display the result of profile operation in a dialog. Before displaying the results, we should form the content of the result to be shown first, specifically in case of errors. This could be done by creating buildFailureMessage method.
In this method, the error message in case of error is formed using following way:
- Name and description of error if the response contains parm-error .
- Type and description of error if the response contains characteristic-error .
- Name, type and description of error if the response contains both parm-error and characteristic-error .
The buildFailureMessage method would have following code to match the above mentioned criteria.
buildFailureMessage method should look like:
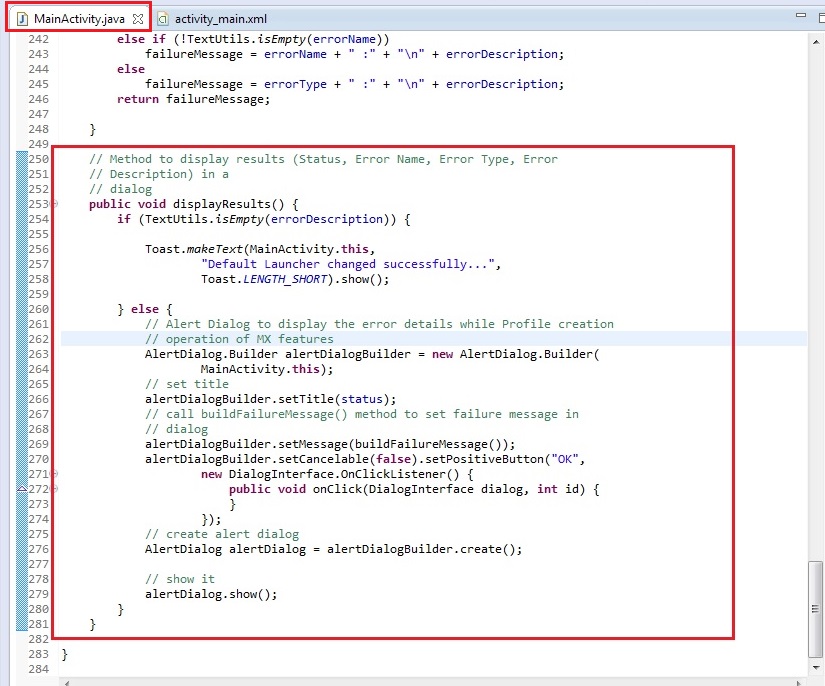
In this step, we will add displayResults method to display the result of profile operation. If the Profile is successfully applied, we will display a Toast with a success message and in case of any errors, we will display a dialog with the corresponding error details.
The method displayResults should look like:
You can see that all the errors are gone.
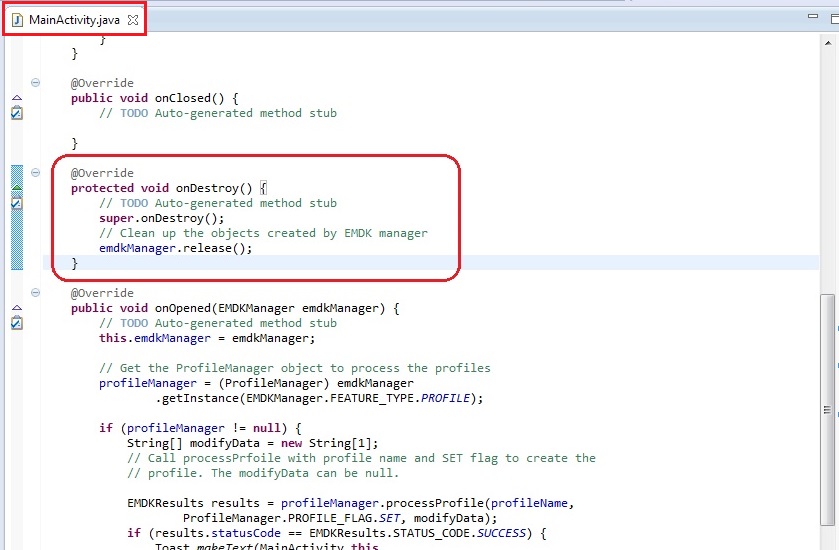
Now let’s override the «onDestroy» method so we can release the EMDKManager resources:
Your onDestroy method should now look like this:
Settings at this point would allow you to apply EHS (Enterprise Home Screen) as the default launcher of your Mototrola Android device when we run the application.
But we also want to set the another launcher application (Galaxy Launcher) as the default launcher programmatically. So we will add the required code to implement it.
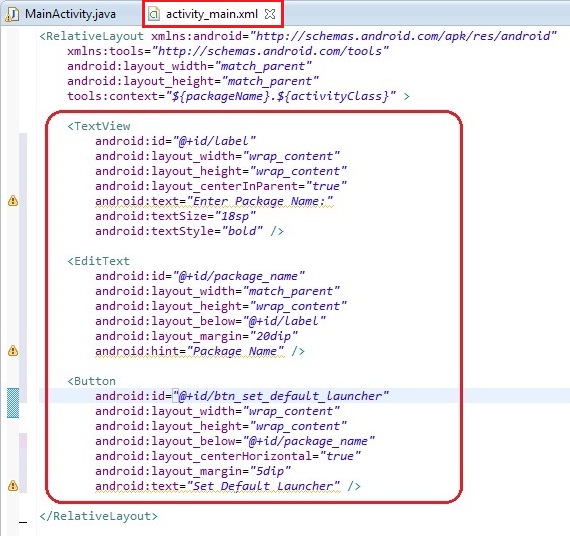
Remove the default «TextView», inside «res/layout/activity_main.xml».
Add the following code that has an Edittext to enter the package name of the launcher application and a button to implement operation.
The layout file ‘activity_main.xml’ inside «res/layout/» should now look like:
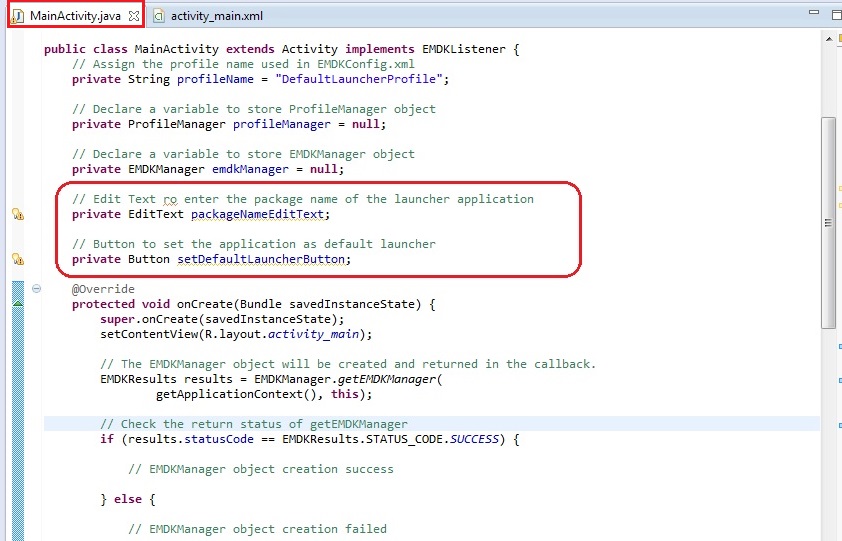
Now, In the Main activity make an entry of these UI elements using following code:
So far the code looks like:
Get the reference of these UI elements in onCreate method.
The onCreate method now looks like:
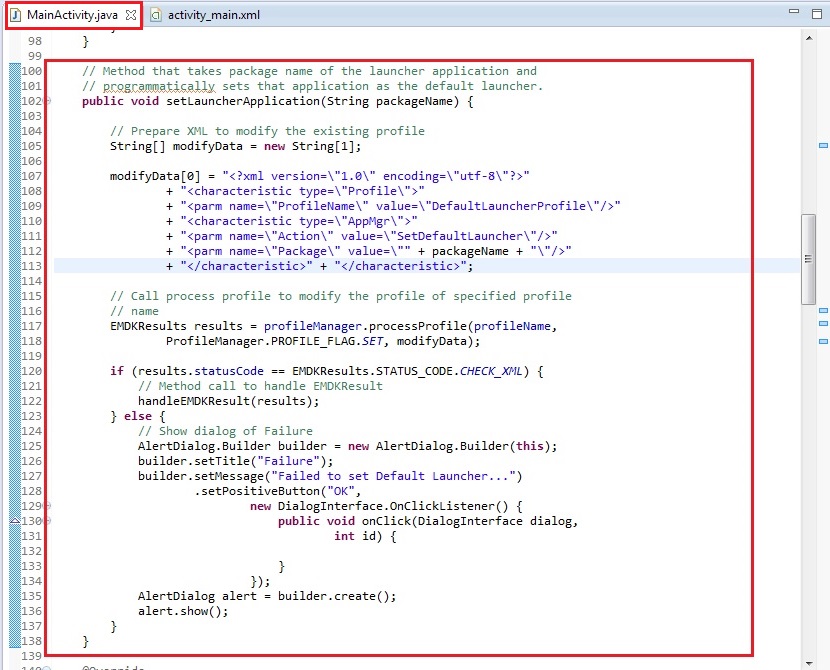
In this step, we will write a function that takes package name of the launcher application as input parameter and programmatically sets that application as the default launcher application.
This method prepares the xml input for the processProfile method by accepting the package name of the launcher application provided by the user. It then calls the handleEMDKResult method that we have already created to handle the EMDKResults and display the output.
The processProfile method then sets the changes to Profile Manager and returns the result to the EMDKResults as follows:
The method setLauncherApplication method should look like:
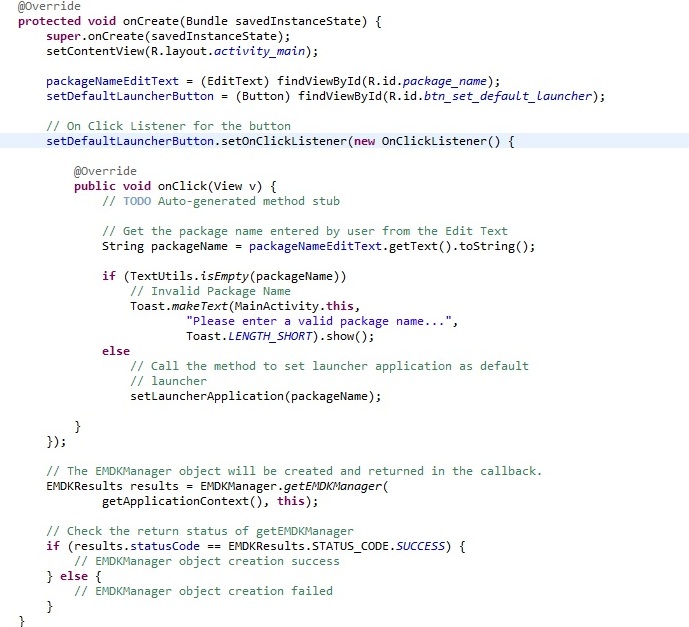
Let us call this method by implementing on click listener of the setDefaultLauncherButton button. This listener will get the package name entered by user from the Edit Text and call the setLauncherApplication method for a valid package name as follows:
Finally the onCreate method should look like:
That’s it. We are done with all the coding and configuration part. Now let us run the application.
Running the Application
Connect the device to a USB port (device must have USB debugging enabled).
The device currently has its own default launcher. Before Running the application, make sure that the two launcher applications (EHS and Galaxy Launcher) are already installed in the device.
The default launcher of TC 55 device looks like:
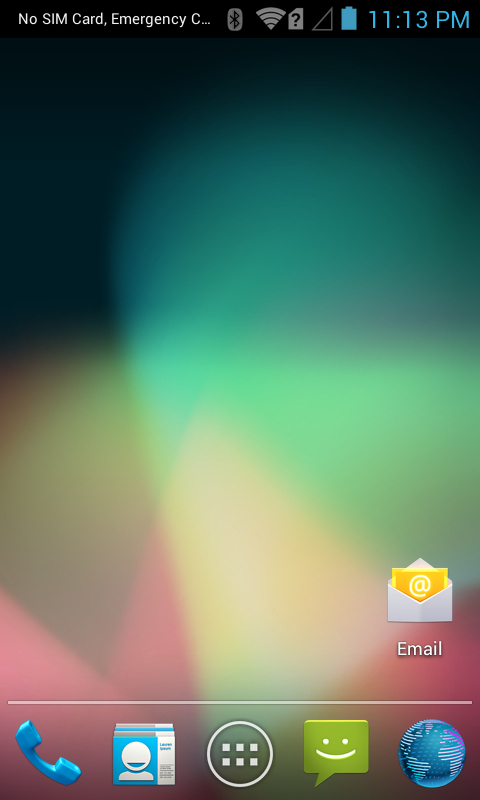
Run the application. The app sets the EHS (Enterprise Home Screen) application as the default launcher application as we had provided its package name while profile creation.
The app automatically closes by displaying a success message as the launcher is changed.

Now we will set Galaxy Launcher as the default launcher application. In order to do that, press and hold the menu key.
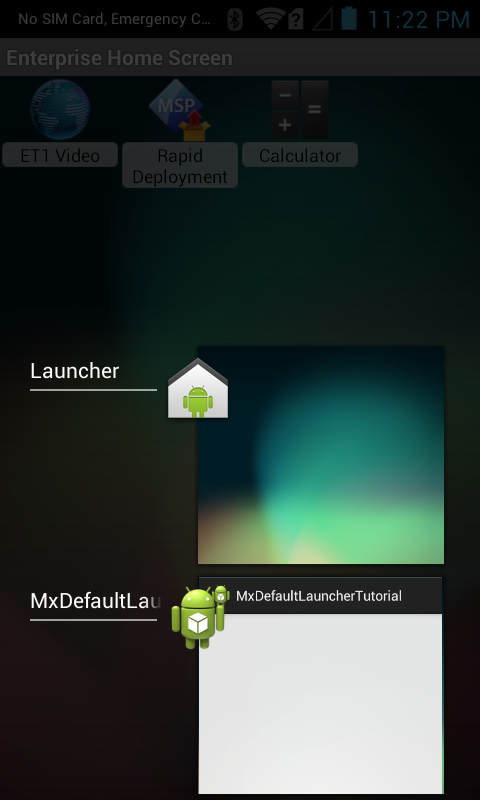
Select the «MxDefaultLauncherTutorial» app and the app will open.

Enter the package name of Galaxy Launcher application that we had obtained previously (com.epic.launcher.tw).
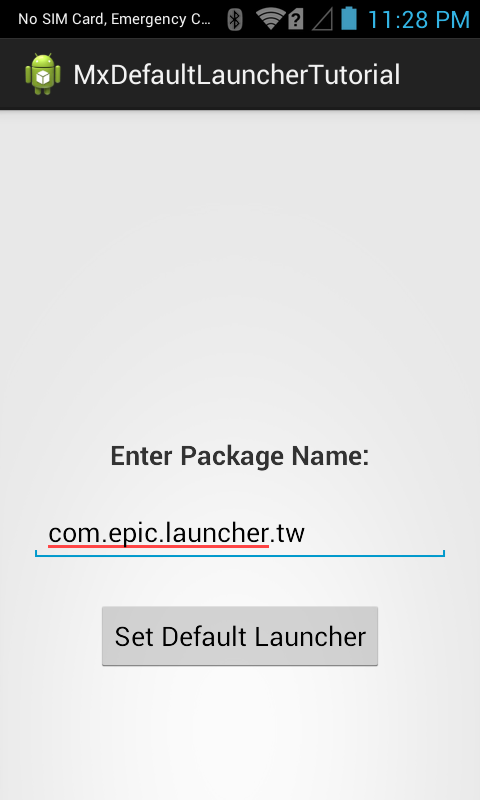
Click Set Default Launcher button. The app will now set Galaxy Launcher as the default launcher application. The app will close automatically displaying a success message.

Note: In case of failure, the app will display a failure message in an Alert Dialog and no change will take place.
Important Programming Tips
It is required to do the following changes in the application’s AndroidManifest.xml:
Use DataWedge v1.7.12 or higher version to test the ProfileManager.processProfile() method for DataWedge profiles.
What’s Next
Now that you have learned how to configure applications in the device using MX App Manager feature, let us try some configuring some of the other MX feature through profile creation. So in the next tutorial, we will concentrate on the «Power Manager» feature and try to explore this feature by creating a tutorial.
Источник


