- Using app-specific passwords
- How to generate an app-specific password
- How to manage app-specific passwords
- How to create a new Apple ID
- Create an Apple ID on your iPhone, iPad, or iPod touch
- Create an Apple ID when you set up your device
- Create an Apple ID using the App Store on your device
- Create an Apple ID on your Mac
- Create an Apple ID on your Windows PC
- Create an Apple ID on another device
- Create an Apple ID on the web
- If you see a message that you need to sign in to iTunes
- Learn more
- Require a password for App Store and iTunes purchases
- Require a password on your iPhone, iPad, or iPod touch
- Require a password on your Mac
- Require a password on your PC
- Require a password on your Apple TV 4K or Apple TV HD
- Require a password on your Apple TV (3rd generation)
- About turning off password protection
- Manage what kids buy or download
Using app-specific passwords
App-specific passwords allow you to sign in to your account securely when you use third-party apps with your Apple ID.
App-specific passwords are passwords for your Apple ID that let you sign in to your account and securely access the information you store in iCloud from a third-party app. For example, use app-specific passwords with mail, contacts, and calendar services not provided by Apple. App-specific passwords maintain a high level of security and help ensure your Apple ID password won’t be collected or stored by any third-party apps you use.
If you are signed in to iCloud for Windows, you don’t need an app-specific password when using your Apple ID with third-party Microsoft apps.
To generate and use app-specific passwords, your Apple ID must be protected with two-factor authentication.
You also need an app-specific password for your devices that use Mac OS X Lion 10.7.5 and earlier or iOS 5 and earlier. If you don’t have devices that can be updated to iOS 9 or later or OS X El Capitan or later, you can set up two-step verification and generate app-specific passwords.
How to generate an app-specific password
- Sign in to your Apple ID account page.
- In the Security section, click Generate Password below App-Specific Passwords.
- Follow the steps on your screen.
After you generate your app-specific password, enter or paste it into the password field of the app as you would normally.
How to manage app-specific passwords
At any given time, you can have up to 25 active app-specific passwords. If you need to, you can revoke passwords individually or all at once.
- Sign in to your Apple ID account page.
- In the Security section, click Edit.
- In the App Specific Passwords section, click View History.
- Click next to a password you want to delete, or Revoke All.
After you revoke a password, the app using that password will be signed out of your account until you generate a new password and sign in again.
Any time you change or reset your primary Apple ID password, all of your app-specific passwords are revoked automatically to protect the security of your account. You’ll need to generate new app-specific passwords for any apps that you want to continue using.
Information about products not manufactured by Apple, or independent websites not controlled or tested by Apple, is provided without recommendation or endorsement. Apple assumes no responsibility with regard to the selection, performance, or use of third-party websites or products. Apple makes no representations regarding third-party website accuracy or reliability. Contact the vendor for additional information.
Источник
How to create a new Apple ID
Use the same Apple ID to enjoy all Apple services. All you need is your full name, date of birth, an email address, and phone number.
Not sure if you have an Apple ID, or forgot what it is? To find your Apple ID, enter your name and email address at iforgot.apple.com.
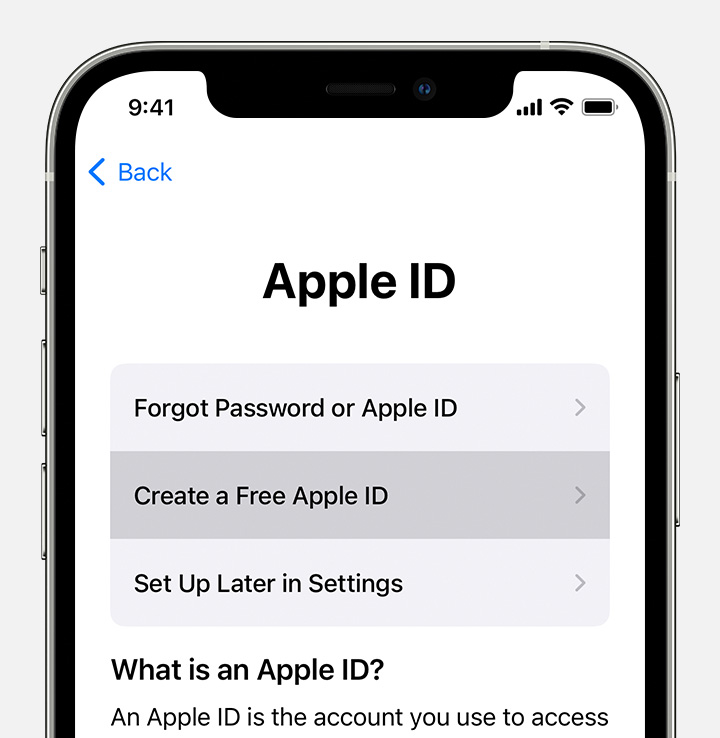
Create an Apple ID on your iPhone, iPad, or iPod touch
Create an Apple ID when you set up your device
- Tap «Forgot password or don’t have an Apple ID?».
- Tap Create a Free Apple ID.

- Select your birthday and enter your name. Tap Next.
- Tap «Use your current email address», or tap «Get a free iCloud email address.»
- When prompted, follow the onscreen steps to verify your email address and set up two-factor authentication. If you choose to skip this step, you’ll be prompted to do this later in Settings.
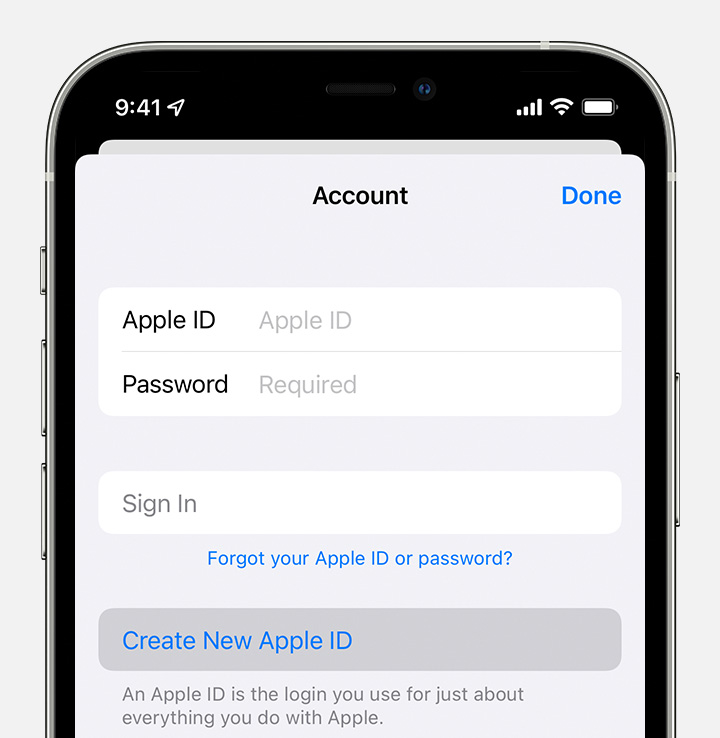
Create an Apple ID using the App Store on your device
- Open the App Store and tap the sign-in button .
- Tap Create New Apple ID. If you don’t see this option, make sure that you’re signed out of iCloud.
- Follow the onscreen steps. The email address that you provide will be your new Apple ID.*
- Enter your credit card and billing information, then tap Next. You can also choose None. Learn what to do if None isn’t showing or you can’t select it. You won’t be charged until you make a purchase.
- Confirm your phone number. This can help to verify your identity and recover your account if needed. Tap Next.
- Check your email for a verification email from Apple and verify your email address.
After you verify your email address, you can use your Apple ID to sign in to the iTunes Store, App Store, and other Apple services such as iCloud.
* In China mainland, you might be required to provide a +86 phone number for your Apple ID. You can change the number later, or change your country or region to a location that doesn’t require it. This number is only used for verification purposes.
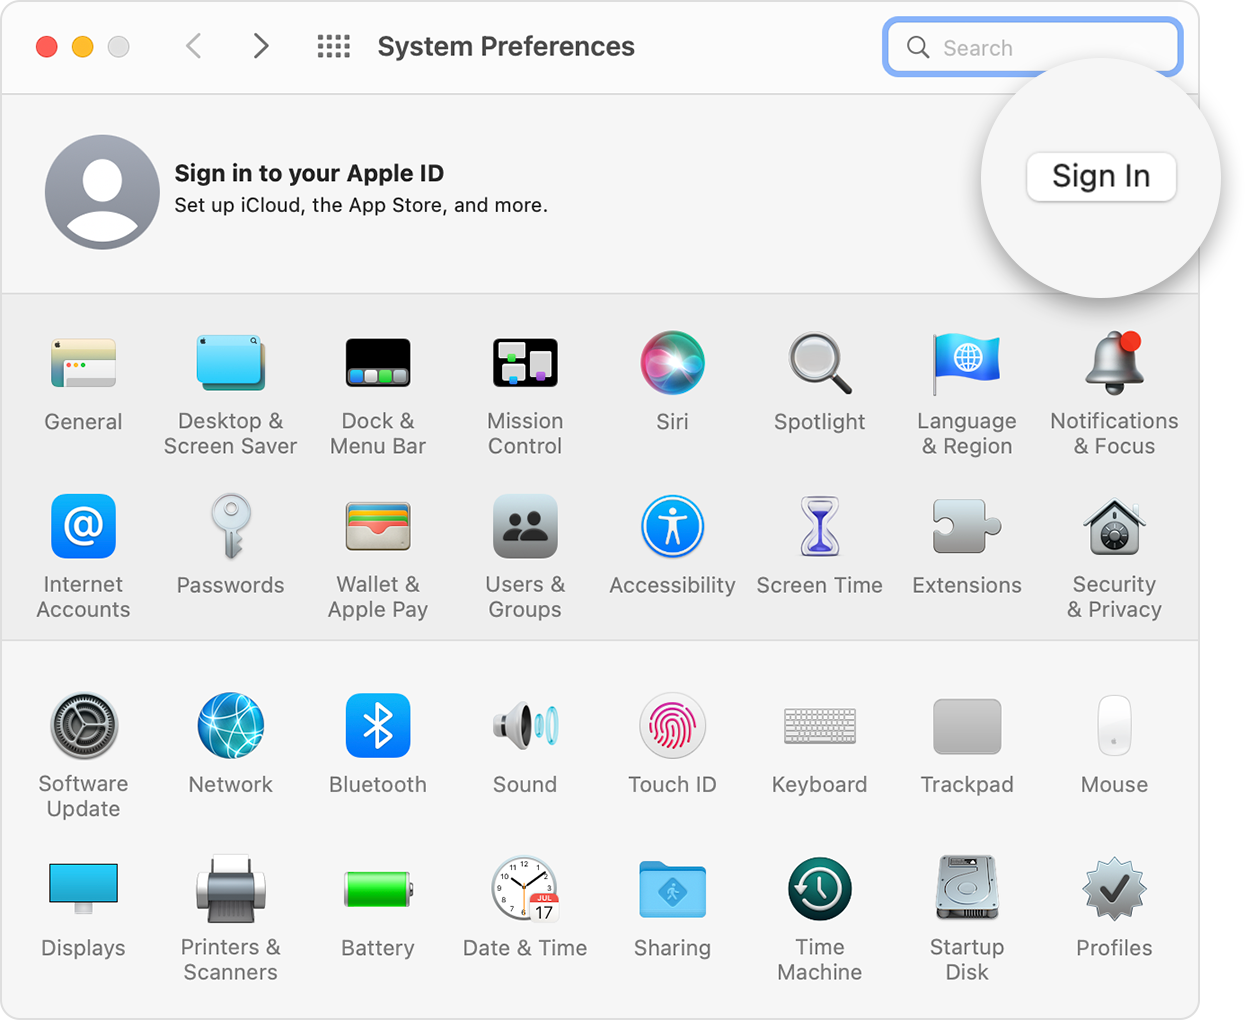
Create an Apple ID on your Mac
- Choose Apple menu > System Preferences.
- Click Sign In.
- Click Create Apple ID, then follow the onscreen steps. The email address that you provide will be your new Apple ID.*
- Enter your credit card and billing information, then click Continue. You can also choose None. Learn what to do if None isn’t showing or you can’t select it. You won’t be charged until you make a purchase.
- Check your email for a verification email from Apple and verify your email address.
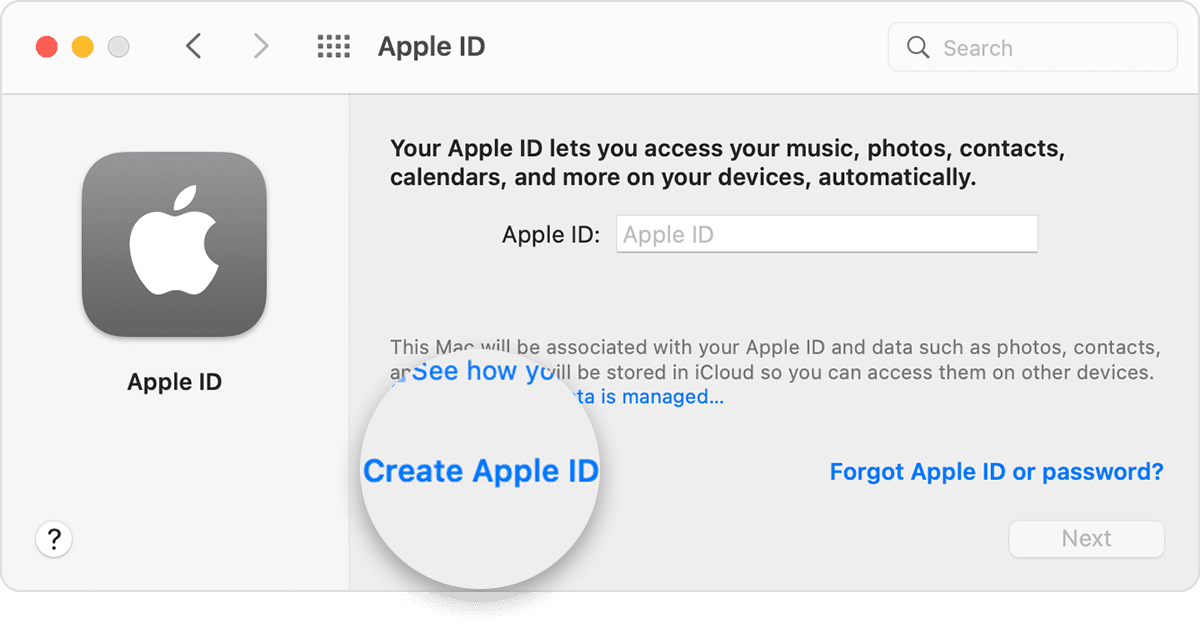
After you verify your email address, you can use your new Apple ID to sign in to the App Store and other Apple services such as iCloud.
* In China mainland, you might be required to provide a +86 phone number for your Apple ID. You can change the number later, or change your country or region to a location that doesn’t require it. This number is only used for verification purposes.
Create an Apple ID on your Windows PC
- Open iTunes for Windows. Make sure that you have the latest version.
- From the menu bar at the top of your computer screen or at the top of the iTunes window, choose Account > Sign In. Then click Create New Apple ID.
- Follow the onscreen steps. The email address that you provide will be your new Apple ID.*
- Enter your credit card and billing information, then click Continue. You can also choose None, and learn what to do if None isn’t showing or you can’t select it. We’ll charge you only when you make a purchase.
- Check your email for a verification email from Apple and verify your email address.
* In China mainland, you might be required to provide a +86 phone number for your Apple ID. You can change the number later, or change your country or region to a location that doesn’t require it. This number is only used for verification purposes.
Create an Apple ID on another device
To create an Apple ID on an Apple TV, Android device, smart TV, or streaming device, you can usually follow the steps provided onscreen and enter your full name, date of birth, an email address or phone number, and a payment method. If you set up the Apple TV app on your smart TV, you might be redirected to activate.apple.com to create your Apple ID. You can also use the steps below to create your Apple ID on the web.
Create an Apple ID on the web
- Go to appleid.apple.com and click Create Your Apple ID.
- Follow the onscreen steps. The email address that you provide will be your new Apple ID.*
- Enter a phone number that you can always access.
- Check the boxes to subscribe to Apple Updates if you’d like. This keeps you up to date on the latest news, software, products, and services from Apple.
- Click Continue.
- Follow the onscreen steps to verify your email address and phone number.

After you verify your email address, you can use your new Apple ID to sign in to the iTunes Store and other Apple services such as iCloud.
* In China mainland, you might be required to provide a +86 phone number for your Apple ID. You can change the number later, or change your country or region to a location that doesn’t require it. This number is only used for verification purposes.
If you see a message that you need to sign in to iTunes
If you created a new Apple ID on the web and see a message that you need to sign in to iTunes, follow the steps below for your device:
- On an iPhone, iPad, or iPod touch: Open Settings, then tap «Sign into device» and sign in with your Apple ID.
- On a Mac: Choose Apple menu > System Preferences, then select Apple ID and sign in with your Apple ID.
- On an Apple TV: Sign in to the App Store, iTunes Store, or Apple Music with your Apple ID.
- On a PC: Sign in to iTunes with your Apple ID.
- On an Android device: Sign in to Apple Music on Android with your Apple ID.
Learn more
- An Apple ID is the account you use to access Apple services like iCloud, the App Store, the iTunes Store, Apple Music, and more.
- If you see a message that says that the email address that you entered is already associated with an Apple ID, you might have already created an Apple ID. Try signing in with that email address. If you don’t remember your password, you can reset your password to regain access to your account.
- Already have an Apple ID? Sign in to all Apple services on your device.
- Learn how to change or remove your Apple ID payment information.
- Learn about how two-factor authentication protects your Apple ID.
Store availability and features might vary by country or region.
Источник
Require a password for App Store and iTunes purchases
You can require a password for every purchase or require a password every 15 minutes.
You can choose how often you want to enter your password when you buy items (including in-app purchases) from the App Store and iTunes Store:
- Always Require—Every time you make a purchase, you’ll be asked to enter your password, even if you’re signed in with your Apple ID.
- Require After 15 Minutes—If you entered your password within the last 15 minutes, you won’t be asked to enter your password again.
If you don’t want to enter a password when you download free items, follow the steps below and turn off password protection for free items.

Require a password on your iPhone, iPad, or iPod touch
- Open the Settings app.
- Tap your name.
- Tap Media & Purchases.
- Tap Password Settings, then choose the setting that you want.
If you don’t see Password Settings, you have turned on Face ID or Touch ID for App Store and iTunes Purchases. To change this, go back to Settings, tap «Face ID & Passcode» or «Touch ID & Passcode», then turn off Face ID or Touch ID next to iTunes & App Store.
Require a password on your Mac
- On your Mac, choose the Apple menu () at the top of your screen, then choose System Preferences.
- Click Apple ID.
- Click Media & Purchases.
- Select the settings that you want for free downloads and purchases. If you have Touch ID turned on for purchases, you won’t see this menu.
If you’re using an older version of macOS, open iTunes, choose iTunes > Preferences, then click the Store tab.
Require a password on your PC
If you’re using a PC, open iTunes. From the top of the iTunes window, choose Edit, then choose Preferences. Click the Store tab. Then select the settings that you want for purchases and free downloads.
Require a password on your Apple TV 4K or Apple TV HD
- From the Home screen, select Settings.
- Select Users and Accounts.
- Select [your name]’s Account.
- Under Require Password, choose the settings that you want for purchases and free downloads.
Require a password on your Apple TV (3rd generation)
- From the Home screen, select Settings > iTunes Store > Sign In.
- Sign in with your Apple ID and password.
- After you click Submit, you’ll see a screen that says «Remember Password?» Select your preferred level of protection:
- Choose Yes if you want the Apple TV to remember your password for purchases as long as you’re signed in with your Apple ID.
- Choose No if you want to enter your password each time that you make a purchase in the iTunes Store.
To change your password settings, sign out, then follow the steps above to sign in again.
About turning off password protection
You can’t completely turn off password protection for paid items on your iPhone, iPad, iPod touch, or computer. On Apple TV, you can turn off password protection for both free and paid items.
If you enabled Touch ID or Face ID for App Store and iTunes Store purchases, you’ll be asked to use Touch ID or Face ID for every download, even if the item is free.
Manage what kids buy or download
If you use Family Sharing, you can use Ask to Buy to control what kids buy. When a child asks to buy an item or download a free item, the family organizer can approve or decline the request.
Information about products not manufactured by Apple, or independent websites not controlled or tested by Apple, is provided without recommendation or endorsement. Apple assumes no responsibility with regard to the selection, performance, or use of third-party websites or products. Apple makes no representations regarding third-party website accuracy or reliability. Contact the vendor for additional information.
Источник


