- Customize headphone audio levels on your iPhone or iPad
- Set up Headphone Accommodations
- Use Custom Audio Setup
- Use your audiogram data from the Health app
- Manually adjust audio settings
- Customize Transparency mode on your AirPods Pro
- Use Conversation Boost on your AirPods Pro
- If your iPhone won’t turn on or is frozen
- If your screen is black or frozen
- On your iPhone 8 or later, including iPhone SE (2nd generation)
- On your iPhone 7 or iPhone 7 Plus
- On your iPhone 6s and earlier, including iPhone SE (1st generation)
- If your iPhone turns on but gets stuck during start up
- How to put your iPhone on vibrate, ring, or silent mode
- Turn Ring/Silent mode on or off on your iPhone
- Use Ring mode
- Use Silent mode
- Change ringtones, sounds, and vibrations
- Change ringtone and alert volume with buttons
- Как транслировать iPhone на Amazon Fire TV Stick с помощью AirPlay?
- Потоковое iPhone на Amazon Fire TV Stick
- 1. Установите приложение AirBuddy из магазина Amazon.
- 2. Отправка медиа-файла с вашего iPhone – зеркально отразите iPhone на Fire Stick
- Наслаждайтесь потоковым мультимедиа с iPhone на Amazon Fire TV
Customize headphone audio levels on your iPhone or iPad
Amplify soft sounds and adjust certain frequencies for your hearing needs with Headphone Accommodations in iOS and iPadOS 14 and later.

Headphone Accommodations works with these headphones:
- AirPods (3rd generation)
- AirPods Max
- Apple EarPods (with 3.5 mm Headphone Plug or Lightning Connector)
- AirPods (2nd generation)
- AirPods Pro
- Powerbeats
- Powerbeats Pro
- Beats Solo Pro
- Beats Fit Pro
When using automatic device switching with your AirPods, your custom audio settings will transfer between your iPhone, your iPad, and your paired Apple Watch (on watchOS 7), but they won’t transfer to your Mac.
Set up Headphone Accommodations
- Check that you have the latest version of iOS or iPadOS.
- Go to Settings > Accessibility > Audio/Visual > Headphone Accommodations. Turn on Headphone Accommodations.
- Choose how you want to apply your custom audio settings:
- Turn on Phone to apply these settings to phone calls, FaceTime calls, and any third-party video call apps.
- Turn on Media to apply these settings to music, movies, podcasts, audiobooks, Siri, voicemail, and Live Listen.
- Customize your headphone audio settings:
- Use Custom Audio Setup. You’ll listen to audio samples and choose which ones sound better to you. Then you can apply the custom settings suggested based on your choices.
- Use your audiogram data.
- Manually adjust audio settings.
Use Custom Audio Setup
- Reset any current audio configurations to their default settings:
- Go to Settings > Music > EQ, then tap Off to turn off Music EQ.
- Go to Settings > Accessibility > Audio/Visual, then adjust the Balance slider. Set the audio volume balance to the center.
- Connect your headphones. Make sure that you’re in a quiet environment.
- Go to Settings > Accessibility > Audio/Visual > Headphone Accommodations. Tap Custom Audio Setup.
- Follow the instructions on your screen. When finished, tap Use Custom Settings to apply the custom settings suggested based on your choices. You can switch back to standard settings at any time.
Use your audiogram data from the Health app
Tap Custom Audio Setup, then tap Use Audiogram to use your audiogram data from the Health app to customize audio settings.
If you have a nearly symmetric audiogram, Headphone Accommodations will take the average of the two ears and fit the left and right audio channels with that profile. If you have an asymmetric audiogram, it will fit the left and right audio channels for your better ear.
Manually adjust audio settings
From the Headphone Audio screen, you can also adjust tone and amplification settings manually. Tap Play Sample to hear an audio sample with your current settings. You can change these settings while listening to the sample to compare them.
To adjust the audio volume balance between left and right channels:
- Go to Settings > Accessibility > Audio/Visual.
- Adjust the Balance slider.
Customize Transparency mode on your AirPods Pro
Headphone Accommodations supports Transparency mode on AirPods Pro, making quiet voices more audible and tuning the sounds of your environment to your hearing needs. Learn more about Transparency mode and how to turn it on.
When Transparency mode is on, your Headphone Accommodations settings might change how you hear your own voice or increase your environment’s noise level. You might need to adjust these settings to find a setup that’s most comfortable for you. You can start from a milder setting by adjusting the Tone or Amplification slider. Then gradually increase to the setting that’s most helpful for hearing people’s voices or natural sound around you.
To customize Transparency mode settings:
- Check that you have the latest version of iOS or iPadOS.
- Put your AirPods Pro in your ears and connect them to your iPhone or iPad.
- Go to Settings > Accessibility > Audio/Visual > Headphone Accommodations > Transparency Mode.
- Tap Custom Transparency Mode and turn it on.
To adjust the audio-volume balance between left and right channels, adjust the Transparency Balance slider. You can also adjust Transparency mode settings by tapping the Hearing button in Control Center.
Use Conversation Boost on your AirPods Pro
Conversation Boost focuses your AirPods Pro on the person who’s talking in front of you. This makes it easier to hear when you’re talking face-to-face.
To turn on Conversation Boost:
- Check that you have the latest version of iOS or iPadOS.
- Put your AirPods Pro in your ears and connect them to your iPhone or iPad.
- Go to Settings > Accessibility > Audio/Visual > Headphone Accommodations > Transparency Mode.
- Tap Conversation Boost.
You can also turn on Conversation Boost by tapping the Hearing button in Control Center.
Источник
If your iPhone won’t turn on or is frozen
If your iPhone has a frozen screen, doesn’t respond when you touch it, or becomes stuck when you turn it on, learn what to do.
iPhone screen is black or frozen
iPhone is stuck on the Apple logo
If your screen is black or frozen
Follow the steps for your device.
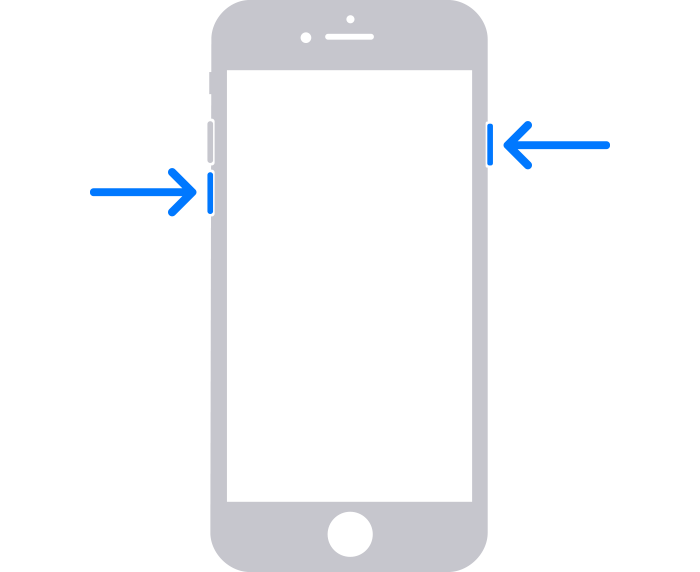
On your iPhone 8 or later, including iPhone SE (2nd generation)
- Press and quickly release the volume up button.
- Press and quickly release the volume down button.
- Press and hold the side button until you see the Apple logo.

- If your phone doesn’t turn on, follow these steps to check your hardware and charge your phone. You might need to charge for up to an hour.
- If your phone still doesn’t turn on, contact Apple Support.
On your iPhone 7 or iPhone 7 Plus
- Press and hold both the side button and the volume down button until you see the Apple logo.
- If your phone doesn’t turn on, follow these steps to check your hardware and charge your phone. You might need to charge for up to an hour.
- If your phone still doesn’t turn on, contact Apple Support.
On your iPhone 6s and earlier, including iPhone SE (1st generation)
- Press and hold both the Home button and the side button or the top button until you see the Apple logo.
- If your phone doesn’t turn on, follow these steps to check your hardware and charge your phone. You might need to charge for up to an hour.
- If your phone still doesn’t turn on, contact Apple Support.

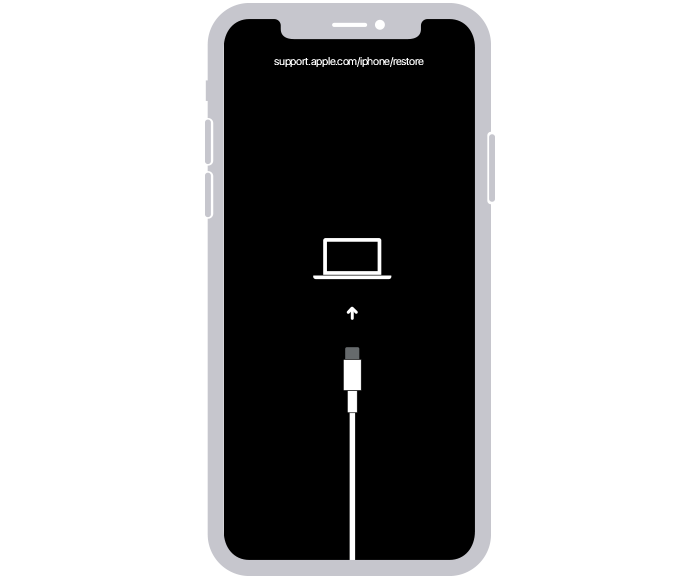
If your iPhone turns on but gets stuck during start up
If you see the Apple logo or a red or blue screen during startup, try these steps:
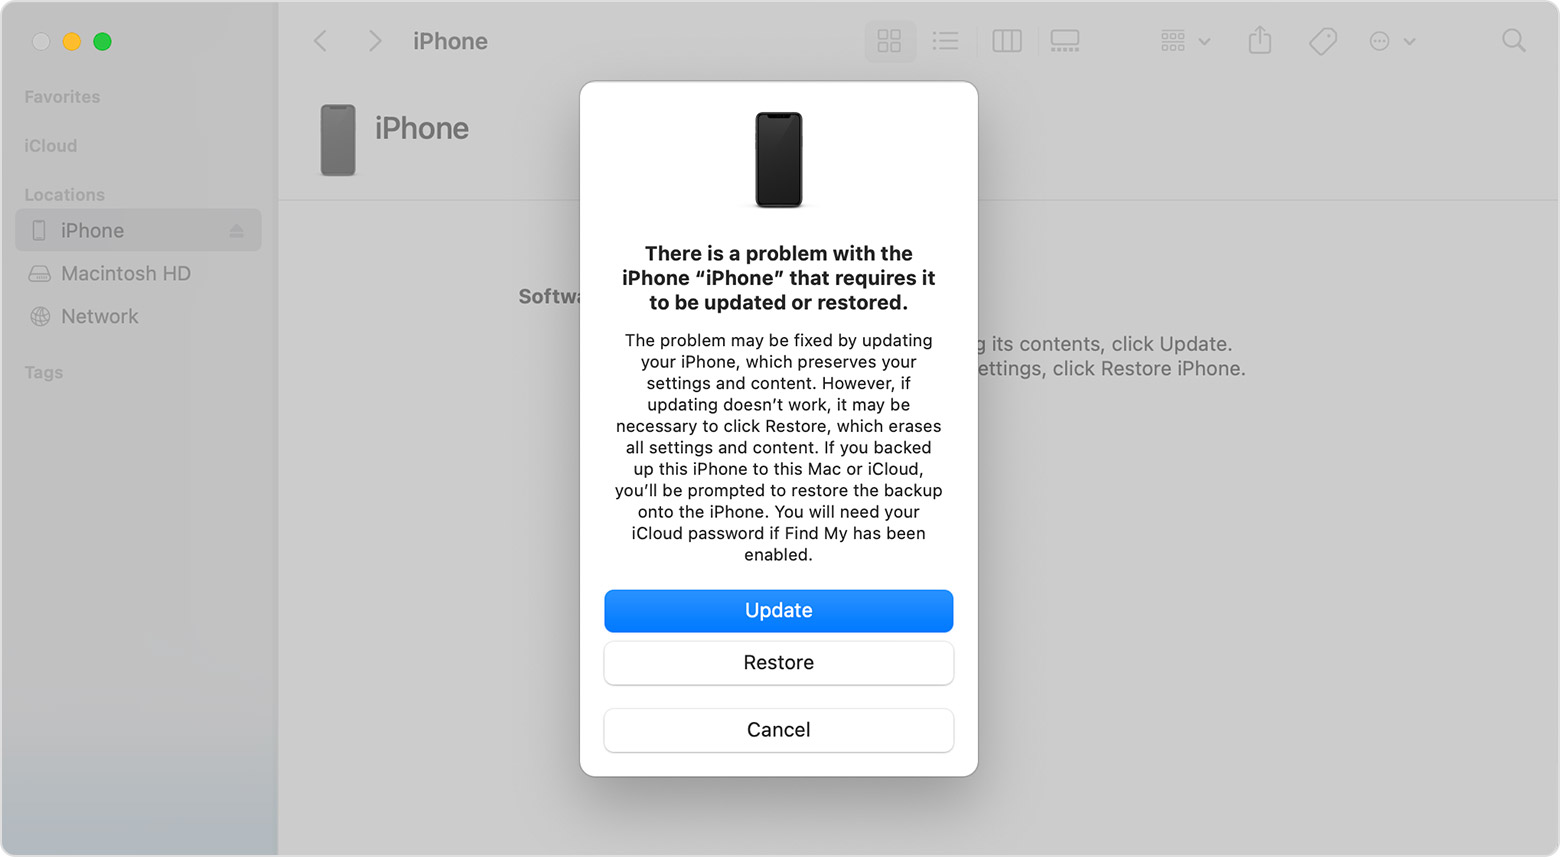
- Connect your iPhone to a computer. On a Mac with macOS Catalina, open the Finder. On a Mac with macOS Mojave or earlier, or on a PC, open iTunes. Find out which macOS your Mac is using.
- Select your iPhone on your computer.
- While your iPhone is connected, follow these steps:
- On your iPhone 8 or later, including iPhone SE (2nd generation): Press and quickly release the volume up button. Press and quickly release the volume down button. Then press and hold the side button.
Источник
How to put your iPhone on vibrate, ring, or silent mode
The Ring/Silent switch is on the left side of your iPhone. You can use it to control which sounds play through your iPhone speaker.
Turn Ring/Silent mode on or off on your iPhone
In Ring mode, you hear ringtones and alerts. In Silent mode, you don’t, but your iPhone can still play sounds, like when you play music or videos.
Use Ring mode
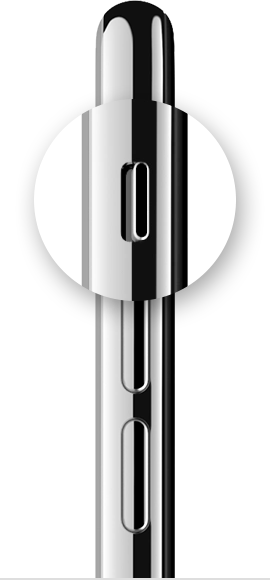
To put your iPhone in Ring mode, move the switch so that orange isn’t showing.
Use Silent mode
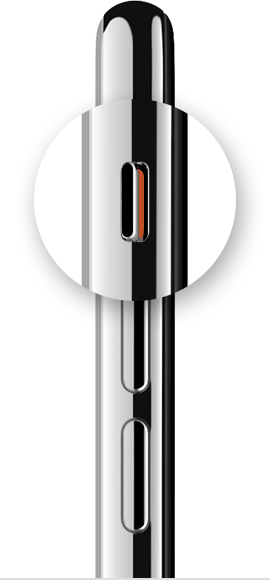
To put your iPhone in Silent mode, move the switch so that orange is showing.
Change ringtones, sounds, and vibrations
- On iPhone 7 and later, go to Settings > Sounds & Haptics. On earlier iPhone models, go to Settings > Sounds.
- Choose what you want to adjust, like Ringtone or New Mail.
- Tap the alert tone that you want. You can also tap Vibration and choose a vibration pattern or make a custom vibration.
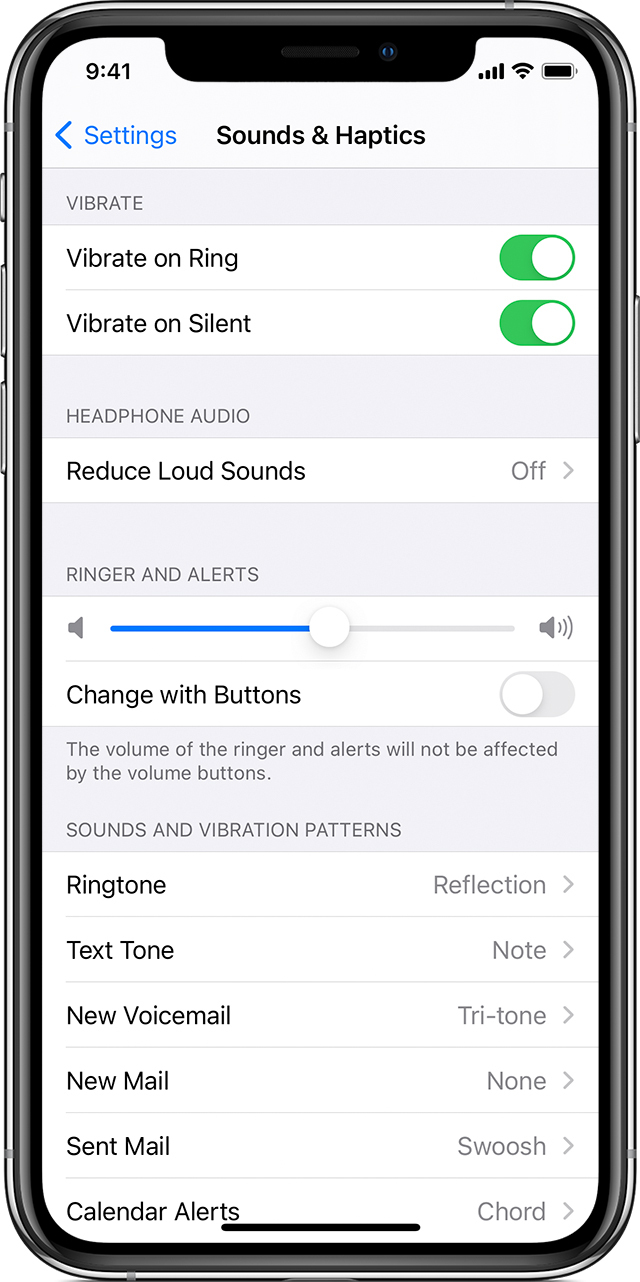
Change ringtone and alert volume with buttons
If you want to control your ringtone and alert volume separately from other apps, turn off Change with Buttons. Then you need to manually adjust your ringtone and alert volume in Settings > Sounds & Haptics or Settings > Sounds.
Источник
Как транслировать iPhone на Amazon Fire TV Stick с помощью AirPlay?

Amazon Fire TV и Stick – это фантастические потоковые устройства с постоянно растущим списком возможностей. Запуск Kodi on Fire TV – одна из самых востребованных функций, которая подробно описана в нашем полном руководстве Fire TV Kodi. Обычно пользователи не хранят медиа на своем устройстве. Ваши коллекции хранятся в другом месте, и вы транслируете их на свой большой палец. Мы склонны наполнять наши телефоны нашими музыкальными коллекциями, а наши компьютеры / планшеты – видео. Используя это простое приложение и технологию Apple AirPlay, это руководство покажет вам, как транслировать iPhone на Amazon Fire TV и Stick. Мы расскажем о лучшем приложении Airplay для пожарного телевидения и о том, как его использовать. Этот же метод можно использовать для потоковой передачи с iPad или из iTunes на вашем компьютере.
Потоковое iPhone на Amazon Fire TV Stick
AirPlay – это потоковая технология, разработанная Apple, которая может использоваться для потоковой передачи мультимедийного контента с одного устройства на другое через Wi-Fi. Эта технология позволяет отражать iPhone на Fire Stick. Чтобы использовать это на своем устройстве, вам необходимо установить приложение-приемник AirPlay. Для этого руководства мы выбрали лучшее приложение AirPlay для Fire TV, которое представляет собой приемник AirBuddy, аналогичный AllCast для Android. Это простое в использовании решение с минимальными настройками.
Еще одна причина, почему это лучшее приложение AirPlay для Fire TV, заключается в том, что оно бесплатное! Бесплатная версия имеет ограничения, такие как ограничения потокового времени и количество файлов, которые могут быть воспроизведены, но позволит вам начать. Полная версия без ограничений можно приобрести менее чем за доллар! Альтернативой приложению AirPlay является установка Kodi на Amazon Fire TV Stick, которая поставляется с приемником Airplay. Но установка Kodi намного сложнее, если все, что вам нужно, это потоковая передача iPhone на Amazon Fire TV.
Чтобы включить AirPlay на вашем устройстве, вам потребуется:
- Стикер Amazon Fire TV
- Приложение AirBuddy (лучшее приложение AirPlay для Amazon Fire TV)
- IPhone или iPad с медиа-контентом
Вы также должны убедиться, что у вас есть достаточная пропускная способность для потокового видео. [ Читать: Учебник: Расчет пропускной способности для потокового видео ]
1. Установите приложение AirBuddy из магазина Amazon.
На вашем Amazon Fire TV Stick перейдите Search и с помощью пульта введите слово AirBuddy . На фото ниже показано приложение AirBuddy. Нажмите, Get и он начнет установку на ваше устройство.

Загрузите и установите AirBuddy на свою Fire TV Stick
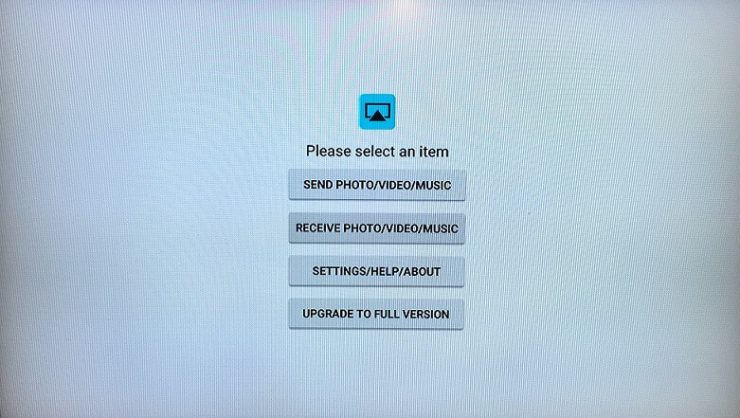
После установки запустите приложение, и вам будет представлено простое меню AirBuddy. Здесь есть два основных параметра: «ОТПРАВИТЬ ФОТО / ВИДЕО / МУЗЫКА» и «ПОЛУЧИТЬ ФОТО / ВИДЕО / МУЗЫКА». Оба варианта говорят сами за себя. Для потоковой передачи iPhone на Amazon Fire TV Stick нажмите RECEIVE PHOTO/VIDEO/MUSIC . Затем приложение подготовит для получения вашего медиа-контента.
Приложение Amazon Fire TV Stick Настройки AirBuddy
На следующем экране вы увидите только две кнопки. Нажмите на Start Server . Это запустит потоковый сервер AirBuddy, и приложение будет готово для получения медиа-файлов.
Лучшие медиаплееры:
- Amazon Fire TV Stick – $ 39,99
- Roku Streaming Stick (3600R) – 49,00 $
- Компьютер Intel Compute Stick CS125 с процессором Intel Atom x5 – $ 129,99
- RBSCH MK808B PRO Smart TV Android 5.1 Amlogic S905 Quad Core – $ 32.99
- NEXBOX 809VI Android 5.1 TV Stick Rockchip 8-ядерный – $ 69.69

2. Отправка медиа-файла с вашего iPhone – зеркально отразите iPhone на Fire Stick
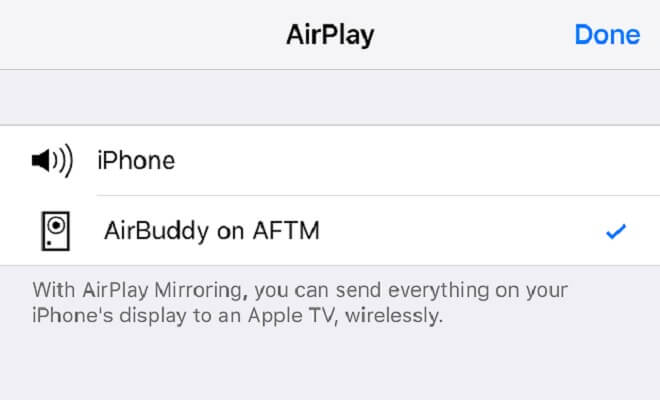
Последний шаг для зеркалирования iPhone на Fire Stick – отправка видео или аудио файла с вашего iPhone. Для этого выберите видео или аудио файл, который вы хотите передать, и начните его воспроизведение. После запуска проведите пальцем снизу вверх по телефону, чтобы получить доступ к Центру управления. Нажмите, AirDrop и вы увидите следующий экран:

Настройки AirPlay на iPhone
Если ваш сервер AirBuddy работает правильно, вы должны увидеть его в списке доступных устройств AirPlay. Выберите его, как показано, а затем нажмите Done . Теперь ваш медиафайл будет отображать iPhone на Fire Stick, и вы увидите ваш контент на большом экране.
Наслаждайтесь потоковым мультимедиа с iPhone на Amazon Fire TV
AirBuddy – это простая и эффективная программа, которая является лучшим приложением AirPlay для Fire TV. На сегодняшний день это самый простой способ для потоковой передачи iPhone на Amazon Fire TV. Теперь вы можете наслаждаться фильмами и аудиоколлекциями или видео, записанными на вашем телефоне, на большом экране. Все шаги в этом руководстве также могут быть применены к устройствам iPad. Если вам нравится потоковая трансляция контента на нашей Amazon Fire TV Stick, обратитесь к нашему руководству AFTV Mobdro.
Источник


