- How to Change DNS on Android
- Get more speed and privacy on Android with a simple configuration
- What to Know
- Changing DNS on Android 9 and Higher
- Caveats About Changing DNS on Android
- Changing DNS on Android 8 and Earlier
- More About DNS and Changing Your Servers
- Add custom DNS server on Android
- Change DNS server in Android directly
- Change DNS server with Third-Party App
- Найден секретный способ улучшить скорость интернета на вашем телефоне
- Что такое DNS сервер
- Как выбрать и изменить DNS-сервер на телефоне Android
- Установка альтернативного DNS с помощью приложения
- How to Change DNS Settings on Android
- Change the DNS settings if you do NOT have root permissions
- Change the DNS settings if you have root permissions
- Most popular free DNS services
How to Change DNS on Android
Get more speed and privacy on Android with a simple configuration
:max_bytes(150000):strip_icc()/JackWallen-56a71ed248bb42a48cf703edd2a2c3b4.jpg)
:max_bytes(150000):strip_icc()/ryanperiansquare-de5f69cde760457facb17deac949263e-180a645bf10845498a859fbbcda36d46.jpg)
What to Know
- Android 9 and higher: Tap Settings (gear) >Network & Internet >Advanced >Private DNS >Private DNS provide hostname.
- Enter the Cloudflare DNS address (1dot1dot1dot1.cloudflare-dns.com) or a CleanBrowing URL.
- Android 8: Tap Settings >Wi-Fi >Modify Network Advanced options (requires long press) >DHCP >Static >DNS 1. Enter the address.
This article explains how to change your DNS servers on an Android phone to create faster and more secure wireless connections. Instructions apply to Android 9 (Pie) and higher, as well as Android 8 (Oreo), but the process is similar on older Android versions.
Changing DNS on Android 9 and Higher
It’s fairly easy to change the DNS address on Android 9 and higher. Instead of changing the addresses on a per-network basis, you can set alternative DNS addresses in a single location. To manually change the DNS, follow these steps:
Open your phone’s Settings, then tap Network & Internet.
Tap Advanced.
:max_bytes(150000):strip_icc()/AndroidDNS01-3f2ebd4d869843efb300e15f6e72bea5.jpg)
Tap Private DNS, then select Private DNS provider hostname and enter either the Cloudflare URL or one of the CleanBrowing URLs in the text field. You can find them in the section below.
:max_bytes(150000):strip_icc()/AndroidDNS02-c16c491967f445e09da8052f151809ff.jpg)
Tap Save to finish.
Caveats About Changing DNS on Android
It’s important to note that with Android 9 and higher, you can’t configure a standard DNS server (such as Google or OpenDNS). Instead, you have to use DNS over TLS, which is an encrypted form of DNS. These addresses are domain names and not IP addresses.
One of the most popular Private DNS services is Cloudflare. The Cloudflare DNS address is 1dot1dot1dot1.cloudflare-dns.com. You can also opt to use the CleanBrowsing DNS service, which has three DNS servers:
- Security Filter: Blocks phishing, malware, and malicious domains, and uses the address security-filter-dns.cleanbrowsing.org.
- Family Filter: Blocks access to adult, pornographic, and explicit sites, as well as sites like Reddit. This uses the address family-filter-dns.cleanbrowsing.org.
- Adult Filter: Blocks access to all adult, pornographic and explicit sites and uses the address adult-filter-dns.cleanbrowsing.org.
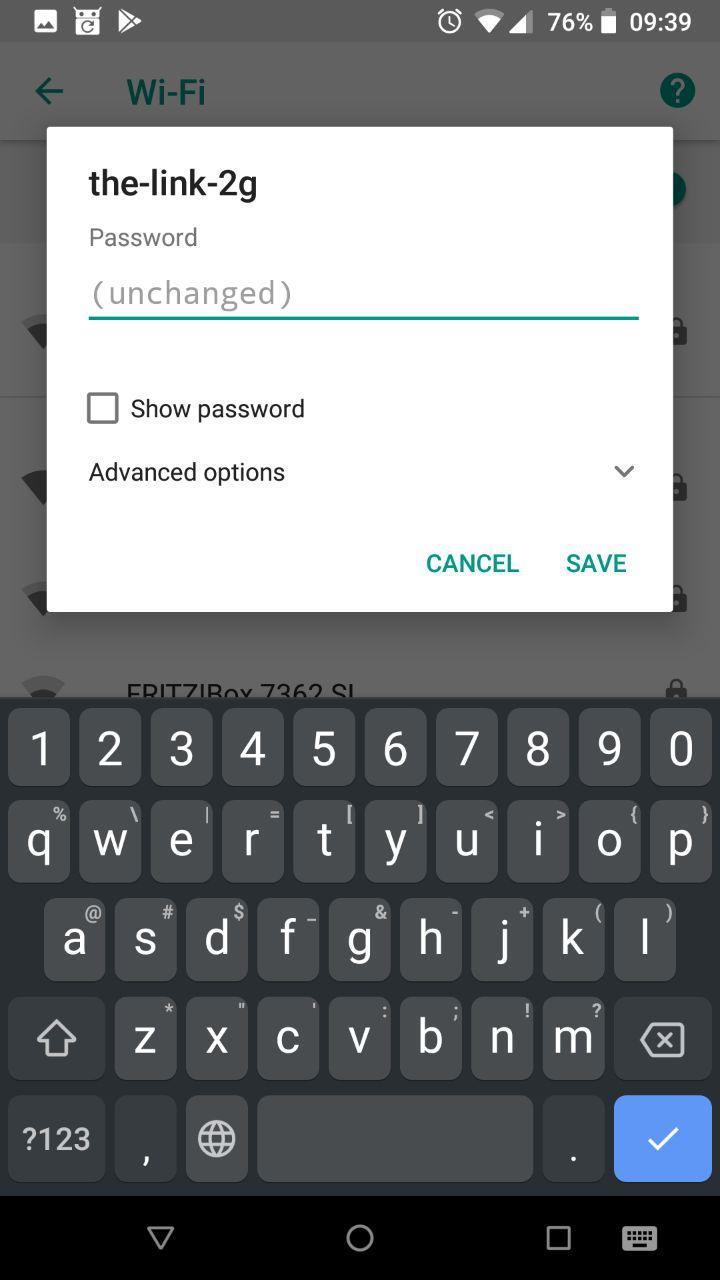
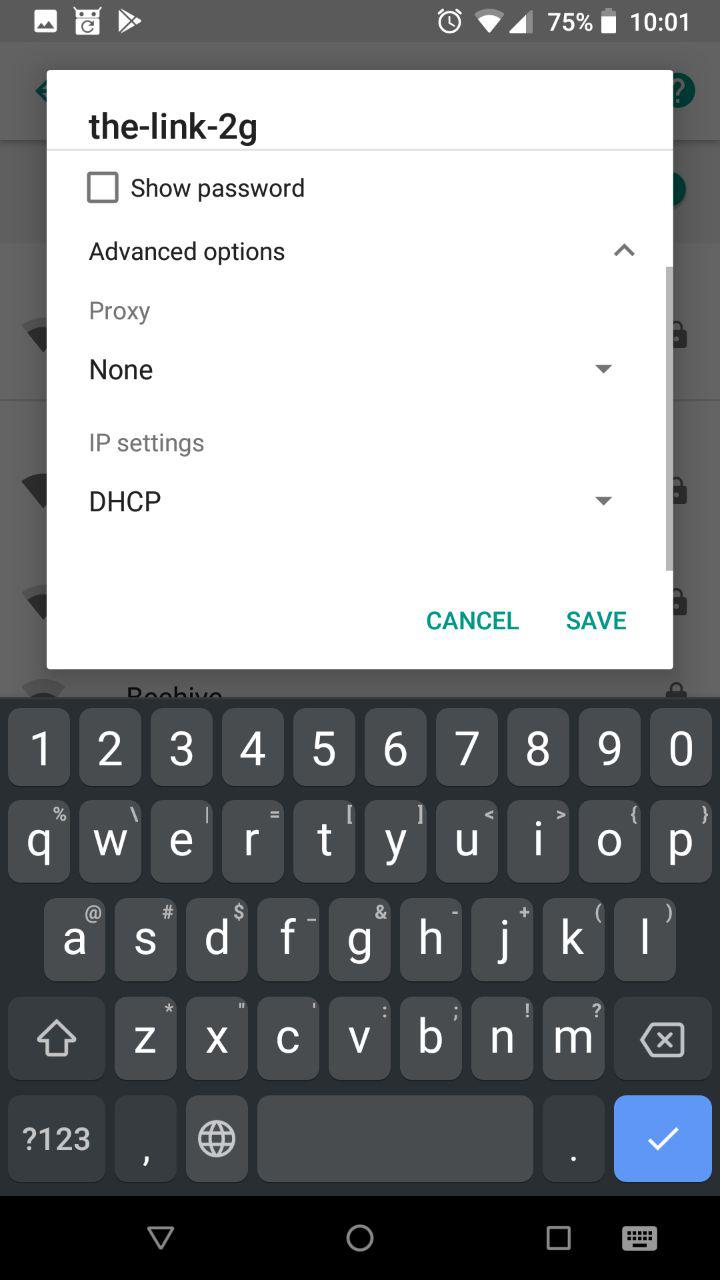
Changing DNS on Android 8 and Earlier
Here’s how to configure a Wi-Fi network to use an alternative DNS server on Android Oreo. This method also works for Android 7 and 6, although the location of some of the settings might vary.
When changing the DNS address for Android 8 and earlier, it’s done on a per-network basis, so you have to do this for any wireless network where you want to use a different DNS server or service.
Pull down the notification shade twice, tap the gear icon in the upper-right corner, and then tap Wi-Fi.
Long press the name of the wireless network to be modified and then tap Modify network.
:max_bytes(150000):strip_icc()/Android8DNS01-b844ccd6e7804df49a6faef7f21ef84d.jpg)
Tap Advanced options and then tap DHCP.
:max_bytes(150000):strip_icc()/Android8DNS02-ebcb6424dd504ad597984cceefab9758.jpg)
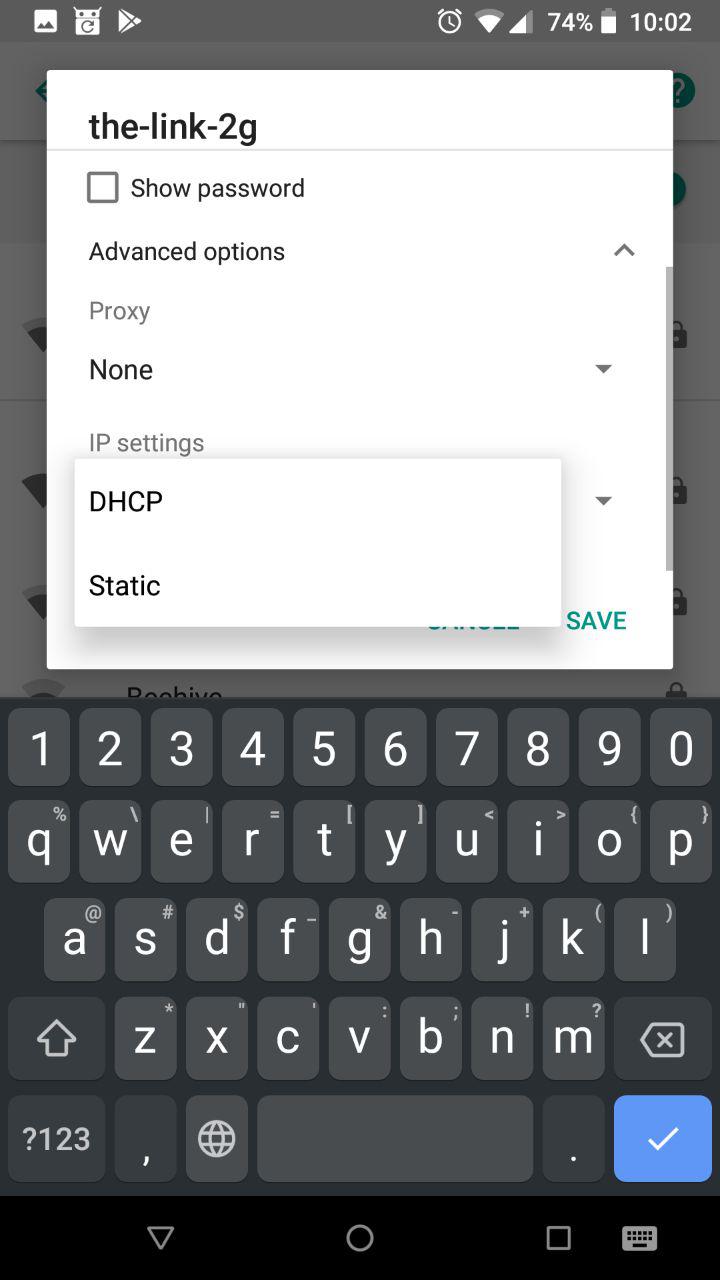
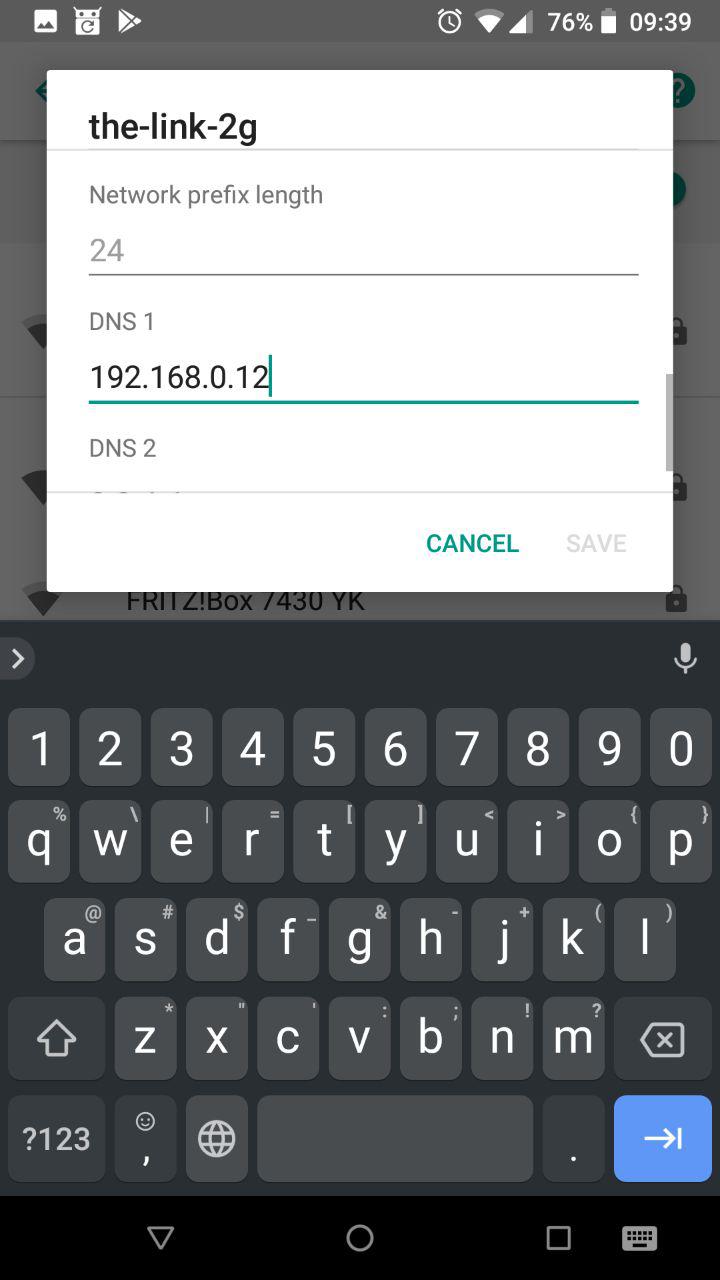
From the pop-up menu, tap Static and then tap DNS 1. Type the DNS address (such as 8.8.8.8).
:max_bytes(150000):strip_icc()/Android8DNS03-b37e95ef8b924e81836551c27f0a919a.jpg)
Tap SAVE to finish.
Go through the above process with every wireless network you want to use alternate DNS addresses for. You can also configure different DNS servers for different Wi-Fi networks. For instance, for your home network, you could use the Google DNS address of 8.8.8.8, and for another network, you could use the OpenDNS address of 208.67.220.220.
You might find that one DNS server works better with a certain wireless network. Fortunately, with Android, you can make such changes to the network configurations.
More About DNS and Changing Your Servers
DNS stands for Domain Name System and serves as the “phone book” for the internet. It’s responsible for translating domains (like lifewire.com) to routable IP addresses. You don’t want to have to remember 151.101.130.114 as the address for lifewire.com every time you visit. Without DNS, those domain addresses couldn’t be translated to routable IP addresses. That’s why DNS is important.
Every device that requires access to the outside world (the Wide Area Network, aka WAN) has a DNS server (or two) that tells your phone how to get to a given address. Those addresses are almost always associated with your device carrier (such as Verizon, AT&T, or Sprint) or the wireless network you use.
DNS services provided by your carrier or Wi-Fi network might not always be the fastest at translating domains to IP addresses. Or worse, they could be less than secure. However, it’s not possible to change the carrier DNS of an unrooted device. But, it’s possible to change the DNS addresses when connected to a wireless network.
Considering wireless networks are often less secure than carrier networks, changing the DNS services used might be wise.
The two most popular free DNS services are Google and OpenDNS. Both function equally well. The addresses are:
Google: 8.8.4.4 and 8.8.8.8
OpenDNS: 208.67.222.222 and 208.67.220.220
Источник
Add custom DNS server on Android
Adding custom DNS server on Android works out of the box for each connected Wi-Fi network separately. There is no need to install external Apps.
Table of Contents
Change DNS server in Android directly
Navigate to Settings -> Wi-Fi
Press and hold on the Wi-Fi network you want to change
Choose Modify network

Android: Wi-Fi list
Scroll down and click on Advanced options
Android: Advanced options
Scroll down and click on DHCP
Android: Select DHCP options
Click on Static
Android: Select static DHCP options
Scroll down and change the DNS server IP for DNS 1 (the first DNS server in the list)
Android: Add custom DNS server
Change DNS server with Third-Party App
If the above does not work for you or you just want another App that makes it even easier to change DNS settings, you can search the Playstore for many available DNS changer Apps. They also work on non-rooted Androids.
Источник
Найден секретный способ улучшить скорость интернета на вашем телефоне
Что такое DNS сервер
DNS — это система доменных имен, которая обеспечивает связь между названием сайта и его адресом. Принцип ее работы можно сравнить с телефонной книгой на вашем смартфоне. Каждому названию сайта соответствует определенная цифровая комбинация на сервере, и когда вы вводите название в адресной строке браузера, компьютер или смартфон запрашивает цифровой IP-адрес сайта через специальный сервер, который хранит базу этих адресов.
Переход на сторонние серверы может помочь вам устранить эти ошибки, а также получать доступ к некоторым заблокированным ранее сайтам, уменьшить время отклика между вашим устройством и сервером, а значит повысить и скорость соединения.
Существует также специальный протокол DNS over TLS, это тот же DNS, но осуществляемый с дополнительным шифрованием, повышающим безопасность и конфиденциальность пользователя путем перехвата данных.
Как выбрать и изменить DNS-сервер на телефоне Android
Во всех смартфонах на Android, начиная с версии 9.0 добавлена возможность ручной настройки DNS-сервера в настройках.
Чтобы настроить персональный сервер:
- перейдите в «Настройки» и выберите пункт «Подключения»;
- пролистайте вниз и выберите пункт «Другие настройки»;
- перейдите в пункт «Персональный ДНС-сервер»;
- поставьте переключатель на пункт «Имя хоста провайдера персонального DNS сервера»;
- введите вручную новое имя хоста из списка ниже и нажмите «Сохранить».
Список некоторых альтернативных DNS-серверов:
Google Public DNS. Бесплатный глобальный сервис от Google известен по всему миру, поэтому нет смысла говорить о его надежности. Сервер обеспечивает безопасность и более высокую скорость интернет-соединения, обеспечивая ускоренную загрузку страниц за счет кэширования данных, а также обеспечивает улучшенную защиту от кибератак.
Имя хоста: dns.google
Quad 9 DNS. Эта бесплатная рекурсивная служба, что означает, что для поиска информации сервер может обращаться к другим DNS серверам. Данный сервер обеспечивает высокую производительность, а также блокирует большинство вредоносных доменов, повышая безопасность интернет-серфинга.
Имя хоста: dns.quad9.net
Cloudflare. Данный сервис владеет и управляет огромной сетью серверов и использует их для ускорения работы сайтов, а также для защиты их от вредоносных атак, таких как DDoS. Многие пользователи, подключившиеся к данному серверу, отмечают ускоренную по сравнению со стандартными серверами загрузку страниц в интернете.
Имя хоста: 1dot1dot1dot1.cloudflare-dns.com
AdGuard DNS. С помощью данного сервиса, кроме повышенной защиты личных данных, вы также сможете избавиться от рекламы на страницах сайтов и игр. Реклама вырезается в момент обработки DNS запросов, в результате страницы загружаются быстрее, не потребляя ресурсы смартфона.
Имя хоста: dns.adguard.com
После установки любого сервера из списка необходимо включить, а затем выключить режим полета в настройках вашего смартфона. Это нужно для очистки кэша DNS.
Установка альтернативного DNS с помощью приложения
Для поиска и установки оптимального DNS-сервера можно воспользоваться сторонним приложением из Play Маркета. Одним из таких бесплатных приложений является приложение Net Optimizer, которое сканирует наиболее быстрые и безопасные DNS и производит подключение в один клик.
Скачиваем и устанавливаем приложение Net Optimizer из Play Маркета.
Источник
How to Change DNS Settings on Android

By default you are using the DNS servers of your Internet service provider, but you don’t have to stick with them. There are a number of reasons to use third-party DNS servers. They can be faster than your provider’s DNS servers, offer advanced security features, and can help bypass internet censorship filters. There are several free domain name resolution services that you can switch to.
Change the DNS settings if you do NOT have root permissions
- Application: DNSet
- Developer: Gambero & Di Florio
- Reviewed version: 1.1
- Price: Free / $1.34
UPDATE: Finally there is an application called DNSet that allows you to change the DNS servers used by your device and doesn’t require root privileges to run. With free version of DNSet you can setup only Google Public DNS on your device, and Pro version allows you to use any DNS servers of your choice. DNSet works both for Wi-Fi and 3G/4G data connections.

If you don’t root permission on your device, you have to face some limitations of the Android system. First, changing the DNS settings will only affect your current Wi-Fi network connection. There is no option available to change the DNS settings for your 3G/4G data networks connection. Second, you must change the DNS server settings for each Wi-Fi network you want to connect to.
To change the DNS settings:
- Open the Settings on the device.
- Select “Wi-Fi”.
- Long press your current network, then select “Modify network”.
- Mark “Show advanced options” check box.
- Change “IP settings” to “Static”
- Add the DNS servers IPs to the “DNS 1”, and “DNS 2” fields.
- Press “Save” button, disconnect from the network, and reconnect for changes to take effect.
UPDATE: Note that setting IP Settings to “Static” will affect the way that DHCP does address allocation and can be used only as a short-term solution. In order to work correctly, you have to configure your router and assign static IP to the device’s MAC address.

How to Change DNS Settings on Android
Change the DNS settings if you have root permissions
If you have rooted your Android device, you can use free and simple DNS Changer application. With DNS Changer you can quickly set DNS servers IP manually or select them from a list of DNS providers. You can set program to automatically apply these settings both to Wi-Fi and 3G/4G data connection.

DNS Changer Screenshot
Most popular free DNS services
DNS 1: 8.8.8.8, DNS 2: 8.8.4.4
DNS 1: 208.67.222.222, DNS 2: 208.67.220.220
DNS 1: 8.26.56.26, DNS 2: 8.20.247.20
DNS 1: 198.153.192.40, DNS 2: 198.153.194.40
Источник


