- Set Up the Preview SDK
- In this document
- Get Android Studio 1.3
- Get the Preview SDK
- Create or Update a Project
- Create a new project
- Update an existing project
- Set Up for Testing
- Set up a physical device
- Set up a virtual device
- Настройка Android SDK
- 1. Скачать Android SDK
- 2. Установить Android SDK
- 3. Удостовериться, что система определяет ваше устройство
- 4. Добавить путь до Android SDK в Unity
- Installing the Android SDK
- Android environment setup
- 1. Download the Android SDK
- 1a. Install the Android SDK using the command line tools
- 1b. Install the SDK using Android Studio
- 2. Enable USB debugging on your device
- 3. Configure the Android SDK path in Unity
- 4. Download and set up the Android NDK
- Using an alternate Java Development Kit
Set Up the Preview SDK
In this document
Get Android Studio 1.3
The Developer Preview is best used with Android Studio 1.3, which is in preview status. It is highly recommended that you install the preview version of Android Studio 1.3 to work with the Preview SDK.
Caution: The canary preview of Android Studio 1.3 is still in active development. If you are using your primary development machine to test the developer preview, you can create a second installation of Android Studio to use for testing.
To install the Android Studio 1.3 preview:
- Download and launch Android Studio.
- Open the Settings window (on Windows, you can do this by choosing File > Settings). Choose the Appearance & Behavior > System Settings > Updates panel.
On OSX, you can find the Appearance & Behavior panel in Android Studio’s Preferences window.
Get the Preview SDK
To add the Preview SDK components to your development environment:
- Launch the Android Studio 1.3 preview.
- Open the Settings window (on Windows, you can do this by choosing File > Settings). Choose the Appearance & Behavior > System Settings > Updates panel.
On OSX, you can find the Appearance & Behavior panel in Android Studio’s Preferences window.
After completing these steps, the preview components are available in your development environment.
Create or Update a Project
In order to use the preview APIs, you must create or update a development project to use the preview components.
Create a new project
We recommend using Android Studio to create a project with the preview. Follow the steps described in Creating a Project until you arrive at the Form Factors screen in the project wizard. Then perform the following steps to create a project configured for the preview.
- Check Phone and Tablet.
- Select MNC: Android M (Preview) in Minimum SDK.
Update an existing project
For existing projects, you must modify the project configuration to enable the preview APIs. In your development environment, open the build.gradle file for your module and set these values as follows:
- compileSdkVersion is set to ‘android-MNC’
- minSdkVersion is set to ‘MNC’
- targetSdkVersion is set to ‘MNC’
Set Up for Testing
Testing an app with the preview requires that you have a device or virtual device configured with the preview version of the platform. If you have a compatible device, you can install the preview platform for testing. Otherwise, you can configure a virtual device for testing.
Set up a physical device
If you have a Nexus 5, Nexus 6, Nexus 9, or Android TV, you can install a preview system image on these devices for testing your app. You can set up a virtual device with the preview version of the platform from within Android Studio using the Android Virtual Device Manager tool.
Important: Installing a preview image on a device removes all data from it, so you should backup any data before installing a preview image.
Set up a virtual device
You can set up virtual device with the preview version of the platform from within Android Studio using the Android Virtual Device Manager tool.
To create an AVD with the AVD Manager:
- Install the Preview SDK in your development environment, as described in Setting Up the Preview SDK.
- Follow the steps in Managing AVDs with AVD Manager. Use the following settings:
- Device: Nexus 5, Nexus 6, Nexus 9, or Android TV
- Target: Android M (Preview) — API Level M
- ABI: x86
For more information about creating virtual devices for testing, see Managing Virtual Devices.
Источник
Настройка Android SDK
Прежде чем вы сможете запустить написанный код на Android-устройстве, нужно выполнить несколько простых действий. Это относится как к работе с Unity, так и к созданию приложений с нуля.
1. Скачать Android SDK
Зайдите на страницу Android Developer SDK. Скачайте архив с последней версией Android SDK и распакуйте его.
2. Установить Android SDK
Следуйте инструкциям на странице Installing the SDK (причём, вы можете свободно пропустить опциональные части, относящиеся к Eclipse). В шаге 4 руководства Installing the SDK убедитесь, что добавили как минимум одну Android platform (Android платформу) с уровнем API равным или выше 9 (платформа 2.3 или выше), Platform Tools и USB drivers (USB драйверы), если вы используете Windows.
3. Удостовериться, что система определяет ваше устройство
Это может быть не так просто, особенно на Windows системах, в которых драйвера часто бывают источником проблем. Также, с вашим устройством может идти дополнительная информация или особые драйверы от производителя.
Для Windows: если Andoid устройство автоматически определяется системой, вам все равно придётся обновить драйверы на те, который поставляются с Android SDK. Это делается через диспетчер устройств Windows. —>Если устройство не определяется автоматически, используйте драйверы из Android SDK или особые драйверы, предоставленные производителем. —>Дополнительную информацию можно найти здесь: USB Drivers for Windows
Для Mac: если вы разрабатываете на OSX, тогда обычно не требуется никаких дополнительных драйверов.
Важно: Не забудьте включить “Отладку по USB” на вашем устройстве. Перейдите в Настройки -> Параметры разработчика , для включения отладки по USB. Начиная с Android Jelly Bean 4.2, параметры разработчика по умолчанию скрыты. Для их включения, понажимайте несколько раз пальцем на строку в меню Настройки -> Об устройстве -> Номер сборки . После этого вам станет доступен пункт Настройки -> Параметры разработчика .
Если вы не уверены, что ваше устройство корректно установилось в системе, пожалуйста, прочтите страницу Решение проблем при разработке под Android для дополнительной информации.
4. Добавить путь до Android SDK в Unity
При первой сборке проекта под Android (или если Unity не сможет обнаружить SDK), вас попросят указать местоположение папки, в которую вы установили Android SDK (вы должны выделить корневую папку установленного SDK). Путь до Android SDK также можно изменить в редакторе, выбрав в меню Unity > Preferences и перейдя в раздел External Tools окна настроек.
Источник
Installing the Android SDK
Android Studio provides everything you need to start developing apps for Android, including the Android Studio IDE and the Android SDK tools.
If you didn’t download Android Studio, go download Android Studio now, or switch to the stand-alone SDK Tools install instructions.
Before you set up Android Studio, be sure you have installed JDK 6 or higher (the JRE alone is not sufficient)—JDK 7 is required when developing for Android 5.0 and higher. To check if you have JDK installed (and which version), open a terminal and type javac -version . If the JDK is not available or the version is lower than 6, go download JDK.
To set up Android Studio on Windows:
- Launch the .exe file you just downloaded.
- Follow the setup wizard to install Android Studio and any necessary SDK tools.
On some Windows systems, the launcher script does not find where Java is installed. If you encounter this problem, you need to set an environment variable indicating the correct location.
Select Start menu > Computer > System Properties > Advanced System Properties. Then open Advanced tab > Environment Variables and add a new system variable JAVA_HOME that points to your JDK folder, for example C:\Program Files\Java\jdk1.7.0_21 .
The individual tools and other SDK packages are saved outside the Android Studio application directory. If you need to access the tools directly, use a terminal to navigate to the location where they are installed. For example:
To set up Android Studio on Mac OSX:
- Unzip the downloaded zip file, android-studio-ide- -mac.zip .
- Drag and drop Android Studio into the Applications folder.
- Open Android Studio and follow the setup wizard to install any necessary SDK tools.
Depending on your security settings, when you attempt to open Android Studio, you might see a warning that says the package is damaged and should be moved to the trash. If this happens, go to System Preferences > Security & Privacy and under Allow applications downloaded from, select Anywhere. Then open Android Studio again.
The individual tools and other SDK packages are saved outside the Android Studio application directory. If you need access the tools directly, use a terminal to navigate into the location where they are installed. For example:
To set up Android Studio on Linux:
- Unpack the downloaded Tar file, android-studio-ide- -linux.zip , into an appropriate location for your applications.
- To launch Android Studio, navigate to the android-studio/bin/ directory in a terminal and execute studio.sh .
You may want to add android-studio/bin/ to your PATH environmental variable so that you can start Android Studio from any directory.
If the SDK is not already installed, follow the setup wizard to install the SDK and any necessary SDK tools.
Note: You may also need to install the ia32-libs, lib32ncurses5-dev, and lib32stdc++6 packages. These packages are required to support 32-bit apps on a 64-bit machine.
Android Studio is now ready and loaded with the Android developer tools, but there are still a couple packages you should add to make your Android SDK complete.
The stand-alone SDK Tools package does not include a complete Android development environment. It includes only the core SDK tools, which you can access from a command line or with a plugin for your favorite IDE (if available).
If you didn’t download the SDK tools, go download the SDK now, or switch to the Android Studio install instructions.
To get started on Windows:
Your download package is an executable file that starts an installer. The installer checks your machine for required tools, such as the proper Java SE Development Kit (JDK) and installs it if necessary. The installer then saves the Android SDK Tools to a specified the location outside of the Android Studio directories.
- Double-click the executable ( .exe file) to start the install.
- Make a note of the name and location where you save the SDK on your system—you will need to refer to the SDK directory later when using the SDK tools from the command line.
- Once the installation completes, the installer starts the Android SDK Manager.
To get started on Mac OSX:
Unpack the ZIP file you’ve downloaded. By default, it’s unpacked into a directory named android-sdk-mac_x86 . Move it to an appropriate location on your machine, such as a «Development» directory in your home directory.
Make a note of the name and location of the SDK directory on your system—you will need to refer to the SDK directory later when using the SDK tools from the command line.
To get started on Linux:
Unpack the .zip file you’ve downloaded. The SDK files are download separately to a user-specified directory.
Make a note of the name and location of the SDK directory on your system—you will need to refer to the SDK directory later when using the SDK tools from the command line.
Troubleshooting Ubuntu
- If you need help installing and configuring Java on your development machine, you might find these resources helpful:
- https://help.ubuntu.com/community/Java
- https://help.ubuntu.com/community/JavaInstallation
- Here are the steps to install Java:
-
If you are running a 64-bit distribution on your development machine, you need to install additional packages first. For Ubuntu 13.10 (Saucy Salamander) and above, install the libncurses5:i386 , libstdc++6:i386 , and zlib1g:i386 packages using apt-get :
For earlier versions of Ubuntu, install the ia32-libs package using apt-get :
The Android SDK tools are now ready to begin developing apps, but there are still a couple packages you should add to make your Android SDK complete.
Then, select which SDK bundle you want to install:
Источник
Android environment setup
Whether you’re building an Android application in Unity or programming it from scratch, you must set up the Android Software Development Kit (SDK) before you can build and run any code on your Android device. By default, Unity installs a Java Development Kit based on OpenJDK.
1. Download the Android SDK
You can install the Android SDK using command line tools or through Android Studio. Android Studio provides an easy to use GUI based tool but installs additional software on your computer. Using the command line tools is a smaller download and does not install additional software, but it can be more challenging to use.
1a. Install the Android SDK using the command line tools
Install or unpack the Android SDK. After installing, open the Android SDK Manager and add at least one Android SDK Platform, the Platform Tools, the Build Tools, and the USB drivers if you’re using Windows.
To install an Android platform SDK and the associated tools:
Unzip the tools folder to a location on your hard drive.
Open a command-prompt window.
Navigate to the bin folder in the location where you unzipped the tools folder:
install folder > tools > bin
Use the sdkmanager command line tool to retrieve the list of packages that you can install. The installable packages include the Platform SDKs, Build Tools, Platform tools, and other tools.
Select a version of the Platform SDK to install. Platform SDKs take the following form in the list: platforms;android-xx. The xx indicates the SDK level. The larger the number, the newer the package. Typically, you can install the latest available version. However, there might be cases where Google has released a new version of the SDK that causes errors when you build your Unity Project. In that case, you must uninstall the SDK and install an earlier version. The general format of the command for package installation is sdkmanager
. You can install the corresponding Platform Tools and Build Tools at the same time.
Example: sdkmanager “platform-tools” “platforms;android–27” “build-tools;27.0.3”
- If you are running on Windows, install the USB device drivers:
This installs the SDK to a directory named platforms in the same directory you unzipped the tools folder to.
c: \platforms
1b. Install the SDK using Android Studio
Install Android studio from the Android developer portal. The Android developer portal provides detailed installation instructions.
Note: Android Studio provides some ease of use benefits, but it is not fully tested for compatibility with Unity installs. If you encounter errors, Unity recommends using the command line method.
When installing the Android platform SDK and other tools, you can typically install the latest available version. There might be cases in which Google has released a new version of the SDK that causes errors when you build your Unity Project. In that case, uninstall the SDK and install an earlier version.
Install the associated Platform and Build tools at the same time. If you are running on Windows, install the USB device drivers.
2. Enable USB debugging on your device
To enable USB debugging, you must first enable Developer options on your device. To do this, find the build number in your device’s Settings menu. The location of the build number varies between devices; for stock Android, it’s usually in Settings > About phone > Build number. For specific information on your device and Android version, refer to your hardware manufacturer.
After you navigate to the build number using the instructions above, tap on the build number seven times. A pop-up notification saying “You are now X steps away from being a developer” appears, with “X” being a number that counts down with every additional tap. On the seventh tap, Developer options are unlocked.
Note: On Android versions prior to 4.2 (Jelly Bean), the Developer options are enabled by default.
Go to Settings > Developer options, then enable USB debugging. Android now enters debug mode when it is connected to a computer via USB.
Connect your device to your computer using a USB cable. If you are developing on a Windows computer, you might need to install the device-specific USB driver. See the manufacture website for your device for additional information.
The setup process differs for Windows and macOS and is explained in detail on the Android developer website. For more information on connecting your Android device to the SDK, refer to the Running Your App section of the Android Developer documentation.
3. Configure the Android SDK path in Unity
The first time you create a Project for Android (or if Unity later fails to locate the SDK), Unity asks you to locate the folder in which you installed the Android SDK.
If you installed the SDK using the sdkmanager, you can find the folder in \platforms .
If you installed the SDK when you installed Android Studio, you can find the location in the Android Studio SDK Manager. To open the SDK Manager from Android Studio, go to Tools > Android > SDK Manager or select SDK Manager in the toolbar.
To change the location of the Android SDK, in the Unity menu bar go to Unity > Preferences > External Tools.
4. Download and set up the Android NDK
If you are using the IL2CPP A Unity-developed scripting back-end which you can use as an alternative to Mono when building Projects for some platforms. More info
See in Glossary scripting backend A framework that powers scripting in Unity. Unity supports three different scripting backends depending on target platform: Mono, .NET and IL2CPP. Universal Windows Platform, however, supports only two: .NET and IL2CPP. More info
See in Glossary for Android, you need the Android Native Development Kit (NDK). It contains the toolchains (such as compiler and linker) needed to build the necessary libraries and produce the output package (APK). If you are not targeting the IL2CPP backend, you can skip this step.Download Android NDK version r16b (64-bit) from the NDK Downloads web page. Extract the android-ndk-r16b folder to a directory on your computer and note the location.
The first time you build a Project for Android using IL2CPP, Unity asks you to locate the folder in which you installed the Android NDK. Select the root folder of your NDK installation. To change the location of the Android NDK, in the Unity Editor, navigate to the menu: Unity > Preferences to display the Unity Preferences dialog box. Here, click External Tools.
Using an alternate Java Development Kit
Unity recommends that you use the JDK installed with the Android build tools, to ensure that you receive the correct version and configuration.
If you have manually installed the JDK and do not want to duplicate the installation, you can specify the location in the Unity Preferences window. To do this, go to Preferences > External tools and enter the directory path in the JDK field:
 Preferences for Android external tools
Warning: The Android tools do not support JDK 9 or later; an alternate JDK must be version 8. Unity does not officially support versions of the JDK other than the one embedded in the Android Build Tools.
To change the JDK that Unity uses to build Android apps:
Open the Project.
In the left navigation column, select External Tools.
Uncheck JDK Installed with Unity (recommended).
In the JDK field enter the path to the JDK or use the Browse button to locate it.
2018–11–21 Page amended with editorial review
Did you find this page useful? Please give it a rating:
Источник
-
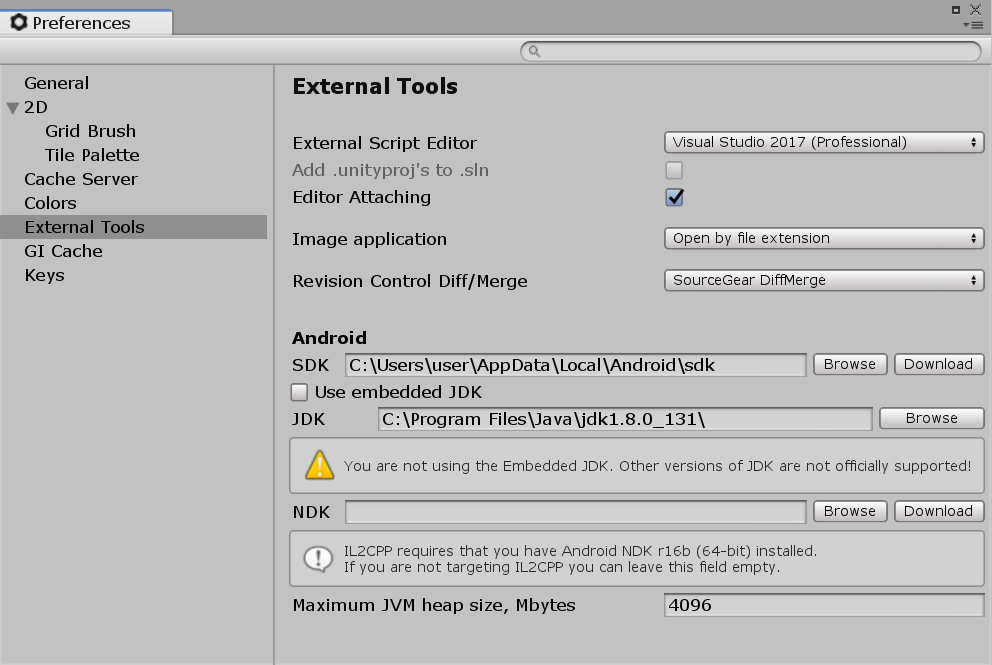 Preferences for Android external tools


