- How to Connect an Android to a Wired Ethernet Connection
- Работа с сетью в Android: трафик, безопасность и батарейка
- How to Change/switch 2G to 3G 4G LTE preferred Network type mode in Android Phone
- How to change 2G to 3G only, Edge to 4G only network mode:
- Set preferred network type or Switch Change 2G to 3G 4G LTE only mode in Android Phone:
- To Change 2G to 3G to 4G LTE only network mode in Android Phone via USSD code, take the following steps:
- How to change 3G to 4G on android phones within Qualcomm Chipset Processor:
- Switch between 2G / 3G / 4G LTE on android mobile phones with Mediatek Chipset Processor
- How to Dual LTE mode or Enable dual SIM Card 4G
- 119 Comments to How to Change/switch 2G to 3G 4G LTE preferred Network type mode in Android Phone
How to Connect an Android to a Wired Ethernet Connection
If you have an Android tablet or smartphone and want to use a wired Ethernet connection it is easy to do.
There are a few requirements.
UPDATE: While the below option still works for many Android Smartphones there is a new better way to connect to Ethernet. Using a Type-C Hub can add many ports including HDMI, VGA, Ethernet, Old USB standards, and SD-Card port. Type-C Hubs also have much better compatibility.
Android Ethernet Requirements
- FirstAndroid Marshmallow 6.0.1 which was released October 2015 must be installed.
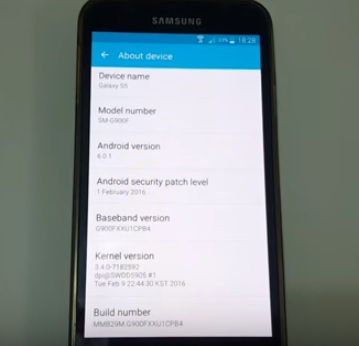
To see which version you have go to Settings –> About Device.
Previous Android versions needed to be rooted which is no longer the case with Android Marshmallow 6.0.1 and above.
Second an OTG to Ethernet adapter will be needed.
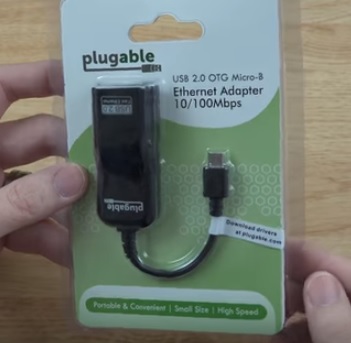
OTG stands for On-The-Go and simply plugs into an Android micro USB port. It is mainly used to copy files to external storage such as a flash drive but also can be used for a LAN internet connection.
The Ethernet adapter will transmit the signals over the network. These items can be bought separately or in one package ready to go.
Not all the adapters are compatible with every Android device and should be verified it works with your device.
While most will not have any problems the Chipset in the adapter and the phone/tablet must be compatible. Simply be sure an adapter will work with your Android device before getting one.
Be sure to know what type of port your phone uses, old Micro-USB or the new Type-C.
Most older Android smartphones use a Micro-USB port with the new Type-C port now on the Galaxy S10, S20 and similar units.
Type-C Android Ethernet Adapter on Amazon
USB C to Ethernet Adapter RJ45 to Type C Gigabit Network LAN Converter 10/100/1000Mbps for MacBook Pro Air/iPad Pro/Galaxy S20 S10 S9 XPS 13 15 /Surface Book 2 Go Chromebook-Silver
Most Android devices simply need to be plugged in and will automatically connect. Be sure to turn off your WiFi to know for sure it is only on Ethernet. 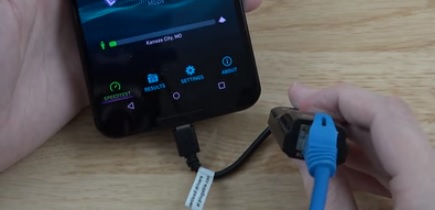
Some devices require it to be in Airplane mode in settings and depends on the ROM.
Summary
Hooking an Android smartphone or tablet to an Ethernet line is easy to do, with Android Marshmallow or higher.
While most will not have any issues the phone or tablet must have the drivers for the chipset in the Ethernet adapter to work.
Every manufacture customizes the Android OS for their devices and may remove or add drivers.
Simply be sure to read the specs of an adapter and the reviews to be sure it works with your smartphone or tablet.
Источник
Работа с сетью в Android: трафик, безопасность и батарейка
На сегодняшний день в Google Play насчитывается более 800 тысяч приложений. Многие из них реализованы на основе клиент-серверного общения. При разработке таких приложений нужно учесть три основных момента, о которых пойдет речь в этой статье.
О чем нужно помнить при реализации сетевой части приложения
Первое – это трафик. Не всегда есть возможность работать по бесплатному Wi-Fi-соединению, а мобильный интернет всё еще дорогой, и об этом нужно помнить, потому что трафик – это деньги пользователя.
Второе – это лимит батарейки. Мобильные устройства необходимы пользователю для каких-то повседневных дел, совещаний, прогулок, бизнеса, и когда батарейка садится в самый неподходящий момент, пользователь негодует.
Третье – это безопасность. Так как все-таки речь идет о мобильных клиентах, и данные гуляют по сети от клиента к серверу и обратно, то их необходимо защищать.
Подходы по реализации сетевого взаимодействия
Для начала вспомним, какие способы реализации клиент-серверного общения существуют и популярны на сегодняшний день.
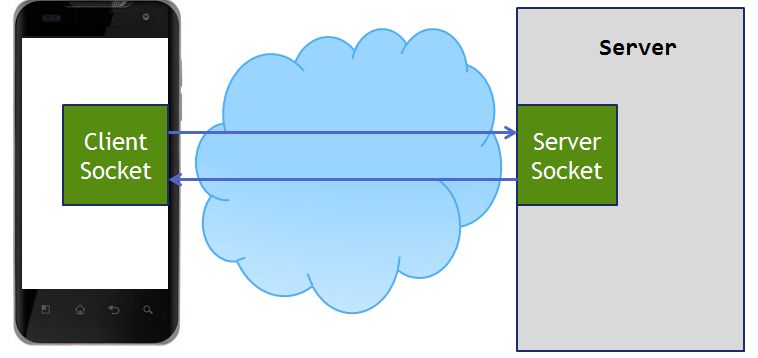
Первый подход — на основе сокетов (здесь я имею в виду работу непосредственно с Socket API). Он часто используется в приложениях, где важна скорость доставки сообщения, важен порядок доставки сообщений и необходимо держать стабильное соединение с сервером. Такой способ зачастую реализуется в мессенджерах и играх.
Второй подход — это частые опросы (polling): клиент посылает запрос на сервер и говорит ему: «Дай мне свежие данные»; сервер отвечает на запрос клиента и отдает все, что у него накопилось к этому моменту.

Минус такого подхода в том, что клиент не знает, появились ли свежие данные на сервере. По сети лишний раз гоняется трафик, в первую очередь из-за частых установок соединений с сервером.
Третий подход — длинные опросы (long polling) — заключается в том, что клиент посылает «ожидающий» запрос на сервер. Сервер смотрит, есть ли свежие данные для клиента, если их нет, то он держит соединение с клиентом до тех пор, пока эти данные не появятся. Как только данные появились, он «пушит» их обратно клиенту. Клиент, получив данные от сервера, тут же посылает следующий «ожидающий» запрос и т.д.
Реализация этого подхода достаточно сложна на мобильном клиенте в первую очередь из-за нестабильности мобильного соединения. Зато при этом подходе трафика расходуется меньше, чем при обычном polling’e, т.к. сокращается количество установок соединений с сервером.
Механизм long polling, или пуш-уведомлений (push notifications), реализован в самой платформе Android. И, наверное, для большинства задач будет лучше использовать его, а не реализовывать самим. Ваше приложение подписывается у сервиса Google Cloud Messaging (GCM) на получение пуш-уведомлений.
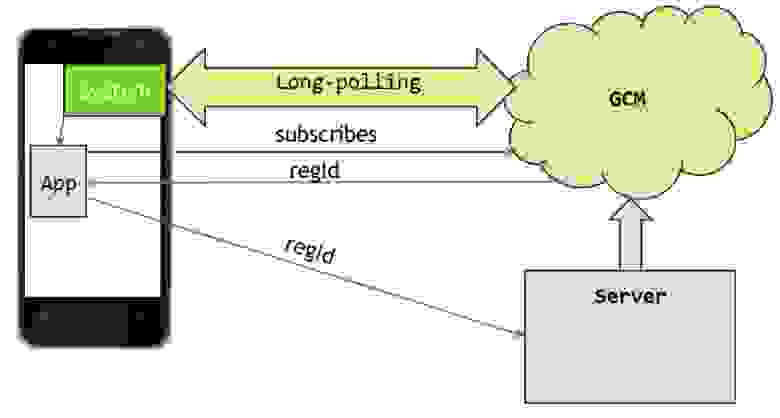
Тем самым разрывается связь непосредственно между сервером и клиентом за счет того, что сервер работает с сервисом GCM и отправляет свежие данные всегда на этот сервис, а он уже в свою очередь реализует всю логику доставки этих данных до вашего приложения. Плюсы этого подхода в том, что устраняется необходимость частых установок соединения с сервером за счет того, что вы точно знаете, что данные появились, и об этом вас оповещает сервис GCM.
Из этих четырех подходов наиболее популярными при разработке бизнес-приложений являются пуш-уведомления и частые опросы. При реализации этих подходов нам так или иначе придется устанавливать соединение с сервером и передавать данные. Далее речь пойдет об инструментах, которые есть в наличии у разработчика для работы по HTTP/HTTPS-протоколам.
HttpUrlConnection и HttpClient
В арсенале Android-разработчика есть два класса для работы по этим протоколам. Первый – это java.net.HttpURLConnection, второй – org.apache.http.client.HttpClient. Обе эти библиотеки включены в Android SDK. Далее будут подробно рассмотрены основные моменты, которые будут влиять на трафик, батарею и безопасность при работе с каждой из этих библиотек.
С HttpURLConnection все просто. Один класс и все. Это объясняется тем, что родительский класс URLConnection был спроектирован для работы не только по HTTP-протоколу, а еще по таким, как file, mailto, ftp и т.п.

HttpClient спроектирован более объектно-ориентированно. В нем есть четкое разделение абстракций. В самом простом случае мы будем работать с пятью разными интерфейсами: HttpRequest, HttpResponse, HttpEntity и HttpContext. Поэтому апачевский клиент намного тяжеловеснее HttpUrlConnection.

Как правило, на все приложение существует всего один экземпляр класса HttpClient. Это обусловлено его тяжеловесностью. Использование отдельного экземпляра на каждый запрос будет расточительным. Мы можем, к примеру, хранить экземпляр HTTP-клиента в наследнике класса Application.

В случае HttpUrlConnection следует создавать на каждый запрос новый экземпляр клиента.

Из чего складывается трафик?
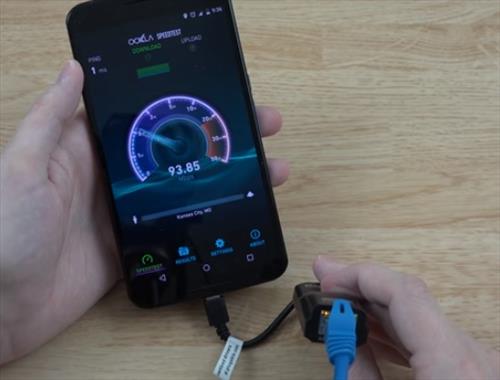
Во время работы нашего приложения картинка будет примерно такая.
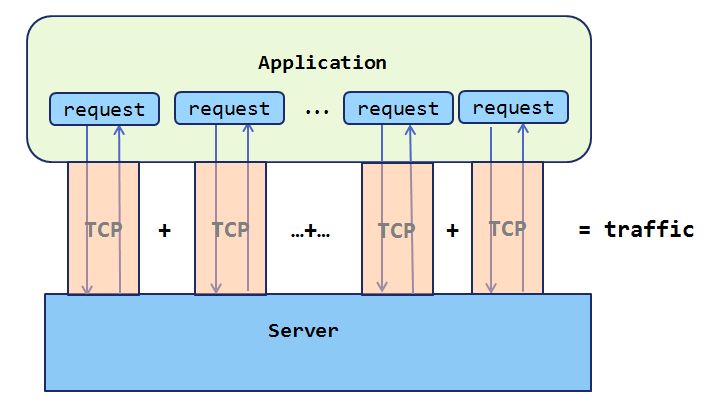
Количество и частота запросов будет зависеть от функционала и насыщенности UI – интерфейса приложения. Каждый такой запрос устанавливает TCP-соединение с сервером. В данном случае трафик, который будет потрачен, будет равняться сумме установок соединений и сумме переданных данных. Понизить расход трафика в данном случае можно за счет использования долгоживущего соединения (keep alive).

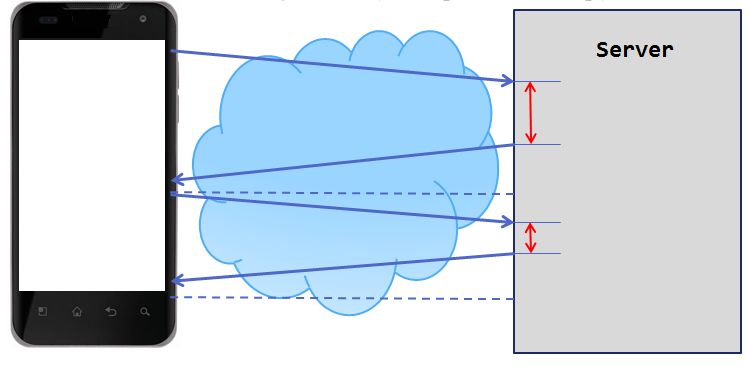
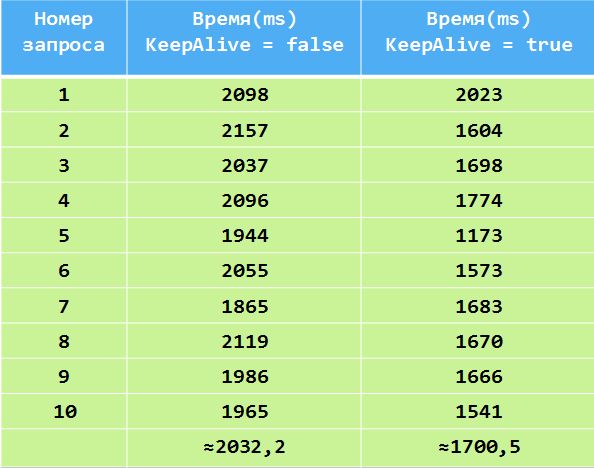
Основная идея keep alive-соединения заключается в использовании одного и то же TCP-соединения для отправки и приема HTTP-запросов. Главные преимущества — снижение трафика и времени выполнения запроса. Мной был проделан простенький тест, который заключался в том, что выполнялось последовательно 10 запросов на один и тот же хост. Данные представлены в таблице ниже. При выключенном keep alive видно, что среднее время выполнения запроса составляло примерно две секунды. В случае с включенным keep alive это время снизилось до 1,7 секунды, что на 16% быстрее. Это обуславливается в первую очередь тем, что устраняется необходимость частой установки соединения с сервером. При использовании защищенного HTTPS-соединения разница была бы заметнее, т.к. процедура SSL Handshake гораздо тяжелее процедуры TCP Handshake.
Важным параметром keep alive-cоединения является keep alive duration. Он означает временной интервал. Если приходит несколько HTTP-запросов в пределах этого интервала, то будет переиспользоваться уже установленное TCP-соединение.

Из рисунка видно, что время между четвертым и третьим запросом превысило keep alive duration, поэтому создается новое TCP-соединение с сервером.
Давайте посмотрим, как можно настроить вышеописанный параметр. В случае HttpClient все хорошо, в нашем распоряжении есть интерфейс ConnectionKeepAliveStrategy. Переопределив метод getKeepAliveDuration, мы можем вернуть нужное значение параметра keep alive duration.
Работая с HttpUrlConnection, нужно помнить о баге в платформе Android 2.2 и отключать keep alive на платформах = 4.0.3 (API Level 15) должна стоять точка в начале домена

Защищенное соединение (HTTPS)
В завершение данной статьи я рассмотрю, как включить HTTPS в Android. Насколько мне известно, на других мобильных платформах достаточно включить HTTPS-схему, механизм транспорта SSL — и все должно работать. В Android есть некоторые проблемы, которые следует учитывать и решать. Для начала вспомним, как устанавливается защищенное соединение. На проблемное место указывает красная стрелка – это проверка подлинности сертификата.
Источник
How to Change/switch 2G to 3G 4G LTE preferred Network type mode in Android Phone
Android phones nowadays come with great connectivity options, like 3G and 4G LTE. The 3G and 4G LTE network mode offers faster internet data speeds than the 2G, GPRS or EDGE. If you subscribed to 4G LTE or 3G Internet Data plan from BSNL, JIO, Airtel, Idea, or Vodafone it is very vital and beneficial to use it in 4G LTE only, HSPA+ or WCDMA 3G only as Preferred Network Type mode for faster Internet data speeds. In some cases to avoid heavy data charges, you might prefer to go with 2G GSM GPRS network priority mode only.
If you have 4G phone below methods will help you to switch between different network modes or force 3G / 4G only mode on Android. But if you have a 3G smartphone and want to use 4G LTE SIM card on the 3G phone you can check the last two methods/tricks but it is not possible to use 4G LTE only network operator SIM on 3G or 2G phone.
You can buy JIOFI and can make HD calls and use 4G data speed on any 3G or 2G supported phone over Wi-Fi. Otherwise, you need to upgrade to LTE / VOLTE capable phone.
How to change 2G to 3G only, Edge to 4G only network mode:
To change from 2G to 3G only, Edge to 3G only, 2G to 4G LTE only or Edge to 4G simply go to Android Settings >> Wireless & Networks >> Mobile Networks >> Select The SIM card >> Network Mode. As shown in the image below from Network Mode you can select the network that you want to choose. All the possible option will appear. If 4G LTE is not showing then that mean your phone is not compatible for 4G SIM or 4G signals so is with the 3G.
The android operating system offers a variety of options to choose the best Preferred network according to your comfort. We found that in some Dual SIM smartphone users face difficulty in selecting their desired preferred network mode. Below are two solutions, with which you can Toggle Switch or Change from 2G to 3G or force 4G LTE only mode or vice-versa.
Many are trying to switch to 4G LTE so that they can enjoy Reliance JIO 4G VOLTE free calling and unlimited data offer on mobile phones. Now Airtel 4G, Vodafone, JIO, Idea, BSNL unlimited plan (3G without usage restriction), and many other operators have also launched low price data plans, but mostly with Data cap/speed restriction. The below image illustrate how to convert 3G 4G only network mode in an android phone.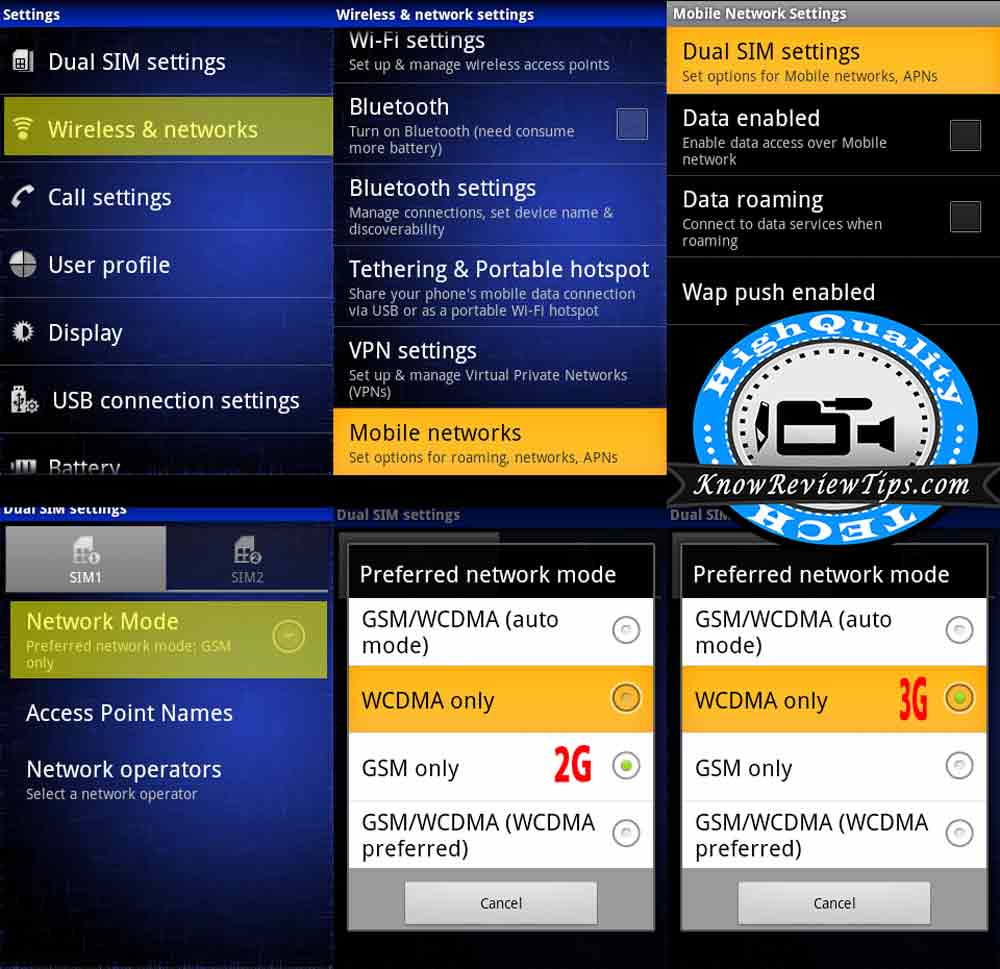
Set preferred network type or Switch Change 2G to 3G 4G LTE only mode in Android Phone:
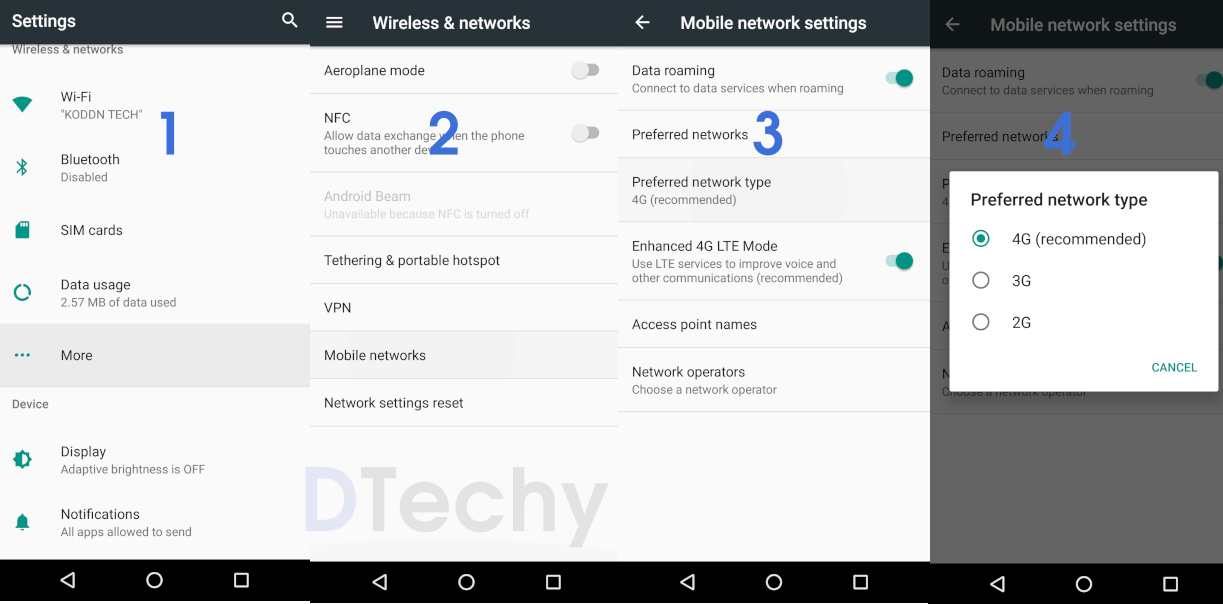
- First Go to Settings
- Select Wireless and Networks and TAP on MORE
- Scroll Down and Touch on Mobile Network
- Tap on Dual SIM / SIM Settings
- Select “Network Mode” or “Preferred network Type ”
- Some option Will Pop in the Screen
- WCDMA (Means 3G) , GSM (2G ) , LTE (4G)
- Choose the best Suited Option for according to your preferences
While doing the Switching between networks make sure your SIM card is compatible with the Network type you chose. WCDMA means 3G or 3.5G, GSM Means 2G (GPRS or EDGE) while LTE or VOLTE means 4G network. If 3G or 4G LTE option is not showing, it means your phone is not compatible with 3G/4G sim cards (Airtel, BSNL, Idea, Vodafone, Tata Docomo, Reliance JIO)respectively.
*NOTE: 1# Always choose 4G for higher Internet Speeds. 2# If you have chosen 4G LTE only it means that SIM will only work if 4G signals are available so always choose preferred instead on the ONLY mode so that if the 4G signal is low the phone can run on 3G signals as a backup. 3# There could little change in the of Settings option depending on different android versions.
You can also select a Combination of 2G + 3G ( Will automatically choose 2G network when 3G is not available). Many users found that after selecting 4G LTE or 2G Network the status bar shows no network signal. This could be due to several reasons, diagnose it in the following ways:
- Make sure 3G or 4G LTE network signal are available in your area
- Go to Network Operators (you will find it in Above solution at Step 5)
- And Touch on “Select Automatically” or “Search Network” to select Network Manually
If the Internet on the phone is not working make sure you have configured correct APN Internet Settings. Solution 2:
If your mobile phone is not showing the required Network or Preferred 4G / 2G / 3G Mode, you can have more options in Advance Internet Settings method to force specific network mode.
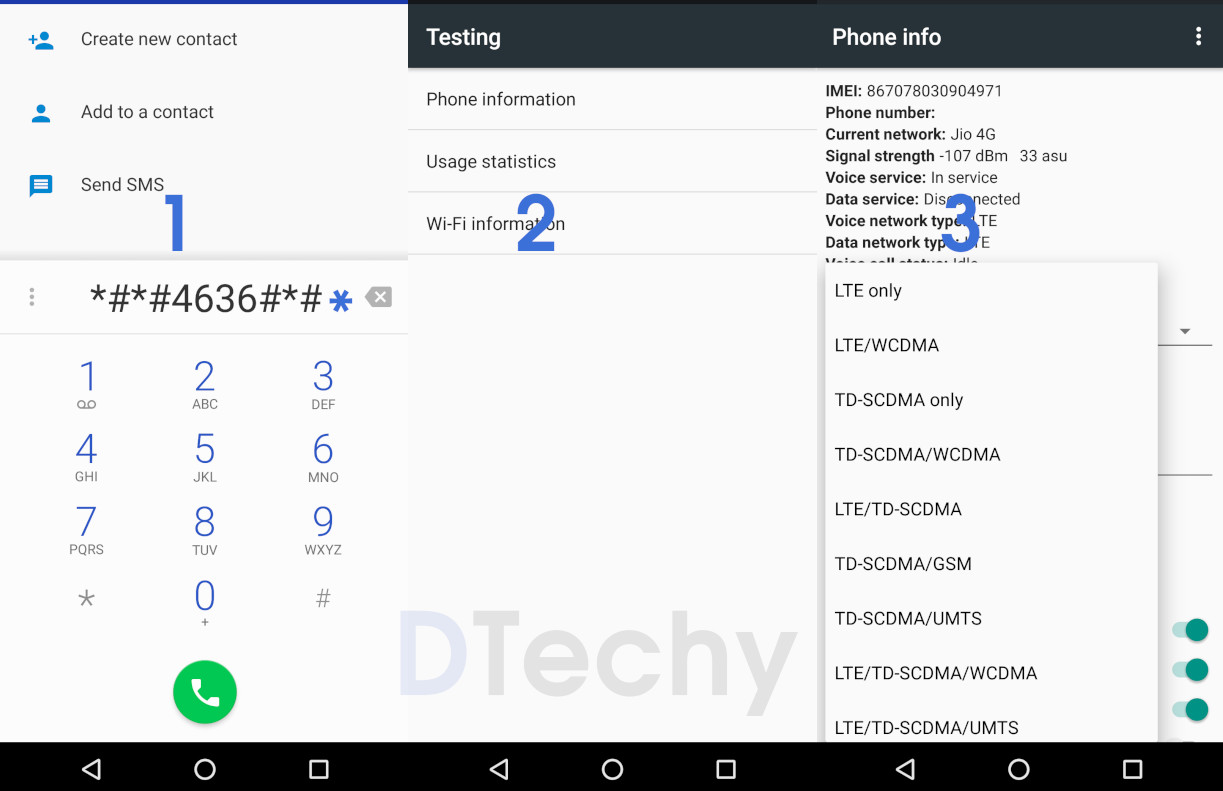
To Change 2G to 3G to 4G LTE only network mode in Android Phone via USSD code, take the following steps:
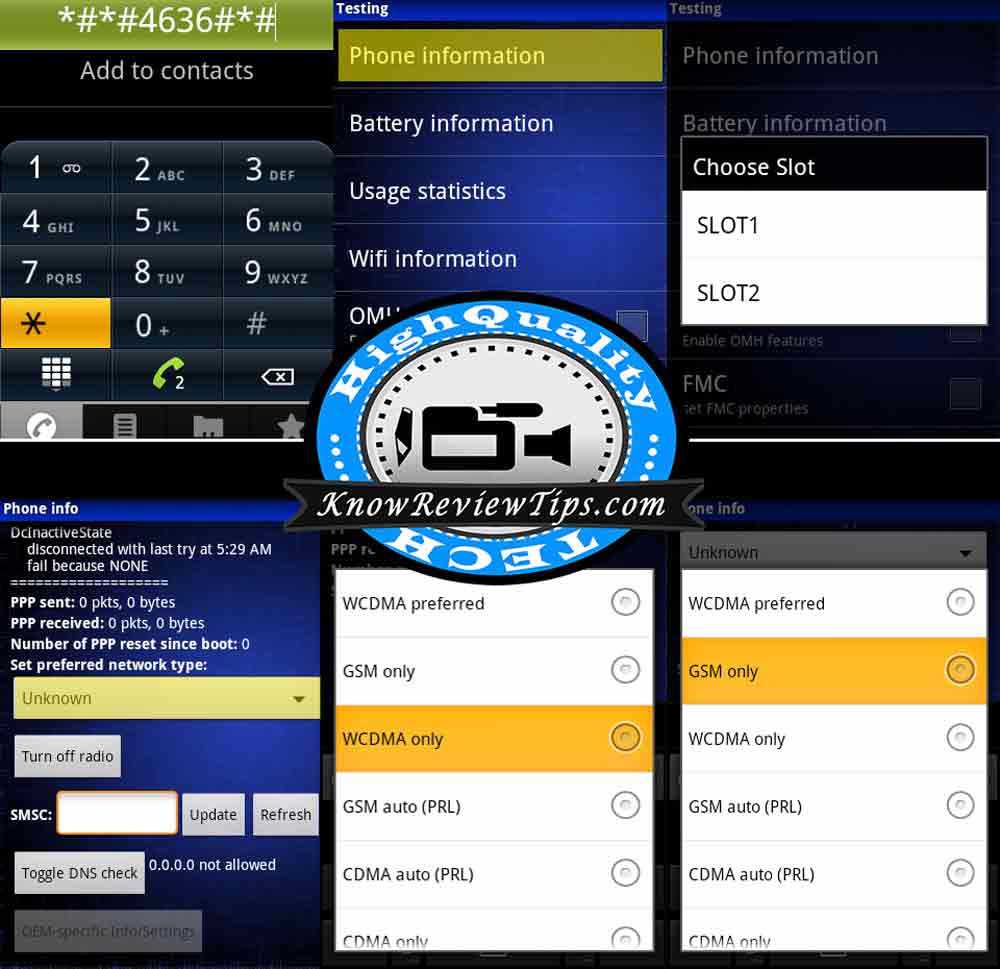
- Dial *#*#4636#*#* OR ##626* OR ##786# ( 3g to 4g code ) in your phone (android network setting code)
- Select Phone Information
- If you have Dual SIM Select the Slot (SIM) you want to change settings for
- Scroll Down and select the Option Under “Set preferred network type”
- From here Select the Network Mode you wish to use (CDMA / GSM / GSM auto (PRL) / LTE / WCDMA)
- Reliance LYF Wind 4
How to change 3G to 4G on android phones within Qualcomm Chipset Processor:
- For open Engineering mode in Qualcomm chipset processor phone download and install “Shortcut Master Lite app”.
- Open it and click on Menu.
- Search for “Service Menu” Or “Engineering Mode” and select it.
- Now you can change the preferred network.
- OR Dial *#2263# then Select Menu and Click Back again then Select Menu.
- Now go to Key Input and Enter “0000”, Select UE Setting from Popup.
- Select the desired band by going: Configure Protocol>NAS>Network Control>Band Selection>LTE Band>
Switch between 2G / 3G / 4G LTE on android mobile phones with Mediatek Chipset Processor
If your device is used mediatek chipset processor then follow below steps to use 4g sim in 3g android mobile phones.
-
- Download and install Mtk Engineering Mode app from play store.
- Open it and click on “Mtk Settings”.
- Under Telephony scroll down , to “Network selecting/Preferred Network” Option.
- Now select the desired network from the list.
These above two methods are good for those who want to use particular Frequency BAND like 2300MHz band 40 provides faster speed than the 1800Mhz band 3 and 850 Mhz Band 5. If you have inserted 4G sim card on a 3G phone
The above Preferred network Settings should work in Allview, Amoi, Reliance JIO, LYF, Archos, AT&T, BenQ, Bird, BLU, Casio, Celkon, Dell, Ericsson, Fujitsu, Siemens, Gigabyte, Haier, HTC, i-mate, Icemobile, iNQ, HP, BlackBerry, Bosch, Cat, OBI, LETV, Elephone, Pepsi, iBerry Auxus, Acer, Alcatel, MChea, Emporia, Eten, Garmin-Asus, Gionee, T-Mobile, Telit, Toshiba, Vertu, vivo, Vodafone, WND, Xiaomi, Yezz, YU yureka ,Chinese phones Nokia, Huawei, i-mobile, Innostream, Jolla, Kyocera, Lenovo, Maxon, Myphone, BQ, Star mobile, Cherry Mobile, TCL, THL, Meizu, Microsoft, Mitsubishi, Motorola, NEC, NIU, Nvidia, OnePlus, Orange, Panasonic, Parla, Plum, Prestigio, Sagem, Sendo, Posh, Qtek, Samsung, Sewon, Siemens, Sony, Spice, Tel.Me., Thuraya, Unnecto, verykool, VK, Mobile, Wiko, XCute, XOLO, Yota, ZTE, Alcatel , Sharp, Sonim, Sony Ericsson,Karbonn, Lava, LG, Maxwest, Micromax, Mitac, Modu, MWg, Neonode, Nokia, O2, Oppo, Palm, Pantech, Philips, Amazon, Apple, Asus, Benefon, BenQ-Siemens, and other android mobile phones.
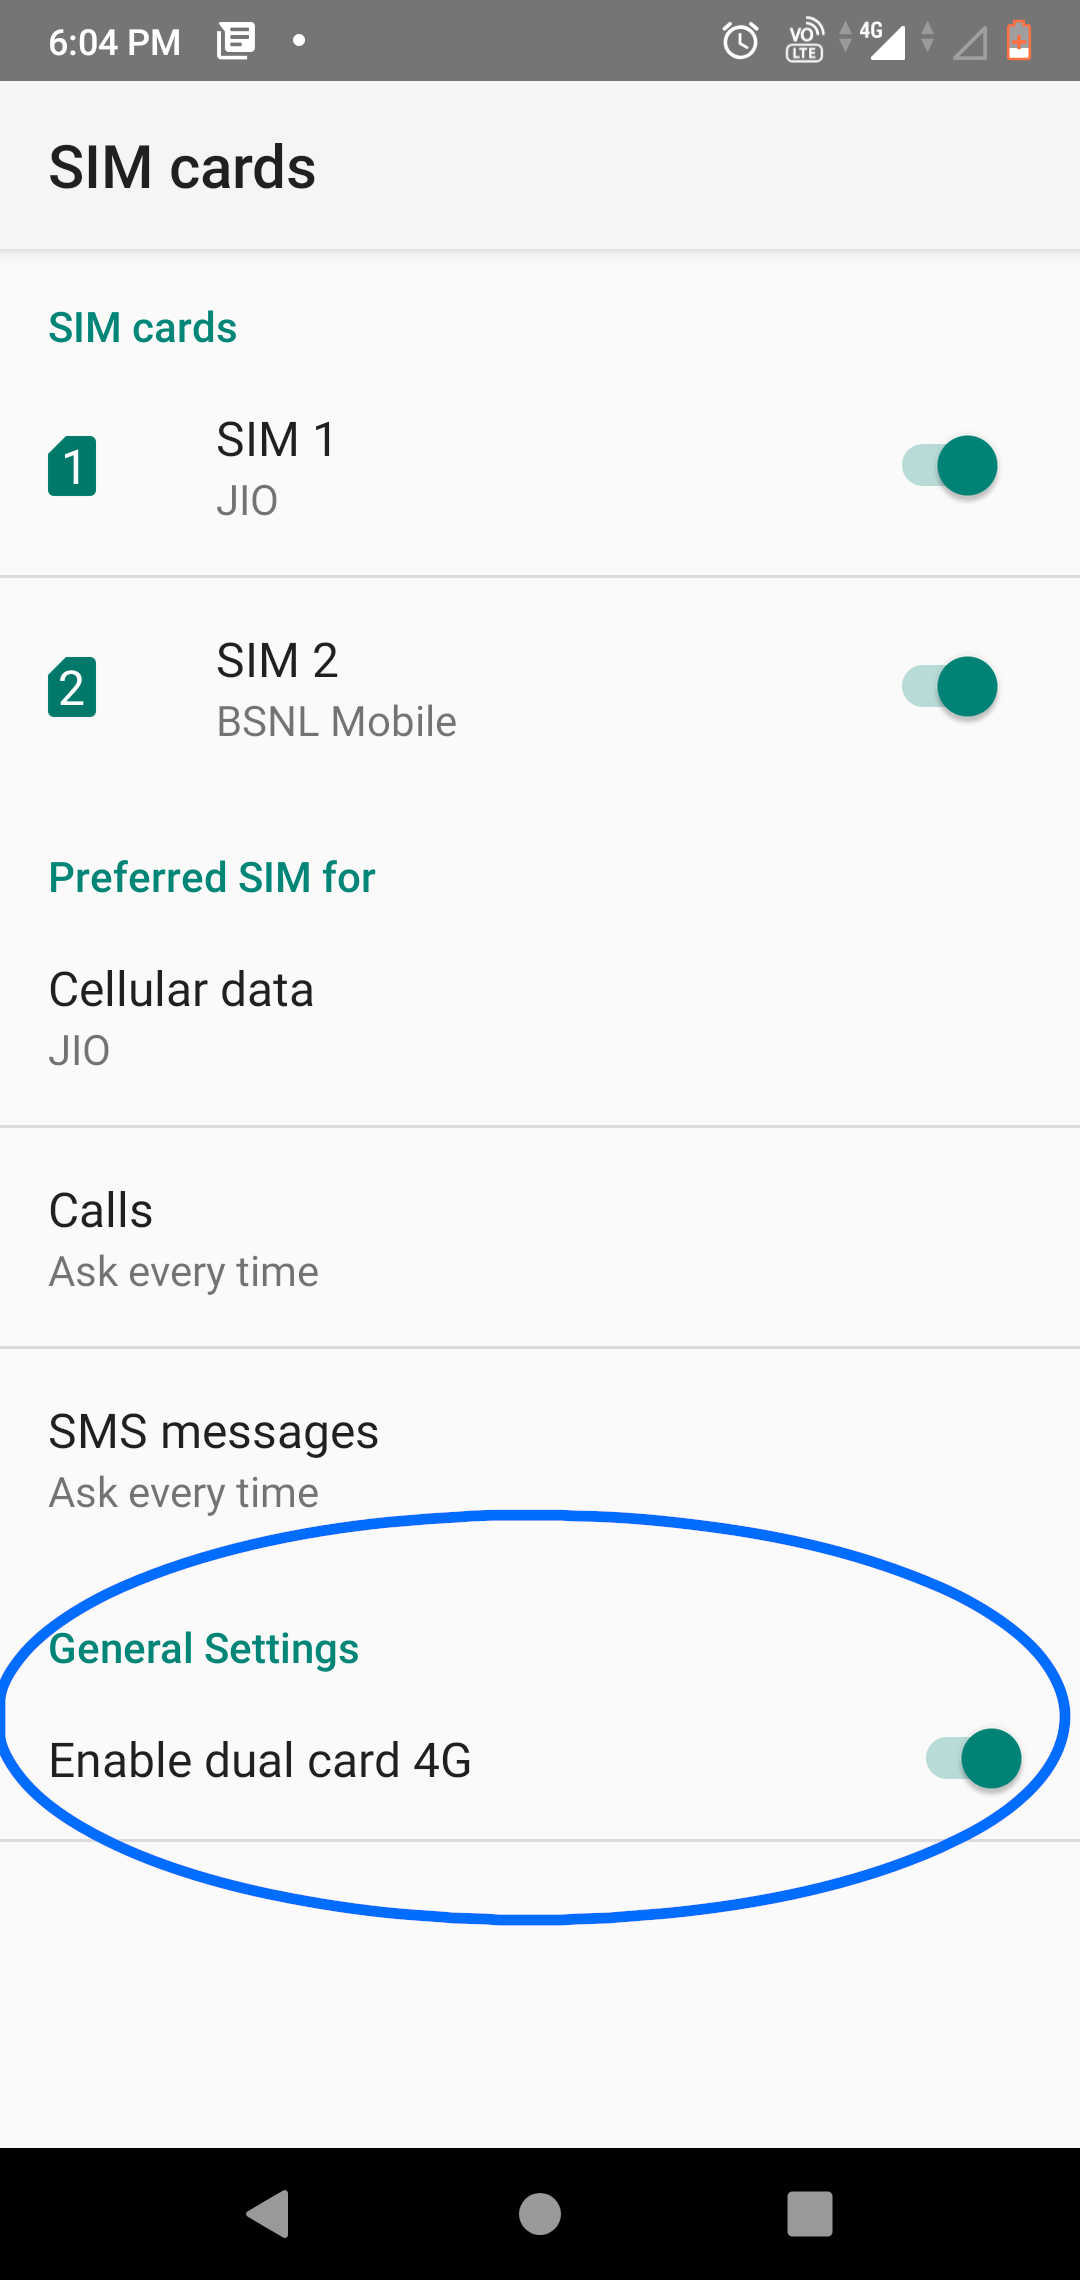
How to Dual LTE mode or Enable dual SIM Card 4G
- First go to the Settings
- Tap on Network and Internet
- Choose SIM Cards
- On this Screen you will Find Toggle to enable Dual Cards 4G to enable 4G on both the cards
 co
co
We also found that sometimes, when you insert Single/One SIM card in mobile phone 4G LTE/VOLTE works perfectly. But if you insert 2 SIM cards such as (one JIO sim and another SIM of 3G BSNL, Idea, Airtel, Vodafone) the 4G LTE Cellular internet data connectivity on the first sim stop working. This problem occurs due to the dual SIM card, so to fix this issue you need to enable DUAL LTE mode so that you can enjoy 4G / 3G on both the sim cards. Note: not all mobile phones support DUAL SIM 4G functionality.
He is expert in tech reviews, unboxing cool gadgets, DIY, software, Tips & tricks, User Interface optimization, SEO and web development. Connect him via Facebook
119 Comments to How to Change/switch 2G to 3G 4G LTE preferred Network type mode in Android Phone
Mera phon nahi ho raha hai
Dear sir/madam am here by requesting form your office to send to me vivo y11 APN NUMBER ,MY Telephone refuse to access internet due to APN no Thanks.
The above setting is not working in LETV LE 1S mobile. when we want to select LTE mode then it automatically select GSM mode. What should i do? Please reply me on my email id pchotelal@gmail.com
have you tried both methods ( means USSD code).
i am not getting signals on my jio4g sim, yesterday when i insert the sim it was showing but now it is showing no service.
It might be due to SIM not activated yet or due to low signal strength.
My phone is 2g i want activate wcdma how i activate.. my phn is karbonn A7*
Sorry WCDMA / HSDPA will appear only on 3G or 4G LTE enabled phones
Very useful. Thanks for the tutorial
How can I convert my sony Xperia C DUAL sim into 4G enable phone?
It is not possible, as it is not an Software upgrade but a hardware one.
Intex Aqua Young update
My HTC 626G+ is nit actually 4G enabled but 4G LTE option is shown by USSD code method.Will it enable 4G on my phone or what?
No. as it doesn’t have the required hardware for 4g lte.
The menu is not enabled on samsung models. On Huawei the option is also disabled.
You can go with the 3 methods, they should work.
I didn’t get the tower I seems emergency calls only what can I do and I search in my settings for 4G it seems Enhanced 4G LTE Mode in my karbonn titanium s204
Sir I am using gionee m2 8gb model in engineering mode it showing 4g/LTE option but if I select it its automatically going back to WCDMA mode unable to change band to LTE/4G using plz help me in this regard
You can try App install Method, mentioned in the post. That will allow you to switch to only one network.
hi sir, mine is mmx a117. I want to use jio sim in this phone. I have installed mtk eng.mode app. in mtk settings it shows GSM/WCDMA/LTE in the preferred network selection. But when it select it and return to revious menu it rolls back to wcdma mode only. There is no provision for saving the settings. Please guide me
The reason is because the phone doesn’t have 4G LTE Hardware.
Actually in ussd code method it is said to open «key input» and enter «0000» so in this context what is «key input»? is it in dialer itself or anything else. And in another method of shortcut lite app , in engineering mode my phone(lenovo A6000 plus) does not have any options to change bands. So do u have any solutions to this.
I have tried both WCDMA And LTE but it is not showing network bars What can i do
It could be due to two reasons either the SIM is not 3G / 4G Lte enabled or the supported SIM bands are not compatible with your phone. OR may be due to low network signal.
How to convert vivo y11 in to 4g(lte)
It has 3G hardware so 4G VOLTE SIM can not run on this. As this is more related to hardware so there is no way to convert it to 4G without changing its hardware components.
status bar shows no network when I choose 3G/4G network what procedure should I use. And my fone ux samsung galaxy note 2 T- mobile fone.
Either the SIM is not 3G/ 4G compatible or the SIM bands are not compatible with your phone.
I recently bought a Samsung Galaxy J7(2016)Dual Sim phone. The reason I did it was so I could use only one phone for my business line and one for my personal line. The problem I have is that AT&T recently discontinued the use of GSM and my phone says «two sim cards cannot use the same 4G or 3G at the same time. The other card will be changed to use 2G», when tried to switch the second line over to 3G or 4G. I read your article and am wondering if this would be a fix for my phone, specifically by using the USSD Code, or if there’s any other workaround.
That setting is set default by the OEM (Samsung), so it cannot be altered without software updates.
Thank you for the response. Does Samsung offer such updates? I did a search and didn’t find one. I’m not convinced they would offer it, since it might dissuade a customer from purchasing a newer model phone. I was wondering whether one sim card could be set up to use 4g only and one set to 3g only by using the USSD Code method. My phone seems to lump those networks together. If each could be set up as dedicated to one network only I’m wondering if perhaps that would solve my problem. That way the sim cards would not share a network if one was one was on 3g and the other on 4g.
I’m using samsung galaxy note 3 neo MODEL N7505 version 4.4.2 please help me jio 4G sim support
Only the SM-N7505 model will support 4G sim. The SM-N750 is not 4G SIM compatible.
I brought oppo f1 from Bangladesh. Now i am staying in india.I haven’t 4G option in my phone.But when i entered into jio sim in my phone,then Enhance 4G(LTE) mode has shown.but no network signal shows.I tried this tricks but failed.is there any way to use 4G in my phone?
The phone is compatible with JIO sim. Make sure the SIM is activated and there is enough signal strength in the area you are using it. Try to check the SIM in other 4G phone, see it shows LTE signals.
Hi sir, i have an Huawei but the prefered network mode is disabled . i have tried the other options but all failed. the phone can support 4G network but its only using 2G! what can i do?
Hi Nasif, See, if you Select 4G / 3G Preferred mode it means that the Phone will be in 4G /3G mode if respective signals will be there. Otherwise if there is no 3G / 4G signals are there then it will automatically choose the 2G / 3G vica versa mode.
pls am using lenovo A630t and I want to change it to 3g it not allow ME to do that pls what Can I do sir
mine is Lenovo how do I do it?
Can a sony xperia t2 ultra be converted to LTE? Cause mine is only till WCDMA
Dear Harpal Singh Jee I have Le 2 phone. Am working in SIgapore for 6 months. And have SIM1 as 4G Starhub SIm card. And SIM2 from Airtel India. It was working fine till 31-March. Singapore has shutdown the 2G network from 31-March. I understand that the Le2 dual sim phone only works on 4G & 2G networks. If one SIM is alreday 4G, the other becomes 2G automatically. Is there any solution (patch, engineering mode) to make SIM1 as 4G & SIM2 as 3G. Pls suggest, this will solve my problem. As I dont want to buy another phone because of 6 months time period. Rgds. Tuteja
Hi, This configuration is easy and less battery draining so most of the OEM apply this to their firmware. It is not possible without tweaking the firmware and might require additional hardware (tx — rx). Sorry but currently we don’t have any patch to make use of 4G on both SIM simultaneously or 4G + 3G at the same time on dual SIM phone.
Thanks Bhai for your response ! Appreciated ! rgds
Источник


