- Используем Android Studio в качестве эмулятора смартфона
- Как установить и подготовить Android Studio
- Как подготовить эмулятор Android Studio
- Как настроить и запустить эмулятор Android Studio
- Setup android emulator android studio
- New Features
- Get Android Emulator 2.0
- Create new Android Virtual Device (AVD)
- Troubleshooting
- Check Intel x86 Emulator Accelerator Installation
- Installing CPU Accelerator (HAXM)
- Known Issues
- Install Android Studio
- Windows
- Linux
- Required libraries for 64-bit machines
- Chrome OS
Используем Android Studio в качестве эмулятора смартфона
Android Studio — быстрый эмулятор смартфонов от Google позволяет запускать на компьютере последние версии операционной системы Android и тестировать необходимые вам приложения.

Эмулятор Android Studio предоставляет практически все возможности реального Android-устройства (смартфона или планшета) прямо с компьютера. Вы можете имитировать телефонные звонки и сообщения, указывать местоположение, имитировать вращение и другие аппаратные датчики, получать доступ к Google Play и многое другое.
Наше руководство покажет как установить и использовать эмулятор смартфонов Android Studio для тестирования разнообразных приложений и последних версий операционных систем Android.
Примечание . Эмулятор Android поддерживает только 64-разрядные версии Windows 10 / 8 / 7 и требует как минимум 4 гигабайта оперативной памяти. Необходима поддержка и активация функций виртуализации «Intel Virtualization Technology» или «AMD Virtualization Technology» в BIOS материнской платы.
Как установить и подготовить Android Studio
Для начала, перейдите на официальную страницу загрузки и скачайте 64-битную версию.

Запустите дистрибутив, нажмите кнопку «Next» и выполните установку следуя инструкциям.

По завершении, нажмите «Finish«.

Если у вас нет сохраненных настроек программы, выберите «Do not import settings» и подтвердите нажав «OK«.

Откажитесь от передачи статистики в Google кнопкой «Dont send«.

Пропустите страницу приветствия.

Выберите индивидуальные настройки.

Задайте подходящую тему оформления.

Отметьте галочкой «Android Virtual Device» и проследуйте дальше.

Задайте объём оперативной памяти руководствуясь вашей конфигурацией компьютера.

В следующем окне нажмите кнопку «Finish«.

Подождите пока загрузятся необходимые компоненты.

И финишируйте одноименной кнопкой.

Как подготовить эмулятор Android Studio
В окне «Welcome to Android Studio» нажмите «Start a new Android Studio project«.

Выберите «Basic Activity«.

Задайте «Версию Android», мы выбрали последнюю Android 10 (Q) и нажмите «Finish«.

Как настроить и запустить эмулятор Android Studio
Запустите Android Studio и нажмите кнопку менеджера виртуального Android-устройства.

В нем будет готовое устройство «Nexus 5 X» которое можно удалить из-за отсутствия сервиса Play Store.

После чего, создадим своё нажав «Create Virtual Device«.

Отметим категорию устройства, это может быть смартфон, планшет либо другое. Мы выберем «Phone» и эмулируем смартфон, «Pixel 2» со значком «Play Store» отлично подойдет.

Теперь скачаем операционную систему Android 10 с сервисом Google Play нажав «Download«.


Дождемся скачивания и распаковки системы.

Нажмем на «Finish«.

И пойдем дальше.

Здесь можно задать новое имя устройству, выбрать положение экрана, посмотреть расширенные настройки и завершить приготовления.

После чего, нажать кнопку запуска эмулятора Android и дождаться загрузки системы.


Когда устройство будет загружено, перейдите в настройки Android, прокрутите в низ и зайдите в раздел «System«.

Пройдите по такому пути Languages & input > Languages.

Добавьте «Русский язык» через кнопку «Add a Language«, поставьте «Русский» первым языком.

Пользуйтесь операционной системой Android и тестируйте разнообразные приложения из Google Play на своем компьютере.
Источник
Setup android emulator android studio
The Android Studio 2.0 (or higher) preview includes the new Android Emulator 2.0 with improved performance and a new user interface to control device features. This page describes some of the changes compared to the emulator available with the stable version of Android Studio 1.5 and how to setup your development environment to use the Android Emulator.
For best performance with Android Emulator 2.0, your system should meet the following specifications:
Windows: Intel® processor with support for Intel® VT-x, Intel® EM64T (Intel® 64), and Execute Disable (XD) Bit functionality. AMD and Intel Atom processors do not support VT-x virtual machine acceleration.
Linux: Intel® processor with support for Intel® VT-x, Intel® EM64T (Intel® 64), and Execute Disable (XD) Bit functionality or AMD processors with support for AMD Virtualization™ (AMD-V™)
64-bit Operating Systems.
New Features
The most valuable updates to the Android Emulator are the speed improvements. When running with Android Studio 2.0 or higher on an x86 machine, response time is faster than the previous Android Emulator and you can transfer files from your machine faster than a physical Android device.
The latest Android Emulator supports new multi-finger touch inputs, including pinch zoom and two finger rotate gestures. Holding down Alt or Option reveals two finger points. Moving the mouse moves one finger and the second finger is mirrored across an anchor point. Clicking the left mouse button enables pinch-zoom gestures and clicking the right mouse button enables two-finger rotate gestures (such as to tilt the perspective when viewing a map).
The panel on the right side of the emulator lets you perform common tasks, such as rotate the screen, capture screenshots, and zoom in on the display.
To install apps, you can drag and drop an APK right on the emulator. You can also drag and drop other file types and they’ll be saved to the /sdcard/Download/ directory.
At the bottom of the toolbar on the right is an ellipsis button that opens the Extended Controls window. In here you’ll find various controls that invoke device events and mock device sensors.
Keyboard shortcuts are available for most actions and are listed in the Help panel, listed on the left.
Get Android Emulator 2.0
The new Android Emulator is available with Android Studio 2.0 or higher, which is available in both the Stable, Beta and Canary channels .
Once you make sure you have the appropriate emulator system image and other tools:
Open the SDK Manager from Android Studio.
Click the SDK Platforms tab, and select the check box for a recent version such as the Android 6.0 (Marshmallow) . By default, this includes the x86 system image that you need for the emulator. You can see and modify the files to download by clicking Show Package Details at the bottom-right.
Click the SDK Tools tab, then select the check boxes for the following:
Android SDK Tools ( 25.0.0 or higher to get the new emulator)
Android SDK Platform-Tools (23.1.0 or higher to get the fast ADB)
Intel x86 Emulator Accelerator (HAXM installer) (rev 6.0.1 or higher to get CPU acceleration)
Click OK to check for updates.
Create new Android Virtual Device (AVD)
To take advantage of the new Android Emulator and adb speeds, you need to create new AVDs. In this example below, we are creating a Nexus 5x AVD.
Open the AVD Manager from Android Studio.
Click Create Virtual Device .
Select the defaults for Nexus 5x .
Select a system image, such as Marshmallow — API 23 — x86 .
Select Show Advanced Settings .
Select the Multi-Core CPU check box. The number of cores available depends on the number of cores available on your development machine.
Run your new Android Virtual Device by click on the green Play button.
You should see the Android Emulator now start up.
Troubleshooting
Check Intel x86 Emulator Accelerator Installation
If you selected the defaults during the Android Studio installation you should be ready to go. If you created a custom Android Studio installation or run into issues, read the troubleshooting guide below. If your Intel x86 Emulator Accelerator is out of date, Android Studio will automatically inform you and suggest a quick fix to update, as shown in the following screenshot in the AVD Manager.
Installing CPU Accelerator (HAXM)
If you skipped the initial setup of Android Studio, you should make sure the CPU acceleration is installed.
You can manually install Intel x86 Emulator Accelerator by opening intelhaxm-android.exe (on Windows) or intelHAXM_6.0.1.dmg (on Mac) from /sdk/extras/intel/Hardware_Accelerated_Execution_Mangager , as shown below:
Installing HAXM in Windows
Installing HAXM in OS X
For Linux, the Android emulator uses Kernel-based Virtual Machine (KVM). If you are using Ubuntu, you can run check your KVM system compatibility by running the following on the command line:
$egrep –c ‘(vmx|svm)’ /proc/cpuinfo
on the command line to check for for a return value of greater than 1
To check if you have KVM installed by running the following on the command line:
If KVM is missing or to ensure you have the latest KVM installed, run the following on the command line:
$sudo apt-get install qemu-kvm libvirt-bin ubuntu-vm-builder bridge-utils ia32-libs-multiarch
The linux commands look like the following on Ubuntu:
Known Issues
Emulating inbound phone call freezes emulator.
Screenshot feature crashes emulator in certain conditions.
If an AVD has been opened in a previous version of the emulator, it may not boot in the new emulator, therefore create a new AVD.
OSX — screen doesn’t go black when you sleep the device.
Linux — segfault on exit in some conditions.
«-gpu mesa» option not supported.
«-net*» option not supported.
«-no-window» option not supported.
Remote desktop not supported.
Emulated hardware «recents» key doesn’t work in older system images.
Multiple DNS servers not supported.
If you find other issues in the Android Emulator, please file a bug report .
We have more features in the pipeline, but if you may also submit feature requests .
Источник
Install Android Studio
Setting up Android Studio takes just a few clicks.
Windows
To install Android Studio on Windows, proceed as follows:
- If you downloaded an .exe file (recommended), double-click to launch it.
If you downloaded a .zip file, unpack the ZIP, copy the android-studio folder into your Program Files folder, and then open the android-studio > bin folder and launch studio64.exe (for 64-bit machines) or studio.exe (for 32-bit machines).
That’s it. The following video shows each step of the setup procedure when using the recommended .exe download.
As new tools and other APIs become available, Android Studio tells you with a pop-up, or you can check for updates by clicking Help > Check for Update.
To install Android Studio on your Mac, proceed as follows:
- Launch the Android Studio DMG file.
- Drag and drop Android Studio into the Applications folder, then launch Android Studio.
- Select whether you want to import previous Android Studio settings, then click OK.
- The Android Studio Setup Wizard guides you through the rest of the setup, which includes downloading Android SDK components that are required for development.
That’s it. The following video shows each step of the recommended setup procedure.
As new tools and other APIs become available, Android Studio tells you with a pop-up, or you can check for updates by clicking Android Studio > Check for Updates.
Note: If you use Android Studio on macOS Mojave or later, you might see a prompt to allow the IDE to access your calendar, contacts, or photos. This prompt is caused by new privacy protection mechanisms for applications that access files under the home directory. So, if your project includes files and libraries in your home directory, and you see this prompt, you can select Don’t Allow.
Linux
To install Android Studio on Linux, proceed as follows:
- Unpack the .zip file you downloaded to an appropriate location for your applications, such as within /usr/local/ for your user profile, or /opt/ for shared users.
If you’re using a 64-bit version of Linux, make sure you first install the required libraries for 64-bit machines.
Tip: To make Android Studio available in your list of applications, select Tools > Create Desktop Entry from the Android Studio menu bar.
Required libraries for 64-bit machines
If you are running a 64-bit version of Ubuntu, you need to install some 32-bit libraries with the following command:
If you are running 64-bit Fedora, the command is:
That’s it. The following video shows each step of the recommended setup procedure.
As new tools and other APIs become available, Android Studio tells you with a pop-up, or you can check for updates by clicking Help > Check for Update.
Chrome OS
Follow these steps to install Android Studio on Chrome OS:
- If you haven’t already done so, install Linux for Chrome OS.
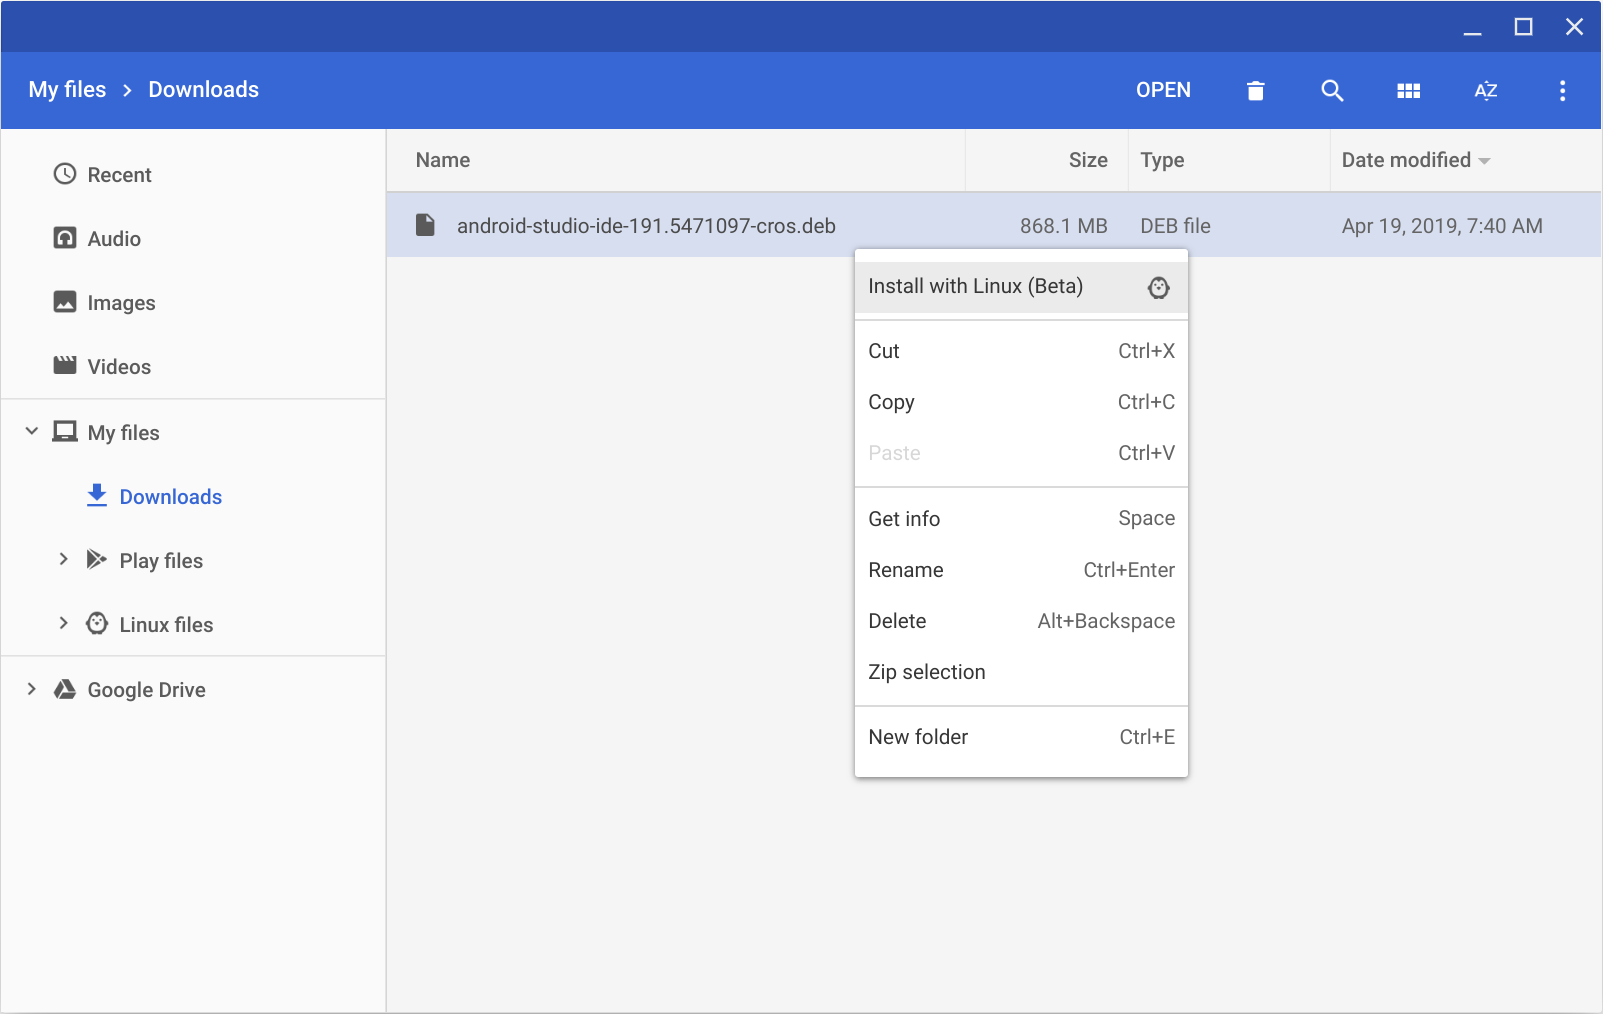
- Open the Files app and locate the DEB package you downloaded in the Downloads folder under My files.
Right-click the DEB package and select Install with Linux (Beta).
- If you have installed Android Studio before, select whether you want to import previous Android Studio settings, then click OK.
The Android Studio Setup Wizard guides you through the rest of the setup, which includes downloading Android SDK components that are required for development.
After installation is complete, launch Android Studio either from the Launcher, or from the Chrome OS Linux terminal by running studio.sh in the default installation directory:
That’s it. As new tools and other APIs become available, Android Studio tells you with a pop-up, or you can check for updates by clicking Help > Check for Update.
Content and code samples on this page are subject to the licenses described in the Content License. Java is a registered trademark of Oracle and/or its affiliates.
Источник


