- How to start another activity on button click using Kotlin
- Start a new Android Studio Project
- Create a new second activity
- Урок 4. Kotlin. Обработка нажатия кнопок и взаимодействие с view в android
- Продолжаем курс по разработке андроид-приложений на языке Kotlin для начинающих программистов.
- Автоматический импорт
- Отображение сообщения по нажатию кнопки
- Buttons
- Responding to Click Events
- Kotlin
- Using an OnClickListener
- Kotlin
- Styling Your Button
- Borderless button
- Custom background
- Android Button in Kotlin with Examples
- Kotlin Android Button Example
- Programmatically create Button
- Tutorialwing
- Output
- Video Output
- Getting Started
- Creating New Project
- Setup ViewBinding
- Using Button in Kotlin
- Different Attributes of Button in XML
- Set Id of Button
- Set Width of Button
- Set Height of Button
- Set Padding of Button
- Set Margin of Button
- Set Background of Button
- Set Visibility of Button
- Set Text of Button
- Set Color of Text in Button
- Set Gravity of Button
- Set Text in Uppercase, Lowercase
- Set text in uppercase
- How do we set text in lowercase?
- Set Size of Text in Button
- Set Style (Bold/italic) of Text in Button
- Set Letter Spacing of Text in Button
- Set Typeface of Text in Button
- Set fontFamily of Text in Button
- Different Attributes of Android Button Widget
How to start another activity on button click using Kotlin
In this tutorial you will learn how to start another activity when a button is clicked. We will begin from scratch(starting a new android studio project)
Start a new Android Studio Project
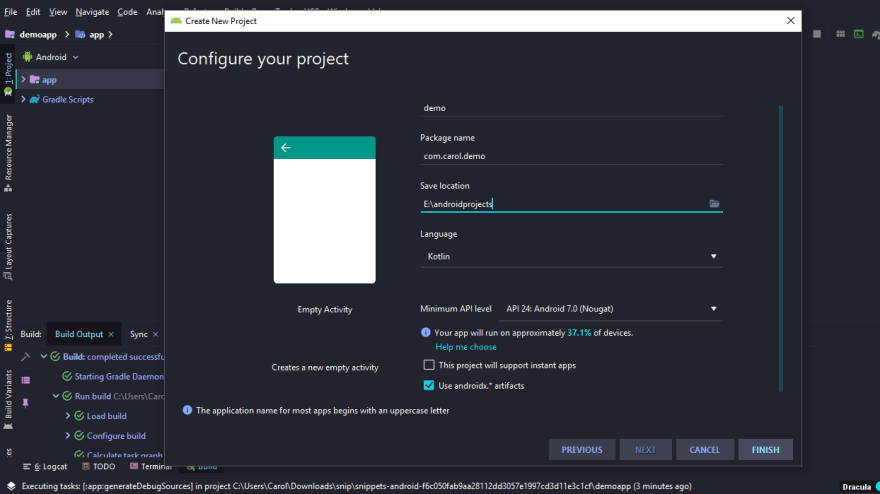
On the activity_main.xml add a textView and a button. Here is is what you can use
Exit fullscreen mode

Create a new second activity
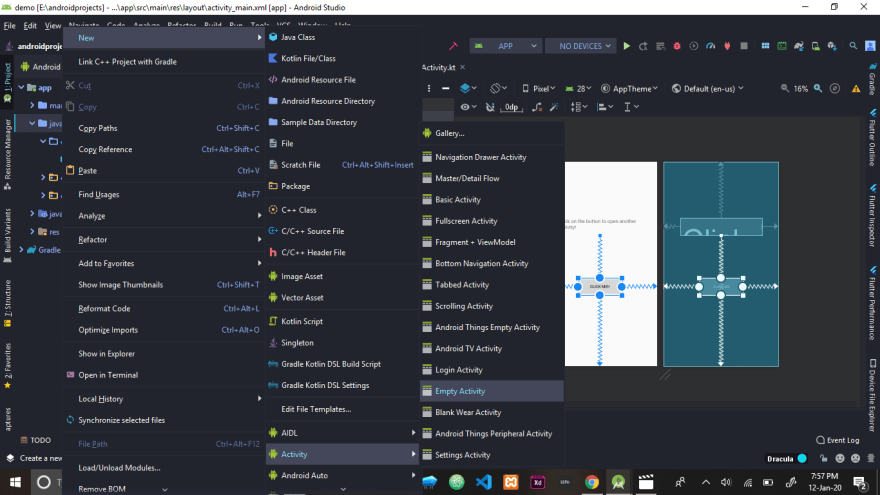
From the second activity you can add an imageView and textView
You now have two activities, the main activity and the second activity. Now all we have to do is to add functionality to the button in the (MainActivity.kt)
Exit fullscreen mode
Now run your app on your emulator or hardware device
You will get something like this


Check out the Source Code on GitHub
That’s a wrap for this post. We have learnt how to start another activity on button click for our app’s first time users.
My ‘images’ don’t quite match with the ones you see on the Drive app 😄. But I’m sure you can come up with something better! Drop ’em in the comments below.
Источник
Урок 4. Kotlin. Обработка нажатия кнопок и взаимодействие с view в android
Продолжаем курс по разработке андроид-приложений на языке Kotlin для начинающих программистов.
На прошлом уроке мы добавили кнопки на главном экране вашего приложения, но пока эти кнопки ничего не делают. В этом уроке сделаем так, чтобы кнопки реагировали, когда пользователь нажимает их.
Автоматический импорт
Перед добавлением поведения к кнопкам необходимо включить автоматический импорт, чтобы Android Studio автоматически импортировала все классы, необходимые для кода Котлин.
- В Android Studio откройте Редактор настроек. Перейдите к File >Other Settings >Default Settings.

- Выберите Auto Imports. В разделе Java убедитесь, что пункт Add Unambiguous Imports on the fly отмечен флажком.
- Закройте редактор настроек.


Отображение сообщения по нажатию кнопки
На этом шаге мы добавим функцию отображения тоста – короткого сообщения на экране. Функция будет выполняться при нажатии кнопки с надписью TOAST. 
- Откройте класс MainActivity.kt. (раскройте ветвь app >java >com.example.android.myfirstapp чтобы найти MainActivity). Этот класс описывает поведение главного экрана нашего приложения.Пока что класс содержит только одну функцию, onCreate(). Функция onCreate() выполняется, когда активити стартует.
- Посмотрите внимательно на функцию onCreate(). Обратите внимание на вызов функции setContentView(). Эта строка устанавливает файл ресурсов activity_main.xml в качестве разметки активити главного экрана.
- Добавим новую функцию toastMe() в класс MainActivity. Функция toastMe() принимает один аргумент — View. Это представление, получающее событие нажатия кнопки.Функция создает и отображает всплывающее уведомление. Вот ее код:
Источник
Buttons
A button consists of text or an icon (or both text and an icon) that communicates what action occurs when the user touches it.
Depending on whether you want a button with text, an icon, or both, you can create the button in your layout in three ways:
- With text, using the Button class:
- With an icon, using the ImageButton class:
- With text and an icon, using the Button class with the android:drawableLeft attribute:
Key classes are the following:
Responding to Click Events
When the user clicks a button, the Button object receives an on-click event.
To define the click event handler for a button, add the android:onClick attribute to the element in your XML layout. The value for this attribute must be the name of the method you want to call in response to a click event. The Activity hosting the layout must then implement the corresponding method.
For example, here’s a layout with a button using android:onClick :
Within the Activity that hosts this layout, the following method handles the click event:
Kotlin
The method you declare in the android:onClick attribute must have a signature exactly as shown above. Specifically, the method must:
- Be public
- Return void
- Define a View as its only parameter (this will be the View that was clicked)
Using an OnClickListener
You can also declare the click event handler programmatically rather than in an XML layout. This might be necessary if you instantiate the Button at runtime or you need to declare the click behavior in a Fragment subclass.
To declare the event handler programmatically, create an View.OnClickListener object and assign it to the button by calling setOnClickListener(View.OnClickListener) . For example:
Kotlin
Styling Your Button
The appearance of your button (background image and font) may vary from one device to another, because devices by different manufacturers often have different default styles for input controls.
You can control exactly how your controls are styled using a theme that you apply to your entire application. For instance, to ensure that all devices running Android 4.0 and higher use the Holo theme in your app, declare android:theme=»@android:style/Theme.Holo» in your manifest’s element. Also read the blog post, Holo Everywhere for information about using the Holo theme while supporting older devices.
To customize individual buttons with a different background, specify the android:background attribute with a drawable or color resource. Alternatively, you can apply a style for the button, which works in a manner similar to HTML styles to define multiple style properties such as the background, font, size, and others. For more information about applying styles, see Styles and Themes.
Borderless button
One design that can be useful is a «borderless» button. Borderless buttons resemble basic buttons except that they have no borders or background but still change appearance during different states, such as when clicked.
To create a borderless button, apply the borderlessButtonStyle style to the button. For example:
Custom background
If you want to truly redefine the appearance of your button, you can specify a custom background. Instead of supplying a simple bitmap or color, however, your background should be a state list resource that changes appearance depending on the button’s current state.
You can define the state list in an XML file that defines three different images or colors to use for the different button states.
To create a state list drawable for your button background:
- Create three bitmaps for the button background that represent the default, pressed, and focused button states.
To ensure that your images fit buttons of various sizes, create the bitmaps as Nine-patch bitmaps.
Источник
Android Button in Kotlin with Examples
In this tutorial, we will create an Android Button in Kotlin. Button class extends the TextView class. Android Kotlin button is a UI widget. Button performs events when we click on it.
Button can be created programmatically and using the xml. There are different ways to handle button click in Kotlin.
- Button setOnClickListener:
- Button View.OnClickListner
Kotlin Android Button Example
Let’s start Android Kotlin Button example by creating three different buttons using the xml.
- Button: first button’s id is button . An id is a unique identifier. Each and every button has a unique id.
- Black Background: its id is btnBlack . Here we have changed the android button background color.
- Disabled Button: 3rd button and id is btnCustom . By default button text is in capital letters. We have disabled it using android:textAllCaps . Changed the text color using textColor property. We have the disabled the button click by setting android:clickable=”false”
activity_main.xml
MainActivity.kt
In Kotin, we don’t need findViewById anymore.
Automatically import the view ids in the class. It makes the code much more cleaner and understandable.
First button is implemented using setOnClickListener.
Second button is implemented using View.OnClickListener interface.
The third button is also implemented using View.OnClickListener interface button we won’t receive the button click as we have disabled it click in the XML code.
As two buttons click is handled using View.OnClickListener interface, inside the onClick function we have a Kotlin when case where buttons are identified by their ids.
On each button click we are showing a Android Toast message.
Programmatically create Button
We can programmatically create a button in Kotlin. I have set all the properties programmatically. relativeLayout is the id of RelativeLayout from the activity_main.xml
MainActivity.kt
That is all from Android Button in Kotlin. If you have any question please don’t hesitate to ask. I am one comment away. To learn about TextView, check out TextView in Android.
Источник
Tutorialwing
In this article, we will learn about android Button using Kotlin. We will go through various example that demonstrates how to use different attributes of Button. For example, set id, text, font, font-size etc. in button.
In this article, we will get answer to questions like –
- What is Button?
- Why should we consider Button while designing ui for any app?
- What are possibilities using Button while designing ui? etc.
Let’s have a quick demo of things we want to cover in this tutorial –
Output
Tutorialwing Android Button Using Kotlin Output
Tutorialwing Android Button Using Kotlin Output
Video Output
Getting Started
Android Button can be defined as below –
Android Button is an user interface that are used to perform some action when clicked or tapped.
Now, how do we use Button in android application ?
Creating New Project
At first, we will create an application.
So, follow steps below to create any android project in Kotlin –
| Step | Description |
|---|---|
| 1. | Open Android Studio (Ignore if already done). |
| 2. | Go to File => New => New Project. This will open a new window. Then, under Phone and Tablet section, select Empty Activity. Then, click Next. |
| 3. | In next screen, select project name as Button. Then, fill other required details. |
| 4. | Then, clicking on Finish button creates new project. |
Some very important concepts (Recommended to learn before you move ahead)
Before we move ahead, we need to setup for viewBinding to access Android Button Using Kotlin file without using findViewById() method.
Setup ViewBinding
Add viewBinding true in app/build.gradle file.
Now, set content in activity using view binding.
Open MainActivity.kt file and write below code in it.
Now, we can access view in Kotlin file without using findViewById() method.
Using Button in Kotlin
Follow steps below to use Button in newly created project –
- Open res/layout/activity_main.xml file. Then, add below code in it –
- We can also access it in Kotlin File, MainActivity.kt, as below –
Now, run the application. We will get output as below –
Different Attributes of Button in XML
Now, we will see how to use different attributes of Android Button using Kotlin to customise it –
Set Id of Button
Many a time, we need id of View to access it in kotlin file or create ui relative to that view in xml file. So, we can set id of Button using android:id attribute like below –
Here, we have set id of Button as buttonID using android:id=”” attribute. So, if we need to reference this Button, we need to use this id – buttonID.
Learn to Set ID of Button Dynamically
Set Width of Button
We use android:layout_width=”” attribute to set width of Button.
We can do it as below –
Width can be either “MATCH_PARENT” or “WRAP_CONTENT” or any fixed value (like 20dp, 30dp etc.).
Learn to Set Width of Button Dynamically
Set Height of Button
We use android:layout_height=”” attribute to set height of Button.
We can do it as below –
Height can be either “MATCH_PARENT” or “WRAP_CONTENT” or any fixed value.
Learn to Set Height of Button Dynamically
Set Padding of Button
We use android:padding=”” attribute to set padding of Button.
We can do it as below –
Here, we have set padding of 10dp in Button using android:padding=”” attribute.
Learn to Set Padding of Button Dynamically
Set Margin of Button
We use android:layout_margin=”” attribute to set margin of Button.
We can do it as below –
Here, we have set margin of 10dp in Button using android:layout_margin=”” attribute.
Learn to Set Margin of Button Dynamically
Set Background of Button
We use android:background=”” attribute to set background of Button.
We can do it as below –
Here, we have set background of color #ff0000 in Button using android:background=”” attribute.
Learn to Set Background of Button Dynamically
Set Visibility of Button
We use android:visibility=”” attribute to set visibility of Button.
We can do it as below –
Here, we have set visibility of Button using android:visiblity=”” attribute. Visibility can be of three types – gone, visible and invisible
Learn to Set Visibility of Button Dynamically
Set Text of Button
We use android:text=”” attribute to set text of Button.
We can do it as below –
Here, we have set text (“Hello Tutorialwing”) in Button using android:text=”” attribute.
Similarly, we can set any text using this attribute.
Learn to Set Text of Button Dynamically
Set Color of Text in Button
We use android:textColor=”” attribute to set color of text in Button.
We can do it as below –
Here, we have set color (#ffffff i.e. white) of text (“Hello Tutorialwing”) in Button using android:textColor=”” attribute. Similarly, we can set any color using this attribute.
Learn to Set Color of Button Dynamically
Set Gravity of Button
We use android:gravity=”” attribute to set gravity of text in Button.
We can do it as below –
Here, we have set gravity of text in Button using android:gravity=”” attribute. Attribute value can be – “center_horizontal”, “center”, “center_vertical” etc.
Learn to Set Gravity of Button Dynamically
Set Text in Uppercase, Lowercase
If we need to show text of Button in uppercase or lowercase etc.
Set text in uppercase
We can use android:textAllCaps=”true” attribute to set text in uppercase. We can do it as below –
Attribute android:textAllCaps=”true” sets text in uppercase. So, HELLO TUTORIALWING is set in Button.
By default, false is set in this attribute. So, Whatever value is written in android:text=”” attribute, it will be set as it is. For example,
Above code will set Hello Tutorialwing to Button.
How do we set text in lowercase?
- In xml file – write all the text in lowercase.
- In kotlin file – take text as string. Then, convert it in lowercase. Then, set it to Button.
Set Size of Text in Button
We use android:textSize=”” attribute to set size of text in Button.
We can do it as below –
Here, we have set size of text in Button using android:textSize=”” attribute.
Learn to Set Size of Text of Button Dynamically
Set Style (Bold/italic) of Text in Button
We use android:textStyle=”” attribute to set style (bold, italic etc.) of text in Button.
We can do it as below –
Here, we have set style of text in Button using android:textStyle=”” attribute. This attribute can take bold, italic or normal.
Learn to Set Style of Text of Button Dynamically
Set Letter Spacing of Text in Button
We use android:letterSpacing=”” attribute to set spacing between letters of text in Button.
We can do it as below –
Here, we have set spacing between letters of text in Button using android:letterSpacing=”” attribute.
Learn to Set Letter Spacing of Text of Button Dynamically
Set Typeface of Text in Button
We use android:typeface=”” attribute to set typeface in Button.
We can do it as below –
Here, we have set typeface of text in Button using android:typeface=”” attribute. This attribute can take values – “sans”, “normal”, “monospace” or “normal”.
Learn to Set Typeface of Button Dynamically
Set fontFamily of Text in Button
We use android:fontFamily=”” attribute to set fontFamily of text in Button.
We can do it as below –
Here, we have set fontFamily (Here, sans-serif) of text in Button using android:fontFamily=”sans-serif” attribute.
Till now, we have see how to use android Button using Kotlin. We have also gone through different attributes of TextView to perform certain task. Let’s have a look at list of such attributes and it’s related task.
Different Attributes of Android Button Widget
Below are the various attributes that are used to customise android Button Widget. However, you can check the complete list of attributes of Button in it’s official documentation site. Here, we are going to list some of the important attributes of this widget –
| Sr. | XML Attributes | Description |
|---|---|---|
| 1 | android:background | This attribute is used to set background to this View. |
| 2 | android:backgroundTint | This attribute is used to set tint to the background. |
| 3 | android:clickable | This attribute is used to set true when you want to make this View clickable. Otherwise, set false. |
| 4 | android:drawableBottom | This is drawable to be drawn at bottom of the text. |
| 5 | android:drawableEnd | This is drawable to be drawn to end of the text. |
| 6 | android:drawableLeft | This is drawable to be drawn to left of the text. |
| 7 | android:drawablePadding | This is padding of the drawable. |
| 8 | android:drawableRight | This is drawable to be drawn to right of the text. |
| 9 | android:drawableStart | This is drawable to be drawn to start of the text. |
| 10 | android:drawableTop | This is drawable to be drawn at top of the text. |
| 11 | android:text | Sets the text of the EditText. |
| 12 | android:textAllCaps | Shows text in capital letters. |
| 13 | android:textColor | Sets color of the text. |
| 14 | android:textSize | Sets size of the text. |
| 15 | android:textStyle | Sets style of the text. For example, bold, italic, bolditalic etc. |
| 16 | android:typeface | Sets typeface of the text. For example, normal, sans, serif, monospace. |
| 17 | android:id | This attribute is use to provide unique ID to the Button widget. |
We have seen different attributes of Button and how to use it. If you wish to visit post to learn more about it
Thus, we have seen what is Button, how can we use android Button using Kotlin ? etc. We also went through different attributes of android Button.
Источник


