- How to Share Internet from Windows, Mac or Linux to Android device
- Windows:
- Mac:
- Linux:
- How To Share Files Between Windows and Android Wirelessly
- Share Files from Android to Windows Over WiFi
- How to Access Shared Windows Folders On Android Over WiFi
- Ashish Mundhra
- Sharing folders on Windows 7
- Accessing Shared Folders on Android
- Video
- My Verdict
- Read Next
- Top 7 Ways to Fix Task Manager Not Working on Windows 11
- Top 7 Ways to Fix Microsoft Word Not Responding on Windows 10 and Windows 11
- How to Insert a Table of Contents in Microsoft Word
- How to Change the Default Browser in Windows 11
- Top 3 Ways to Fix Windows Spotlight Image Not Working
- Top 8 Ways to Fix Bluetooth Not Working on Windows 11
- How to Enable and Use Focus Sessions in Windows 11
- Top 3 Ways to Insert Screenshots in Microsoft Outlook
- Did You Know
How to Share Internet from Windows, Mac or Linux to Android device
Most people are aware that Android devices can be used as a USB tether for sharing mobile data to a computer, but a nifty trick is the same procedure in reverse – that is, sharing a computer’s internet connection with the Android device. It’s known as “reverse tethering”, and it’s a fairly easy thing to setup.
There are different ways to achieve this depending on your operating system, so I will share methods for Windows, Mac, and Linux systems.
Windows:
- Download and install the Connectify Hotspot software on your computer, and proceed with the instructions on screen. Connectify Hotspot essentially creates a hotspot network through your computer’s WiFi antenna – of course, there’s a native Windows method of achieving this, but Connectify Hotspot is far less technical and more user-friendly.
- To configure Connectify Hotspot, you simply create a network by entering the desired name in the SSID field, and a password. Then you choose the connection you want to share, such as the Wi-Fi network your computer is connected to.
- In SSID type the connection name you want to give, this will be the wi-fi network name that you will see on your Android. Give your network a password if you want to use a secured network. Now select from the connection you want to share. i.e. This is the adapter which has the internet. Select the Wi-Fi network using which you will connect your Android Phone.
- Now enable your Android device’s WiFi, and click “Start Hotspot” in Connectify. You should be able to see the network on your phone’s list of available WiFi networks, so simply choose the SSID from Connectify, provide the password, and you’re all set.
Mac:
- First go to System Preferences > Sharing.
- Click on Internet Sharing, and under the dropdown box for “Share your connection from:”, choose the network your Mac is connected to, such as Ethernet or WiFi.
- Now in the box for “To computers using”, choose either Bluetooth PAN or AirPort, depending on your Mac OS/X version. However, if you’re sharing a Mac’s internet to a non-Apple device through AirPort, Mac absolutely requires a 5 or 13 letter WEP key. No more, no less.
- After you’re broadcasting the SSID from your Mac, go ahead and connect to it under your Android device’s WiFi settings.
Linux:
Please note this requires a rooted Android phone – you can search Appuals for Android root guides for your device.
You’ll also need ADB and Fastboot installed, which is easily obtained with:
sudo apt-get install android-tools-adb android-tools-fastboot
Finally, you should have a Terminal Emulator installed on your phone.
- If you meet those prerequisites, go ahead and connect your Android device to your PC over USB.
- Now launch a Linux terminal, and type the following commands:
Ifconfig
- This should display the network interface from the connected Android device, typically usb0 but in some cases it can be something else. In the commands I am giving, make sure to change usb0 to the actual network interface being used.
- So now type in the terminal:sudo ifconfig usb0 10.42.0.1 netmask 255.255.255.0
echo 1 | sudo tee /proc/sys/net/ipv4/ip_forward
sudo iptables -t nat -F
sudo iptables -t nat -A POSTROUTING -j MASQUERADE
- Now we have to type the next command on your Android’s terminal emulator :
adb shell busybox ifconfig
- After that last command, it should display a different network interface being used, for example So again, change the commands I am sharing to whatever is your actual network interface.
adb shell ifconfig rndis0 10.42.0.2 netmask 255.255.255.0
adb shell route add default gw 10.42.0.1 dev rndis0
- Now we can test the internet sharing by trying to send a ping from your phone’s Terminal Emulator, so type on your phone:
adb shell ping 8.8.8.8
If you get a successful ping, then you’re all set to go.
Источник
How To Share Files Between Windows and Android Wirelessly

![]()
Need to grab a file on your PC to put on your Android device? Now with the latest version of ES File Explorer, you can do it over your WiFi network.
If you need to access a file on your PC and put it on your Android device, you can do it by connecting a USB cable. An example for this would be adding your videos to the Kindle Fire. But if you want an easier way, with the latest version of ES File Explorer (free) you can do it over your WiFi network.
Share Files from Android to Windows Over WiFi
Download and install ES File Explorer to your smartphone or tablet. If you already have it installed, make sure to update to version 3 or higher. For this example I’m using the Nexus 7, but it should be a similar experience across the board for all versions.
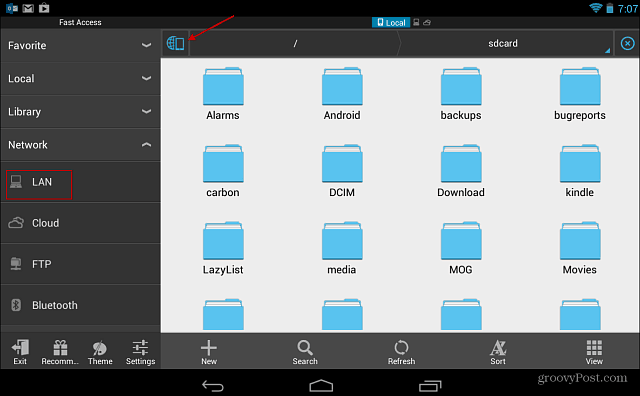
Open ES File Explorer and tap Network > LAN.
Next you should start seeing the computers that are up and running on your home network. If not, tap the Search button from the menu at the bottom. It will scan your network again and refresh the screen. If you’re not sure which machine you want, check out our guide on how to find your computer’s local IP address.
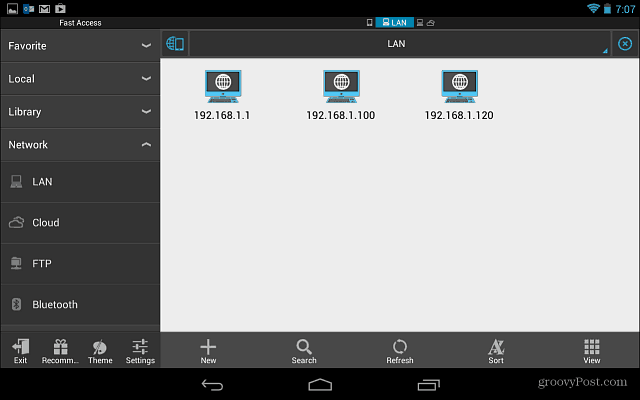
Just tap on the system you want and sign in with your Windows Username and Password. You can also have it remember your credentials which will make it much easier to log in the next time.

There you go! Now you can start sharing files to your PC or vice versa.
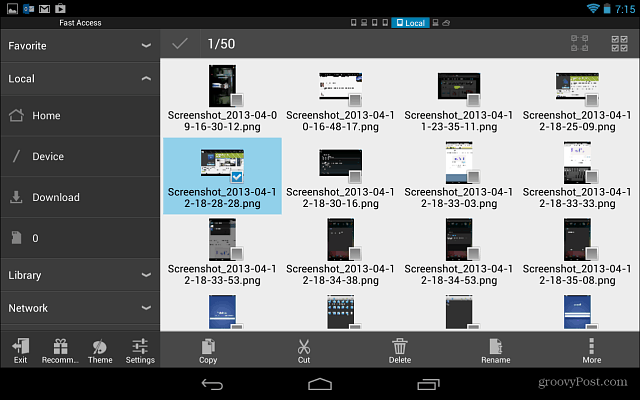
Tapping the More button brings up an impressive list of features that can used to navigate around and get exactly what you need. This method is SO much easier than having to connect your device to your computer every time you want to transfer a file.

You can also transfer files between PC and Android with an app like AirDroid. But I recommend using ES File Explorer V3 because it’s powerful and has so many things you can do with it.
Источник
How to Access Shared Windows Folders On Android Over WiFi
Ashish Mundhra
20 Apr 2012
While talking about the AirDroid for Android the other day, we discussed how you can use the application to manage your phone’s data and files from your PC using a WiFi connection. But what if you want it the other way? What if you wanted to access a folder on your Windows PC on your phone and edit the files present in it?

Of course using an online backup tool is an option but you might not want to put a folder there just because of the purpose of sharing on your phone. You should be able to access it directly through WiFi, right?
You all probably know about file sharing in Windows and how it can be used to work on files hosted on different computers using a network connection (LAN or WiFi). Today we will see to use the same principle of file sharing and access files shared on your Windows PC on your Android.
Let me first show you how you can share a particular folder on Windows. And then we will move to the Android part of the process.
Sharing folders on Windows 7
Step 1: Right-click on the folder you want to share on your Windows and click on Properties to open the folder properties. Navigate to the Sharing tab and click on the Share button to open the File Sharing window.

Step 2: On the File Sharing window, you will be asked to enter the name of the group you want to share the folder with. Write Everyone and click on the Add button. You may give Read or Read/Write permission to the share access depending on your needs. Once you are done, click on the Share button.

Step 3: Now you can opt for two types of sharing, either password protected or open. If you are on a secure home network, I would recommend you go for the open file sharing as it makes things a bit easier. But if you are on an unsecured WiFi network, you must go for the password protected sharing.
To change these settings, navigate to Control Panel —> Network and Sharing Center. Here click on the link Change advanced settings on the left hand sidebar to open Advance sharing settings. Scroll down to the end of the page to find the Password protected sharing option, choose a password and save the settings.


Cool Tip: To see list of all the folders you have shared on your computer, right click on the Computer icon in the start menu and click on Manage. Having done that, click on the Shared Folders—>Shares to list all the folders shared on your computer.

You may share any number of folders you want to access on your Android.
So that was all we needed on the Windows side of the equation. Now let us configure settings on the Android.
Accessing Shared Folders on Android
Step 1: Download and install ES File Explorer on your Android device. It’s an amazing and one of the most acclaimed file managers for Android. It works on all the devices running on Android version 1.6 and above. One of the features of ES File Explorer is that it allows you to access your Home PC on WiFI via Server Message Block (SMB).
Step 2: Once you have downloaded the app, launch it. The home screen will display all the files and folders that are on your SD card. Swipe your finger to the left on the screen to move to navigate to the right to the LAN share screen. Also make sure both your computer and your Android phones are connected to the same network.

Step 3: Touch the button New on the top bar to add a new server (your computer in this case).


Step 4: Here leave the Domain field empty and do one of the following tasks depending upon your sharing security.
a) If you have opted for non-password protected sharing, enter the IP address of your computer (use the command ipconfig on the command prompt of your computer to know your IP) and check the anonymous option. Give your server an alias to identify if (it’s useful when you are using the app to access shared folders on different computer) and press the OK button to add the server.


b) For those who have enabled the password protected sharing option, do not check the anonymous option, instead provide the username and password you use to login to Windows and add the server.


That’s all, you can now browse through all the files and folders that are shared on the computer on your Android. That’s not all, depending upon the type of sharing privileges you have granted on Windows, you can do tasks such as:
- Viewing images and streaming live video. Though in the past, we have covered a dedicated app for this, I prefer ES File Explorer now because it’s ad-free and smooth.
- Open and edit text files, documents and save the changes directly without downloading the files on your phone.
- Copy a file from your computer to your phone easily. You can also modify and delete the files on your computer from your Android.
- You can view almost all the files on your Android provided you have a supported viewer for the specific file type.
- If you have write access to the shared folder on Windows, you can copy files and folders from Android to computer as well.
Video
Here’s our video on this entire process. Watch it to learn exactly how it is done.
My Verdict
This feature of ES File Explorer has made me fall in love with it. Now I can work on my computer while roaming in the house or while having a cup of coffee on the balcony… I just need the phone. So do try it out and mobilize your work.
Last updated on 8 Feb, 2018
The above article may contain affiliate links which help support Guiding Tech. However, it does not affect our editorial integrity. The content remains unbiased and authentic.
Read Next

Top 7 Ways to Fix Task Manager Not Working on Windows 11
Is the # Task Manager not working on # Windows 11? Here are the top helpful fixes to resolve # Task Manager issues on # Windows 11.

Top 7 Ways to Fix Microsoft Word Not Responding on Windows 10 and Windows 11
Are you facing issues accessing # Microsoft # Word on # Windows? Here’s how you can fix # Microsoft # Word not responding on Windows.

How to Insert a Table of Contents in Microsoft Word
It’s quite easy to insert a table of contents in # Microsoft # Word. Here’s how to add one in Microsoft Word # Windows and Mac.

How to Change the Default Browser in Windows 11
If you’re not happy with Microsoft Edge as the default browser on # Windows 11, you can change it. Here’s how to change the default browser on # Windows 11.

Top 3 Ways to Fix Windows Spotlight Image Not Working
Do you like the # Spotlight # images shown on your # Windows lock screen but don’t know why they aren’t working anymore? Here’s how you can fix it.

Top 8 Ways to Fix Bluetooth Not Working on Windows 11
# Bluetooth not working or keeps disconnecting on # Windows 11? Try out these # troubleshooting fixes to resolve the issue.

How to Enable and Use Focus Sessions in Windows 11
Did you know # Windows 11 now lets you block time natively? Here’s how to use Focus Sessions in # Windows 11 and up your # productivity levels.

Top 3 Ways to Insert Screenshots in Microsoft Outlook
# Screenshots can either be inserted in the body of a # Microsoft # Outlook email or included as an attachment. This article covers the three best ways to do insert # screenshots in Outlook.
Did You Know
The Kindle ebook reader was initially, codenamed Fiona.
Источник


