- Google Drive: How to upload, download, view, and share files and documents
- How to add an account to your Google Drive on Android
- How to upload files to your Google Drive on Android
- How to view files in your Google Drive on Android
- How to share files from your Google Drive on Android
- How to view files that were shared with you via Google Drive on Android
- How to download a file from Google Drive
- How to check your storage in Google Drive on Android
- How to delete files from your Google Drive on Android
- How to upload files from your home computer to Google Drive
- Samsung needs to bring back its iPod competitor
- VoLTE: How to use it and why you should care
- PlayStation reportedly planning service to compete with Xbox Game Pass
- These are the best USB-C cables you can find for Android Auto
- How to sync a local folder with Google Drive on your Android device
- How to sync a local folder on device to storage to the Google Drive
- Some tips to use the FolderSync app
Google Drive: How to upload, download, view, and share files and documents
Google Drive is one of the handiest cloud storage services around, giving you 15GB of free space, which you can access from just about any device with an internet connection. The age of USB thumb drives is over.
When you set up your Android phone, you would have been prompted to add your Google account, which is all you need to use Google Drive. Here’s how to set up your personal Google Drive and use some of its main functions.
How to add an account to your Google Drive on Android
If you’ve already set up your Gmail account on your phone, then you’ll just have to launch Google Drive and perform steps 1-3 below. If you’d like to add another account, like a work email address, continue on after step 3.
- Launch Google Drive from your home screen or from the app drawer.
- Tap the next arrow in the bottom right corner through the start screens.
- Tap Done in the bottom right corner of your screen.
Tap the menu button in the top left corner of your screen. It looks like ☰.

Tap the type of account you’d like to use. You can even use Twitter!

Type in your Password and tap Next in the bottom right corner.
Tap Continue.
The account will now be added to your phone and can be used with other Google apps, like Gmail, Docs, Sheets, and more!
How to upload files to your Google Drive on Android
You can upload Microsoft Word documents, Google Docs, photos from your Gallery, and tons more!
- Find the document on your phone that you’d like to upload to Google Drive. In this example, we’re using a photo from the Gallery.
- Tap the share button. It’ll usually look like a left-pointing triangle, with a dot at each point.
Tap Save to Drive.
Add a title to the document if you’d like and tap Save in the bottom right corner of your screen.
Your file will now be uploaded to your Google Drive where you can view it from any device on which you can access Google.
How to view files in your Google Drive on Android
Viewing your files in Google Drive on Android is as easy as launching the app from your home screen or app drawer. That’s it! When you launch the app, you’ll be brought to your Drive with all of your files right there for you to scroll through and view. Just tap a file to open it.
You can search for files by name by tapping the search icon (usually looks like a magnifying glass) and typing the name of the file you’d like to view.
How to share files from your Google Drive on Android
You can share any file from your Google Drive, either by sending the physical file or by sharing a link that will allow someone to view the file in your Google Drive (they won’t be able to see anything else).
- Launch Google Drive from your home screen or from the app drawer.
- Tap the more button on the file you want share. It looks like three vertical dots.
- You have two ways to share your file:
- Tap Share link to send someone a link to this file in your Google Drive.
- Tap Send file to send someone the physical file.
Tap a sharing method. You can share files via email, Facebook, messaging, and much more!
Now you can just share the file or the link via the method you’ve chosen normally. If you’re sending it as a message, just tap the send button like you would for a text message. If you’re sharing it via email, you can add a message and add multiple recipients, just like normal!
How to view files that were shared with you via Google Drive on Android
If you have notifications for Google Drive turned on (which they usually are by default), you can just tap the notification and it’ll open right to the file that’s been shared with you. If you dismissed the notification by mistake or just didn’t get one, here’s how to view files that have been shared with you!
- Launch Google Drive from your home screen or from the app drawer.
- Tap the menu button on the top left of your screen. It looks like ☰.
- Tap Shared with me.
Tap the file you’d like to view.
How to download a file from Google Drive
If you’re transferring files via Google Drive and want to save a hard copy to your phone, you just have to download the file.
- Launch Google Drive from your home screen or from the app drawer.
- Tap the more button on the bottom right of the file thumbnail. It’s the three vertical dots.
Tap Download.
The file will now be downloaded to your phone. You’ll receive a notification when it’s downloaded, and you can tap that to view it or look in your file storage.
How to check your storage in Google Drive on Android
Google Drive starts you off with 15GB for free, and if you find you’re saving a lot to your Google Drive, it’s probably best to keep an eye on your storage.
- Launch Google Drive from your home screen or the app drawer.
- Tap the menu button on the top left of your screen. It looks like ☰.
Tap Settings.
The first item in the Settings list is Storage and beneath it, it’ll tell you how much of your 15GB you have used. If you’re just using your Drive to save Google Docs, it’s going to take you a very long time to fill it up.
How to delete files from your Google Drive on Android
If you do find your Google Drive is getting a bit full because you’ve been using it to save photos, videos, music, and a ton of other stuff, you can choose to pay to upgrade your storage or take the frugal route and delete some stuff!
- Launch Google Drive from your home screen or the app drawer.
- Tap the more button on the file you’d like to delete. It’s the three vertical dots in the bottom right corner of the thumbnail.
Tap Remove, which is at the bottom of the options.
The file will now be removed from your Google Drive, but you can always re-upload it if you need to.
How to upload files from your home computer to Google Drive
Google Drive is also a great place to store documents and other files that you created on your desktop computer. You can either do a one-time backup, or set your folders to synchronize to Google Drive.
- Open the Google Drive web site.
- Click on New.
- Click on File upload or Folder upload, whichever is appropriate.
- Select the file or folder you’d like to upload, then click open.
- When the files or folders are down uploading, there will be a notification in the lower right corner of the screen.

This was a one-time upload, but setting up the synchronization is also easy!
- Download Google Drive Backup and Sync from this website.
- Click on the installation file. You will need administrator rights for your computer to install the software.
Once the installation is finished, click on the cloud icon in the lower-right corner of your screen.
Select the libraries and folders you would like to synchronize to Google Drive.

That’s it! Now your computer files will automatically backup to the cloud, where they’ll be safe and sound.
This article was updated in May 2018 with information about uploading files from your home computer to Google Drive.
![]()
Samsung needs to bring back its iPod competitor
I don’t want to buy an iPod Touch. Since I want a reasonably priced PMP with acceptable audio hardware that can install a few crucial apps, I might have to.
![]()
VoLTE: How to use it and why you should care
VoLTE — or Voice over LTE — is the new standard for calling throughout the U.S., Canada, and parts of Europe. Not only does it facilitate much higher call quality between cell phones, but it allows devices to stay connected to LTE while on a call, improving data speeds for everyone.
![]()
PlayStation reportedly planning service to compete with Xbox Game Pass
Sony is planning to create a service similar to Xbox Game Pass, according to a new report. The service could launch as early as sometime in the spring of 2022, with multiple tiers.
![]()
These are the best USB-C cables you can find for Android Auto
Android Auto is an absolute necessity when driving, regardless of whether you’re headed out to the grocery store or for a long road trip. These cables will ensure your phone stays protected and charged, no matter what.
Источник
How to sync a local folder with Google Drive on your Android device
Perhaps it might have occurred to you at least once that if you could sync a folder located in your device internal storage or external storage to Google drive without actually copying the data one by one. No?
You could also be probably wondering, “Why a guide for this silly thing? Google drive must have the feature.” No, my dear!
Although, it may sound an obvious feature, but it’s missing in the Google Drive Android app. Yeah, we’re painted you surprised already! (Also, hey Google! you know, if you are listening, it would be cool if you could sync feature into Drive app.)
Anyway, many apps that you may be using for a purpose or two, do allow adding a folder to Google Drive, but most of them lack the sync feature, which would allow you to upload content of a folder on device storage to a Google Drive folder. So that when you lose your phone, you can simply download the files from Google Drive. Or if you wanna send someone a file, you can simply share its Google Drive link.
What if one of your apps doesn’t support the data upload to Google drive or any other cloud storage in the free version or for that matter in any version – free or pro. What do you do? Should you copy the files one by one to Google drive, every time you add a new file?
With Android, there’s always a way.
So, you need to use an app that solves that problem for you, by automatically uploading all content of the folder you specify, to your Google Drive. For example, you have an SMS backup app that can take a daily backup of your messages. You can set the sync for this app’s messages backup folder to Google Drive, so that you always have your messages backed up in Google Drive.
Just head on to the Google Play Store and download an app called FolderSync Lite (free version). The free version has few limitations as it supports only two cloud accounts, has no sync filters and is bundled with ads – as every free app is. However, if you are keen on removing the ads and using more than two cloud accounts, buy the pro version.
FolderSync allows you to effortlessly sync data to and fro between local storage and cloud storage. Though the app is not intuitive for the first time user (don’t worry we got you covered!), but the sync process is fast and reliable.
Ready to get started?
How to sync a local folder on device to storage to the Google Drive
Step 1. Download and Install FolderSync Lite (free version) from the Google Play Store.
Step 2. If you are using an Android version 6 and above, you are asked to grant permission to access photos, media, and files on your device. Tap Allow to grant the permission, or else the app won’t work.

However, asking for permission below Android Marshmallow (6) wasn’t mandatory, so you will directly see the next screen.
Step 3. Tap “Create new Sync” button located at the bottom to synchronize a local folder to the Google Drive.
Step 4. The sync wizard will start. Give your sync folder pair a name to differentiate it from other pairs. Finally, tap Next.
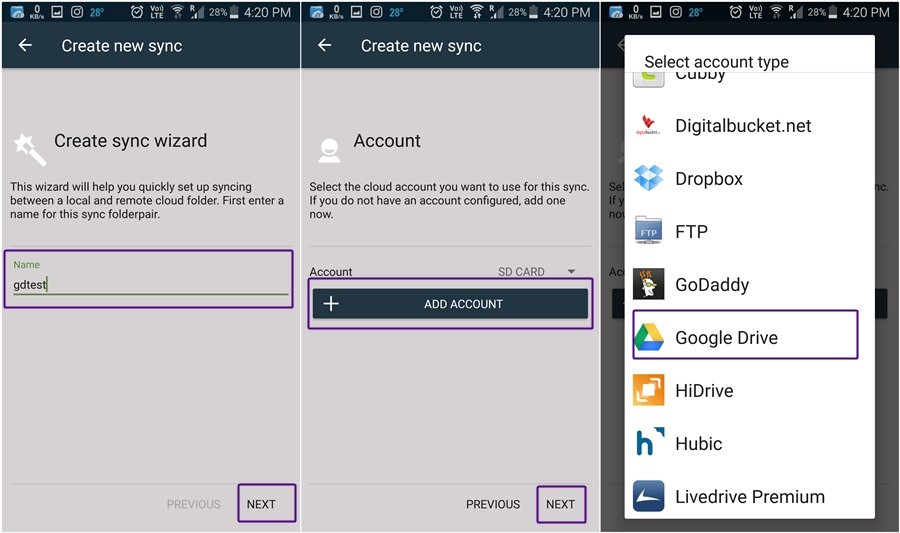
Step 5. Click on “Add Account” to configure your Google Drive account. From the list that appears, select Google Drive.
Psst. If you want to sync the folder to any other cloud service like Dropbox, One Drive, etc., then select that account. The rest of the steps remain the same.
Step 6. The app then asks you to set a unique name for your sync pair. You can name it anything and finally, when you enter the name, make sure you press the authenticate account button and not save. (We know it’s confusing since the SAVE is more prominent while writing the name).

Step 7. You are taken to the Google Sign in Page. Sign in with your account followed by giving permission for offline access.
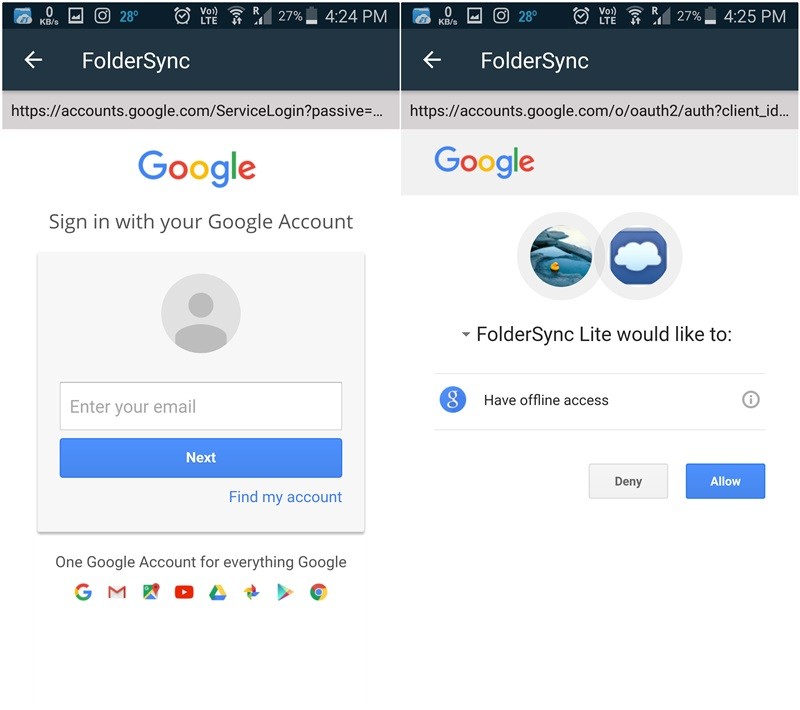
Step 8. If everything has gone well, you will get a toast saying “Login successful”. Also, you will see your Google Name, Google Drive Quota and Google Drive usage statistics in the next screen. You will also see “Authenticate account” has changed to “Unlink account” which you can use to unlink or remove your Google account from the app.
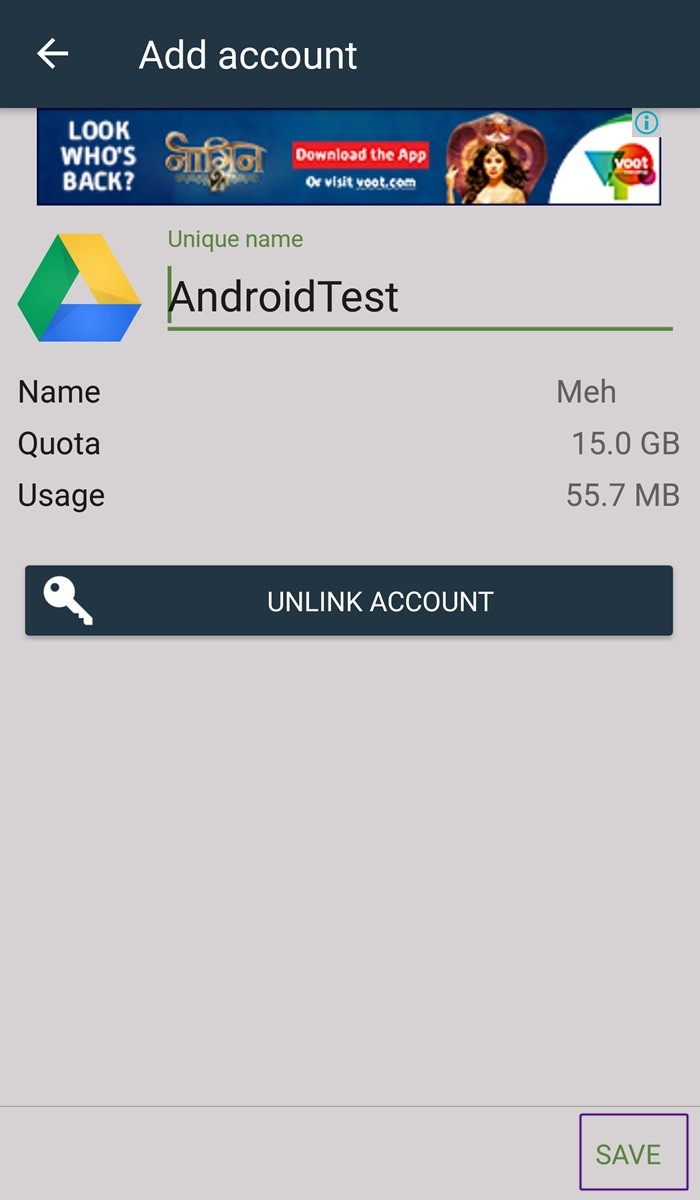
Press the Save button located at the bottom right corner.
Your account is now set up. All you have to do is tell the app which folder to sync to the Google drive.
Step 9. After you tap the Save button, you are redirected to the “create new sync” screen, the one where you started from. However, next to the Account you will see the name you set for this sync. To sync the folder to Google drive, hit NEXT located at the bottom right corner of the screen.

Step 10. Select the Sync type that you want to use for this particular folder. There are three options:
- To local folder: Use this option if you want to sync a folder from Google Drive to your device internal storage. Any changes you make to this folder on your device are not reflected in the Google Drive but the changes you make to the folder in the Google drive, are reflected in your device.
- To remote folder: Use this option if you want to sync a folder from your Android device to Google Drive. Any change you make to this folder in your device is reflected in the Google drive but any change you make to the folder in the Google Drive is not reflected in the app. Note: If you are looking to backup a folder of any other app, use this one, so that that app’s data in a folder on your device gets backup to Google Drive.
- Two Way: Use this option if you want to sync a folder both ways i.e you can change the contents of your folder both in the Google drive and in the device and the same is reflected in the other.
We have selected Two Way option since it is the best-suited one. However, if you want to sync only from local storage to Google drive, go with “To remote folder”. Tap Next.
Step 11. In the remote folder option, select the folder to which you want to sync the data and in local folder select the folder from which you want to sync data. Tap next to go to the next screen.
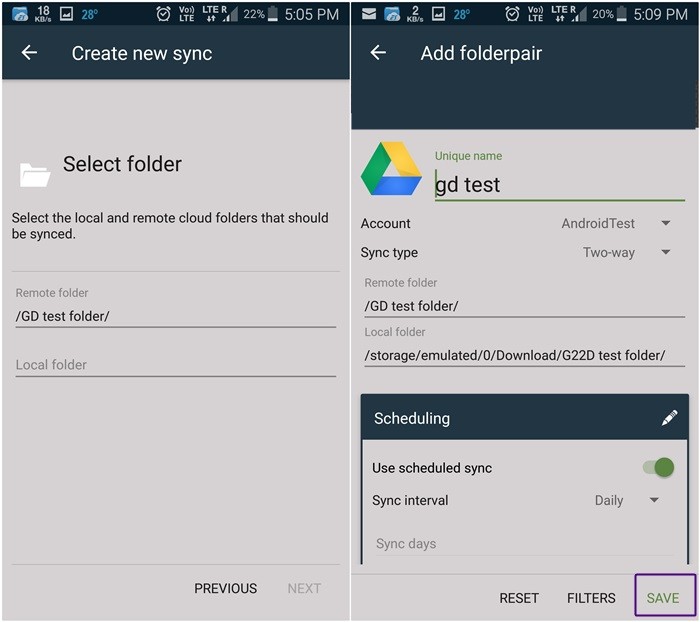
Step 12. Use the scheduled sync option to set the time interval when you want to sync the data. Finally press Save.
Now relax back and let the FolderSync app do its job. Any change you make to this folder in your device will be reflected in the Google Drive and vice versa.
If your message backup takes new backups, the new backup files will be automatically uploaded to Google Drive folder.
Some tips to use the FolderSync app
- To view the sync status and sync history of your folder, tap the Sync Status option in the home screen of the app.
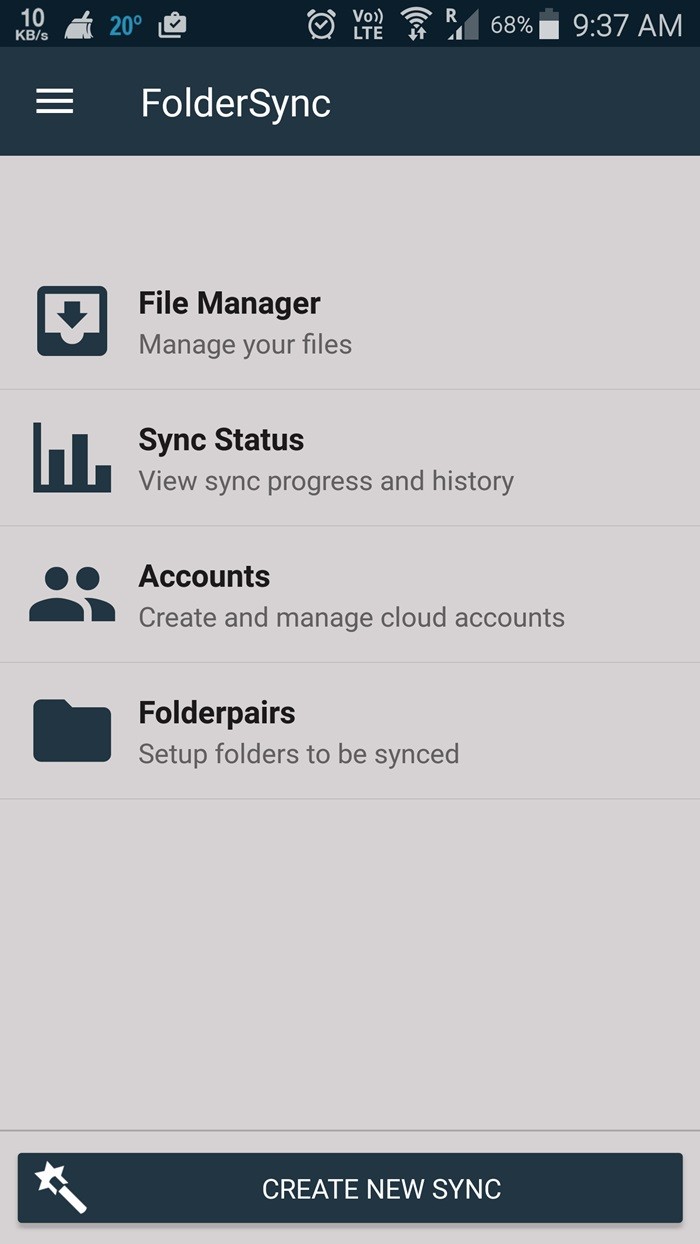
- If you want to add another cloud account, tap the “Accounts” option followed by Plus button located at the bottom. You need to follow the above steps to add another account. However, you can only add two accounts in Lite version. If you want to sync more accounts, you would have to say bye to the free version and buy a pro version.
- If you want to sync more folders, tap the Folderpairs option followed by Plus (Add) button at the bottom of the screen.
- The app gives you multiple sync options to choose from such as “sync subfolders”, “Wifi or Mobile data connection”, “show notifications” etc. You can set the options as per your preference.
- You can change the theme of the app, in case you don’t like the default theme. To do so, tap the three lines located at the top left corner, followed by settings, finally tap the theme option to change the theme.
- Below the theme option, you will find another option called Startup screen. This option allows you to change the startup screen of the app – the first screen that appears when you open the app.
Update 30/03/2019: We have verified that this method to sync a local folder to your Google Drive still works as expected hence you shouldn’t encounter any issues while following the guide.
We hope you liked the tutorial. Think we can do better, let us know in the comments.
Источник


