- Fragment Transitions with Shared Elements using Android Navigation
- Shared Elements
- Setup
- ChangeBounds Transition — Single View
- ChangeBounds Adjustments
- ChangeBounds Transition-Nested View
- Shared Element Transitions — Part 2: Fragments
- Guidelines
- Fragment to Fragment
- Fragment transitions with shared elements
- What about older versions of Android?
- Setup
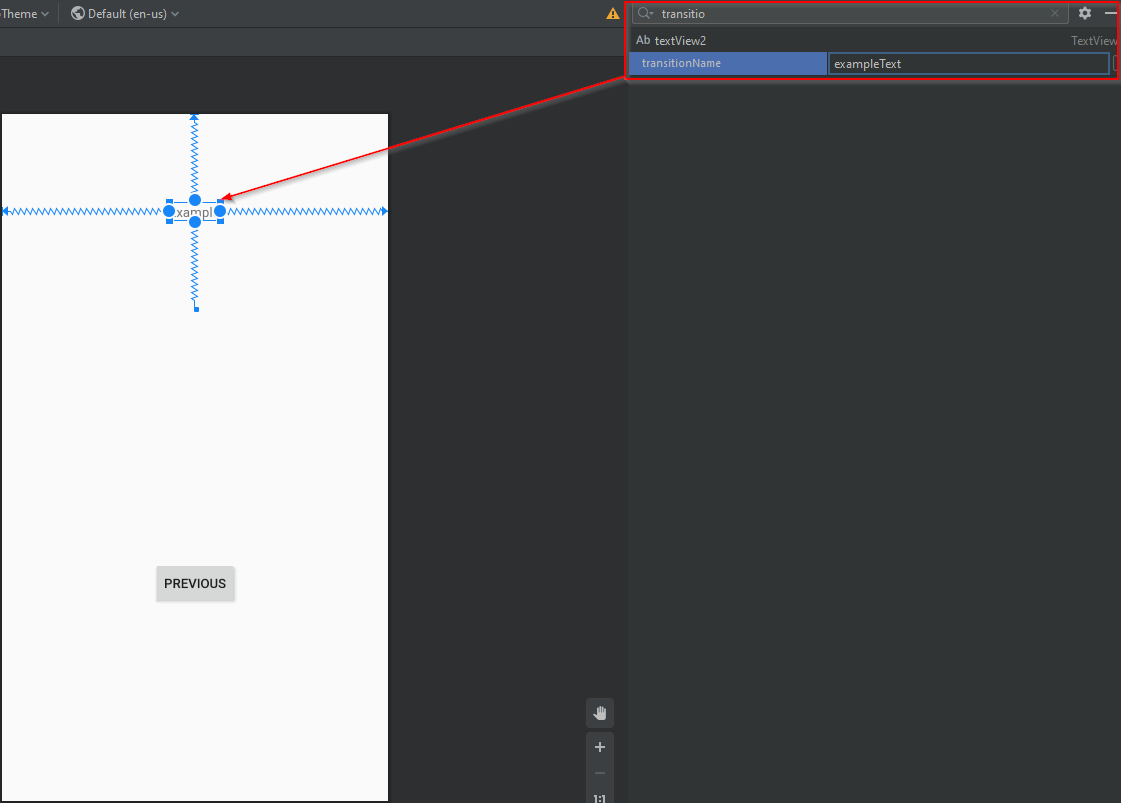
- Transition Names
- Set up the FragmentTransaction
- Specifying the transition animations
- Transition animation classes
- Putting it all together
Fragment Transitions with Shared Elements using Android Navigation

Feb 24, 2020 · 4 min read
Anyone that isn’t using the newest Android Studio tools should definitely change that, especially if that means they aren’t using Android Jetpack’s Navigation component. This component makes maneuvering through the screens of your app a breeze and its chock full of features that can be used to make the navigation itself appear elegant. In this article I’ll be explaining how you can use the navigation component to create transitions with shared elements.
Shared Elements
What are shared elements? In the singular sense, a shared element is a pair of views that are present in two different fragments or activities. These views display the same information, such as a string or an image, but they may have different sizes or locations on screen. To give the the user the illusion that the view is being preserved during navigation, a transition is used to move and reshape the first view so that it “becomes” the second view. Since shared elements actually consist of two different views, they are technically not shared between destinations.

Setup
We’ll be creating an app that performs a simple transition from one fragment to another with multiple shared elements. In Android Studio, create a new project using the “Bottom Navigation Activity” project template.
File -> New -> New Project -> Bottom Navigation Activity
This template gets us up and running pretty quick since there is already a navigation action between HomeFragment and HomeSecondFragment.
In addition to the basic project setup, you should also verify the following items are checked off:
- Increase the minSdkVersion in build.grade(Module:app) to 21
- Implement navigation component in build.gradle (Module:app):
- Enable window content transitions in style.xml
- Create a new transition folder in app/res.
Right-click on the res folder -> New -> Android Resource Director
resource type = transition
- Create a new transition resource in the transition folder (change_bounds.xml):
ChangeBounds Transition — Single View
Now that everything’s set up, let’s work on executing a simple shared element transition with one TextView. Add one TextView to HomeFragment and one TextView to HomeSecondFragment. Move them to different locations on screen, constrain them each appropriately, and make them say the same thing (ex. “Example”).
If we navigate between these two fragments as is, there is no way to know that the first TextView is associated with the second TextView. For this reason, we need to add the android:transitionName property to both TextViews. All shared elements require unique transitionNames. Note that the transitionName property will not be available if windowActivityTransitions are not enable in your theme.
Now, in the onClickListener in HomeFragment, create a new val extras that maps the view in the starting fragment to the view in the destination fragment (textView to “exampleText”). Then, pass the extras argument to the navigate method of the navController.
The last step is to handle the incoming shared element in the destination fragment. To do this, we set sharedElementEnterTransition to the change_bounds.xml transition we created earlier. Add the same thing for sharedElementReturnTransition so that the transition works in the reverse direction.
With that, BAM! Transition works like a charm. You can move the TextViews anywhere on screen and it will still work fine.
Although not totally related to this tutorial, you need to add this line to MainActivity.kt to make the back button in the upper left corner work properly:
ChangeBounds Adjustments
You can also apply a ChangeBounds transition using the following code:
Using this method, you can adjust specific aspects of the transition.
- Duration (duration = ## in ms)
- Interpolator
- Propogation (CircularPropogation or SidePropogation)
ChangeBounds Transition-Nested View
A shared element nested inside another view (such as a CardView or a ConstraintLayout) will not transition properly if the parent view is not also treated as a shared element. For example, if our TextView is nested inside a ConstraintLayout in fragment 1 and we do not map the ConstraintLayout to the destination fragment, we get something super choppy like this:
To fix this, the parent View also needs to be transitioned. Using the same ConstraintLayout example, the proper way to make the transition is to map the ConstraintLayout from the first fragment to the root ConstraintLayout in the second fragment like this:

In conclusion, Shared Elements are pretty simple to use but there are a few gotchas that can make creating transitions a troubleshooting marathon. Code carefully!
Источник
Shared Element Transitions — Part 2: Fragments

In part 1 we learned what Shared Element Transitions are, how they work and a simple example using Activity to Activity .
In part 2 we’re going to learn a little more on how they should be used and then do a Fragment to Fragment example.
Guidelines
There are a few things that should be kept in mind when using Shared Element Transitions. These come from the Material motion guidelines mentioned in part 1.
- While we want the user to marvel at our fantastic new animation, we don’t want to impede them on their journey so it’s important we animate quickly. If we stagger too many animations or slow it down we’re not creating a great user experience.
- Don’t do too many Shared Element Transitions at once. When transitioning we want the intention to be clear as possible. Too many Shared Elements potentially crossing paths or moving in different directions can just be confusing.
- Be consistent. If you’re using Shared Element Transitions in only one part of your app and you leave out other prime candidates, you’re going to have negative impact on the users feelings towards it. It will feel incomplete and will be worse than having no Shared Element Transitions at all. As above though, this doesn’t mean go crazy, but by keeping consistency you will help users understand what they mean and their intention.
To see some prime examples of the above scenarios head here.
Fragment to Fragment
To get started let’s create a simple Activity to hold our Fragment .
Nothing special here. We’re just launching our SimpleFragmentA in onCreate of our FragmentToFragmentActivity by adding it in a Transaction .
Now we need to setup our SimpleFragmentA . First of all lets make sure our ImageView in our layout XML has a transitionName .
Just like the Activity example we need to set a transitionName (line 10) on BOTH of the views we intend to be part of our Shared Element Transition. Now to the actual Fragment itself.
Our main concern in SimpleFragmentA is the onViewCreated method. On line 7 we’re getting hold of our ImageView from the layout. We’ll need this for the Shared Element Transition. Line 9 we’re getting our button and in line 8 we’re setting an onClickListener to get clicks to launch SimpleFragmentB . Line 14 is where things get interesting.
We create a Transaction as is normal to launch a new Fragment . On line 16 we actually call addSharedElement and, much like the Activity to Activity example from part 1, we need to give our View and transitionName as parameters. So we give our ImageView and our transitionName which is located in strings.xml (We don’t want any spelling or typing mistakes!) which we just use ViewCompat.getTransitionName as we know the transitionName in both layouts is the same. Remember, it doesn’t have to be and only needs to be unique in the view hierarchy.
Line 17 we call addToBackStack . Why? Well otherwise we won’t get the nice Shared Element Transition when we press back. If this line is left out, when you press back it would just finish the FragmentToFragmentActivity as there’s no history (or nothing in the back stack).
Line 18 we call replace as we want SimpleFragmentB to completely replace SimpleFragmentA .
Again not too different to how you would normally launch a Fragment . Finally lets get SimpleFragmentB setup.
Apart from inflating our layout (not shown here) and adding a transitionName to the ImageView in our layout xml (as above in SimpleFragmentA ), this is the only other thing we need to do.
So all we need to do is call setSharedElementTransition and pass in a Transition by inflating one provided to us from resources. This is only available on 21+, which is why we wrap it in an if . By default the «move» transition combines 4 different types.
We’ll go into these in a bit more detail in a future post. But for now, by using these, we’re using the same default style of Transition that we used in the Activity to Activity example in part 1.
And that’s it. If we run it, we should have something identical to part 1 except with a Gorilla 😃
The source code for part 2 can be found here alongside part 1.
In part 3 we’ll look at how we can use Picasso and Glide with Shared Element Transitions.
Update (5/03/17): I’ve made some minor adjustments to this post since first releasing. There’s nothing better than having 1000’s of eyes on your work for reviewing!
Thanks to Wesley Ellis, Dimitris Karittevlis and Marcos Holgado for proof reading
Источник
Fragment transitions with shared elements

Oct 29, 2015 · 4 min read
One of the cornerstones of Material design is meaningful motion between screens. Lollipop introduced support for these animations in the form of the transitions framework, which allows us to animate transitions between Activities and Fragments. I haven’t seen many articles on how to use transitions with Fragments, so I set out to write one!
Our end product is fairly simple. We will be m a king an app that has a grid of images, and when you click on an image the app will show a details screen. Thanks to the transitions framework, the image from the grid will animate into place on the details screen.

If you want to head straight to the sample app, you can find it here on GitHub.
What about older versions of Android?
I have good news and bad news. The bad news is that content transitions don’t exist prior to Lollipop. However, the support library provides methods that you can use to gracefully support transitions on API 21+ without littering your code with API version checks.
This article will use these support library functions to provide content transitions.
Setup
Unlike Activity transitions, you do not need Window.FEATURE_ACTIVITY_TRANSITIONS to use Fragment transitions. You also don’t need Window.FEATURE_CONTENT_TRANSITIONS. As a matter of fact, you don’t need to do anything special- you should already be ready to go!
Transition Names
The framework needs a way to associate Views on the first screen to their counterparts on the second screen. Lollipop also introduced a new “transition name” property on Views that is the key to making this association.
There are two ways to add a transition name to your Views:
- In code you can use ViewCompat.setTransitionName() . Of course, you can also just call setTransitionName() on devices running Lollipop and up.
- In your layout XML, you can use the android:transitionName attribute.
One important item to note is that within a given layout (e.g. all views in screen one), transition names must be unique. Keep this in mind when you are transitioning from a ListView or RecyclerView; defining a transition name in your row XML will lead to each row having the same transition name.
Set up the FragmentTransaction
Setting up your FragmentTransactions should look very familiar:
The new step is calling addSharedElement() to specify what Views to share between the Fragments.
The View passed to addSharedElement() is the View in the first Fragment you want to “share” with the second Fragment. The transition name here is the transition name of the “shared” View in the second Fragment. If the View in the first screen has the transition name “foo” and the View in the second screen has the transition name “bar,” then your want to pass in “bar”.
Specifying the transition animations
Finally we need to specify how we want to animate the transition between Fragments.
For the shared element:
- Call setSharedElementEnterTransition() to specify how the View moves from the first Fragment to the second Fragment.
- Call setSharedElementReturnTransition()to specify how the View moves from the second Fragment back to the first Fragment when the user hits the back button.
Note that you need to call these methods on the second Fragment. If you set these on the originating Fragment, nothing will happen.
You can animate the transition for all non-shared Views as well. For these Views, use setEnterTransition(), setExitTransition(), setReturnTransition(), and setReenterTransition() on the appropriate Fragment.
Each of these methods takes in a single parameter, which is the Transition animation to use for the transition.
We are going to keep our animations fairly simple. We will use a custom transition for the movement of the image (more on that in a second), and a Fade exit transition.
Transition animation classes
Android provides some pre-made transition animations that are suitable for many use cases. Fade will perform a simple fade. Slide will slide views in from the sides of the screen. Explode can be fun- views will all move away from a particular focal point. Finally, AutoTransition will fade, move, and resize. These are just a few examples- explore the transition package for yourself to find more!
I mentioned that we need a custom transition to move our image. Here it is:
This transition is just a set of three transitions that will play together:
- ChangeBoundsanimates the bounds (location and size) of the view.
- ChangeTransform animates the scale of the view, including the parent.
- ChangeImageTransform allows us to change the size (and/or scale type) of the image
If you are curious about how these three interact together, try out the sample app and try removing one at a time to see how the animation breaks.
You can also define more complex transitions like this using XML. If you prefer XML, check out the Transition documentation.
Putting it all together
Our final code for performing this transition is fairly simple:
We are using our custom DetailsTransition for our shared element enter and return animation. All the other views in our first screen will exit with a Fade transition, and the non-shared views in the second fragment will enter with a Fade as well.
There you have it! An easy to implement transition between two Fragments!
Источник


