- Shared Preferences — How to save Flutter application settings and user preferences for later re-use?
- How to use?
- Interesting gist:
- Flutter Shared Preferences
- Mobile Apps Development A-Z Guide.
- Using SharedPreferences in Flutter to store data locally
- What is SharedPreferences in Flutter?
- Scaffolding a Flutter project
- Flutter SDK
- We made a custom demo for . No really. Click here to check it out .
- Android Studio
- Installing shared_preferences
- shared_preferences methods
- Adding data
- Add int
- Add string
- Add bool
- Add double
- Retrieving data
- Get int data
- Get bool data
- Get double data
- Get string data
- null value
- Deleting data
- Verifying that data exists
- Using shared_preferences in Flutter
- Testing our Flutter app
- Implementing a splash screen using SharedPreferences
- Testing our splash screen
- Conclusion
Shared Preferences — How to save Flutter application settings and user preferences for later re-use?

This article describes the notion of Shared Preferences that allows a Flutter application (Android or iOS) to save settings, properties, data in the form of key-value pairs that will persist even when the user closes the application.
Shared Preferences are stored in XML format.
Shared Preferences is application specific, i.e. the data is lost on performing one of the following options:
- on uninstalling the application
- on clear the application data
The main use of Shared Preferences is to save user preferences, settings, maybe data (if not too large) so that next time the application is launched, these pieces of information could be retrieved and used.
Overview of the API
Full documentation can to be found in the Flutter packages repository .
Returns all keys
Returns the value, associated with the corresponding key
Returns the boolean value, associated with the corresponding key. If the value is not a boolean, throws an exception.
Returns the integer value, associated with the corresponding key. If the value is not an integer, throws an exception.
Returns the double value, associated with the corresponding key. If the value is not a double, throws an exception.
Returns the string value, associated with the corresponding key. If the value is not a string, throws an exception.
Returns a set of string values, associated with the corresponding key. If the value is not a string set, throws an exception.
Saves a boolean value and associated with the key.
Saves an integer value and associated with the key.
Saves a double value and associated with the key.
Saves a string value and associated with the key.
Saves a list of string values and associated with the key.
Removes the key-pair associated with the key.
Also, in any setter, the fact of passing a null value, corresponds to calling a remove(key).
Removes all the key-pairs linked to the application package.
How to use?
In the pubspec.yaml, add the shared_preferences to the list of dependencies, as follows:
The following piece of code simulates a class that needs to deal with a user preference (e.g. allow notifications, sorting order)
This second example shows how to use the SharedPreferences during a build.
Explanation: Basic sample that shows a flag in the AppBar and a list of flags in the body. If the user clicks some kind of “ select” icon, the user selection is saved in the SharedPreferences and the AppBar flag icon is refreshed accordingly.
Line 22: we get the information saved in the SharedPreferences from a Future; the output is used to draw the corresponding flag (lines 24–28).
Line 41: when the user presses a “ selection” icon, the selected language is saved in the SharedPreferences, and we force a rebuild via setState().
Interesting gist:
Simon Lightfoot wrote a generic SharedPreferencesBuilder that I wanted to share ( with his permission) with you:
As you can see, it is straightforward to use this package.
Keep in mind that Shared Preferences are not encrypted therefore, it is not recommended to put any sensitive data, such as a password for example.
Stay tuned for new articles and happy coding.
Didier (alias boeledi)
Other articles can also be found on my personal blog, also in French.
Источник
Flutter Shared Preferences
Mobile Apps Development A-Z Guide.

Give us a message if you’re interested in Blockchain and FinTech software development or just say Hi at Pharos Production Inc.
Or follow us on Youtube to know more about Software Architecture, Distributed Systems, Blockchain, High-load Systems, Microservices, and Enterprise Design Patterns.
Absolutely any mobile application needs data storage. Information about the user, and so to say the main data such as posts, purchases, orders, and similar should be stored in a database.
But the application settings — it is best to store in the key-value storage. So let’s implement local storage in our Flutter application.
Step1. Create a new application. And add the following dependency to pubspec.yaml. The latest version on this moment is 0.5.1+1:
Step2. Create a class that will contain the static functions of reading and writing to preference:
Step3. A little running ahead, let’s create a class that will consist of constant variables.
Step 4. This class combines a class with constant variables and a helper class for writing and reading primitive data.
Step5. It remains the simplest. Making a simple screen with four widgets. Two buttons and text and text field:

An example of code you can find on the link below:
Источник
Using SharedPreferences in Flutter to store data locally
August 16, 2021 7 min read 2223

There may come a time when you want to persist data in your Flutter app so you can reuse it later. A common use case for this functionality is storing login credentials to be recalled the next time the user launches the app.
With SharedPreferences, you can configure your Flutter app to remember the data even after the user terminates their activity. SharedPreferences can be used to store critical data such as passwords, tokens, and complex relational data.
In this tutorial, we’ll demonstrate how to persist and modify data using SharedPreferences in a Flutter app. We’ll cover the following with practical examples:
What is SharedPreferences in Flutter?
SharedPreferences is what Android and iOS apps use to store simple data in an allocated space. This data exists even when the app is shut down and starts up again; we can still retrieve the value as it was.
The data stored in SharedPreferences can be edited and deleted. SharedPreferences stores the data in a key-value pair.
To use SharedPreferences in Flutter, a plugin called shared_preferences enables us to store data. The plugin wraps NSUserDefaults on iOS and SharedPreferences on Android.
Scaffolding a Flutter project
Let’s walk through how to scaffold a Flutter project, add the shared_preferences plugin to a Flutter project, and the methods exposed to us by the plugin.
You’ll need to have some tools and binaries already installed on your machine, including the Flutter SDK and Android Studio.
Flutter SDK
To install the Flutter SDK on our machine, you need to choose your Flutter binary as per your machine below:
After the installation, you will have the Flutter CLI available globally in your system. Run the below command to test this:
We made a custom demo for .
No really. Click here to check it out .
Your version may be different from mine but you should be able to verify that the Flutter SDK was successfully installed.
Android Studio
We’ll be developing for the Android OS and we’ll need an emulator to test our apps on the run. Android Studio is the official IDE/SDK used for building, testing, and publishing Android apps.
Head to the official website to download and install Android Studio on your machine.
To use Android Studio to develop Flutter projects, you’ll need to install the following plugins:
To scaffold a Flutter project, run the following command:
This command creates a folder, shared_pref , and places a Flutter project inside it. You can open the project using VS Code or Android Studio.
Installing shared_preferences
Now that we have the Flutter SDK ready and set, it’s time to install the shared_preferences plugin.
Open the pubspec.yaml file and add shared_preferences in the dependencies section:
This will install the latest version of the dependency.
To use the shared_preferences plugin, we have to import it into our file:
The shared_preferences plugin exports a SharedPreferences class, which has methods that can be used to set data of various primitive types in SharedPreferences. It has a method, getInstance , which is used to create an instance of a SharedPreferences .
The getInstance creates and returns a SharedPreferences instance. The prefs holds the instance of SharedPreferences .
shared_preferences methods
In this section, we’ll demonstrate how to add data to and get, edit, and delete data from SharedPreferences.
Adding data
It’s possible to add data of primitive types to SharedPreferences. We can add the following primitive types:
Each primitive type has its corresponding setter method. (Note: The key of the key-value pair is in string.)
Add int
This adds an int, 1 , to the counter table of SharedPreferences.
Add string
This adds a string, «yes» , to the counter .
Add bool
This adds a bool, true , to the counter .
Add double
This adds a double value, 10.2 , to the counter .
Retrieving data
Now, let’s see how we can retrieve data from SharedPreferences. As we have setter methods for the primitive types so we have getter methods for retrieving data.
Get int data
The getInt method is used to retrieve an int value from the SharedPreferences.
Get bool data
This method getBool returns a boolean value from the SharedPreferences.
Get double data
The getDouble method returns a double value from the SharedPreferences.
Get string data
The getString method returns a string value from the SharedPreferences.
null value
In a case where the data is not present in the SharedPreferences, a null value is returned:
Deleting data
To remove data from the SharedPreferences, we’ll use the remove method. The key of the data is passed to the .remove method so the key-value pair data in the SharedPreferences is deleted.
Here, the counter in the SharedPreferences is deleted.
Verifying that data exists
We can check in SharedPreferences to see whether data exists before we either read or write. To do this, we’ll use the containsKey method.
The containsKey method accepts the key of the data in its arg and uses it to check whether the key exists in SharedPreferences.
The method returns a bool, true or false :
In the above example, counter exists in the SharedPreferences. That’s why it returns true .
_counter does not exist, so it returns false .
Using shared_preferences in Flutter
By default, Flutter adds a counter project whenever you scaffold a new project. This counter project enables us to increment a counter when a FloatingActionButton is pressed. The current state of the counter is displayed as it is being increased.
The counter reverts to 0 when the app is destroyed or closed. We’ll use SharedPreferences to persist the state of the counter so the counter value begins from where it was before the app was shut down.
First, import the shared_preferences plugin:
Next, add an initState lifecycle method in the MyHomePageState widget. This lifecycle method is called when a stateful widget is being initialized.
Here, we’ll load the counter from SharedPreferences. If present, we’ll make it the counter value. If not, we assign 0 to the counter:
Now let’s make the _incrementCounter function an async function. Inside it, we’ll get the counter from SharedPreferences, increment it, then set the counter with the increment and also set the increment in the SharedPreferences.
Now our Flutter application can remember the last value of the counter when shut down and restarted.
Testing our Flutter app
First, let’s start our app:
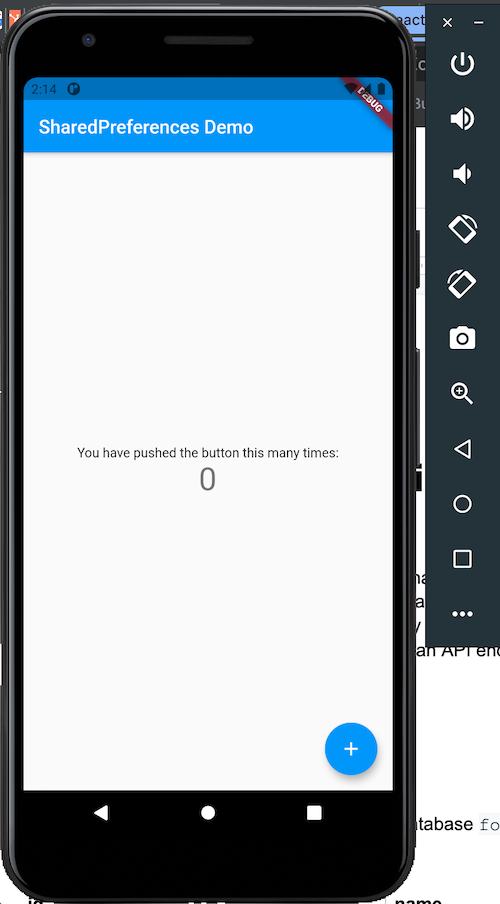
Increment to seven:

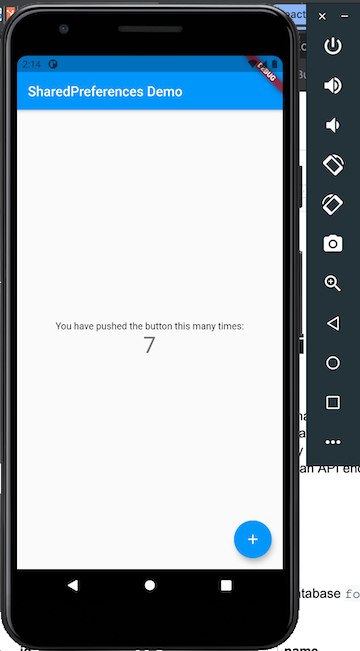
Now let’s try killing the app:
Upon restarting the app, the button count should still display as 7.
Implementing a splash screen using SharedPreferences
A splash screen appears when an app is launched for the first time and does not appear again when the app is launched subsequently.
Let’s say we have an app with two screens: ProfileScreen and SplashScreen . We’ll hook into the initState method in the MyApp widget. From there, we’ll always check for a data in the SharedPreferences — let’s say newLaunch . If this newLaunch is true , the SplashScreen is shown and after some time the ProfileScreen is shown. The SplashScreen will reset the newLaunch to false .
If the newLaunch is false , the SplashScreen is skipped and the ProfileScreen is shown.
Let’s code our splash and profile screens!
Create a folder, screens , inside the lib folder:
Let’s edit the MyApp widget as follows:
We have LoadPage widget and its state widget, LoadPageState . In LoadPageState , we have a method, loadNewLaunch , which checks to get the newLaunch data from the SharedPrefs and assigns it to the newLaunch state variable.
In the build method of the LoadPageState , the widget checks the newLaunch state. If the state is true , that means the app is launching for the very first time and the SplashScreen widget is shown. If not true , the ProfileScreen is shown.
Let’s code the SplashScreen widget:
The resetNewLaunch method sets the newLaunch data in the SharedPrefs to false .
In the initState method, SplashScreen calls the resetNewLaunch method to set the newLaunch data to false in the SharedPrefs. This will cause the app to only show the ProfileScreen when the app is launched subsequently.
The timer code waits for three seconds before the ProfileScreen is shown.
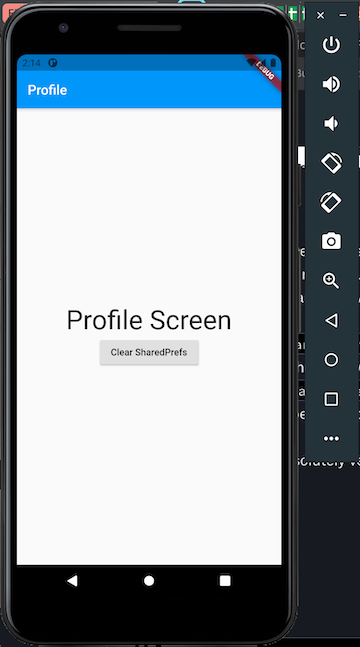
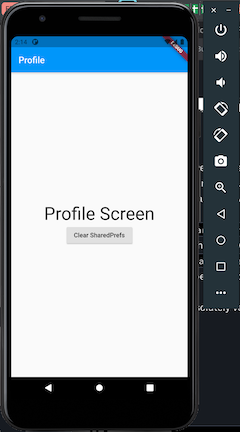
Now let’s code the ProfileScreen :
Nothing much to go over here. We have a Clear SharedPrefs button, which clears the newLaunch data in the SharedPrefs. This action will make the app show the SplashScreen the next time it is launched.
Testing our splash screen
The splash and profile screens should look as follows on the first launch after installation:
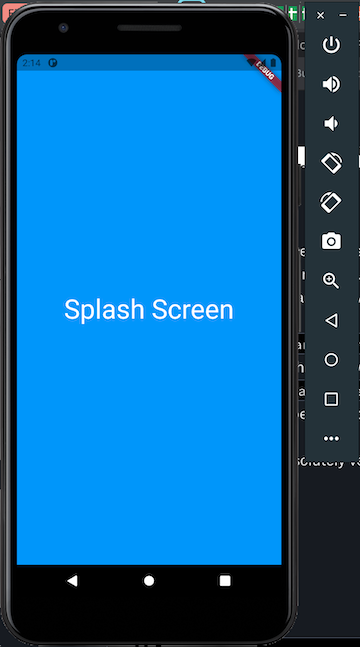
SplashScreen shows first, followed by the ProfileScreen .
Subsequent launches should display the following screens:

SplashScreen will never appear again, while the ProfileScreen appears straight.
Conclusion
In this tutorial, we covered what SharedPreferences is and how it is used in Android and iOS applications. We also introduced the shared_preferences plugin and learned how to set up Flutter with SharedPreferences.
Next, we learned how to import the shared_preferences plugin, walked through how to initialize its instance, and reviewed its methods and what all of them do. We modified a normal Flutter counter project to show how to use the shared_preferences plugin to persist the counter value and retrieve it after the app has been killed and restarted.
The source code for all the examples in this tutorial is available on GitHub.
Источник


