- PopupMenu — Всплывающее меню
- res/menu/popupmenu.xml
- Меню со значками (Kotlin)
- Программное добавление пунктов
- Popupwindow Android example in Kotlin
- 1. Adding Dependencies
- 2. Create PopupWindow Layouts
- 3. Implement PopupWindow With Data
- 4. Show / Hide the PopupWindow
- Tek Eye
- How to Display A Smaller Window on Top of an Activity
- Design the Layout for the Pop-Up
- Code to Load a Pop-up Window
- Calling the Pop-up Function
- See Also
- Do you have a question or comment about this article?
- Android Popup Menu with Examples
- Create Android Popup Menu in XML File
- Load Android Popup Menu from an Activity
- Handle Android Popup Menu Click Events
- Android Popup Menu Example
- activity_main.xml
- popup_menu.xml
- MainActivity.java
- Output of Android Popup Menu Example
PopupMenu — Всплывающее меню
Начиная с Android 3.0, в системе появилась возможность создавать всплывающее меню, привязанное к элементу View. Меню реализовано в виде модального окна, которое отображается снизу от родителя меню или в другом месте, если места снизу недостаточно. PopupMenu не нужно путать с контекстным меню. У них разные задачи, хотя поведение весьма схоже. В новых версиях Android использование всплывающих меню предпочтительнее контекстных, которые можно считать устаревшим интерфейсом.
В Android 4.0 добавили новую функциональность, чтобы работать было проще. В частности, всплывающее меню можно получить из XML-файла, используя метод inflate(int), которому следует передать идентификатор ресурса меню. А до этого приходилось использовать отдельный класс MenuInflator с избыточным кодом.
Также появился слушатель PopupMenu.OnDismissListener для работы с закрытием меню. Он срабатывает либо, когда пользователь щёлкает на пункте меню и меню закрывается, либо пользователь щёлкает в другом месте экрана, и меню также закрывается.
Есть момент, который приводит к конфузу. Сейчас существует два класса с одинаковым именем из двух разных пакетов: android.widget и androidx.appcompat.widget (ещё были android.support.v7.widget.PopupMenu и android.support.v4.widget.PopupMenuCompat). Они практически одинаковы в применении, но в паре моментов поведение отличается.
Например, всплывающее меню из AndroidX может быть прокручиваемым. Когда я щёлкал на изображении, то на экран выводилось только два пункта, и для третьего пункта приходилось прокручивать меню.
Создать всплывающее меню очень просто. По сути мы повторяем шаги по созданию обычного меню. Сначала в ресурсах меню создадим нужный файл:
res/menu/popupmenu.xml
Я постарался использовать всевозможные варианты использования атрибутов, которые отвечают за вывод флажков, доступность и т.д. Есть и другие атрибуты, о которых читайте в документации.
Далее добавим на экран активности текстовую метку, кнопку и ImageView. При щелчке на каждом из этих компонентов мы будем выводить одинаковое всплывающее меню:
Осталось написать код.
Вам надо создать новый экземпляр PopupMenu, указав контекст активности и компонент, к которому будет привязано это меню. Далее загружаете меню из ресурсов и добавляете методы для обработки щелчков. Для отображения на экране вызывается метод show().
Запустив проект, вы можете щёлкать по любому элементу на форме и увидеть всплывающее меню.
Несмотря на то, что в XML мы указали значки, в реальности они не выводятся. В интернете можно найти примеры решения проблемы через программный код. В Android Q (API 29) можно сделать из коробки (см. пример ниже).

Меню со значками (Kotlin)
Напишем другой вариант примера на Kotlin и заставим систему выводить значки. Будем вызывать меню при нажатии на кнопку и выводить информацию в TextView через новый объект popupMenu2 из пакета android.widget, у которого есть специальный метод setForceShowIcon() для вывода значков на экран. И для сравнения оставим код из предыдущего примера.
Создадим новый файл меню res/menu/popup_menu.xml для второго примера.

Программное добавление пунктов
Повесим на новую кнопку возможность программного добавления новых пунктов меню.
Источник
Popupwindow Android example in Kotlin

Popupwindow is a floating view that is displayed on top of an activity. Android provides a PopupWindow class for creating a popup window with the custom design.
It is present from the first versions of the API, but not as popular as other dialog boxes due to the need for additional configuration, which is not always necessary.
Android PopupWindow very useful when you want to show the dialog just over the view items. For Example you can able to show the dialog near to the more option of your cardview / button view.
Check out my popup window android example demo.
Now we are going to create popup window showed in the popupwindow example video.
1. Adding Dependencies
In this example, we are going to show list of items in the recyclerview. So, we need recyclerview and cardview dependencies.
I have explained about using recyclerview and cardview in separate post. Please check it in the links.
2. Create PopupWindow Layouts

As mentioned in the design, First we need to create popupWindow layout with recyclerview.
Recyclerview need a adapter view to hold the popup items. So, we need to create adapter layout file.

3. Implement PopupWindow With Data
We are using recyclerview in the popup window. so, we need model class to hold the data.
Also, we need to create adpater to set popup items.
In the Adapter, set the click listener interface for the popup window click callbacks.
Already, we have created layouts and adapter for the PopupWindows. Lets create the PopupWindow.
In the above code, I am using adapter.setOnClick to pass the implementation of the RecyclerviewCallbacks interface to receive the callbacks of the popup window items.
4. Show / Hide the PopupWindow
Now, our popup window is ready to display. So, whenever we need to show the popup window. call the below code.
To dismiss the popup window,
That’s it. Now we can able to show and hide the popup window in android.
Download the example code from Github.
Thanks for reading.
Please try this with example and let me know your feedback in comments.
Источник
Tek Eye
The main screen for an Activity is not the only way to interact with the user of an app. A brief message or dialog can be displayed in appropriate circumstances to ask a specific question, get specific input, or show a brief message. Android has build in support for such small focused interactions that require immediate attention.
(This Android pop-up tutorial assumes that Android Studio is installed, a basic App can be created and run, and the code in this article can be correctly copied into Android Studio. The example can be changed to meet other requirements. When entering code in Studio add import statements when prompted by pressing Alt-Enter.)
How to Display A Smaller Window on Top of an Activity
There are different ways in Android to pop-up a brief window over the current Activity screen, these include:
- The Toast class – to display brief informational only message.
- The Dialog class, managed by a DialogFragment – to support a flexible input that can display information and can ask for inputs or choices. There are several built in sub-classes including:
- AlertDialog – supports buttons (from zero to three), list selections, check boxes and radio buttons (see the article About Box in Android App Using AlertBuilder).
- ProgressDialog – supports a progress bar or wheel and supports buttons because it extends AlertDialog.
- DatePickerDialog – supports selecting a date.
- TimePickerDialog – supports a time selection.
- The PopupWindow class – allows a View to float on top of an existing activity. Suitable for custom informational messages.
These classes build their user interfaces through class methods with support from custom layouts when required. For this article the PopupWindow class is used. This Android pop-up tutorial includes example code. What is the PopupWindow? The Android developer PopupWindow documention gives this class overview:
«This class represents a popup window that can be used to display an arbitrary view. The popup window is a floating container that appears on top of the current activity.»
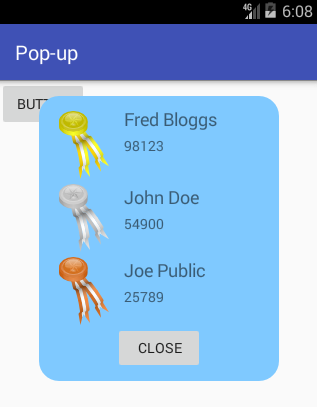
It can be used to display extra information without needing to code another Activity. An example would be to show results at the end of a game (or end of a level), which will be done in this tutorial. The steps for this example project and code are:
- Create a new project in Android Studio.
- Design the pop-up window.
- Add the code to load and populate the pop-up window.
- Call the code.
Design the Layout for the Pop-Up
For this example a pop-up is going to display a game’s result as gold, silver and bronze medal positions. The pop-up will have a graphic, shown in a ImageView , for each of the medals; a TextView for the winner’s name, and one for the score. The images for the medals came from the Open Clip Art Library by user momoko. They have been resized for the Android project and are available in medals_png.zip. Ready to download and add into the app project.


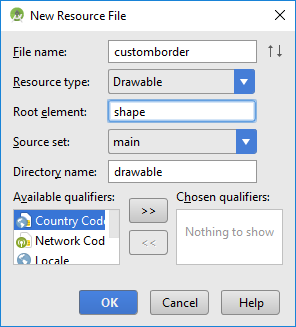
Start a new app project in Android Studio. Here it was called Pop-up and uses an Empty Activity with all other settings left at their default values. The pop-up window will be defined in a new layout XML file in the project’s layout folder, called winners.xml. To add some interest to the pop-up screen it will have a blue background and rounded corners, this is done using a shape drawable (see Add a Border to an Android Layout). The shape drawable for the custom background definition is a drawable resource XML file in the folder res/drawable. With the app or res folder highlighted in the Project explorer use the File or context (often called right-click) menu. Select the New then Android resource file option. Call the new resource customborder.xml:
Add this code for the pop-up window background shape definition. The android:shape is a rectangle:
Add the images for the medals to the project’s res/drawable folders (see medals_png.zip). Now create the winners.xml layout file, again use the New menu and select XML then Layout XML File. A RelativeLayout is used for the Root Tag. Open the file, add the ImageViews for the medals and TextViews for winners names and scores. Here is the code used for the layout used in this example:
Code to Load a Pop-up Window
The code to display the pop-up window will be wrapped in a function called showWinners(). It can be called from a button press or other action. The first code in the function inflates the pop-up window layout using a LayoutInflater :
The inflated layout is used to get the id of the TextViews. The ids are used to set the names of the winners and their scores, e.g. here we assume that the name of the gold medal winner is stored in the string goldWinner:
The pop-up window is created by passing in the layout and required size. We defined a size in the XML which is used here, scaled by the screens density to support different devices:
The button on the pop-up is given an OnClickListener so that the pop-up can be closed (if not familiar with coding event handlers see the article Different Ways to Code Android Event Listeners).
A touch event outside of the pop-up will also close it. The trick here is to call setBackgroundDrawable with a transparent drawable. This allows for screen presses outside of the pop-up to also close the pop-up:
Finally display the pop-up:
Calling the Pop-up Function
The following listing is for a simple Activity with a button that has an OnCLickListener to call the showWinners() function that is described above. The names of the medal winners and there scores are simple variables, in a real app game they would come from the game results. This is the complete code for the example in action shown at the beginning of the article:
Bookmark this page in your browser so that you can use the code as a template for future projects that require a pop-up.
See Also
- Download the project code for this pop-up example, available in android-pop-up.zip ready for importing into Android Studio
- For more android example projects see the Android Example Projects page.
- The medal images are also available via the Free Launcher Icons, Menu Icons and Android Graphics page.
- View the Tek Eye full Index for other articles.
Author: Daniel S. Fowler Published: 2013-02-05 Updated: 2017-07-23


Do you have a question or comment about this article?
(Alternatively, use the email address at the bottom of the web page.)
↓markdown↓ CMS is fast and simple. Build websites quickly and publish easily. For beginner to expert.
Free Android Projects and Samples:
Источник
Android Popup Menu with Examples
In android, Popup Menu displays a list of items in a modal popup window that is anchored to the view. The popup menu will appear below the view if there is a room or above the view in case if there is no space and it will be closed automatically when we touch outside of the popup.
The android Popup Menu provides an overflow style menu for actions that are related to specific content.
Following is the pictorial representation of using Popup Menu in our android applications.

In android, the Popup Menu provides an overflow of actions that are related to specific content and the actions in the popup menu won’t affect the corresponding content. The popup menu won’t support any item shortcuts and item icons.
In android, the Popup menu is available with API level 11 (Android 3.0) and higher versions. If you are using Android 3.0 +, the Popup Menu won’t support any item shortcuts and item icons in the menu.
Create Android Popup Menu in XML File
In android, to define the popup menu, we need to create a new folder menu inside of our project resource directory (res/menu/) and add a new XML (menu_example) file to build the menu.
Following is the example of defining a menu in XML file (menu_example.xml).
xml version= «1.0» encoding= «utf-8» ?>
menu xmlns: android = «http://schemas.android.com/apk/res/android» >
item android :id= «@+id/mail»
android :icon= «@drawable/ic_mail»
android :title= «@string/mail»/>
item android :id= «@+id/upload»
android :icon= «@drawable/ic_upload»
android :title= «@string/upload»
android :showAsAction= «ifRoom»/>
item android :id= «@+id/share»
android :icon= «@drawable/ic_share»
android :title= «@string/share»/>
menu >
Once we are done with the creation of menu, we need to create a view element which anchored the menu.
Button
android :id= «@+id/btnShow»
android :layout_width= «wrap_content»
android :layout_height= «wrap_content»
android :text= «Show Popup Menu»
android :onClick= «showPopup»/>
Now in our activity we need to implement showPopup method to show the popup menu.
Load Android Popup Menu from an Activity
To show the popup menu for the view, we need to instantiate Popup constructor and use MenuInflater to load the defined menu resource using MenuInflater.inflate() like as shown below.
public void showPopup(View v) <
PopupMenu popup = new PopupMenu( this , v);
MenuInflater inflater = popup.getMenuInflater();
inflater.inflate(R.menu.menu_example, popup.getMenu());
popup.show();
>
Handle Android Popup Menu Click Events
To perform an action when the user selects a menu item, we need to implement the PopupMenu.OnMenuItemClickListener interface and register it with our PopupMenu by calling setOnMenuItemclickListener(). When the user selects an item, the system calls the onMenuItemClick() callback in your interface.
Following is the example of handling a popup menu item click event using onMenuItemClick().
public void showMenu(View v) <
PopupMenu popup = new PopupMenu( this , v);
popup.setOnMenuItemClickListener( this );
popup.inflate(R.menu.actions);
popup.show();
>
@Override
public boolean onMenuItemClick(MenuItem item) <
switch (item.getItemId()) <
case R.id.archive:
archive(item);
return true ;
case R.id.delete:
delete(item);
return true ;
default :
return false ;
>
>
Note: If you are using Android 3.0 +, the Popup Menu won’t support any item shortcuts and item icons in the menu.
Android Popup Menu Example
Following is the example of implementing a Popup Menu in the android application.
Create a new android application using android studio and give names as PopupMenuExample. In case if you are not aware of creating an app in android studio check this article Android Hello World App.
Now open an activity_main.xml file from \res\layout path and write the code like as shown below
activity_main.xml
xml version= «1.0» encoding= «utf-8» ?>
LinearLayout xmlns: android = «http://schemas.android.com/apk/res/android»
android :layout_width= «match_parent»
android :layout_height= «match_parent»
android :orientation= «vertical» >
Button
android :id= «@+id/btnShow»
android :layout_width= «wrap_content»
android :layout_height= «wrap_content»
android :text= «Show Popup Menu»
android :layout_marginTop= «200dp» android :layout_marginLeft= «100dp»/>
LinearLayout >
If you observe above code we created a one Button control in XML Layout file to show the popup menu when we click on Button.
In android, to define the popup menu, we need to create a new folder menu inside of our project resource directory (res/menu/) and add a new XML (popup_menu.xml) file to build the menu.
Now open newly created xml (popup_menu.xml) file and write the code like as shown below.
popup_menu.xml
xml version= «1.0» encoding= «utf-8» ?>
menu xmlns: android = «http://schemas.android.com/apk/res/android» >
item android :id= «@+id/search_item»
android :title= «Search»/>
item android :id= «@+id/upload_item»
android :title= «Upload»/>
item android :id= «@+id/copy_item»
android :title= «Copy»/>
item android :id= «@+id/print_item»
android :title= «Print»/>
item android :id= «@+id/share_item»
android :title= «Share»/>
item android :id= «@+id/bookmark_item»
android :title= «BookMark»/>
menu >
Once we are done with the creation of the menu, we need to load this menu XML resource from our activity by instantiating a Popup constructor, for that open main activity file MainActivity.java from \java\com.tutlane.popupmenuexample path and write the code like as shown below.
MainActivity.java
package com.tutlane.popupmenuexample;
import android.support.v7.app.AppCompatActivity;
import android.os.Bundle;
import android.view.MenuItem;
import android.view.View;
import android.widget.Button;
import android.widget.PopupMenu;
import android.widget.Toast;
public class MainActivity extends AppCompatActivity implements PopupMenu.OnMenuItemClickListener <
@Override
protected void onCreate(Bundle savedInstanceState) <
super .onCreate(savedInstanceState);
setContentView(R.layout. activity_main );
Button btn = (Button) findViewById(R.id. btnShow );
btn.setOnClickListener( new View.OnClickListener() <
@Override
public void onClick(View v) <
PopupMenu popup = new PopupMenu(MainActivity. this , v);
popup.setOnMenuItemClickListener(MainActivity. this );
popup.inflate(R.menu. popup_menu );
popup.show();
>
>);
>
@Override
public boolean onMenuItemClick(MenuItem item) <
Toast.makeText( this , «Selected Item: » +item.getTitle(), Toast. LENGTH_SHORT ).show();
switch (item.getItemId()) <
case R.id. search_item :
// do your code
return true ;
case R.id. upload_item :
// do your code
return true ;
case R.id. copy_item :
// do your code
return true ;
case R.id. print_item :
// do your code
return true ;
case R.id. share_item :
// do your code
return true ;
case R.id. bookmark_item :
// do your code
return true ;
default :
return false ;
>
>
>
If you observe above code we are trying to show popup menu on Button click, loaded defined menu resource using Popup.inflate() and implement popup menu items click event.
Generally, during the launch of our activity, the onCreate() callback method will be called by the android framework to get the required layout for an activity.
Output of Android Popup Menu Example
When we run above example using an android virtual device (AVD) we will get a result like as shown below.

This is how we can create Popup Menu in android applications to handle global actions.
Источник


