- How to Create an Automatic Slider in Android Studio
- Overview
- Prerequisites
- Getting Started
- Putting the slider in place
- Setting a ViewPager and TabLayout
- Setting up PagerAdapter
- Setting up a model class
- Create a custom PagerAdapter
- Hook everything together
- Preparing the slider adapter
- Setting up the timer
- Conclusion
- About the author
- Want to learn more about the EngEd Program?
- Sliders — Material Component For Android
- Types of sliders
- Continuous Slider
- Values changes Listeners
- Discrete Slider
- Setup the Slider Label
- app:labelBehavior
- LabelFormatter
- key properties of sliders
- Компонент Slider из библиотеки материального дизайна
How to Create an Automatic Slider in Android Studio
April 2, 2021
Sliders are found on cross-platforms such as website pages, desktop, and mobile apps. They are usually used to highlight important features on home screens.
A perfect use-case is an e-commerce app. As a developer, you want to show off new products without messing with the user’s interactions.
Slides are an excellent way to display such items to the consumer.
This tutorial will teach you how to create and implement sliders in Android Studio.
Overview
The following principles would be used to create a Slider.
- The PagerAdapter to populate an ArrayList of slides into a ViewPager .
- A tabbed interface to build a list of slide presentations.
- Set a timer task to control the flow of the slides.
Prerequisites
To follow this tuorial along, it would be helpful to have a basic understanding of Android ViewPager, PagerAdapters, and TabLayout.
Getting Started
Launch Android Studio and create a new empty project. Note that I have modified the predefined parent theme. To do the same, navigate to the res directory в†’ values в†’ style.xml and adjust the style theme to the one shown below.
Putting the slider in place
Go ahead and create the items_layout.xml file inside the Layout directory. Two major elements make up the slide.
- The TextView shows a caption or the tagline of a slide.
- The ImageView shows an image to the user.
This GitHub repository includes all of the drawable resources used in this project. Go over and check any assets and code fragments listed in this tutorial.
RecyclerView uses a list_item layout. The same concept applies here. An item layout represents a single row of the list items.
In our case, a row will represent a single view of one slide. The item layouts are reused by setting up adapter objects that will display the data sets dynamically.
Setting a ViewPager and TabLayout
The application’s main layout includes a ViewPager and TabLayout , as shown in the XML code below.
We’ll populate the slider layout items into a ViewPager . The ViewPager is a layout widget that hosts several children’s views.
It also controls the slides’ movement. An individual slide represents each child’s view. These items will be displayed once we link up the ViewPager to a PagerAdapter .
Setting up PagerAdapter
ViewPager and TabLayout depend on one another. TabLayout controls the movement between sliders. It also provides an overview of all the slides.
ViewPager gets its data from a PagerAdapter . The PagerAdapter stores the slides in the memory, making it lightning fast to switch between already loaded slides.
Before we implement the PagerAdapter , we need a model class.
Setting up a model class
A model class is made up of a collection of data objects that we will feed into the adapter. These are the header image and the slider caption. Create a model class and name it The_Slide_Items_Model_Class.java .
In this file, we will:
- Declare an integer for the hero image and a string for the slider title (variables).
- Generate the respective constructor, getters, and setters.
Create a custom PagerAdapter
Create a new class and name it The_Slide_items_Pager_Adapter.java . This class should extend PagerAdapter .
PagerAdapter controls the actual swiping between the different slides.
To implement the PagerAdapter , use the mouse to hover over The_Slide_items_Pager_Adapter extends PagerAdapter , then right-click , and navigate to generate and import .
- A Constructor of The_Slide_items_Pager_Adapter with parameters Context and List
and set the parameter globals using this keyword.
- Override methods — import the following override methods.
-
instantiateItem Inflates the slider root items layout and initialize each item in the layout by the item id . This sets the position of the respective ViewGroups by mapping the data objects to respective view items. The instantiateItem method will add this item list into the parent ViewGroup
getCount Overriding getCount will return the number of slides in the list. This will return the slide at each position.
isViewFromObject This method is required by the instantiateItem method. instantiateItem returns an Object as the key when the slider pager changes to another slider pager. This key becomes the View (the current displaying slider). isViewFromObject will check if the View == Object and return a boolean value. If true , the View will be displayed as the current slide.
destroyItem PagerAdapter saves every slide it creates in a memory. This makes it faster to switch between one slider to another. However, this can take a lot of memory, especially if you have a larger number of slides. It becomes a heavy and expensive task for the PagerAdapter to manage. The destroyItem override method solves this problem by destroying and recreating the slides as needed.
Here is the complete The_Slide_items_Pager_Adapter code:
Hook everything together
Declare the following variables in your MainActivity class.
Create an instance of viewPager and tabLayoutIndicator inside the onCreate method.
Preparing the slider adapter
This consists of:
- An ArrayList of the slider items, an image, and a title describing each slide.
Check image resources( drawable ) in this GitHub repository.
- Hook the Viewpager to the The_Slide_items_Pager_Adapter ( PagerAdapter ) using setAdapter .
This will populate the available list of slides into pager views.
- Hooking up a TabLayout to the ViewPager setupWithViewPager . You need a single method ( setupWithViewPager ) to set the TabLayout into the ViewPager . With that, you get a sliding view with a tabular indicator.
You can now run the application to test if everything is working.

Swiping on the screen will change the displaying slide, and tapping on the slide’s tab will change the slide pages — as you’d expect.
Setting up the timer
Create a method named SliderTimer that extends TimerTask .
Hover over it в†’ right-click в†’ generate в†’ implement methods в†’ run():void and include the following code block.
Initialize the Timer task and set the delay and period parameters in milliseconds within the onCreate method.
Here is the MainActivity full code.
Run the app on your mobile phone to see if this works.
Conclusion
I hope this guide helped you to create and implement sliders in your app. For further reference, download or clone this project from here.
Peer Review Contributions by Wanja Mike
About the author
Joseph Chege is an undergraduate student taking a Bachelor in Business Information Technology, a 4th-year student at Dedan Kimathi University of Technology. Joseph is fluent in Android Mobile Application Development and has a lot of passion for back-end development.
Want to learn more about the EngEd Program?
Discover Section’s community-generated pool of resources from the next generation of engineers.
Источник
Sliders — Material Component For Android
Sliders used to view and select a value or range from the given slider bar.They’re mainly used for adjusting settings such as volume and brightness, etc.
Sliders can use icons on both ends of the bar to represent a numeric or relative scale. The range of values or the nature of the values, such as volume change, can be communicated with icons.
Sliders add into Material design in library version 1.2.0. So, you need to add 1.2.0 or higher version on material design.
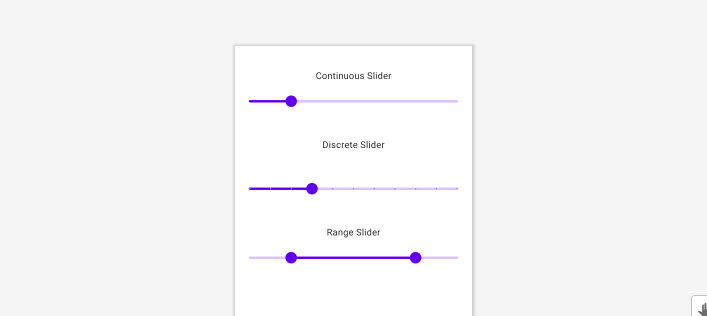
Types of sliders
There are two types of sliders.
- Continuous Slider
- Discrete Slider
Also, We have a another slider called range slider.
Lets see about these sliders in detail.
Continuous Slider
Continuous sliders allow us to select any value between the given start and end value.
For example, valueFrom = “0.0” and valueTo=”100.0″ in this case, you can select any values between from and to values like 55.5, 62.0, etc.
defining the slider In the layout,
valueFrom : starting value of the slider.
valueTo : ending value of the slider.
value: setting the initial value of the slider.
Similarly, we can add a RangeSlider in a layout:
The RangeSlider has app:values attribute to set the range for the slider. we need to provide the range in arrays.
Values changes Listeners
We can observe the changes of the slider in two different ways.
by using addOnSliderTouchListener, we can observe the sliders start and stop touch position values.
similarly, we can add touch listener for the range slider.
Sliders OnChangeListener notified eveerytime the slider value changes.
Also, OnChangeListener for the RangeSlider.
Discrete Slider
Discrete slider allows user to select an exact value in the given input range.
If you want to slider to be discrete, then you need to add attribute call android:stepSize=”5.0″. This will setup the step between valueFrom and valueTo values based on the stepSize value.
For example, valueFrom = 10.0, valueTo = 50.0 and stepSize = 10.0, then you can able to select values 10.0, 20.0, 30.0, 40.0, 50.0 only.
defining discrete slider in the layout:
Also, we can add discrete in the RangeSlider.
We can observe the discrete slider values change same as continuous slider. Please check value changes Listeners above.
Setup the Slider Label
The label will be shown at the top of the slider thumb after you touch the thumb. Basically, Slider layout holding the current selected value of the slider.
We can change the behavior and label format using the below methods.
app:labelBehavior
You can change how it’s drawn via the app:labelBehavior attribute or setLabelBehavior method.
app:labelBehavior having three different modes.
- floating (default) — draw the label above the slider view.
LabelFormatter
By using a LabelFormatter you can change the display format of the selected values based on your requirement like 10KG, 12MB, like that.
That can be achieved through the setLabelFormatter method.That can be achieved through the setLabelFormatter method.
In above code, I have rounded the selected values and converted into dollars.
key properties of sliders
A Slider has a four UI elements.
- Track
- Thumb
- Value Label
- Tick Mark (only for discrete slider)
Источник
Компонент Slider из библиотеки материального дизайна
Началось с небольшой детективной истории — разглядывая сайт Material Design, наткнулся на страницу Sliders. В описании говорилось, что данный компонент доступен для Android и даже дана ссылка на Гитхаб. Меня это немножко удивило, так как я ни разу о нём не слышал. Перехожу по ссылке — на Гитхабе говорится, что компонент пока находится в активной разработке и даны куцые примеры на Java. «В этих ваших интернетах» упоминания о Slider не нашёл. В официальной документации по библиотеке тоже нет никаких упоминаний.
Любопытство взяло верх и я стал самостоятельно копаться.
По своему внешнему виду Slider похож на стандартный Seekbar. Но небольшие отличия есть. Чтобы их увидеть, набросал простой проект. Добавим пару слайдеров на экран, кнопку и посмотрим на компонент в действии.
Я использовал последнюю версию библиотеки.
На всякий случай замечу, что когда я вручную прописал код, то Android Studio отказывалась показывать экран активности в режиме «Design», пришлось перезапускать студию. После этого всё нормализовалось.
Код для класса активности.
Запускаем и смотрим на результат.
Первое что бросается в глаза — мы можем установить несколько ползунков через slider.values. Они ведут себя независимо и не мешают друг другу.
У второго слайдера установлен дискретный режим через атрибут android:stepSize. Можно заметить, что в этом режиме на дорожке появились маленькие точки.
Если нажать на ползунок, то сверху появляется плашка с указанием текущего значения.
Щелчок на кнопке программно установит ползунок в нужном месте у первого слайдера. Учтите, что в нашем случае компонент превратится в
тыквуслайдер с одним ползунком, так как мы сбросили список значений, оставив только одно.У слайдера есть несколько слушателей. Для демонстрации привёл один из них — Slider.OnSliderTouchListener.
Текст на плашке можно менять. Это пригодится, когда используются большие числа. Тогда вместо чисел с большим количеством нулей (миллионы, триллионы и т.д.) можно использовать сокращенные варианты. За это поведение отвечает интерфейс LabelFormatter. Также существует вспомогательный интерфейс BasicLabelFormatter, который уже содержит полезные сокращения больших чисел типа 9.1K вместо 9100.
Давайте немного пошалим и напишем слово из трёх букв.
Новый элемент показался интересным и вполне пригодным для использования в проекте.
Источник