- [HOWTO]More smooth scroll & volume step increase for MOST android phones[Poweramp OK]
- Breadcrumb
- AndroidON
- Scrolling in Android: Custom Scroll Behavior for a List of Varying Height
- Making ListView Scrolling Smooth
- This lesson teaches you to
- You should also read
- Use a Background Thread
- Hold View Objects in a View Holder
- Scrolling Behavior for Appbars in Android
- Basic Setup
- Standard App bar scrolling with only Toolbar
- App bar scrolling with tabs
- App bar scrolling with Flexible space
- App bar scrolling with image in Flexible space
- App bar scrolling with overlapping content in Flexible space
[HOWTO]More smooth scroll & volume step increase for MOST android phones[Poweramp OK]
Breadcrumb
AndroidON
Senior Member
[HOWTO]More smooth scroll & volume step increase for MOST android phones[Poweramp OK]
※Do this when you completely understand this.
This is not for people who are noob to phone and computer things.
This is a framework.jar mod which will affect on overall scrolling and volume steps.
I’ve searched through several references and found some modification.
By following steps below, you will modify your rom’s framework.jar.
And it will make your phone’s volume control more precise and scroll to be more smooth.
Some phones may have different structure in framework.jar so I’m not sure.
(I’ve tested this on HTC desire and Motorola Atrix. I’m an Atrix user.)
Ok, so here’s everything you need before start.
1. framework.jar of your phone. (Deodexed ROM needed)
4. Text editor — Window basic text editor can be used..but I recommend Notepad++
http://notepad-plus-plus.org/
5. Program which can extract .jar file. (I prefer 7zip)
6. File manager which can access to phone’s internal system.
(Like root explorer)
7. Your rom’s original zip under SDcard for in case of bootloop.
1. Unzip the smali/baksmali tool to certain folder and put the framework.jar in same folder.
2. Run baksmali manager.bat.
3. Select framework.jar by pressing 4 -> 2 in main menu.
4. Press 1 to Baksmali the framework.jar.
6. Make it sure that new ‘framework’ folder is created and files inside it. (Don’t close the baksmali manager window yet!)
B. Modification Steps
Volume steps mod
— Since I saw some people are complaining about android’s volume control is jumping to large amount, I made some mod.
This will adjust your phone volume steps.

Sorry for not showing you by English, but you can recognize the media volume counts increased from 15 to 30.
Here’s what you have to modify:
1. Open the framework/android/media/AudioService.smali with text editor.
2. Press Ctrl + F to open the search window and serch for ‘max_’
3. Continue search until you find the line below.
4. You can see the ‘array_1ba’ in screenshot. This may vary for roms. (But usually only ‘1ba’ changes.)
This will lead you to data of max volume.
Search for ‘array_1ba’ again.
5. You will see like this:
This data’s meaning is same with this. (From CM7 source)
6. So if you want modify your music or movie volume, you have to modify 4th line’s ‘f’.
(This ‘f’ means 15 by hexadecimal number)
If you use bluetooth, modify 7th line too.
I changed ‘f’ to ‘1e’, which means 30 in hexadecimal number.
7. Press the text editor’s save button if you finished.
Smooth scroll mod
Add — This tweak will be included in CM7 officially. Editing smali manually will not needed.
So you can find the option in performance setting. Thanks cyanogenmod team!
(But other stock based roms still can do this like ‘Sense’,’Blur’,’Touchwiz’,etc)
— Some android applications have some lag when they scroll.
I found in logcat that garbage collector is working to much when I do some scroll in application.
I googled about it and found the ‘scrollingcache’ function inside android making problem.
Some application developers recommend disable ‘scrollingcache’ in app’s internal config.
But not all applications have disabled scrollingcache.
So the mod I’ll do will disable the scrollingcache throughout the Android OS.
All apps will have no problem with scrollingcache.
I’ve had scrolling improvements with facebook,playerpro,poweramp,gallery apps , etc.
It is simillar with volume step mod but different value to change.
Here’s what you have to modify:
1. Open the framework/android/widget/AbsListView.smali with text editor.
2. Search through ‘ScrollingCache’ and change it like below screenshot.
3. Press the text editor’s save button if you finished.
C. Finishing steps.
1. Come back to baksmali manager window.
2. Press 2 to smali.
3. Wait. (It will create classes.dex file after finish)
4. Open the framework.jar file with 7zip.
5. Overwrite the classes.dex file inside the framework.jar.
(You can just drag&drop the classes.dex file to 7zip window.)
D. Installing steps.
1. Put modified framework.jar to your phone’s sdcard.
2. Open the phone’s file manager which have root access and copy the modified framework.jar to /system.
3. Set permission to rw-r—r— or like this:

4. Move it to /system/framework. (Select yes for overwrite.)
I’ve used a lot of time for searching this.
You can use this for your own rom but please tell me before you use it.
And any bug reports or impressions will be appriciated.
EDIT — Some people are complaining about volume mod that it is not working with poweramp.
You can use it by changing your setting.
Power Amp settings — Audio Engine — Advanced Tweaks — Uncheck ‘Direct Volume Control’
This will solve the problem.
This info is by ‘wd2347’ from Korean Atrix forum.
Источник
Scrolling in Android: Custom Scroll Behavior for a List of Varying Height

A scrollbar is a useful and recognizable way to show progress and position in a feed of content. It’s an important feature for a news publication to have, especially since articles have items varying in height, from one-line bylines to vertically-oriented images.
As an Android developer on The Wall Street Journal, handling lists with content of varying heights is a common use case on Android. Unfortunately, a scrollbar that doesn’t behave erratically is not well supported out of the box when working with dynamically-sized items in a RecyclerView. The scrollbar will not move smoothly – it will jump around and resize. To keep things performant, we want a scrollbar that can accurately and smoothly track the user’s position in a list of content without knowing the entire list.
To accomplish this for a list of items with varying height, you must either create a custom layoutManager that estimates how the scrollbar should move for each user interaction, or that measures the entire list to calculate the size of each item before displaying it. We chose the first approach — its performance will always be better and can support updates to the content without remeasuring everything.
Before we can go deeper, let’s discuss the nomenclature for the various parts that make up a scrollbar.
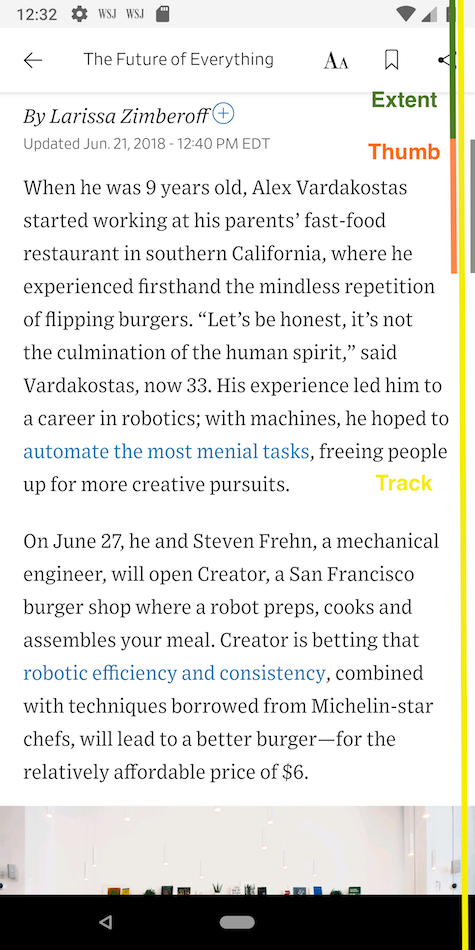
The thumb is the moving part that tracks progress, the track is the area that the thumb can move in, and the extent is the position of the thumb in the track.
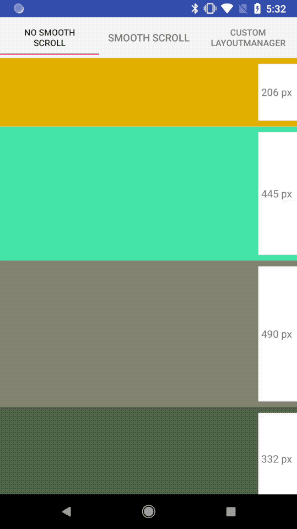
There are two out-of-the-box solutions that work for some use cases. The first is setting smoothScrollEnabled() to false. Smooth Scroll is a setting in LinearLayoutManager that attempts to smooth the scrollbar’s transition between items. Setting smoothScrollEnabled() to false jumps from one item to the next, adjusting the size of the track for how large the current item is.
The other out-of-the-box option is setting smoothScrollEnabled() to true. This is similar to the default implementation, except that it resizes the thumb and interpolates the extent based on the size of on-screen items to smooth the transition.
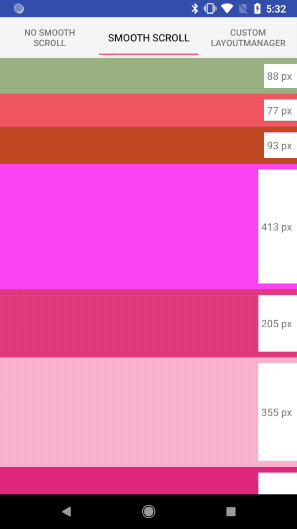
Even with items only varying in height a small amount, the scrollbar thumb can be jarring.
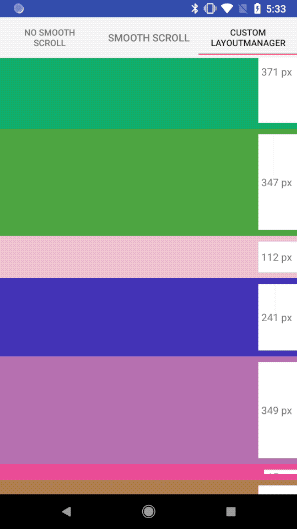
To adjust how the scrollbar behaves for every increment of scroll for the solution we pursued, we have to use a custom LayoutManager. The LayoutManager is responsible for positioning items as well as recycling items in a RecyclerView. There are several stock layout managers, but we are interested in the LinearLayoutManager.
We want smoothScrolling off so we can can add that to our LayoutManager’s constructor.
To get our scrolling smooth, we are only interested in overriding three methods from LinearLayoutManager.
The first is computeVerticalScrollExtent(RecyclerView.State state) , the length of the thumb. It can be adjusted for your specific use case, but we want to use a fixed value to avoid any odd resizing that could distract and annoy the user. For this use case, SMOOTH_VALUE represents a single item in our list. Therefore, we are using a thumb that is about three times the size of a single item.
Next is computeVerticalScrollRange(RecyclerView.State state) , the length of the scrollbar track. We also want this to be a fixed length, calculated from the size of our list multiplied by a smoothing factor. The smoothing factor is just a static value applied to the ratio of the scrolled off content and applied to our position. More on that below.
Finally we get to computeVerticalScrollOffset(RecyclerView.State state) , the interesting method. We want to avoid the default implementation that jumps from item to item, but to do this we need a way to know how far down a view a user has scrolled to move the thumb in smooth fractions of a view.
First we start by checking for some error states, then we want to find the first visible view.
Next we find the top of the view, compare it to the height of the view, and find the ratio of the amount of screen that has been scrolled out of view. Since we are grabbing the first visible item and we are only concerned with the content that scrolled off the top of the screen (or content that moves the scroll bar), we can take the absolute value of the ratio between top and bottom. Most of the time this gives us a pretty nice transition between items of various sizes. The SMOOTH_FACTOR also allows the use of integers without having to convert and round numbers explicitly.
The velocity of the extant — how fast the thumb will transition — will not be uniform since not all items are the same size. The impact is mitigated the longer your list is. Still, this results in a scrollbar that behaves in a more consistent and a less distracting way to the user.
Above this code block, we must check if we are at the last item – if so, scroll to the end. The reason this is needed is because we do not know the size of all the items and we are tracking the position from the top. Since the top item isn’t the same size as the bottom item, the amount scrolled will not always match up with the extant we have already traversed. The only way we know the extant we’ve traversed is by scrolling each item off the screen.
If the scroll bar jumping to the end of the list is an issue, a very simple change would be to add a static value to the heightOfScreen . This number can be adjusted based on your use case and expected size of an item.
We could choose to find the last visible item instead of the first, but then we’d have the same issue scrolling up. If you find that this works better for your app, then it is a fairly simple change to make.
This gives us a scrollbar that works well in most use cases.
You can checkout the sample app here. The only resources used for this class were the LinearLayoutManager and RecyclerView documentation. Thanks to WSJ Android team, WSJ mobile team and Dow Jones Tech.
Источник
Making ListView Scrolling Smooth
This lesson teaches you to
You should also read
The key to a smoothly scrolling ListView is to keep the application’s main thread (the UI thread) free from heavy processing. Ensure you do any disk access, network access, or SQL access in a separate thread. To test the status of your app, you can enable StrictMode .
Use a Background Thread
Using a background thread («worker thread») removes strain from the main thread so it can focus on drawing the UI. In many cases, using AsyncTask provides a simple way to perform your work outside the main thread. AsyncTask automatically queues up all the execute() requests and performs them serially. This behavior is global to a particular process and means you don’t need to worry about creating your own thread pool.
In the sample code below, an AsyncTask is used to load images in a background thread, then apply them to the UI once finished. It also shows a progress spinner in place of the images while they are loading.
Beginning with Android 3.0 (API level 11), an extra feature is available in AsyncTask so you can enable it to run across multiple processor cores. Instead of calling execute() you can specify executeOnExecutor() and multiple requests can be executed at the same time depending on the number of cores available.
Hold View Objects in a View Holder
Your code might call findViewById() frequently during the scrolling of ListView , which can slow down performance. Even when the Adapter returns an inflated view for recycling, you still need to look up the elements and update them. A way around repeated use of findViewById() is to use the «view holder» design pattern.
A ViewHolder object stores each of the component views inside the tag field of the Layout, so you can immediately access them without the need to look them up repeatedly. First, you need to create a class to hold your exact set of views. For example:
Then populate the ViewHolder and store it inside the layout.
Now you can easily access each view without the need for the look-up, saving valuable processor cycles.
Источник
Scrolling Behavior for Appbars in Android

Jan 1, 2017 · 5 min read
App bars contains four main aspects, that plays huge role in scrolling behavior. They are,

AppBar scrolling behavior enriches the way contents in a page presented.
I am going to share my experience about how easily we can understand and use the elevation in scrolling, sizing the flexible spaces, how to anchor specific elements.
App Bar has following scrolling options,
- Standard App bar scrolling with only Toolbar
- App bar scrolling with tabs
- App bar scrolling with Flexible space
- App bar scrolling with image in Flexible space
- App bar scrolling with overlapping content in Flexible space
If you wish to jump into the code directly, Here is the Github repository link.
Basic Setup
Before we start jumping in and see all types of scrolling behavior, we needs to be clear about the basic setup and implementation.
Us e design support library to achieve AppBar scrolling behavior. This library provides many of the material design components.
In app build.gradle,
Extend android.support.v7.app.AppCompatActivity in the Activity class.
In the layout xml, we need to have CoordinatorLayout in the top. Add Toolbar inside AppBarLayout and the AppBarLayout needs to be inside the CoordinatorLayout. CoordinatorLayout is the one, which gives proper scrolling and material animations to the views attached with it like FloatingButtons, ModalSheets and SnackBar.
That’s it. We have done with the basic implementation and after this, there are some flags that will decide the scrolling behavior.
Standard App bar scrolling with only Toolbar
- scroll off-screen with the content and returns when the user reverse scrolls.
- stay fixed at the top with content scrolling under it.

To achieve this, apart from the above basic setup code implementation:
The Toolbar needs to have app:layout_scrollFlags
scroll -will be scrolled along with the content.
enterAlways -when content is pulled down, immediately app bar will appear.
snap -when the AppBar is half scrolled and content scrolling stopped, this will allow the AppBar to settle either hidden or appear based on the scrolled size of Toolbar.
Once app:layout_scrollFlags added to Toolbar, the content view (Either a NestedScrollView or RecyclerView) needs to have app:layout_behavior tag.
That’s it these two tags along with basic setup is enough to achieve the Standard AppBar with Toolbar scrolling behavior. We can get different behaviors by playing with app:layout_scrollFlags.
Here is clear explanation from Android docs for the flags,

App bar scrolling with tabs
- TabBar stays anchored at the top, while the Toolbar scrolls off.
- Whole AppBar stays anchored at the top, with the content scrolling underneath.
- Both the toolbar and tab bar scroll off with content. The TabBar returns on reverse-scroll, and the Toolbar returns on complete reverse scroll.
To achieve this, we need to add TabLayout inside the AppBarLayout and provide the layout_scrollFlags inside TabLayout. That will be enough to achieve this and we can play around with the scrolling behavior like above examples by just altering the layout_scrollFlags.
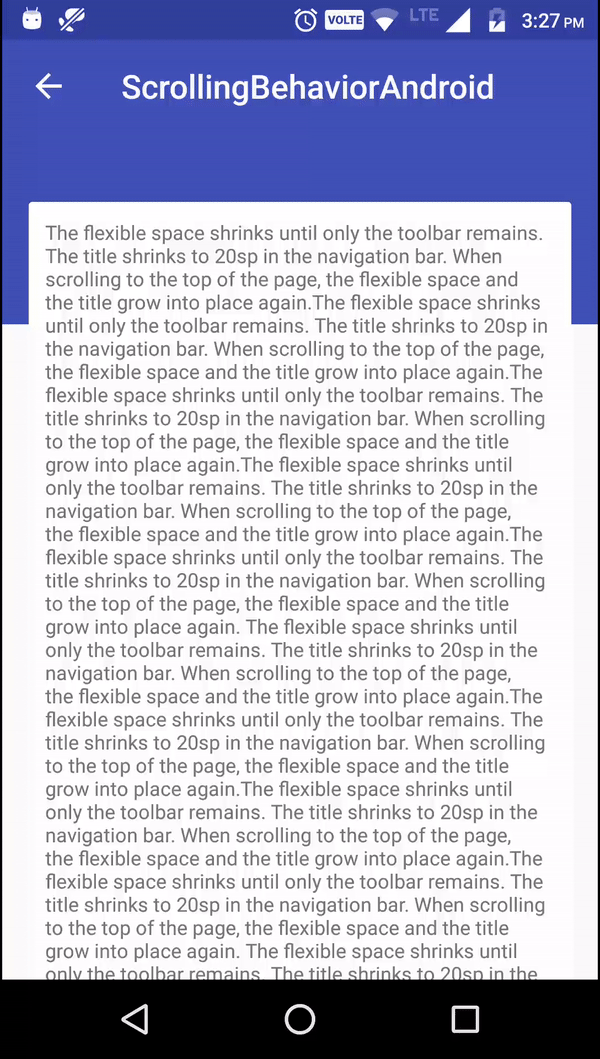
App bar scrolling with Flexible space
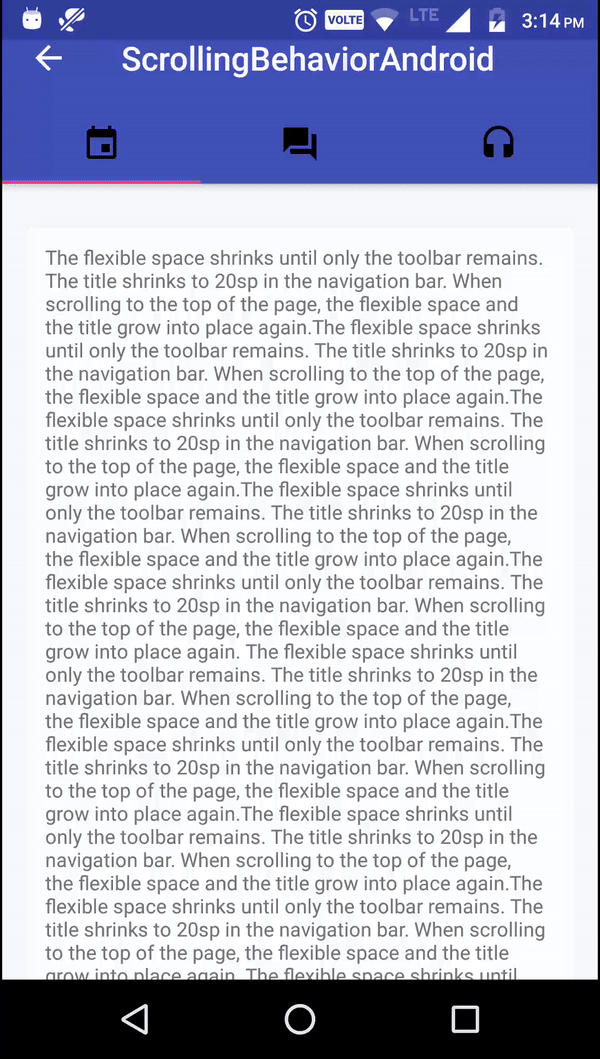
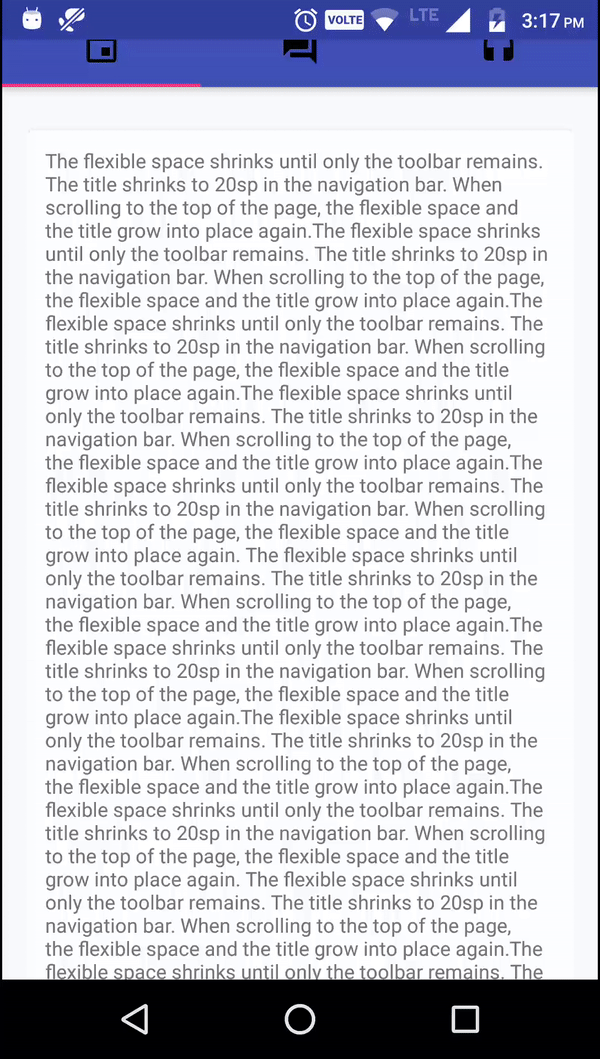
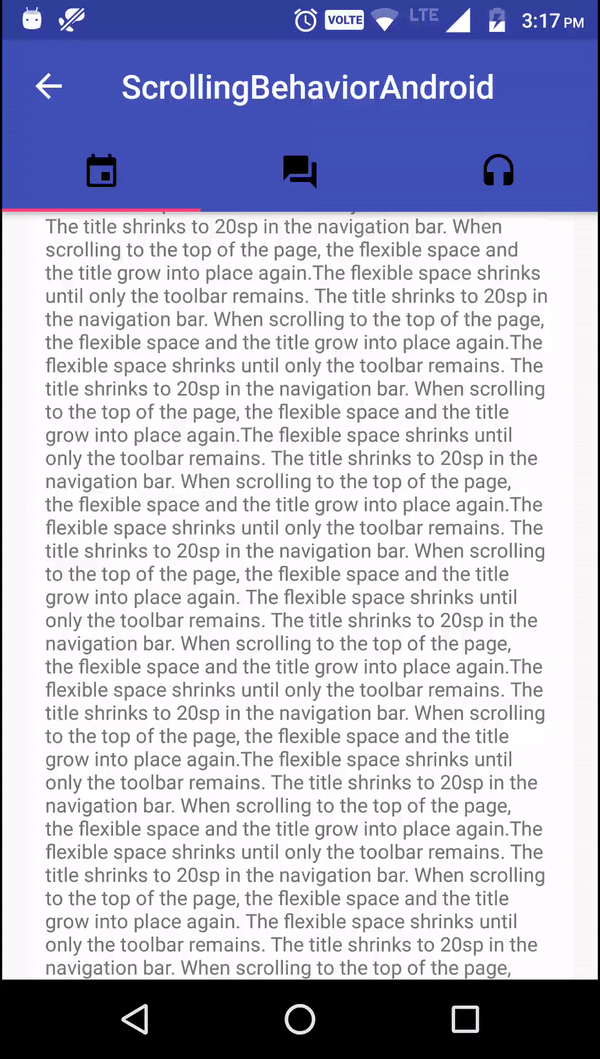
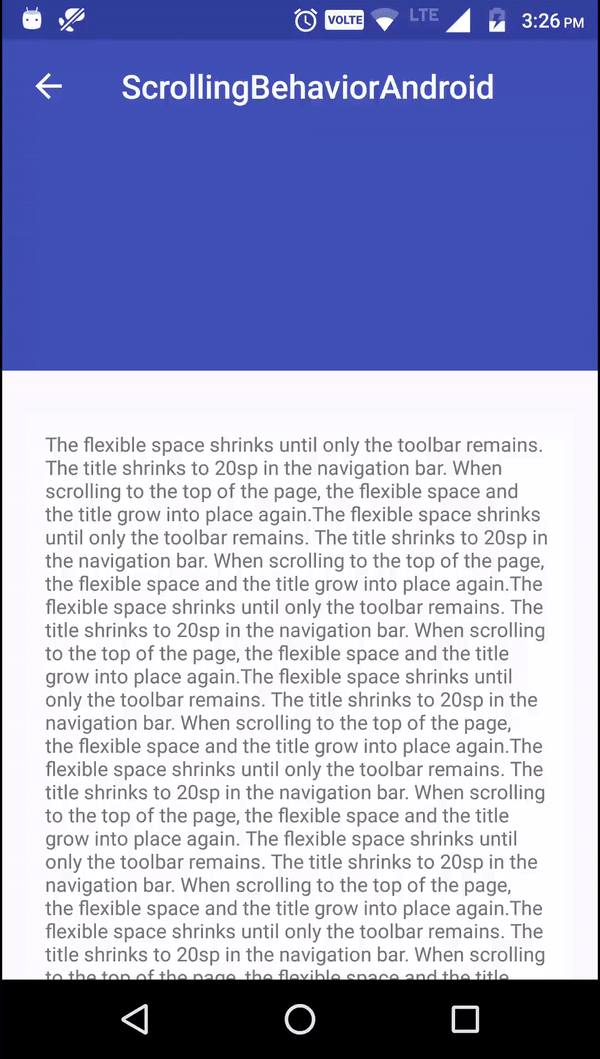
- The flexible space shrinks until only the toolbar remains. The title shrinks to 20sp in the navigation bar. When scrolling to the top of the page, the flexible space and the title grow into place again.
- The whole app bar scrolls off. When the user reverse scrolls, the toolbar returns anchored to the top. When scrolling all the way back, the flexible space and the title grow into place again.
To get Flexible space for AppBar, we need to use CollapsingToolbarLayout around the ToolBar tag. Which means CoordinatorLayout in the top and AppBarLayout, CollapsingToolbarLayout, ToolbarLayout inside the order.
We need to add height for the AppBarLayout and need to specify app:layout_scrollFlags for CollapsingToolbarLayout.
Also we need to add app:layout_collapseMode=”pin” tag in Toolbar.
exitUntilCollapsed -flag will make the Flexible space scrolled down while scrolling back to position along with the content.
App bar scrolling with image in Flexible space
- Similar to the above Flexible space behavior. When scrolling image will pushed up with slight animation and the color changes to primary color.
- While reversing the scrolling primary color fades away to leave way for the image been pulled down with a slight animation.
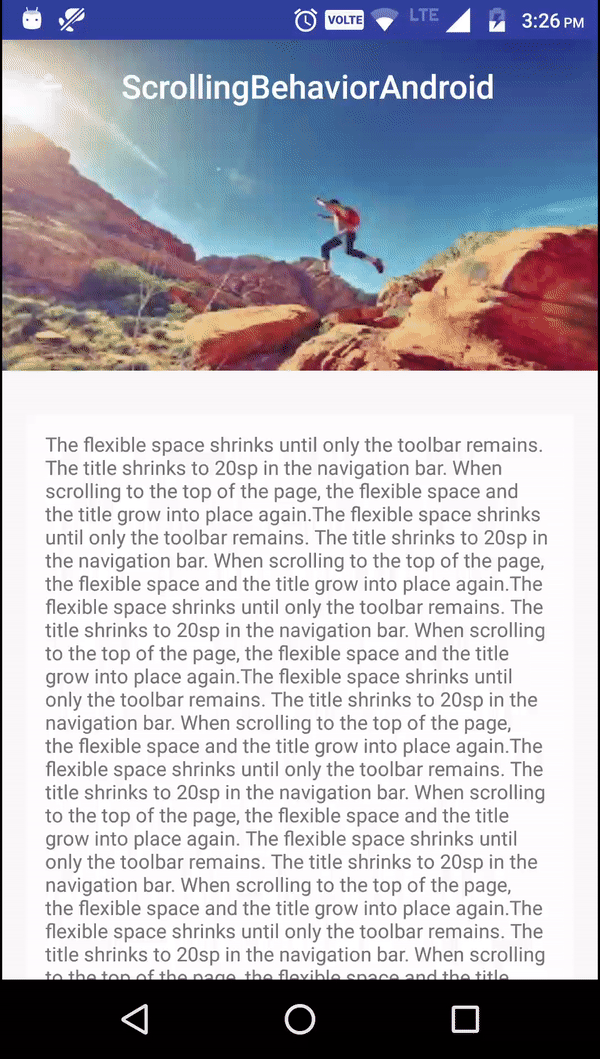
It is very much similar to the Flexible Space implementation with the below changes,
- ImageView needs to added inside CollapsingToolbarlayout.
- AppBarLayout height specified 200dp will be applied to image.
App bar scrolling with overlapping content in Flexible space
- In this scrolling, the AppBar with Flexible space will be placed behind the content. Once content starts scrolling, the app bar will scroll faster than the content until it gets out of the overlapping content view. Once the content reaches top, app bar comes upside of the content and content goes underneath and scrolls smoothly.
- The whole AppBar can scroll off-screen along with content and can be returned while reverse scrolling.
- There will not be any TabBar placement in this behavior.
This can be achieved by using app:behaviour_overlapTop in the NestedScrollView or RecyclerView. Also in this case we are specifying height value for CollapsingToolbarLayout .
Also we can implement and specify the scrollFlags dynamically through java code.
Hopefully this article will help you to implement scrolling behaviors for AppBar.
I posted this article originally on my blog.
Code for demo app is available on Github.
If you like the article, follow me on Medium and Twitter. You can also find me on LinkedIn.
Источник


