- Android — Sending SMS
- Example
- Using Built-in Intent to send SMS
- Intent Object — Action to send SMS
- Intent Object — Data/Type to send SMS
- Intent Object — Extra to send SMS
- Example
- 5 Ways to Transfer SMS from Android to Android
- Part 1: How to transfer SMS from Android to Android in 1 click
- MobileTrans — Phone Transfer
- Part 2: How to selectively transfer SMS from Android to Android
- Dr.Fone — Phone Manager (Android)
- Part 3: How to transfer SMS from Android to Android using Android SMS Transfer
- Part 4: How to transfer messages from Android to Android using Bluetooth
- Part 5: How to transfer messages from Android to Android using SMS Backup & Restore
Android — Sending SMS
In Android, you can use SmsManager API or devices Built-in SMS application to send SMS’s. In this tutorial, we shows you two basic examples to send SMS message −
Built-in SMS application
Of course, both need SEND_SMS permission.
Apart from the above method, there are few other important functions available in SmsManager class. These methods are listed below −
| Sr.No. | Method & Description | |||||||||||||||||||||||||||
|---|---|---|---|---|---|---|---|---|---|---|---|---|---|---|---|---|---|---|---|---|---|---|---|---|---|---|---|---|
| 1 |
| Step | Description |
|---|---|
| 1 | You will use Android Studio IDE to create an Android application and name it as tutorialspoint under a package com.example.tutorialspoint. |
| 2 | Modify src/MainActivity.java file and add required code to take care of sending sms. |
| 3 | Modify layout XML file res/layout/activity_main.xml add any GUI component if required. I’m adding a simple GUI to take mobile number and SMS text to be sent and a simple button to send SMS. |
| 4 | No need to define default string constants at res/values/strings.xml. Android studio takes care of default constants. |
| 5 | Modify AndroidManifest.xml as shown below |
| 6 | Run the application to launch Android emulator and verify the result of the changes done in the application. |
Following is the content of the modified main activity file src/com.example.tutorialspoint/MainActivity.java.
Following will be the content of res/layout/activity_main.xml file −
Here abc indicates about tutorialspoint logo
Following will be the content of res/values/strings.xml to define two new constants −
Following is the default content of AndroidManifest.xml −
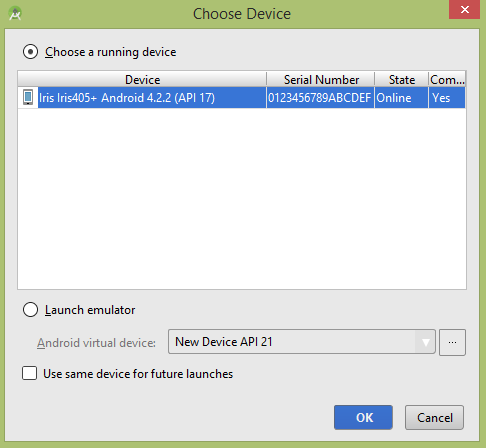
Let’s try to run your tutorialspoint application. I assume you have connected your actual Android Mobile device with your computer. To run the app from Android studio, open one of your project’s activity files and click Run  icon from the toolbar. Before starting your application, Android studio installer will display following window to select an option where you want to run your Android application.

Now you can enter a desired mobile number and a text message to be sent on that number. Finally click on Send SMS button to send your SMS. Make sure your GSM/CDMA connection is working fine to deliver your SMS to its recipient.
You can take a number of SMS separated by comma and then inside your program you will have to parse them into an array string and finally you can use a loop to send message to all the given numbers. That’s how you can write your own SMS client. Next section will show you how to use existing SMS client to send SMS.
Using Built-in Intent to send SMS
You can use Android Intent to send SMS by calling built-in SMS functionality of the Android. Following section explains different parts of our Intent object required to send an SMS.
Intent Object — Action to send SMS
You will use ACTION_VIEW action to launch an SMS client installed on your Android device. Following is simple syntax to create an intent with ACTION_VIEW action.
Intent Object — Data/Type to send SMS
To send an SMS you need to specify smsto: as URI using setData() method and data type will be to vnd.android-dir/mms-sms using setType() method as follows −
Intent Object — Extra to send SMS
Android has built-in support to add phone number and text message to send an SMS as follows −
Here address and sms_body are case sensitive and should be specified in small characters only. You can specify more than one number in single string but separated by semi-colon (;).
Example
Following example shows you in practical how to use Intent object to launch SMS client to send an SMS to the given recipients.
To experiment with this example, you will need actual Mobile device equipped with latest Android OS, otherwise you will have to struggle with emulator which may not work.
| Step | Description |
|---|---|
| 1 | You will use Android studio IDE to create an Android application and name it as tutorialspoint under a package com.example.tutorialspoint. |
| 2 | Modify src/MainActivity.java file and add required code to take care of sending SMS. |
| 3 | Modify layout XML file res/layout/activity_main.xml add any GUI component if required. I’m adding a simple button to launch SMS Client. |
| 4 | No need to define default constants.Android studio takes care of default constants. |
| 5 | Modify AndroidManifest.xml as shown below |
| 6 | Run the application to launch Android emulator and verify the result of the changes done in the application. |
Following is the content of the modified main activity file src/com.example.tutorialspoint/MainActivity.java.
Following will be the content of res/layout/activity_main.xml file −
Here abc indicates about tutorialspoint logo
Following will be the content of res/values/strings.xml to define two new constants −
Following is the default content of AndroidManifest.xml −
Let’s try to run your tutorialspoint application. I assume you have connected your actual Android Mobile device with your computer. To run the app from Android studio, open one of your project’s activity files and click Run icon from the toolbar. Before starting your application, Android studio will display following window to select an option where you want to run your Android application.
Select your mobile device as an option and then check your mobile device which will display following screen −
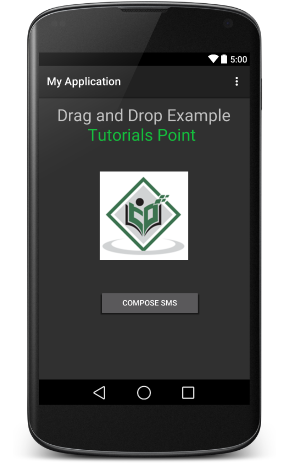
Now use Compose SMS button to launch Android built-in SMS clients which is shown below −
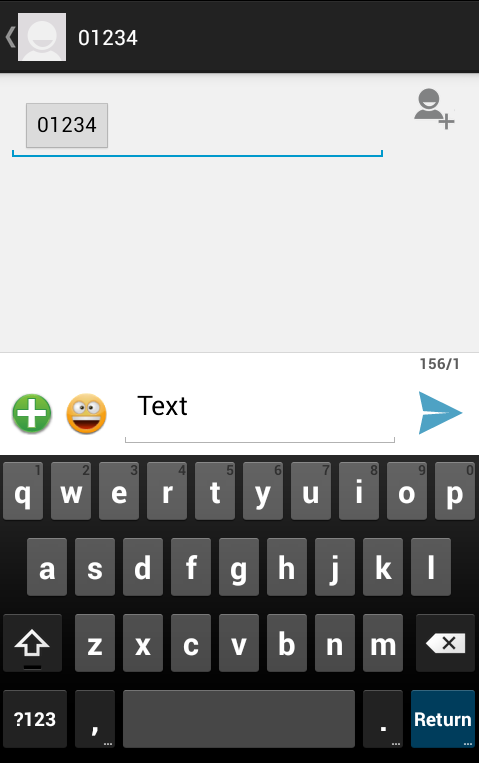
You can modify either of the given default fields and finally use send SMS button to send your SMS to the mentioned recipient.
Источник
5 Ways to Transfer SMS from Android to Android


Whenever we move from one Android device to another, we mostly focus on transferring our photos, videos, contacts, and other data files. Too often, we forget to transfer messages from Android to Android, which might backfire in the long run.
From personal chats to important information, our SMS messages may contain crucial details at times. Therefore, when you transfer from old Android to new Android, make sure that you also migrate your messages. In this guide, you will learn 5 different ways to transfer SMS from Android to Android.
Part 1: How to transfer SMS from Android to Android in 1 click
If you are looking for a hassle-free and quick solution to transfer text messages from Android to Android, give MobileTrans — Phone Transfer a try. With this tool, you can directly move all the important data like SMS from one Android to another. Compatible with all the major Android and iOS devices, it allows you to transfer text messages not only between Android and Android but also between Android and iOS.
MobileTrans — Phone Transfer
Transfer Messages from Android to Android in 1 Click
- Easily transfer every type of data from Android to Android, including messages, music, videos, photos, contacts, call logs, etc.
- Transfer messages between two devices even of different operating systems (iOS 14 and Android 10 included).
- Work perfectly with Apple, Samsung, HTC, LG, Sony, Google, HUAWEI, Motorola, ZTE, and more smartphones and tablets.
- Fully compatible with major providers like AT&T, Verizon, Sprint, and T-Mobile.
- The Latest Windows 10 and Mac 10.15 supported.
To learn how to transfer text messages from Android to Android in one click, follow these simple steps.
- Launch MobileTrans on your computer and select the “Phone Transfer” module from its welcome screen.
![]()
![]()
![]()
In this way, you can transfer messages from Android to Android with a single click. The process is not only easy but also extremely time-saving.
If you’re tired of reading text guide, you can learn the video tutorial below:
Part 2: How to selectively transfer SMS from Android to Android
Sometimes you may not want to transfer all Android messages in one click but would like to select only important texts to transfer to a new Android phone. For this requirement, one-click for all SMS transfer may fail to meet your expectations.
In this situation, you’d better opt for Dr.Fone — Phone Manager (Android), which is developed to complement Android SMS transfer by meeting selective-transfer needs.
Dr.Fone — Phone Manager (Android)
Selectively transfer SMS messages from Android to Android
- Select and transfer desired messages, contacts, call logs from Android to Android.
- Export/import your music, photos, videos, contacts, SMS, apps, etc. to computer/Android.
- Parse and transfer iTunes messages to Android (vice versa).
- Manage your Android device on a computer.
- Fully compatible with Android 10.0.


This Android SMS transfer tool is designed to meet custom transfer requirements. Just transfer only wanted messages to new Android, and leave unwanted ones on old Android. Many users take it as an ideal solution to minimize SMS storage consumption in new Android.
Follow the below instructions to selectively transfer SMS from Android to Android:
- Install and launch Dr.Fone, and select the «Phone Manager» option from the main screen.

Connect the two Android devices to your computer using the USB ports. Click the upper left corner and you can see the names of both Android devices. Click on the name to specify it as the source Android for SMS transfer.
![]()
![]()
That’s all the process of selectively transferring Android messages to a new device. Pretty easy, isn’t it?
Part 3: How to transfer SMS from Android to Android using Android SMS Transfer
There are also a few readily available apps that you can use to transfer text messages from Android to Android. For instance, the Android SMS Transfer is one of the time-honored apps that can help you.
The app will first take a backup of your Android messages and can later restore them to the target Android device. The messages will be exported to an Android SD card, which will later be used for SMS restore. While the SMS transfer process is not as fast and direct as MobileTrans — Phone Transfer, it can meet your basic SMS transfer requirements.
Here’s how you can transfer SMS from Android to Android using this Android SMS Transfer app.
- First of all, download the Android SMS Transfer app on the source Android and launch it. From its welcome page, click on the «Backup SMS» option.
![]()
You will be asked to name the backup file of your Android messages. Just enter any file name and proceed.
![]()
The app will show that the SMS backup has been taken and stored on the Android SD card.
![]()
In this way, you can transfer messages from Android to Android by using an SD card. Though, it will only transfer the text messages and will not include any other media data.
Part 4: How to transfer messages from Android to Android using Bluetooth
While the technique is not widely recommended, you can use the native Android Bluetooth feature as well to transfer text messages from one Android to another. Since Bluetooth SMS transfer is gradually getting obsolete, the feature might not be supported on all Android devices. Also, it would take a lot of time to send your Android messages via Bluetooth.
The method is also not recommended from a security perspective. If the source Android phone has malware, then it can be transferred to your target phone as well. Therefore, you should only consider this as your last resort for Android SMS transfer.
You can follow these steps for Android SMS transfer via Bluetooth.
- To start with, bring the source and the target Android devices in close vicinity.
- Turn on the Bluetooth feature on both Android devices and pair them by confirming the passcode.
- Now, go to the Messaging app on the source device and select the messages that you wish to transfer.
- Go to its Settings and choose to «Send» or «Share» the selected SMS threads. After that, you need to send SMS via Bluetooth.
- A list of all the available Android devices will be displayed. Simply tap on the target device to receive SMS messages.
- On the target Android, you will receive a prompt for the incoming SMS data. Touch «Agree» and start the SMS transfer process.
![]()
As you can see, it can be tedious to learn how to transfer messages from Android to Android via Bluetooth. Not only is this SMS transfer method time-consuming, but it would also be complicated to implement as well.
Part 5: How to transfer messages from Android to Android using SMS Backup & Restore
Another smart and easy way to transfer SMS from Android to Android is by using the SMS Backup & Restore app. Besides taking a backup of your Android messages and restoring them afterward, it can also perform a wireless SMS transfer. Unlike Bluetooth, this message transfer takes place via WiFi direct, which makes it a lot faster and reliable.
The app is available for free and can be downloaded from Google Play Store. Therefore, before you begin, make sure that you have downloaded the SMS transfer app on both Android devices.
Later, you can follow these steps to transfer messages from Android to Android directly.
- Launch the Android SMS transfer app on both the devices and choose to «Transfer» your messages. You can find «Transfer» on the home page of the app or under its Settings tab.
![]()
Now, you need to specify the source and the target Android device. On the source phone, tap on the “Send from this phone” option, while on the target device, tap on the “Receive on this phone” button.
![]()
The target Android will wait for the SMS transfer. On the other hand, you can view a list of all the available devices on the source Android. Simply tap on the target Android device from here.
![]()
On the target Android, you will get an invitation to connect. Tap on the “Accept” button to proceed.
![]()
Great! You are almost there. On the source Android, the app will provide an option to send a previous backup file or all the text messages and calls. Choose the relevant option and touch on the “OK” button.
![]()
Just wait for a while for the Android messages to transfer to the target device. Once the process is complete, you can view the newly transferred messages on the target Android phone.
Источник


