- Использование сокетов в Android
- Особенности использования сокетов
- Клиентский android-сокет
- Класс Connection
- Листинг Connection
- Класс активности MainActivity
- Листинг активности
- Методы управления сокетным соединением
- Серверное приложение
- Листинг ConnectionWorker
- Серверный класс
- Листинг CallableDelay
- Листинг CallableServer
- Листинг серверного класса Server
- Native Socket.IO and Android
- Introduction#
- Installing the Dependencies#
- Using socket in Activity and Fragment#
- Emitting events#
- Listening on events#
- Managing Socket State#
- Further reading#
- Sending and Receiving Data with Sockets
Использование сокетов в Android
Создано большое количество приложений как для Android, так и для других ОС, которые взаимодействуют друг с другом с помощью установления соединенией по сети. К таким приложениям относятся, например, мессенджеры социальных сетей WhatsApp, Viber. Как правило, для установления соединения между такими приложениями используются сокеты.
Сокет (socket) — это интерфейс, позволяющий связывать между собой программы различных устройств, находящихся в одной сети. Сокеты бывают двух типов: клиентский (Socket) и серверный (ServerSocket). Главное различие между ними связано с тем, что сервер «открывает» определенный порт на устройстве, «слушает» его и обрабатывает поступающие запросы, а клиент должен подключиться к этому серверу, зная его IP-адрес и порт. В Android сокеты для передачи данных используют по умолчанию протокол TCP/IP, важной особенностью которого является гарантированная доставка пакетов с данными от одного устройства до другого.
Особенности использования сокетов
Что важно знать при использовании сокетов в Android ?
- соединения сокетов отключаются при переходе устройства в спящий режим;
- чтобы не «рвать» соединение при наступлении спящего режима в устройстве можно использовать сервис;
- для использования интернет-сети необходимо Android-приложению предоставить нужные права в манифесте.
Для определения прав в манифесте необходимо в файл AndroidManifest.xml добавить следующую строку :
Теперь android-приложения будет иметь доступ к сети.
Далее в статье рассмотрим пример клиент-серверного сокетного соединения с передачей сообщения. Функции клиента будет выполнять android-приложение. Серверное java-приложение выполним в IDE Eclipse с использованием пакета concurrent. В конце страницы можно скачать оба приложения.
Клиентский android-сокет
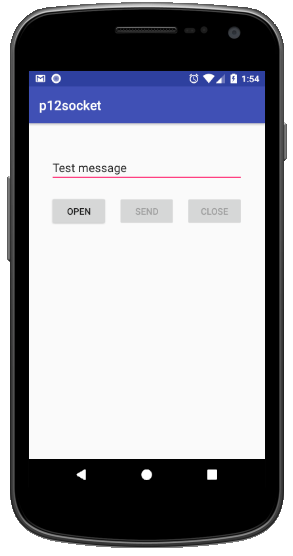
Интерфейс andriod-приложения представлен на следующем скриншоте. Форма приложения включает поле ввода текстового сообщения и кнопки установления соединения сервером, передачи сообщения и закрытия соединения.
Клиентское приложение создадим из двух классов : класс взаимодействия с серверным сокетом Connection и класс стандартной активности MainActivity.
Класс Connection
Класс взаимодействия с сервером Connection получает при создании (через конструктор) параметры подключения : host и port. Методы Connection вызываются из активности и выполняют следующие функции :
| Метод | Описание |
|---|---|
| openConnection | Метод открытия сокета/соединения. Если сокет открыт, то он сначала закрывается. |
| closeConnection | Метод закрытия сокета |
| sendData | Метод отправки сообщения из активности. |
| finalize | Метод освобождения ресурсов |
Листинг Connection
Класс активности MainActivity
В активности MainActivity определены параметры сервера : host, port. Помните, что IP-адрес сервера для Вашего android-примера не может быть localhost (127.0.0.1), иначе Вы будете пытаться связаться с сервером внутри Andriod-системы. Кнопки интерфейса связаны с методами обращения к классу Connection. Кнопки отправки сообщения mBtnSend и закрытия соединения mBtnClose с сервером блокируются при старте приложения. После установления соединения с сервером доступ к кнопкам открывается.
Листинг активности
Методы управления сокетным соединением
Ниже представлены методы обработки событий, связанных с нажатием кнопок интерфейса. Обратите внимание, что подключение к серверу выполняется в отдельном потоке, а открытие доступа к кнопкам в основном потоке, для чего вызывается метод runOnUiThread. Для отправки сообщения серверу также создается отдельный поток.
Серверное приложение
Серверное приложение включает 2 класса : Server и ConnectionWorker. Серверный класс Server будет выполнять обработку взаимодействия с клиентом с использованием ConnectionWorker в отдельном потоке. Конструктор ConnectionWorker в качестве параметра получает объект типа Socket для чтения сообщений клиента из потока сокета.
Листинг ConnectionWorker
ConnectionWorker получает входной поток inputStream из клиентского сокета и читает сообщение. Если сообщение отсутствует, т.е. количество прочитанных байт равно -1, то это значит, что соединение разорвано, то клиентский сокет закрывается. При закрытии клиентского соединения входной поток сокета также закрывается.
Серверный класс
Серверный класс Server создадим с использованием многопоточного пакета util.concurrent. На странице описания сетевого пакета java.net и серверного ServerSocket был приведен пример серверного модуля с использованием обычного потока Thread, при работе с которым необходимо решать задачу его остановки : cтарый метод Thread.stop объявлен Deprecated и предан строжайшей анафеме, а безопасная инструкция Thread.interrupt безопасна, к сожалению, потому, что ровным счетом ничего не делает (отправляет сообщение потоку : «Пожалуйста, остановись»). Услышит ли данный призыв поток остается под вопросом – все зависит от разаработчика.
Чтобы иметь возможность остановить сервер «снаружи» в серверный класс Server включим 2 внутренних реализующих интерфейс Callable класса : CallableDelay и CallableServer. Класс CallableDelay будет функционировать определенное время, по истечении которого завершит свою работу и остановит 2-ой серверный поток взаимодействия с клиентами. В данном примере CallableDelay используется только для демонстрации остановки потока, организуемого пакетом util.concurrent.
Листинг CallableDelay
CallableDelay организует цикл с задержками. После завершения последнего цикла cycle поток завершает цикл, останавливает вторую задачу futureTask[1] и закрывает сокет. В консоль выводится соответствующее сообщение.
Листинг CallableServer
Конструктор CallableServer в качестве параметров получает значение открываемого порта для подключения клиентов. При старте (метод call) создается серверный сокет ServerSocket и поток переходит в режим ожидания соединения с клиентом. Остановить поток можно вызовом метода stopTask, либо завершением «задачи» типа FutureTask с данным потоком.
При подключении клиента метод serverSoket.accept возвращает сокет, который используется для создания объекта ConnectionWorker и его запуска в отдельном потоке. А сервер (поток) переходит к ожиданию следующего подключения.
В случае закрытия сокета (завершение внешней задачи FutureTask с данным потоком) будет вызвано исключение Exception, где выполняется проверка закрытия сокета; при положительном ответе основной цикл прерывается и поток завершает свою работу.
Листинг серверного класса Server
Cерверный класс Server создает два потоковых объекта (callable1, callable2), формирует из них две задачи futureTask и запускает задачи на выполнение методом execute исполнителя executor. После этого контролируется завершение выполнение обоих задач методом isTasksDone. При завершении выполнения обеих задач завершается также и цикл работы executor’а.
Два внутренних описанных выше класса (CallableDelay, CallableServer) не включены в листинг.
Источник
Native Socket.IO and Android

In this tutorial well learn how to create a chat client that communicates with a Socket.IO Node.JS chat server, with our native Android Client! If you want to jump straight to the code, it’s on GitHub. Otherwise, read on!
Introduction#
To follow along, start by cloning the repository: socket.io-android-chat.
The app has the following features:
- Sending a message to all users joining to the room.
- Notifies when each user joins or leaves.
- Notifies when an user start typing a message.
Socket.IO provides an event-oriented API that works across all networks, devices and browsers. It’s incredibly robust (works even behind corporate proxies!) and highly performant, which is very suitable for multiplayer games or realtime communication.
Installing the Dependencies#
The first step is to install the Java Socket.IO client with Gradle.
For this app, we just add the dependency to build.gradle :
We must remember adding the internet permission to AndroidManifest.xml .
Now we can use Socket.IO on Android!
Using socket in Activity and Fragment#
First, we have to initialize a new instance of Socket.IO as follows:
IO.socket() returns a socket for http://chat.socket.io with the default options. Notice that the method caches the result, so you can always get a same Socket instance for an url from any Activity or Fragment. And we explicitly call connect() to establish the connection here (unlike the JavaScript client). In this app, we use onCreate lifecycle callback for that, but it actually depends on your application.
Emitting events#
Sending data looks as follows. In this case, we send a string but you can do JSON data too with the org.json package, and even binary data is supported as well!
Listening on events#
Like I mentioned earlier, Socket.IO is bidirectional, which means we can send events to the server, but also at any time during the communication the server can send events to us.
We then can make the socket listen an event on onCreate lifecycle callback.
With this we listen on the new message event to receive messages from other users.
This is what onNewMessage looks like. A listener is an instance of Emitter.Listener and must be implemented the call method. Youll notice that inside of call() is wrapped by Activity#runOnUiThread() , that is because the callback is always called on another thread from Android UI thread, thus we have to make sure that adding a message to view happens on the UI thread.
Managing Socket State#
Since an Android Activity has its own lifecycle, we should carefully manage the state of the socket also to avoid problems like memory leaks. In this app, we’ll close the socket connection and remove all listeners on onDestroy callback of Activity.
Calling off() removes the listener of the new message event.
Further reading#
If you want to explore more, I recommend you look into:
Other features of this app. They are just implemented with emit() , on() and off() .
Источник
Sending and Receiving Data with Sockets
Network sockets are the endpoints of internet connections between devices. Basically we need two types of sockets to handle the connection — client and server. The main difference between them is that a server socket is listening for incoming connection requests. In this snippet I will try to show you a simple connection between an Android client device and a Java server app over a local network. (Warning: Using AsyncTask might not be the most modern way to do that!)
We will be using AsyncTask to make connection as a background task, Callback Interface for managing the incoming messages, Handler for updating GUI and TCPClient class representing the client. I will explain this on the Network Remote example — easy client-server app for shutting down the computer.
We are using AsyncTask to avoid StrictMode fatal error for network access ( Look in references ). The StrictMode policy is simply forbidding us to affect on UI Thread.
In this AsyncTask we are creating TCPClient object ( explained below ). In the TCPClient constructor we are passing Handler object for changing the UI, COMMAND — the String with the «shutdown -s» command for shutting down the computer, IP number — the servers ip number; Callback object — when we are getting servers response, the callback method ‘messageCallbackReceiver’ is starting ‘publishProgress’ method, which is publishing progress to ‘onProgressUpdate’ AsyncTask’s method.
After receiving proper message, we are sending command, or if we received wrong message, we are sending message «wrong» and stopping client. After this we are being transferred to the ‘onPostExecute’ method:
So step by step:
- AsyncTask is creating TCPClient object
- In TCPClient constructor we are passing Handler, Command, IP Number and Callback object
- When TCPClient begins connection, it sends message «shutdown» to the server
- When we are receiving message from server, the callback is passing it to ‘onProgressUpdate’
- If the received message ( response from server ) is equal to «shutdown», we are sending COMMAND to server
- After sending it we are stopping client, which is transferring us to ‘onPostExecute’ method.
- Meanwhile, the handler is receiving empty messages with ‘msg.what’ integers defined in MainActivity, which are responsible for updating the GUI
Example of how the widget UI is updated
This class is responsible for maintaining the connection. I will explain it step by step:
In the first step we can see the objects passed from ShutdownAsyncTask and others. Additionally we can see the sendMessage and stopClient methods.
The magic happens here — in ‘run()’ method. Here we are using ‘try-catch’ tools for handling exceptions ( server not enabled, ip not proper etc. ). As you can see below, we have infinite while() loop for listening to the incoming messages. We can simply stop it and finalize with ‘stopClient()’ method ( used in ShutdownAsyncTask’s ‘onProgressUpdate’ method)
The last thing in the client is the Callback interface. We have it in the TCPClient class in the end:
- Strict Mode Policy — Vogella’s blog post about this exception
- Sockets — Android Developers API about Sockets implementation in Android
- TurnMeOffMobile — The post was based on this app. Simple TCP Client as Android widget with connection handled by AsyncTasks + IP number finding dynamically.
Read about sockets generally on the Oracle Sockets Tutorial.
We need a way to send data to a computer from our android device. Easiest way is given the local ip address of the computer on the network to simply send data via a socket:
- http://android-er.blogspot.com/2011/01/simple-communication-using.html — Guide to sending data via a socket
- http://stackoverflow.com/a/20131985/313399 — stackoverflow snippet which connects to a host, and can send data to it via an asynctask
- http://stackoverflow.com/questions/6309201/sending-tcp-data-from-android-as-client-no-data-being-sent — stackoverflow snippet sending data to an ip address via a socket
- http://thinkandroid.wordpress.com/2010/03/27/incorporating-socket-programming-into-your-applications/ (client piece is phone, server piece needs to be on computer)
- TurnMeOffMobile — Simple TCP Client as Android widget with connection handled by AsyncTasks + IP number finding dynamically.
To send messages between an Android phone and a computer, the computer needs to be running a program that listens for messages sent on the socket coming from the phone:
Источник


