- Android
- Contents
- Executive Summary [ edit ]
- Prepare the OpenSSL Sources [ edit ]
- Build the OpenSSL Library [ edit ]
- Install the OpenSSL Library [ edit ]
- Compile and Link against the Library [ edit ]
- OpenSSL Library [ edit ]
- Acquire the Required Files [ edit ]
- Adjust the Cross-Compile Script [ edit ]
- Prepare the OpenSSL Sources [ edit ]
- Build the OpenSSL Library [ edit ]
- Install the OpenSSL Library [ edit ]
- Compile and Link against the Library [ edit ]
- Testing the OpenSSL Library [ edit ]
- Wrapper Shared Objects [ edit ]
- Miscellaneous [ edit ]
- Position Independent Code [ edit ]
- Qt Documentation
- Contents
- Building OpenSSL for Android
- Using OpenSSL Libraries with Qt for Android
- Авторизация с помощью клиентских SSL сертификатов в IOS и Android
Android
This document will provide instructions for building the OpenSSL library for Android devices. If you need the FIPS Validated Object Module and the FIPS Capable Library, see FIPS Library and Android.
The script setenv-android.sh is sourced. Sourcing ensures the variables set in the script are available to other scripts that are run later in the process. If you shell does not provide the source command, then use . ./setenv-android.sh (note the leading dot).
NOTE: The instructions on this page are for older versions of OpenSSL (they should work for OpenSSL 1.0.2). For OpenSSL 1.1.1 see the INSTALL and NOTES.ANDROID files in the source distribution.
Contents
Executive Summary [ edit ]
Use the following commands to build and install the OpenSSL library for Android. Before running the commands download openssl-1.0.1g.tar.gz and setenv-android.sh; place the files in the same directory (the ‘root’ directory mentioned below); ensure ANDROID_NDK_ROOT is set; and verify setenv-android.sh suites your taste. ANDROID_API and ANDROID_TOOLCHAIN will be set by the setenv-android.sh script. The files can be obtained from http://www.openssl.org/source/, http://openssl.com/fips/2.0/platforms/android/, and below (see Downloads section).
Prepare the OpenSSL Sources [ edit ]
Build the OpenSSL Library [ edit ]
Install the OpenSSL Library [ edit ]
Compile and Link against the Library [ edit ]
OpenSSL Library [ edit ]
While the Executive Summary provided the whirlwind instructions for building and installing the OpenSSL library, this sections provides detailed instructions. There are six steps to building the OpenSSL Library for use in various projects, and they are listed below. Projects range from simple NDK based command line programs to Android activities using the JNI bridge.
- Acquire the required files
- Adjust the cross-compilation script
- Prepare the OpenSSL sources
- Build the OpenSSL Library
- Install the OpenSSL Library
Acquire the Required Files [ edit ]
Next, acquire the auxiliary files which can be obtained from below (see Downloads section) or http://openssl.com/fips/2.0/platforms/android/. You won’t need all the files from the location.
openssl-1.0.1g.tar.gz is the OpenSSL Library. setenv-android.sh is used to set the cross-compilation environment.
After collecting the required files, your working directory will look similar to below.
Adjust the Cross-Compile Script [ edit ]
setenv-android.sh is used to set the cross-compilation environment. Open the script an ensure the following match your needs. If you are using android-ndk-r8e, android-14, and ANDROID_NDK_ROOT is set, then the script should be ready to use as-is.
- _ANDROID_NDK – the version of the NDK. For example, android-ndk-r8e
- _ANDROID_ARCH – the architecture. For example, arch-arm or arch-x86
- _ANDROID_EABI – the version of the EABI tools. For example, arm-linux-androideabi-4.6, arm-linux-androideabi-4.8, x86-4.6 or x86-4.8
- _ANDROID_API – the API level. For example, android-14 or android-18
You should also set ANDROID_SDK_ROOT and ANDROID_NDK_ROOT. The environmental variables are used internally by the Android platform tools and scripts. For details, see Recommended NDK Directory?.
Additional environmental variables which are set by setenv-android.sh and used by Configure and config include the following. You should not need to change them.
- MACHINE – set to armv7
- RELEASE – set to 2.6.37
- SYSTEM – set to android
- ARCH – set to arm
- CROSS_COMPILE – set to arm-linux-androideabi-
- ANDROID_DEV – set to $ANDROID_NDK_ROOT/platforms/$_ANDROID_API/arch-arm/usr
- HOSTCC – set to gcc
Prepare the OpenSSL Sources [ edit ]
Remove stale versions of the OpenSSL Library, and then unpack fresh files. Also ensure the script is executable.
Build the OpenSSL Library [ edit ]
This section of the document will guide you through the creation of the the OpenSSL Library. The OpenSSL Library (and Makefile.org) needs its install rule modified. The install rule includes the all target, which causes items to be built during install. A bug in the process when running as root results in an empty signature for the shared object (the signature is a string of zeros).
To build the OpenSSL Library, you must issue config, but other options are up to you. Some suggested options for configure include: shared, no-ssl2, no-ssl3, no-comp, no-hw, and no-engine. shared will build and install both the shared object and static archive. You should specify —openssldir to ensure the build system installs the android version of the library in a distinct location (other than /usr/local/ssl).
Begin building the OpenSSL library by setting the cross-compilation environment. Note the leading ‘.’ when running the setenv-android.sh script. If you have any errors from the script, then you should fix them before proceeding.
If you receive a meesage «Error: FIPS_SIG does not specify incore module, please edit this script, then its safe to ignore it. setenv-android.sh is used to build both the FIPS Capable OpenSSL library and the non-FIPS version of the library. FIPS_SIG is not needed in this configuration.
Next, fix the makefile and run configure. A user on Stack Overflow reports this fails under OpenSSL 1.1.0. If so skip it because its not essential to the cross-compile.
Then run make depend and make all:
After make completes, verify libcrypto.a and libssl.a were built for the embedded architecture.
Install the OpenSSL Library [ edit ]
Finally, install the library. The makefile’s install rule uses both CC and RANLIB, so you will need to fully specify the command variables on the command line (during install, sudo drops the user’s path). You must also use sudo’s -E option; otherwise ANDROID_TOOLCHAIN will be empty and tools such as arm-linux-androideabi-gcc and arm-linux-androideabi-ranlib will not be found.
Compile and Link against the Library [ edit ]
Install the OpenSSL Library placed the cross-compiled library in /usr/local/ssl. To link against it, you must perform the following:
The above only tells you how to specify the OpenSSL library. You will still need to include system headers and libraries, or use --sysroot to supply the information.
Testing the OpenSSL Library [ edit ]
Testing the installation consists of building a sample program, installing it with adb, and then running the program using a remote shell. Both the static and dynamic version of the OpenSSL library can be tested. Instructions for testing the OpenSSL library are given at FIPS Library and Android. The same basic steps apply.
Wrapper Shared Objects [ edit ]
Using OpenSSL on Android often involves JNI and the platform’s version of OpenSSL or BoringSSL. The platform likely loaded the system’s version of libssl.so and libcrypto.so at boot during Zygote initialization. Due to issues with the loader and symbol resolution, customary LD_LIBRARY_PATH tricks do not work for most applications. And changing the build to output different library names, like libmyssl.so and libmycrypto.so, to avoid clashes does not work either.
The solution to the namespace and symbol resolution problems is to wrap the static version of the OpenSSL library in a separate dynamic library or shared object provided by you. To do so, write a small C wrapper library with references to functions you need from the OpenSSL library. You don’t need to wrap all the functions.
Your wrapper.c might look as follows (also see GCC’s Visibility page):
Then, compile the source file into a shared object. A typical command line might look as follows.
-fvisibility=hidden works as you expect, and -Wl,--exclude-libs,ALL means your library does not re-export other linked library symbols. Only the functions marked with DLL_PUBLIC will be exported and callable through JNI.
The -Wl,-Bstatic tells the linker to use the static version of the OpenSSL library for the Library. After it and the -Wl,-Bdynamic tells the linker to use dynamic linking for anything else it might need, like libc.
Then use your shared object in place of OpenSSL.
Miscellaneous [ edit ]
The following lists some miscellaneous items we are aware.
Position Independent Code [ edit ]
The NDK supplies headers for each major platform — for example, API 18, API 14, API 9, API 8, and API 5. If you are building for Android 4.2 (API 17), Android 4.1 (API 16) and Android 4.0 (API 14), then you would use the NDK’s API 14 (android-14 platform).
Specify the full library name when calling Java’s System.load. That is, call System.load(“libcrypto.so.1.0.0”). Also note that some Android routines expect the prefix of “lib” and suffix of “so”, so you might have to rename the library.
Some versions of the Android Java system loader will load the system’s version of the OpenSSL library, even though you built and included a copy with your application. In this case, you might need to write a wrapper shared object and link to the static version of the OpenSSL library. See, for example, «Unable to find native library» error in Native Activity app.
If you compile with -fPIE and -pie, then you will core dump unless using Android 4.1 and above. Logcat shows the linker (/system/bin/linker) is the problem.
When building the OpenSSL library for Android, take care to specify -mfloat-abi=softfp. If you specify -mfloat-abi=hard or -mhard-float (even if the hardware support a floating point unit), then the entropy estimate passed through the Java VM to RAND_add will always be 0.0f. See Hard-float and JNI for details.
Источник
Qt Documentation
Contents
The Qt installation package comes with OpenSSL support but the OpenSSL libraries are not part of the package due to legal restrictions in some countries. If your application depends on OpenSSL, consider packaging the SSL libraries with your Application Package (APK) as the target device may or may not have them.
You can use the QSslSocket::supportsSsl() static function to check for SSL support on the target device. First include the header:
Then use the following line to check if SSL is supported:
Check Qt Creator’s Application Output section or the Android logcat for the result.
Building OpenSSL for Android
A convenient Github repository with prebuilt and a build script can be used without the need for manual step-by-step build. For more information, see OpenSSL for Android. If you download the repository, you can then skip to Using OpenSSL Libraries with Qt for Android.
The following instructions guide you to build the OpenSSL libraries manually:
- Download OpenSSL 1.1.x sources.
- Extract the sources to a folder and navigate to that folder using the CLI.
Note: If your development platform is Windows, you need msys with perl v5.14 or later to build OpenSSL.
Add the Android LLVM toolchain (NDK r20b or r21) to your path:
Note: You must consider enabling or disabling the SSL features based on the legal restrictions in the region where your application is available. For more information about the configurable features, see OpenSSL Configure Options.
To build libcrypto and libssl shared libraries that are not versioned, but with an _1_1 suffix, run:
Without a suffix, Android 5 (API 21) will load the system libraries libcrypto.so and libssl.so, which are OpenSSL 1.0, rather than your libraries.
If you want to use a different suffix, you must change SHLIB_EXT in the previous command, and set the ANDROID_OPENSSL_SUFFIX environment variable before you access the Qt Network API.
Then set the environment variable in your main.ccp file:
Note: Android does not load versioned libraries.
Using OpenSSL Libraries with Qt for Android
Depending on the method you obtained the OpenSSL libraries, you can use one of the following step to include those libraries in your project:
- Using the project files:
Using the convenience OpenSSL for Android repository, you can directly add the include projects into your own project, by adding the following to your .pro file:
Or if using CMake, add the following to your CMakeLists.txt :
Alternatively, you can either use the Qt for Android variable ANDROID_EXTRA_LIBS to add extra libraries, mainly libcrypto and libssl . For QMake use:
Note: When targeting multiple architectures, include OpenSSL libraries for all the targeted architectures.
В© 2021 The Qt Company Ltd. Documentation contributions included herein are the copyrights of their respective owners. The documentation provided herein is licensed under the terms of the GNU Free Documentation License version 1.3 as published by the Free Software Foundation. Qt and respective logos are trademarks of The Qt Company Ltd. in Finland and/or other countries worldwide. All other trademarks are property of their respective owners.
Источник
Авторизация с помощью клиентских SSL сертификатов в IOS и Android
Протокол безопасной передачи данных SSL (Secure Sockets Layer) помимо обеспечения безопасной передачи данных так же позволяет реализовать авторизацию клиентов при помощи клиентских SSL сертификатов. Данная статья является практическим руководством по реализации данного вида авторизации в мобильных приложениях на IOS и Android.
Процесс организации работы сервера обеспечивающего такой вид авторизации в статье не рассматривается, однако в конце приведены ссылки по данной тематике.
Процесс авторизации выглядит следующим образом. При переходе клиента в закрытую область сервер запрашивает у клиента сертификат, если проверка прошла успешно то клиент получает доступ к закрытому контенту в ином случае клиент может получить ошибку “No required SSL certificate was sent”.
Для организации подключения мы сгенирировали клиентский сертификат, а так же создали запрос на подписание сертификата в результате чего получили файл client.csr. Далее мы отправили данный файл поставщику услуг и получили наш подписанный клиентский сертификат необходимый для аутентификации на удаленном сервере.
Тестирование подключения может быть осуществлено при помощи утилиты curl.
curl cert client.crt key client.key k someserive.com
Однако стоит заметить, что в последняя версия curl 7.30.0 в OS X сломана и не может быть использована для организации тестирования (http://curl.haxx.se/mail/archive-2013-10/0036.html).
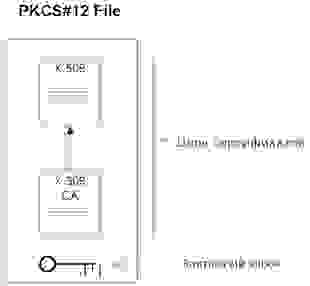
Для передачи клиентского сертификата мы будем использовать файл в формате PKCS#12. В файлах PKCS#12 хранятся одновременно и закрытый ключ, и сертификат (разумеется в зашифрованном виде). Примерная организация PKCS#12 файла показана на рисунке.
Сконвертировать Ваш client.crt в файл формата PKCS#12 можно при помощи следующей команды:
openssl pkcs12 export in client.crt inkey client.key out client.p12
После того как мы получили файл в формате PKCS#12 можно переходить к разработке и тестированию нашего мобильного приложения. Начнем с IOS.
1. Реализуем IOS версию приложения
Необходимо подключить к Вашему проекту Security.Framework
Для осуществления запроса нам необходимо извлечеть из PKCS#12 цифровой сертификат и ассоциированный с ним приватный ключ (SecIdentityRef). Наличие данного объекта позволит нам получить соответствующий NSURLCredential.
Итак реализуем функецию extractIdentityAndTrust.
Производим извлечение при помощи функции SecPKCS12Import, незабываем указать пароль к серитификату.
Далее реализуем делегат canAuthenticateAgainstProtectionSpace, вызов данного делегата позволяет нам определить свойства сервера, а именно протокол, механизм авторизации. У нас реализация этого делегата будет простой, укажем, что обрабатываем любой способ аутентификации представленный сервером.
Обработаем возможные ошибки:
Теперь перейдем к реализации непосредственно механизма аутентификации. Реализуем делегат didRecieveAuthentificationChallenge:
Загружаем наш сертификат, извлекаем из него нужные нам данные, создаем NSURLCredential, передаем нужную информацию, сохраняем данные аутентификации только в контексте текущей сессии.
Ну и для полноты картины приведу код подготавливающий NSURLConnection:
Реализацию делегата didReceiveData приводить не буду.
2. Реализуем Android версию приложения
Начну сразу с кода:
Получаем экземпляр соответствующего KeyStore в нашем случае это (PKCS12), загружаем из ресурсов наш сертификат, вторым аргументом указываем пароль. Далее создаем экземпляр SSLSocketFactory, использую собственную реализацию SSLSocketFactory, позволяющую инициализировать SSL контекст с использованием нашего сертификата. Код фабрики приведен чуть ниже. Далее конфигурируем параметры подключения, регистрируем нашу фабрику, указываем порт на который будем посылать запрос, формируем соответсвующий POST и выполняем запрос.
Заключение.
Мы рассмотрели как производить авторизацию по SSL с использованием клиентского сертификата.
Источник


