- Status Bar Icons
- In this document
- See also
- Android 3.0 and Later
- Overview of changes
- Size and format
- Style, colors, and effects
- Automatic dimming
- Example icons
- Android 2.3
- Size and positioning
- Style, colors, and effects
- Do’s and don’ts
- Example icons
- Android 2.2 and Earlier
- Structure
- Light, effects, and shadows
- Color palette
- Setting Android Status Bar Background & Icon Colors
- Android Status Bar Icons: What They Mean and How to Remove Them
- Use the System UI tool to manage the Android symbols at the top of the screen
- What to Know
- How to Dismiss Android Notifications
- How to Disable Insistent Android Notifications
- How to Disable Android App Notifications
- What Are Android Status Bar Icons?
- Is System UI Available on All Androids?
- How Android Status Bar Icons Work
Status Bar Icons
In this document
See also
New Guides for App Designers!
Check out the new documents for designers at Android Design, including more guidelines for Iconography.
Status bar icons are used to represent notifications from your application in the status bar.
As described in Providing Density-Specific Icon Sets and Supporting Multiple Screens, you should create separate icons for all generalized screen densities, including low-, medium-, high-, and extra-high-density screens. This ensures that your icons will display properly across the range of devices on which your application can be installed. See Tips for Designers for suggestions on how to work with multiple sets of icons.
Templates for creating icons in Adobe Photoshop are available in the Icon Templates Pack.
Warning:The style and dimensions of status bar icons have changed dramatically in Android 3.0 and 2.3 compared to previous versions. To provide support for all Android versions, developers should:
- Place status bar icons for Android 3.0 and later in the drawable-xhdpi-v11 , drawable-hdpi-v11 , drawable-mdpi-v11 , and drawable-ldpi-v11 directories.
- Place status bar icons for Android 2.3 in the drawable-xhdpi-v9 , drawable-hdpi-v9 , drawable-mdpi-v9 , and drawable-ldpi-v9 directories.
- Place status bar icons for previous versions in drawable-xhdpi , drawable-hdpi , drawable-mdpi , and drawable-ldpi directories.
Android 3.0 and Later
The following guidelines describe how to design status bar icons for Android 3.0 (API Level 11) and later.
Overview of changes
The design for status bar (notification) icons has been revised in Android 3.0. Status bar icons used in Android 3.0 and later are easier to create, and they allow for more flexible presentation in a variety of situations:
- Status bar icons are composed simply of white pixels on a transparent backdrop, with alpha blending used for smooth edges and internal texture where appropriate.
- Icons are square icon contents should fill the available space, although a small amount of internal padding can help maintain balance across status bar icons. See Size and format below for details.
These larger and brighter icons, while highly legible, are too intense for use on dark phone status bars. These icons would be too distracting if used directly in the status bar. Therefore:
- The system automatically resizes and dims these icons in such situations and developers do not need to supply a separate icon for this purpose. See Automatic dimming below for more on this behavior.
Size and format
Status bar icons should be 32-bit PNGs with an alpha channel for transparency. The finished status bar icon dimensions corresponding to a given generalized screen density are shown in the table below.
Note: The system will shrink and dim status bar icons to minimize distractions, allowing users to focus on the foreground activity.
Table 1. Summary of finished icon dimensions for each generalized screen density.
| ldpi (120 dpi) (Low density screen) | mdpi (160 dpi) (Medium density screen) | hdpi (240 dpi) (High density screen) | xhdpi (320 dpi) (Extra-high density screen) | |
|---|---|---|---|---|
| Status Bar Icon Size (Android 3.0 and Later) | 18 x 18 px | 24 x 24 px | 36 x 36 px | 48 x 48 px |
You can also include a few pixels of padding in status bar icons to maintain a consistent visual weight with adjacent icons. For example, a 48 x 48 pixel xhdpi status bar icon can contain a 44 x 44 pixel shape with 2 pixels on each side for padding.
Style, colors, and effects
Status bar icons are flat, pictured face on, and must be white on a transparent background.
In order to maintain consistency across all status bar notifications, status bar icons should use the styling shown in Figure 1.
| 1. | Fill color: | #ffffff |
Automatic dimming
The system may dim and shrink status bar icons to allow users to focus on the foreground activity. For example, in Android 4.0, the platform-standard status bar for handset-size devices reduces icons to 18 x 18 dip and 40% opacity in the status bar, while drawing them full-size and at full intensity in the expanded notification panel. An example of what this looks like is shown below in Figure 2.
Figure 2. Automatic shrinking and dimming behavior in Android 3.0 and later.
Example icons
Shown below are example extra-high-density status bar icons that are used throughout Android system applications.
Warning: Because resources can change between platform versions, you should not reference built-in icons using the Android platform resource IDs (i.e. status bar icons under android.R.drawable ). If you want to use any icons or other internal drawable resources, you should store a local copy of those icons or drawables in your application resources, then reference the local copy from your application code. In that way, you can maintain control over the appearance of your icons, even if the system’s copy changes. Note that the grid below is not intended to be complete.
Android 2.3
The following guidelines describe how to design status bar icons for Android 2.3 (API Levels 9 and 10).
Size and positioning
Status bar icons should use simple shapes and forms and those must be scaled and positioned inside the final asset.
Figure 3 illustrates various ways of positioning the icon inside the asset. You should size the icons smaller than the actual bounds of the asset. Status bar icons may vary in width, but only minimally.
In order to indicate the recommended size for the icon, each example in Figure 3 includes two different guide rectangles:
- The red box is the bounding box for the full asset.
- The blue box is the recommended bounding box for the actual icon. The icon box is sized smaller vertically than the full asset box to allow for varying icon shapes while maintaining a consistent visual weight.
| ||||||||||||||||||||||||
| ||||||||||||||||||||||||
| ||||||||||||||||||||||||
| 1. | Fill gradient: | 90°, from #828282 to #919191 |
| 2. | Inner shadow: | #FFFFFF , 10% opacity angle 90° distance 1px size 0px |
| 3. | Inner content: | Inner content should subtract from the outer shape and consist purely of transparent pixels. |
Do’s and don’ts
Below are some «do and don’t» examples to consider when creating status bar icons for your application.
Example icons
Shown below are standard high-density status bar icons that are used in the Android platform.
Warning: Because these resources can change between platform versions, you should not reference these icons using the Android platform resource IDs (i.e. status bar icons under android.R.drawable ). If you want to use any icons or other internal drawable resources, you should store a local copy of those icons or drawables in your application resources, then reference the local copy from your application code. In that way, you can maintain control over the appearance of your icons, even if the system’s copy changes. Note that the grid below is not intended to be complete.
Android 2.2 and Earlier
The following guidelines describe how to design status bar icons for Android 2.2 (API Level 8) and earlier.
Structure
- Rounded corners must always be applied to the base shape and to the details of a status bar icon shown Figure 5.
- All dimensions specified are based on a 25×25 pixel artboard size with a 2 pixel safeframe.
- Status bar icons can overlap the safeframe to the left and right when necessary, but must not overlap the safeframe at the top and bottom.
- Final art must be exported as a transparent PNG file.
- Templates for creating status bar icons using Adobe Photoshop are available in the Icon Templates Pack.
| Figure 5. Safeframe and corner-rounding for status bar icons. Icon size is 25×25. Light, effects, and shadowsStatus bar icons are slightly debossed, high in contrast, and pictured face-on to enhance clarity at small sizes.
Color paletteOnly status bar icons related to the phone function use full color; all other status bar icons should remain monochromatic. Источник Setting Android Status Bar Background & Icon ColorsOver the past few months, I have been attempting to figure out the best ways to implement a light theme and dark theme in my Hanselman.Forms app. Working closely with my friend Kym Phillpotts we came up with a very nice theme changer for Xamarin.Forms, that allowed us to change all of the colors dynamically. The result is a very nice looking application that allows the users to pick their theme or use system defaults.
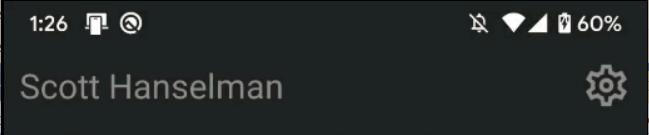
One thing that bugged me in the original implementation for Android, was the status bar color that was a single dark blue color. Modern apps will set the status bar to match the background color when toggling between light and dark. Since we are allowing the user to set the theme, we must also set the color of the status bar. This can be accomplished with the following code: This uses my Current Activity Plugin to get the Window of the app, and also Xamarin.Essentials Color Converters to set the color to light or dark.
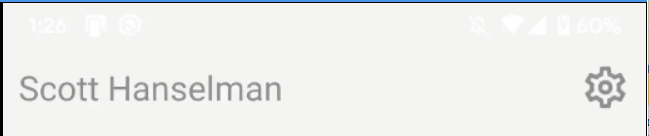
This works really great unless I set it to a light color where the icon colors remain white.
We can also control this with the following code: Now it looks beautiful, and we are in full control! Источник Android Status Bar Icons: What They Mean and How to Remove ThemUse the System UI tool to manage the Android symbols at the top of the screen
What to Know
This article explains what Android status bar icons are, how you can dismiss them when they pop up, and how you can disable them permanently if they’re becoming a nuisance. This information should apply to all Android phones that have the latest version of the operating system. How to Dismiss Android NotificationsThe easiest way to get rid of notifications is as follows: First, swipe down from the top of the screen to open the Notification Drawer. Be sure to review the notifications to make sure you’re not getting rid of anything important. After you have reviewed your notifications, swipe the Notification either left or right to dismiss it. It’s important to note that dismissing Notifications is permanent. Once they’re gone, Android doesn’t have a «history» or other record of them. But you’re also not «deleting anything by doing so (i.e. dismissing a text notification doesn’t erase the text message itself). Whatever message or event that triggered the Notification is still there. but it’s now up to you to find it. How to Disable Insistent Android NotificationsIn some cases, an app’s notification is tied to the app running. In other words, if you dismiss a notification, you’ll close the app as well. But this isn’t always the case. Occasionally, you’ll come across notifications that can’t be swiped off-screen. There’s a few reasons this can happen. The notification is displaying the status in a currently-running app. In this case, shutting down the offending app should do the trick. Similarly, a previously running app may have started a service in the background that’s still going. There should be something on the notification to stop the service. Finally, some misbehaving apps simply put notifications up there you can’t dismiss. In this extreme case, the notification won’t disappear when you swipe, but instead it will reveal a gear icon which will take you to the App Notifications settings for that app. If they’re being a nuisance, you can toggle Show Notifications off, but bear in mind this is turning off all Notifications for the app, so make sure there’s nothing critical you’ll miss by doing so. How to Disable Android App NotificationsEven if you don’t get the gear icon when you swipe an Android Status Bar Icon notification, you can still disable the notifications for any app. Here’s how: Go to Settings. Tap Notifications > See All. Find the app for which you want to disable notifications, and tap the toggle switch to turn notifications off. The switch should turn white when it’s off and blue when it’s on. This same permission is available by going to Settings > Apps, choosing your app, then changing the Notifications setting in the App settings section. What Are Android Status Bar Icons?Android Status Bar icons are simply notifications in the system user interface from apps running on your device. These notifications can contain text, graphics, and even controls. They can represent information about your wireless connection, cellular network, or home Wi-Fi and they can tell you you’ve received a text message. When the system UI receives a message, it responds by putting it in the Notifications Drawer at the top of the screen. Is System UI Available on All Androids?System UI is the user interface on your Android device. All Android devices have System UI, though some—such as those manufactured by Samsung—might have another user interface installed over the Android System UI. In the case of Samsung phones, the user interface is called One UI. Because this is a consistent interface on all Android phones, all Android devices, including Android tablets, will display notifications using Android status bar icons, including those with the Samsung One UI installed. How Android Status Bar Icons WorkOnce you receive an Android status bar icon notification, you need to open the Notifications Drawer to access the notification each icon represents. Then, you can usually tap the notification to open its corresponding app. Depending on the app, you may be able to take other actions as well, such as pausing and playing music. When you tap a notification you’ll be taken to that specific app and the notification will disappear; Android assumes you’ve been notified. But in the event you don’t want to jump around a dozen apps just to clean up the top of your screen, you can also Dismiss notifications easily. Источник  Когда к мобильному устройству присоединены наушники  ОС Google Android развивается, и по всему видимому |
:max_bytes(150000):strip_icc()/acp_casual_headshot-5b59662146e0fb002561f951.jpg)
:max_bytes(150000):strip_icc()/WorkBadgePhoto-61c0b98ef5a74e4a85851a8f706dbd65.jpg)

