- Android Fundamentals: Status Bar Notifications
- Step 0: Getting Started
- Step 1: Android Notifications
- Step 2: Creating a Notification
- Step 3: Creating a PendingIntent
- Step 4: Preparing the Notification Event
- Step 5: Notifying the User
- Conclusion
- Как я сделал статус-бар на Android по кайфу
- Разрешения на Android
- Как можно заблокировать Android-смартфон
- Как изменить статус-бар на Android
- Android Status Bar Icons: What They Mean and How to Remove Them
- Use the System UI tool to manage the Android symbols at the top of the screen
- What to Know
- How to Dismiss Android Notifications
- How to Disable Insistent Android Notifications
- How to Disable Android App Notifications
- What Are Android Status Bar Icons?
- Is System UI Available on All Androids?
- How Android Status Bar Icons Work
Android Fundamentals: Status Bar Notifications
Often times, applications will perform some background operation—maybe while the app is running or maybe triggered on a scheduled alarm. The user won’t know what’s going on, though, unless they are informed of some event. Luckily, Android has an easy notification system that allows applications to display a message in the status bar and provide informative details to the user when something important occurs.
In this tutorial, we’ll extend the existing unnamed «TutList» application to notify the user when the scheduled download of tutorials has taken place. When the user taps on the notification in the status bar, the application will be launched. This way, we use notifications to provide feedback to the user that something has happened, while also reminding he user of the existence of the application and that fresh content is available.
Step 0: Getting Started
This tutorial assumes you start where our last «TutList» tutorial left off. You can download that code and work from it, or you can simply download or view the code provided with this tutorial and follow along. The choice is yours. We’re on Version Code 9. The «tags» view of the source viewer has each version, for convenience.
Step 1: Android Notifications
The Android notification system is highly praised by users and developers. It’s easy to use, flexible, and convenient. This tutorial will not cover every detail of the notification system. Instead, we’ll focus on getting specific notifications working for the TutList application.
Generally speaking, notifications in the status bar at the top of the users screen (or the bottom on tablets running Android 3.0) appear as an icon and some short text. When the status bar is «pulled down», the user can see more notification details. These details can be drawn in a default way or they can be drawn using a custom RemoveViews object if you want to get fancy. Additionally, notifications can play sounds or flash colorful lights. Notifications can also display once, display persistently (for instance, to update the progress of an ongoing task), or display a count of items (for instance, to display the number of new emails).
We will create a simple notification that informs the user when the list of tutorials, in XML format, has been downloaded and parsed.
Let’s start by getting an instance of the NotificationManager object, the base object with which notifications are handled. We’ll start by adding code to the onPostExecute() method of the DownloaderTask inner class found in the TustListDownloaderService.
The following Java code retrieves an instance using the application context:
Step 2: Creating a Notification
A Notification object encapsulates the information used to display a new notification to a user or to update an existing notification. Because existing notifications can be updated, the creation of a notification comes in two parts. First, the notification’s core data is configured—the icon to be displayed in the status bar, the brief text displayed in the status bar, and the time of the notification are created separate from a notification event. The notification event, which consists of the specifics to show the user,
Let’s create the notification:
Here, we set the icon to one of the system icons. For your own app, it’s probably best to create your own set of icons. Google has a great resource on creating status bar icons for Android 2.3 and later as well as Android 2.2 and earlier found with the developer documentation icon guidelines. The ticker text is displayed briefly in the status bar right when the notification fires. The time (the «when» field) is used to show the user when the notification occurred.
Note: While using Notification.Builder may be simpler, it’s only available in SDK Level 11 and later.
Step 3: Creating a PendingIntent
Notifications can trigger an Intent when tapped. They use the PendingIntent object to do this. A PendingIntent simply wraps a regular Intent inside an object such that another application can send the original Intent as if your application had done so. When the user taps on the notification, we just want the application to launch, so creating this PendingIntent object is easy:
Step 4: Preparing the Notification Event
The default displayed notification event consists of a title and some informational text to tell the user what the notification is for. The event also uses the PendingIntent object we just created. We’ll load text based on whether or not the download and parse was successful.
After loading the text, the setLatestEventInfo() method updates the notification with the most recent information you want to provide to the user. We’re only doing this notification once per download (as opposed to giving download status), but it could be used to display various status updates as a task proceeds.
Step 5: Notifying the User
Finally, we return to the NotificationManager object and use its notify() method to actually show the notification to the user (or update it if it’s changed).
The first parameter of the notify() method is an application unique identifier. We’ve defined this within the TutListDownloaderService class to be a value of 100, although the value just needs to be unique – and it is since we have no other notifications.
That’s all for displaying simple notifications in the status bar.
The following image shows what the notification looks like. It displays when the user manually downloads the latest articles or when the list is automatically updated daily.

Conclusion
ou have learned how to present notifications to users in this quick tutorial. The notification system is very flexible, but also easy when you just need a simple notification displayed. Your users will benefit from notifications by seeing what is going on in the background and being reminded about the application.
Источник
Как я сделал статус-бар на Android по кайфу
Для меня кастомизация Android всегда была чем-то далёким и откровенно гиковским. Ну зачем, думал я, что-то менять, если разработчики – явно неглупые люди – всё уже продумали за меня? Долгое время меня вполне устраивала моя позиция, и желания что-либо менять в интерфейсе своего смартфона у меня не было, тем более что обычно для этого приходилось что-то перепрошивать или устанавливать сторонние моды. Однако я немного изменил своё отношение к такому явлению, как кастомизация, когда познакомился с приложением Super Status Bar.
Не устраивает статус-бар на Android? Кастомизируйте его
Это приложение, как ясно из названия, позволяет настроить статус-бар Android-смартфона так, как хочется именно вам. На самом деле сначала меня привлекла только функция блокировки смартфона по двойному нажатию на верхнюю часть экрана, однако довольно быстро стало понятно, что эта программа может сильно улучшить такой незначительный, на первый взгляд, компонент операционной системы, как статус-бар.
Разрешения на Android
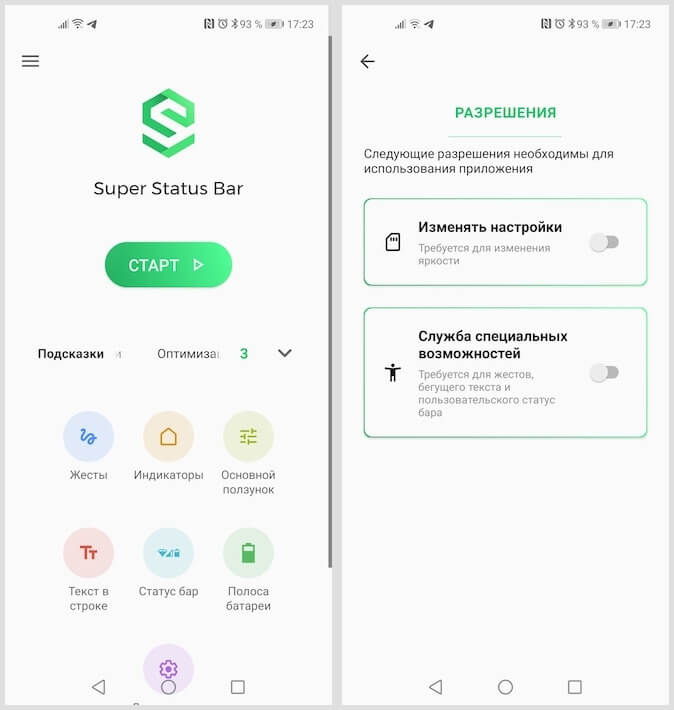
Приложение запросит две привилегии — дайте их
Для начала вам потребуется дать Super Status Bar две привилегии: возможность изменять настройки и открыть доступ к службе специальных возможностей. Это необходимо для того, чтобы приложение смогло вносить изменения в статус-бар и расширить его функциональность.
После того, как разрешения будут даны, вернитесь на домашний экран. Здесь вы увидите 7 вкладок, в которых скрываются настройки статус-бара. Забегая вперёд, скажу, что не советую включать сразу все параметры, во-первых, чтобы не запутаться, а, во-вторых, чтобы не перегрузить его.
Как можно заблокировать Android-смартфон
Первое, что я сделал, это включил возможность блокировать смартфон по двойному тапу на статус-бар. Для этого откройте вкладку «Жесты» — «Двойное нажатие» и активируйте параметр «Выключить экран». После этого вы сможете быстро и непринуждённо гасить экран, не задействуя физическую клавишу питания. Это очень удобно в ситуациях, когда смартфон лежит на столе, а возможности взять его в руки по какой-то причине у вас нет, либо если боковая клавиша включения и выключения сломалась.
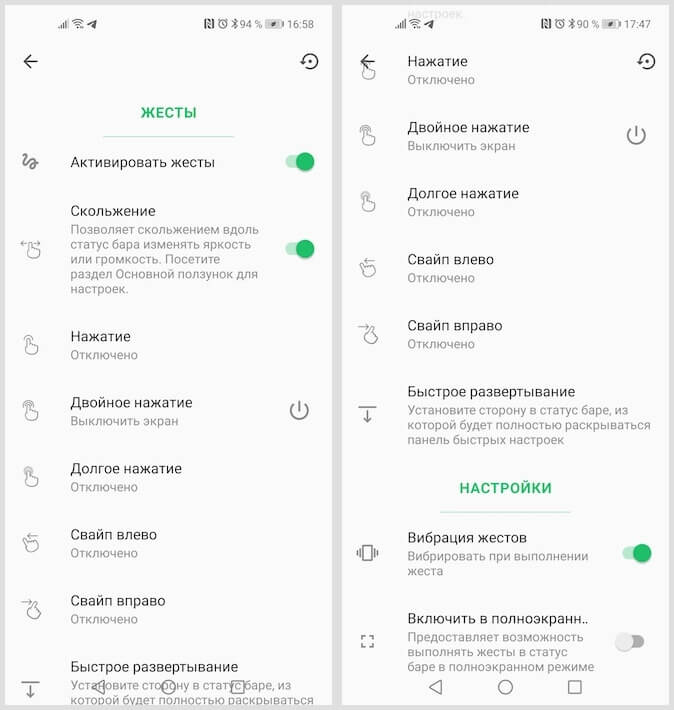
Управлять статус-баром при помощи жестов реально удобно
Затем я настроил изменение яркости дисплея жестом скольжения вправо или влево по статус-бару. Как оказалось, это очень классная возможность, которой мне очень давно не хватало, ведь в помещении мне всегда было много максимальной яркости моего Honor View 20, и мало – на улице. Для активации этого механизма перейдите во вкладку «Жесты» и включите параметр «Скольжение». Здесь же можно настроить вызов конкретных приложений с помощью жестов, но, на мой взгляд, это было бы уже чересчур.
Как изменить статус-бар на Android
На Android можно заменить привычный статус-бар на решение из iOS
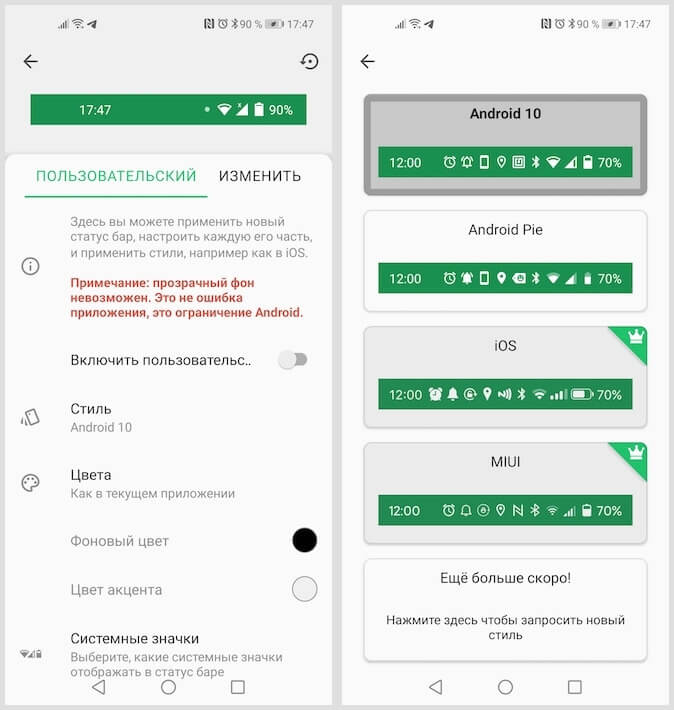
Скажу честно, мне никогда не нравились иконки в статус-баре на Android и всегда нравилась реализация iOS. Поэтому для меня стал позитивным открытие тот факт, что Super Status Bar позволяет заменить классический статус-бар Android решением, используемым в iOS. Для этого перейдите во вкладку «Статус-бар» — «Стиль» и выберите понравившийся. Кроме iOS, тут есть статус-бары из Android 10, Android 9 Pie и MIUI. Правда, учитывайте, что такая рокировка доступна только в платной версии приложения, за которую придётся заплатить 189 рублей.
Как на Android переключать песни длительным нажатием на кнопки регулировки громкости
Если вам не нравится, как реализованы уведомления на Android, Super Status Bar и тут придёт вам на помощь. Он позволяет заблокировать появление всплывающих окон с оповещениями, заменив их бегущей строкой с содержимым послания. Для этого откройте вкладку «Текст в строке» и включите параметр «Бегущий текст в статус-баре». Тут же можно настроить скорость анимации бегущего текста, начальную задержку перед его появлением, изменить фон, на котором он будет появляться и настроить стилистику появления текста.
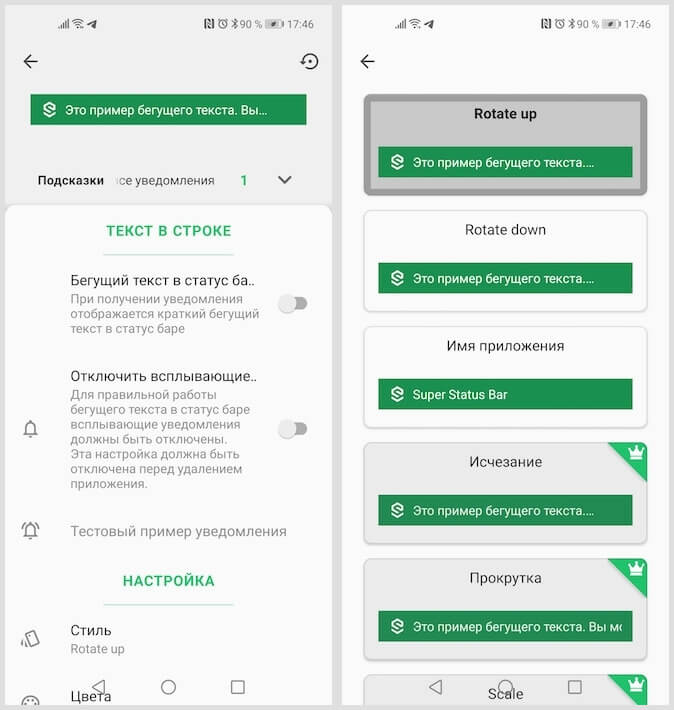
Уведомления бегущей строкой воспринимаются реально удобнее
Super Status Bar – их тех приложений, которые запускаются один раз. А ведь и правда, если можно сразу настроить все конфигурации статус-бара, то зачем открывать его повторно и вносить какие-то изменения? По крайней мере, я так решил для себя, включив все нужные мне параметры. Попробуйте и вы. Думаю, вам понравится.
Источник
Android Status Bar Icons: What They Mean and How to Remove Them
Use the System UI tool to manage the Android symbols at the top of the screen
:max_bytes(150000):strip_icc()/acp_casual_headshot-5b59662146e0fb002561f951.jpg)
:max_bytes(150000):strip_icc()/WorkBadgePhoto-61c0b98ef5a74e4a85851a8f706dbd65.jpg)
What to Know
- To dismiss notifications: Swipe down from the top of the screen to open the Notification Drawer, then swipe left or right on each one.
- To disable persistent notifications: Swipe left or right on the notification, then tap the gear icon and select turn off notifications.
- You can also disable notifications by going to Settings >Notifications >See All. Tap the toggle next to an app to stop notifications.
This article explains what Android status bar icons are, how you can dismiss them when they pop up, and how you can disable them permanently if they’re becoming a nuisance. This information should apply to all Android phones that have the latest version of the operating system.
How to Dismiss Android Notifications
The easiest way to get rid of notifications is as follows:
First, swipe down from the top of the screen to open the Notification Drawer.
Be sure to review the notifications to make sure you’re not getting rid of anything important.
After you have reviewed your notifications, swipe the Notification either left or right to dismiss it.
It’s important to note that dismissing Notifications is permanent. Once they’re gone, Android doesn’t have a «history» or other record of them. But you’re also not «deleting anything by doing so (i.e. dismissing a text notification doesn’t erase the text message itself). Whatever message or event that triggered the Notification is still there. but it’s now up to you to find it.
How to Disable Insistent Android Notifications
In some cases, an app’s notification is tied to the app running. In other words, if you dismiss a notification, you’ll close the app as well. But this isn’t always the case. Occasionally, you’ll come across notifications that can’t be swiped off-screen. There’s a few reasons this can happen.
The notification is displaying the status in a currently-running app. In this case, shutting down the offending app should do the trick. Similarly, a previously running app may have started a service in the background that’s still going. There should be something on the notification to stop the service. Finally, some misbehaving apps simply put notifications up there you can’t dismiss.
In this extreme case, the notification won’t disappear when you swipe, but instead it will reveal a gear icon which will take you to the App Notifications settings for that app. If they’re being a nuisance, you can toggle Show Notifications off, but bear in mind this is turning off all Notifications for the app, so make sure there’s nothing critical you’ll miss by doing so.
How to Disable Android App Notifications
Even if you don’t get the gear icon when you swipe an Android Status Bar Icon notification, you can still disable the notifications for any app. Here’s how:
Go to Settings.
Tap Notifications > See All.
Find the app for which you want to disable notifications, and tap the toggle switch to turn notifications off. The switch should turn white when it’s off and blue when it’s on.
This same permission is available by going to Settings > Apps, choosing your app, then changing the Notifications setting in the App settings section.
What Are Android Status Bar Icons?
Android Status Bar icons are simply notifications in the system user interface from apps running on your device. These notifications can contain text, graphics, and even controls. They can represent information about your wireless connection, cellular network, or home Wi-Fi and they can tell you you’ve received a text message. When the system UI receives a message, it responds by putting it in the Notifications Drawer at the top of the screen.
Is System UI Available on All Androids?
System UI is the user interface on your Android device. All Android devices have System UI, though some—such as those manufactured by Samsung—might have another user interface installed over the Android System UI. In the case of Samsung phones, the user interface is called One UI.
Because this is a consistent interface on all Android phones, all Android devices, including Android tablets, will display notifications using Android status bar icons, including those with the Samsung One UI installed.
How Android Status Bar Icons Work
Once you receive an Android status bar icon notification, you need to open the Notifications Drawer to access the notification each icon represents. Then, you can usually tap the notification to open its corresponding app. Depending on the app, you may be able to take other actions as well, such as pausing and playing music.
When you tap a notification you’ll be taken to that specific app and the notification will disappear; Android assumes you’ve been notified. But in the event you don’t want to jump around a dozen apps just to clean up the top of your screen, you can also Dismiss notifications easily.
Источник


