- StepsApp
- Плюсы
- Минусы
- Описание
- Несколько слов о приложении СтепсАпп
- Функции программы, которые наверняка будут вам полезны:
- Step Up — Walk & Earn v1.1 Mod (Бесплатная покупка)
- Информация о моде: (Что такое модд)
- Step Up — Walk & Earn
- Скачать Step Up — Walk & Earn APK для Android — бесплатно — Последняя версия
- Последняя версия
- приложение Step Up — Walk & Earn
- Step Up — Walk & Earn v1.1 APK+Mod
- A guide to Android app development for complete beginners in 5 easy steps
- Step 1: Downloading the tools you need for Android app development
- Step 2: Start a new project
- Java vs Kotlin for Android app development
- Minimum SDK
- Step 3: Familiarize yourself with the files
- Introducing layout files
- The other files and folders
- Step 4: Test your app
- Step 5: Make a thing!
StepsApp
| Разработчик: | StepsApp |
| Категории: | Здоровье и фитнес |
| Версия Android: | 5.0+ |
| Размер: | 26 MB |
| Скачали: | 221 |
| Рейтинг: | |
| Обновлено: | 30.07.2021 |
| Ограничения: | Для всех |
Плюсы
- Ведет подсчет шагов автоматически.
- Точное определение пройденных шагов.
- Наглядное отображение статистики.
- Красивый дизайн.
- Выбор системы мер.
- Поддержка русского языка.
Минусы
- Наличие рекламы.
- Присутствуют платные функции.
Описание
StepsApp — это небольшое приложение, которое превратит ваш телефон в полноценный и функциональный шагомер. Позволяет вести подсчет шагов в автоматическом режиме и публиковать ваши рекорды в социальных сетях.
Несколько слов о приложении СтепсАпп
Перед вами простой в использовании и функциональный шагомер, который можно использовать для точного отслеживания вашей активности, без какого-либо дополнительного оборудования. Программа позволяет устанавливать персональные цели и отслеживать прогресс их выполнения, а также в любой момент просматривать статистику в удобном и наглядном виде. К слову, приложение обладает красивым оформлением и предлагает 6 цветовых схем на выбор, которые помогут настроить оформление шагомера, в соответствии с вашими предпочтениями.
Функции программы, которые наверняка будут вам полезны:
- Автоматический подсчет шагов.
- Сохранение статистики сожженных калорий.
- Наглядные графики вашего прогресса.
- Установка персональных целей.
- Удобный виджет для просмотра статистики за день.
- Поддержка Google Fit.
- 6 тем оформления.
- Функция публикации вашего прогресса в социальных сетях.
- Еженедельные отчёты.
Ищете удобный и красивый шагомер? Тогда скачайте StepsApp для Android.
StepsApp на APKshki.com скачали 221 раз. StepsApp распространяется бесплатно в расширении apk.
Все приложения и игры на нашем сайте проходят обязательную проверку антивирусом с последними сигнатурами.
Если обнаружился вирус: [email protected]
Если хотите разместить приложение или игру [email protected] .
Добавить описание: [email protected] с пометкой добавить описание.


Источник
Step Up — Walk & Earn v1.1 Mod (Бесплатная покупка)
Информация о моде: (Что такое модд)
Шаг вверх — это приложение, которое помогает отслеживать ваши шаги ежедневно.
Heart Использует встроенный датчик для подсчета ваших шагов. Отслеживание GPS не требуется, что снижает потерю батареи.
Шаг вверх — продолжайте идти, продолжайте зарабатывать.
Haps Up Предоставляет вам настоящий кэшбэк, захватывающие призы и гораздо больше только для ходьбы, так что нормальные люди не должны тратить на их рацион.
Это также отслеживает ваш регулярный стиль ходьбы, который помогает в расчете расстоянии, времени и сожженных калориях.
Отследить ежедневные шаги, которые вы ходили, и вся остальная информация в любое время. Давайте наслаждаться ходьбой с этим приложением!
— первый — через измерение движения бедер. Потому что, когда человек ходит, его бедра продвигаются вперед в заднем и др. Движения, шагомер подсчитывает каждое движение, которое человек делает через бедра как шаг. Каждый человек может принять разную длину шага, который может повлиять на измерение шагометра.
Другой метод Установка шагов, используемых для измерения предпринятых шагов — значительно сосчитать фактическое количество раз наземных ног на земле. Обычно это зарезервировано для более высокотехнологичных устройств мониторинга.
Вы можете скачать STAP UP UP APP для Android.
Другие ключевые особенности:
— лучший шаг для любого телефона.
— Точные шаги и отслеживание активности.
— Тенденции демонстрируют ежедневные шаги, время и сожженные калории.
— Следите за своим кошельком и получите деньги в любой момент.
— Некоторые устройства не будут записывать количество шагов, когда они заблокированы. Это зависит исключает исключительно на спецификациях каждого устройства, и это не ошибка приложения,
Отказ от ответственности
100 000 шагов = 1 $
Вы получите оплату примерно примерно 21-го вещества каждого месяца для баланса предыдущего месяца.
Наш минимальный платеж — 10 долларов США (USD), составив все ваши приложения. Если вы зарабатываете меньше, мы добавим ваш доход в следующий месяц, пока вы не достигнете 10 USD, пожалуйста, удалите это приложение может привести к выводу денег из вашего кошелька.
Для любого запроса, связанного с вашим платежом, вы можете Свяжитесь с нашей командой.
Все сегодняшние шаги будут зачислены в кошелек в конце дня.
Источник
Step Up — Walk & Earn
Скачать Step Up — Walk & Earn APK для Android — бесплатно — Последняя версия

Последняя версия
| Имя | Step up APK |
| Версия | 1.1 (2) |
| Обновлено | 04 янв. 2021 г. |
| Разработчик | Elite Coder |
| ID | com.stepgo.stepcount |
| Количество установок | 10+ |
| Категория | Приложения, Здоровье и фитнес |
приложение Step Up — Walk & Earn
Step Up provides the step details and leads you towards your earning.
Step Up is the app that helps to track your steps on daily basis.
Step Up uses the built-in sensor to count your steps. No GPS tracking is required, which reduces battery loss.
Step Up — Keep walking, Keep earning.
Step Up provides you with real cashback, exciting prizes, and much more only for walking so that normal people don’t need to spend on their diet.
It also keeps track of your regular walking style which helps in the calculating distance, time, and calories burned.
Track the daily steps you have walked and all other information anytime. Let’s enjoy walking with this app!
Working of Step Up:
— The first is through measuring the movement of the hips. Because when a person walks, his hips are propelled forward in a back-and-forth motion, the Pedometer counts every motion a person makes via the hips as a step. Each person may take a different length of stride that can affect the pedometer’s measurement differently.
— Another method a Step Up uses to measure steps taken is to count the actual number of times your feet step on the ground. This is usually reserved for more high-tech monitoring devices.
You can download the Step Up free app for android.
Other Key Features:
— The best Step Up for any phone.
— Accurate steps & activity tracking.
— Trends display daily steps, time, and calories burned.
— Keep an eye on your wallet and get cash back at any moment.
— Some devices will not record the number of steps when they are locked. This depends exclusively on the specifications of each device and it is not a bug of the app,
100,000 Steps = 1$
You’ll receive payment on approximately the 21st of each month for the previous month’s balance.
Our minimum payment is 10 US dollars (USD), totaled across all of your apps. If you earn less, we’ll add your revenue to the following month until you reach USD 10
Uninstall this app may lead to a deduction of money from your wallet.
For any query related to your payment, you can contact our team.
All of today’s steps will be credited into the wallet at the end of the day.
Источник
Step Up — Walk & Earn v1.1 APK+Mod
- Имя файла: com.stepgo.stepcount
- Версия для загрузки приложения: 1.1
- Цена: 0
- Размер apk: 6.3M
- Скачать: 100
- Время последнего обновления: Jan 5, 2021
- цель: 0
- MD5:
- Подпись:
- SHA256: ROOT: —> 0 —> Предложения покупки в приложении: —> 0 —>

Шаг вверх — это приложение, которое помогает отслеживать ваши шаги ежедневно.
Heart Использует встроенный датчик для подсчета ваших шагов. Отслеживание GPS не требуется, что снижает потерю батареи.
Шаг вверх — продолжайте идти, продолжайте зарабатывать.
Haps Up Предоставляет вам настоящий кэшбэк, захватывающие призы и гораздо больше только для ходьбы, так что нормальные люди не должны тратить на их рацион.
Это также отслеживает ваш регулярный стиль ходьбы, который помогает в расчете расстоянии, времени и сожженных калориях.
Отследить ежедневные шаги, которые вы ходили, и вся остальная информация в любое время. Давайте наслаждаться ходьбой с этим приложением!
— первый — через измерение движения бедер. Потому что, когда человек ходит, его бедра продвигаются вперед в заднем и др. Движения, шагомер подсчитывает каждое движение, которое человек делает через бедра как шаг. Каждый человек может принять разную длину шага, который может повлиять на измерение шагометра.
Другой метод Установка шагов, используемых для измерения предпринятых шагов — значительно сосчитать фактическое количество раз наземных ног на земле. Обычно это зарезервировано для более высокотехнологичных устройств мониторинга.
Вы можете скачать STAP UP UP APP для Android.
Другие ключевые особенности:
— лучший шаг для любого телефона.
— Точные шаги и отслеживание активности.
— Тенденции демонстрируют ежедневные шаги, время и сожженные калории.
— Следите за своим кошельком и получите деньги в любой момент.
— Некоторые устройства не будут записывать количество шагов, когда они заблокированы. Это зависит исключает исключительно на спецификациях каждого устройства, и это не ошибка приложения,
Отказ от ответственности
100 000 шагов = 1 $
Вы получите оплату примерно примерно 21-го вещества каждого месяца для баланса предыдущего месяца.
Наш минимальный платеж — 10 долларов США (USD), составив все ваши приложения. Если вы зарабатываете меньше, мы добавим ваш доход в следующий месяц, пока вы не достигнете 10 USD, пожалуйста, удалите это приложение может привести к выводу денег из вашего кошелька.
Для любого запроса, связанного с вашим платежом, вы можете Свяжитесь с нашей командой.
Все сегодняшние шаги будут зачислены в кошелек в конце дня.
Источник
A guide to Android app development for complete beginners in 5 easy steps

Learning Android app development may seem like a daunting task, but it can open up a world of possibilities. You could create the next “hit app” that changes the way we work or interact with each other. Maybe you’ll develop a tool that you can use yourself to improve your workflow. Or perhaps you’ll just gain a new skill that lands you a great job!
Whatever the case, learning Android app development might not be as tough as you think, as long as you understand what all the different moving parts are for, and have a roadmap to guide you through. This post is that road map!
Step 1: Downloading the tools you need for Android app development
First, you need to create your development environment so that your desktop is ready to support your Android development goals. For that, you will need Android Studio and the Android SDK. Thankfully, these both come packaged together in a single download that you can find here.
Android Studio is an IDE. That stands for “integrated development environment,” which is essentially an interface where you can enter your code (primarily Java or Kotlin) and access all the different tools necessary for development. Android Studio allows you to access libraries and APIs from the Android SDK, thereby giving you access to native functions of the operating system. You’ll also be able to build your app into an APK using Gradle, test it via a “virtual device” (emulator), and debug your code while it runs.

With all that said, keep in mind that there are other options available for your Android app development. For example, Unity is a very powerful tool for cross-platform game development that also supports Android. Likewise, Visual Studio with Xamarin is an excellent combination for creating cross-platform apps in C#.
Android Studio is the best place for most people to start (with Android game development being an exception), particularly as it provides all these additional tools and resources in a single place.
Fortunately, set up is very simple and you only need to follow along with the instructions on the screen.
If you need help getting set up, check out our Android Studio tutorial for beginners. And our guide on how to install the Android SDK.
Step 2: Start a new project
Once you have Android Studio on your machine, the next step is to start a new project. This is a straightforward process, but you’ll need to make a few decisions that will impact on your Android app development going forward.
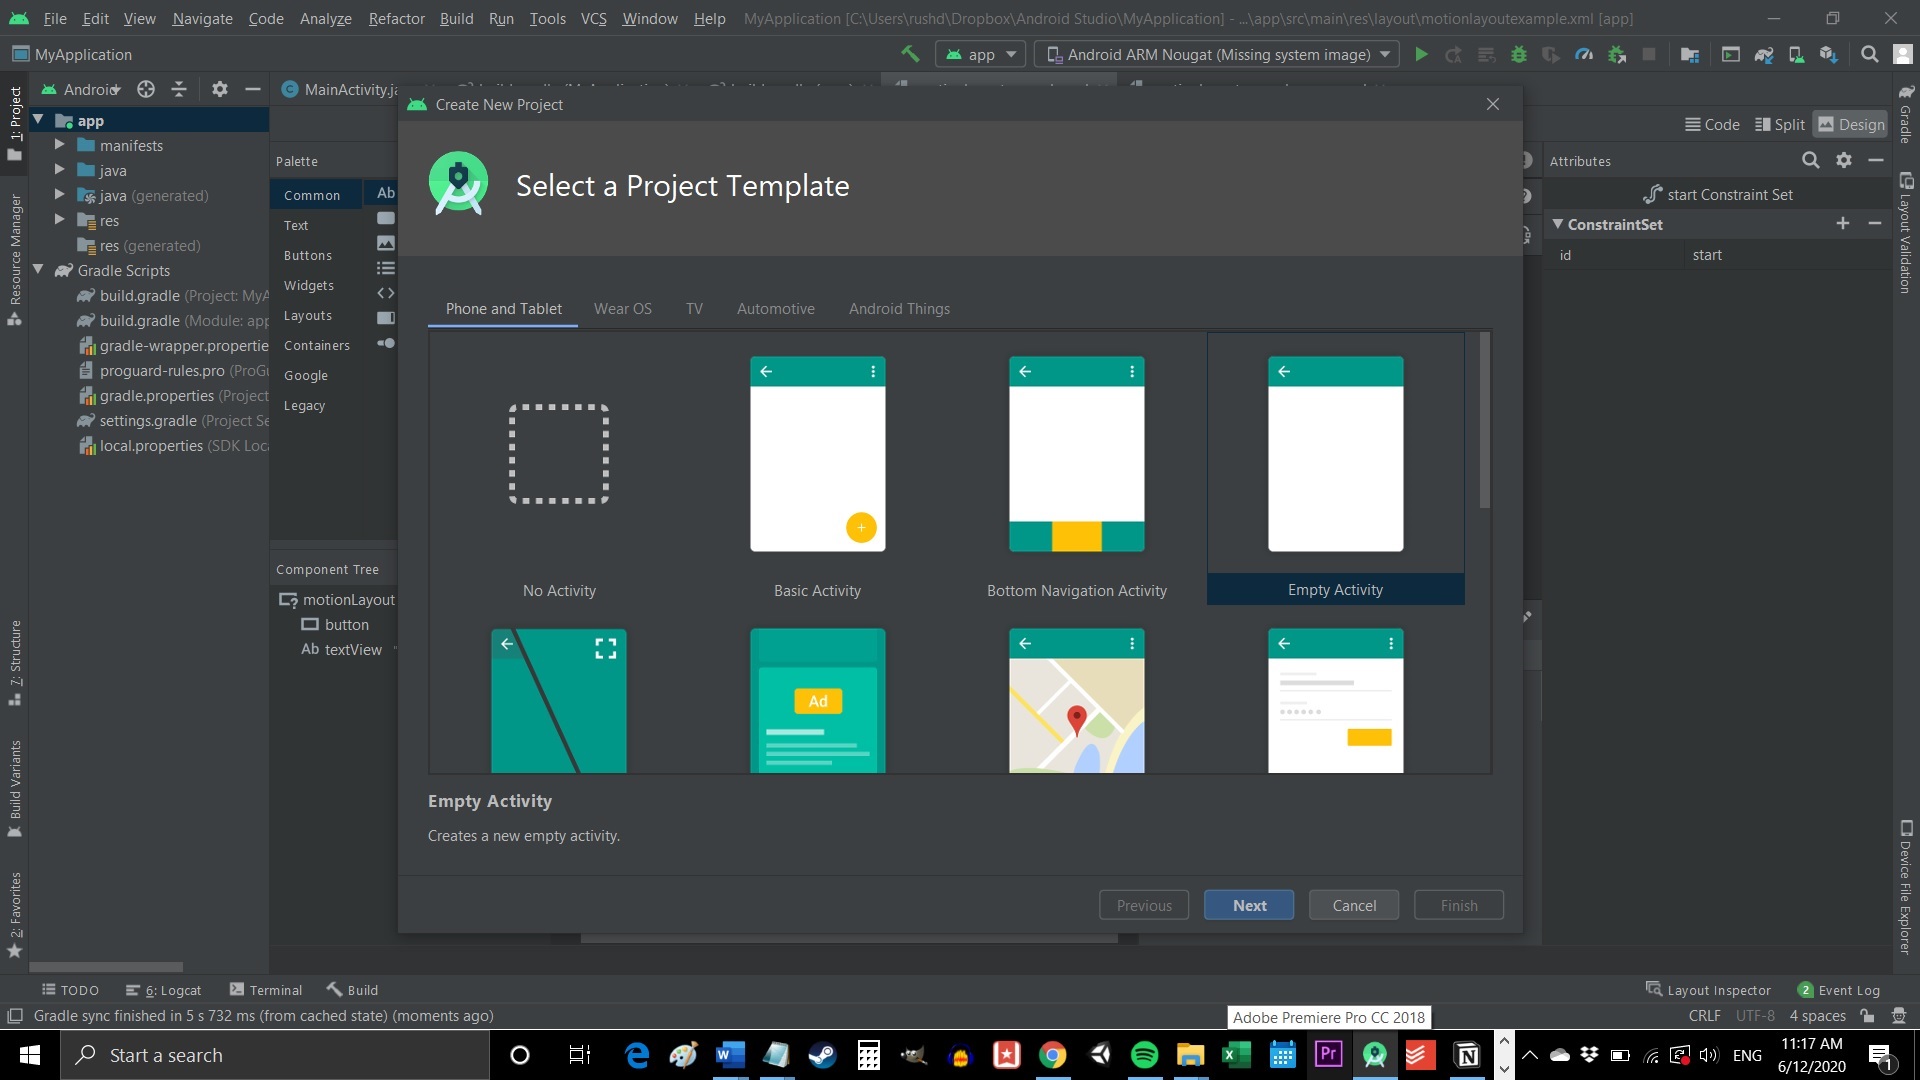
Go to File > New > New Project. You will now be asked to select a “Project Template.” This defines the code and UI elements that will be included in your new app when it loads.
The word “Activity” refers to a “screen” in your app. Thus, a project with “No Activity” will be completely empty, apart from the basic file structure. A “Basic Activity” on the other hand will create a starting screen for your app and will add a button in the bottom and a hamburger menu at the top. These are common elements in many Android apps, so this can save you some time.
That said, it can also risk making things more complicated when you’re first getting to grips with development. For that reason, we’re going to choose the “Empty Activity.” This will create an activity and some files for us, but it won’t add a lot of additional code.

Choose a name and “package name” for your new app. The name is what your audience will see when the app is installed on their device. The package name is an internal reference used by Android to differentiate it from other apps. This should be composed using your top level domain (e.g. .com), domain name, and app name.
For example: com.androidauthority.sampleapp.
If you don’t have a domain or a company, just use “com” followed by something that appeals to you!
You’ll also need to decide where you want the files to be saved and what language you’re going to code in: Java or Kotlin.
Java vs Kotlin for Android app development
One of the biggest decisions you’ll need to make as an Android developer is whether you’re going to learn Kotlin or Java. Both languages are officially supported by Google and Android Studio, but they have some distinct differences.
Java has been supported by Google the longest and is what developers have been using to craft Android apps for years. Java is also one of the most in-demand programming languages in the world, which makes it a great choice for those who want to begin a career in development. As the oldest Android programming language, there is also slightly more support for Java vs Kotlin, although it’s not by much.

Kotlin, on the other hand, has become Google’s preferred choice for Android development. This is the default when starting a new app, and it is likely to become more common going forward. Kotlin is also significantly easier to get to grips with if you’re a complete beginner.
For these reasons, Kotlin is probably the language of choice for Android developers that are learning for fun, or that have no aspirations to develop for other platforms. However, Java makes more sense if you’re interested in becoming a professional developer.
You can learn more about the two options here by reading our guide to Kotlin vs Java for Android.
Minimum SDK
Finally, you also need to consider your Minimum SDK. This is the lowest version of Android that you want your app to support.
The lower you make this number, the broader your potential audience will be. Keep in mind that there is a relatively low adoption rate for the latest versions of Android, so sticking with the latest update will prevent a lot of users from trying your creation.
However, you will only be able to access the latest features of Android if you target a more recent version. If you like the sound of supporting chat bubbles, then you’ll want to stick with the most recent version.
Step 3: Familiarize yourself with the files
I remember the first time I tried Android app development. I loaded up Android Studio and was immediately baffled by what I saw. There are just so many different files, multiple types of code, folders, and more! This was worlds away from the single blank file I was used to working with in Python or even QBasic (anyone remember QBasic??).
This can be rather daunting, but here’s what you need to know.
![]()
The file that is open is MainActivity.java or MainActivity.kt. This is the main logic file for the activity that is going to define how your app behaves. Look on the left, and you’ll see that this file is found in: MyApplication > app > src > main > java > com > companyname > myapplication.
The folders used are important for Android app development, as they help Android Studio and Gradle to find everything and build it correctly (more on Gradle in a moment). Suffice to say, you can’t just rename these as you please!
You’ll notice that there is already some code on the main page. This is what we call “boilerplate code,” meaning that it is code that is almost identical across different app projects and that is needed to make basic functions work. Boilerplate code is what you’ll find yourself typing out over and over again! One of the benefits of Kotlin is that it requires less boilerplate, meaning that you’ll have less code on your screen if that is what you chose.
Introducing layout files
The role of this code is to tell Android where the associated layout file is. A layout file is slightly different from a Kotlin/Java file. This defines the way that an activity looks, and lets you add things like buttons, text, and browser windows.
You’ll find this file in: MyApplication > app > src > res > layout.
It will be called activity_main.xml. Note that files stored in the resources folder can’t use capitals; they need to use the underscore symbol to distinguish different words. Double click on this file and it will open in the main window where you edit your code. Notice that you can switch between the open files using tabs along the top.
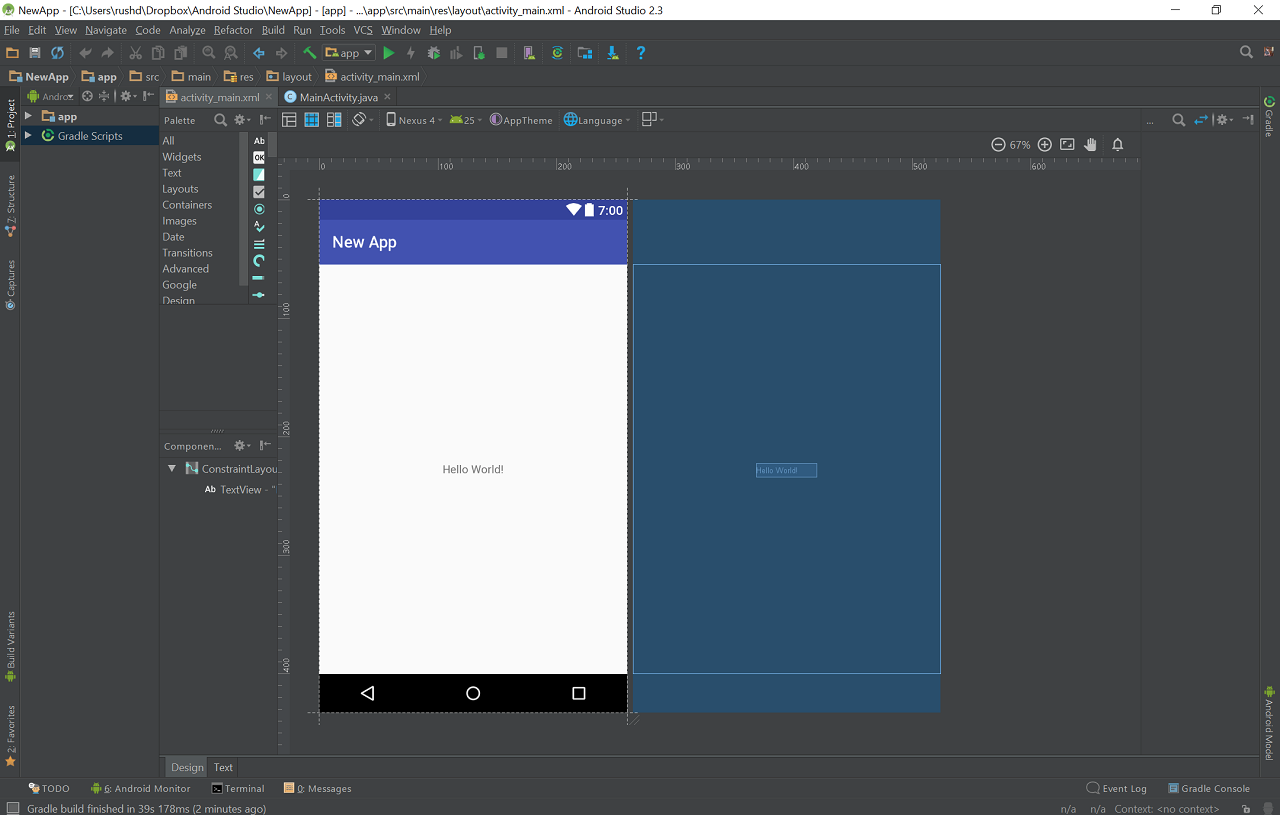
You can view this file via the “Code” view, the “Design” view, or a split view that shows these windows side-by-side. There are buttons to switch mode in the top right.
In the design view, you can actually drag and drop different widgets onto the screen. The code view shows you a load of XML script. When you add new widgets via the Design view, this script will update. Likewise, you can tweak properties of the widgets (called “views”) in here and see them reflected in real-time via the Code view.
In the vast majority of apps, you’ll need to create a new Java/Kotlin file and a corresponding XML file, each time you want a new activity. And for those that were wondering: yes, that means you have to learn either Kotlin or Java and XML. This is a bit of a headache, but it actually simplifies the process in the long run.
The other files and folders
There are lots more files and folders here though, so what do they all do?
In truth, you don’t need to know what everything here is. But some things that are useful to know about:
The Android Manifest: This is an XML file in the res folder that defines important features of your app. That includes the orientation of the app, the activities that you want to be included in it, the version, etc.
Drawable: This folder is found in res. This is where you will put things like images that you want to reference later.
Values: This resource folder is a useful place to store values that will be used globally across your app. For example, this can include color codes (making it easy for you to change the look of your entire app) or strings (words). You’ll define these values in individual XML files, such as colors.xml.
Gradle: Gradle is the tool that takes all your files and bundles them into a workable APK for testing. It is also useful for generating previews etc. You won’t need to worry about the files in here often, but if you want to add a “dependency,” this is where you will do it. Dependencies are external libraries that let you access additional functionality from within your own code.
Of course, we also have a detailed introduction to Gradle for new Android developers.
Step 4: Test your app
The first thing that you are supposed to do when familiarizing yourself with any new programming language, is to create an app that says “Hello World.” Thankfully, this is very easy in this case seeing as that’s what the code that’s already here does! If you look at the XML, it includes a small label that just says: Hello World!
If you look at the controls along the top, you’ll see there’s a little green play arrow. On the left of this is a drop-down menu, with a phone name in it. When you installed Android Studio, this should also have installed an Android system image along with the Virtual Device Manager. In other words, you should already have an Android emulator set up and ready to go! By clicking on this green arrow, you’ll be able to launch that and test your app! Notice that this will also let you use the emulated phone as though it were a real device.
You can change the settings for your virtual device – such as screen size, Android version, space etc. – by going to Tools > AVD Manager. You can also download new system images here. Make sure that your virtual device meets or exceeds the minimum SDK you set at the start.
Alternatively, you can try plugging a physical device into your computer and using this to test your new app. You’ll need to turn on Developer Options though, and enable USB Debugging.
Step 5: Make a thing!
The best way to learn Android app development is by doing! That means you should have a stab at editing the code in front of you, to see if you can make it do something new.
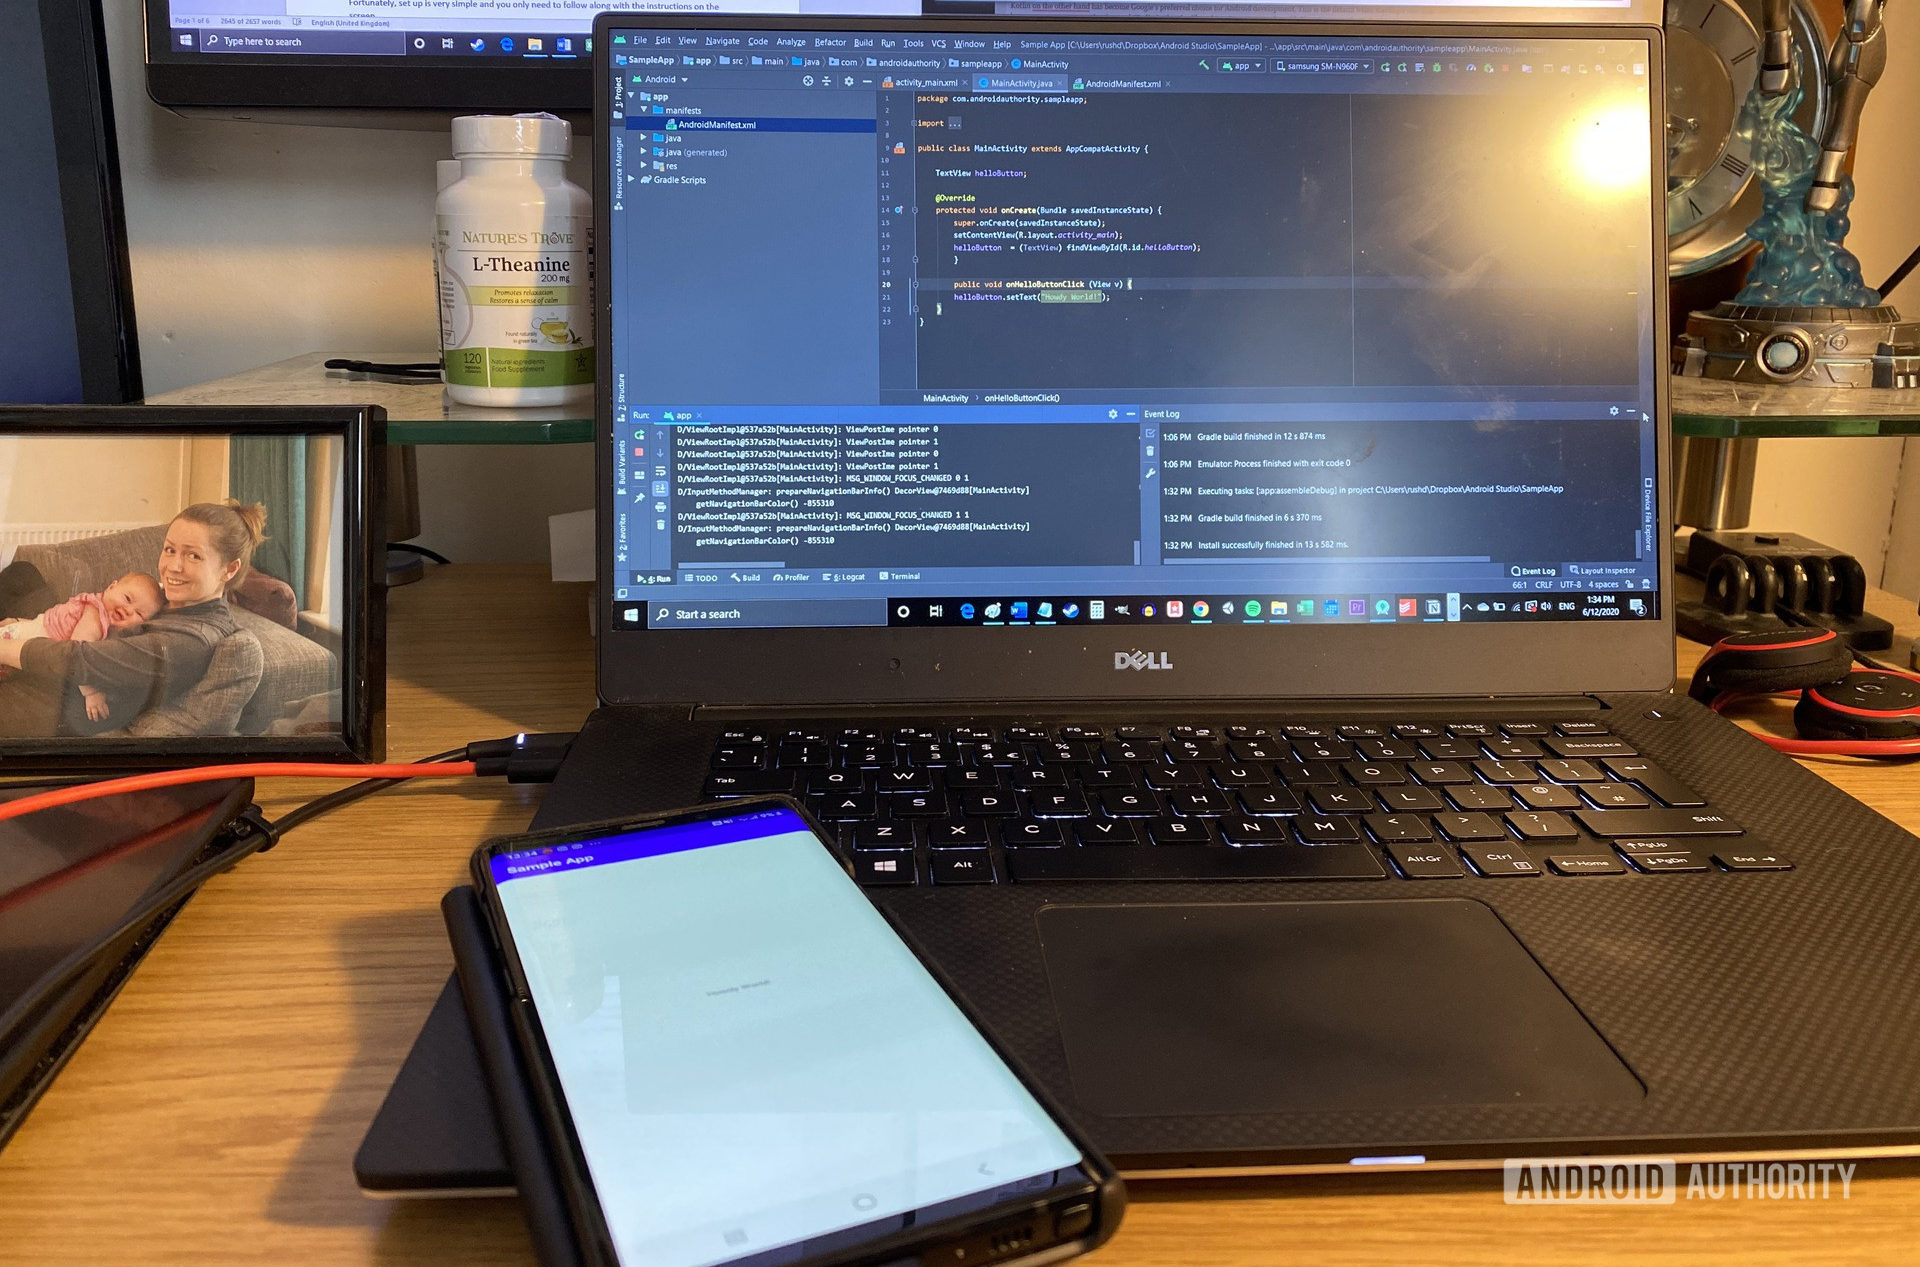
Changing the message that displays is as simple as going into your XML and changing the line that says “Hello World!” into “Howdy World!”
But what if you want to add some kind of interactive element to your creation? In that case, you might decide to let the user click the button to change the text.
First, you’ll need to place this line inside the TextView tag in your activity_main.xml:
This will give the text label the name “helloButton” and will state that the method “onHelloButtonClick” will reference this view. We’re going to add that to our code in a moment.
Now you can add the following code to your MainActivity. If you see any text appear red as you are typing it, that means you need to “import” that code from the Android SDK. Click on the red text then press Alt + Enter and Android Studio will do this for you automatically. In short, this tells Android that you are referencing a library that is a part of the Android SDK.
(The following example is written in Java.)
In this code example, we first create an “object” in the code called “helloButton.” Inside our “onCreate” method (everything within the curly brackets) we then tell Android that this object represents the button in our layout file. The code you place here is what will run first when you launch an app.
Next, we create the method that runs when someone clicks on the button. Once that happens, we can then change the text on the said button. Notice that once again, Kotlin requires significantly fewer lines to achieve the same thing!
Run the app and you should now see that when you click the button, the text changes!
This is a very simple app, but it demonstrates the basics of how Android app development works. Generally, you will be creating new on-screen elements in the layout file, then defining how they behave in the associated Java or Kotlin file.

As you get more advanced, you’ll need to start manipulating and storing data. To do this, you’ll use variables that contain numbers and strings (words).
We have an in-depth Java tutorial that will help you get started.
Once you’ve read through that, you’ll have a basic idea of how Java works, and all that is left is to learn how you can apply these skills to Android app development. To that end, a great strategy is to pick a project and then work on that.
And wouldn’t you know it: we have a ton of great projects to try out! Like an easy first project for Android app development noobs (math game).
The key is not to try and learn “all of Android app development” but to set your sights on a realistic first project. You’ll keep learning as you add new features and want to do new things, and having a goal will keep your learning fun and structured. Before you know it, you’ll be a pro!
Источник


