- Different Ways to Programmatically Restart an Android App on Button Click
- Step by Step Implementation
- How To Create, Start, Stop Android Background Service
- 1. How To Create Android Background Service In Android Studio.
- 2. Android Background Service Methods.
- 3. How To Start Stop Android Background Service In Activity.
- 4. Android Background Service Example.
- Android studio app keeps stopping & rename project
- Android studio app keeps stopping
- Clean your phone cache memory
- Reinstall the app
- Network issues
- Issues in code
- Issues with emulator
- Reading stack trace
- Memory errors
- Android studio rename project
- METHOD 1
- METHOD 2
- METHOD 3
- Conclusion
- How to create a Stopwatch App using Android Studio
- Strings.xml
- activity_stopwatch.xml
Different Ways to Programmatically Restart an Android App on Button Click
Sometimes we want to refresh an Activity, but there it is not possible to refresh. In that place, if we restart our app then it automatically gets refreshed. Also, we can use this to restart our app whenever it crashes. Most of the time when we open any app then it fetches all the data currently available. But if in the meantime if more data is updated to the database then we can use this feature to restart to again fetch all data every time it gets new data.
Now the point that comes here is how we can Programmatically Restart an Android App on Button Click . So in this article, we are going to discuss three different methods to Programmatically Restart an Android App on Button Click.
Attention reader! Don’t stop learning now. Get hold of all the important Java Foundation and Collections concepts with the Fundamentals of Java and Java Collections Course at a student-friendly price and become industry ready. To complete your preparation from learning a language to DS Algo and many more, please refer Complete Interview Preparation Course.
Step by Step Implementation
Step 1: Create a New Project
To create a new project in Android Studio please refer to How to Create/Start a New Project in Android Studio. Note that select Java as the programming language.
Источник
How To Create, Start, Stop Android Background Service
Android background service is an android component that runs in the background. There is no GUI for users to interact with the android background service object directly, it is usually started in android activity and runs in the same thread of the activity. When users quit the android-activity, the android background service will also exit automatically. This article introduces how to create, start, stop android background service with examples.
1. How To Create Android Background Service In Android Studio.
- Start android studio and right-click the package name in the android studio left project panel.
- Click the menu item New —> Service —> Service.
- Give the android background service a name by input its name in the next New Android Component window Class Name input box, check both the Exported and Enabled checkbox. If you check the Exported checkbox, then this service component can be invoked by other android apps besides the current android app. If you check the Enabled checkbox then this service component is enabled to be used by other android apps.
- When you click the Finish button in the above window, it will create the android background service class that extends android.app.Service. It will also add the service object configuration XML data in AndroidManifest.xml file as below.
2. Android Background Service Methods.
If you want to customize the android background service component, you need to override the below methods.
- onCreate : When the service object is created, it will run this method. This method runs only once.
- onStartCommand : This method is invoked every time when the background service is started. You can execute tasks or start child threads in this method. Because the android background service is executed in the main activity thread, so if you do not use child threads and if the task is very time-consuming, the android activity main thread will be blocked by the service object.
- onDestroy : This method is invoked when the background service is destroyed. You can release related resources in it such as close database connection, write data to file, etc.
- stopSelf : If you want to stop and exit the running service in your source code, you can call this method.
3. How To Start Stop Android Background Service In Activity.
- If you want to start an android background service in an android activity, you can run the below source code.
- Call stopSerivce(intent) method to stop the service.
- If you want to make sure the background service is running after you start it, you can go to Settings —> Developer options —> Running services to see it.
- If you want to see the running andriod service in a terminal, you can run the below shell command to list all the running android services.
- If you want to list the android service by its name, you can run the below shell command.
The result like below:
4. Android Background Service Example.
Below is this example project java files structure.
Источник
Android studio app keeps stopping & rename project
Android studio app keeps stopping & rename the project. If you are irritated why your android studio app keeps crashing, here you will get your answer. Keep reading to know more. I am working on an application and each time I try to run it, I receive the following message: Unfortunately, MyApp has stopped.
Each moment an Android application fails to function (or the entire Java application, for the matter) it is an Stack trace The console is logged to (in this instance logcat). This trace of the stack contains crucial information to resolve your problem. Click on the logcat trace to see it. You can also hit the alt + 6 . Check that your computer or other device has been chosen in the Devices panel. Then, you can try to locate the trace for the stack. There might be lots of data that is logged into logcat, therefore it may be necessary to scroll. The easiest way to find the trace of the stack is to delete your logcat (using the recycle bin to the right) and allow the application to crash.
Android studio app keeps stopping
Android studio app keeps stopping & renaming projects. Does your android studio app keep crashing? You have written all the codes right. Still, you are facing this issue again and again. Well, there are many reasons for them. We will see those reasons in this article and try to resolve them.
Android studio stops working because, due to some issues, it faces an unexpected exit. This unexpected exit can be due to many reasons. Or the other reason is that your app is not able to handle the exception thrown by the program. If the code is written in native java, the exception handling is thrown are SIGSEGV.
When this kind of exception handling happens, the app gets crashed and shows a message that the app has been crashed,
We are going to look into the causes of this crash, and we will resolve them.
Clean your phone cache memory
If you are testing your app on your phone, one of the reasons to crash your app is your phone cache memory. It happens when your phone’s cache memory gets filled, and you don’t clean it. So, when you start running your new app, it needs some cache memory to run, and the app could not find it. So the app gets crashed.
To resolve this problem, you need to clear your phone cache memory. To clean your cache memory, go through these steps.
Step 1. Open your phone setting.
Step 2. Go to the phone store and open it.
Step 3. On the bottom of the page, you will find the cache. Tap on it.
Step 4. When you tap it, a pop-up message will appear, click OK. Now your cache memory will get clean in a moment.
Now you can again try to run your program.
Reinstall the app
Many of the times the issue happens it that when you try to install the app from the android studio, the app did not get installed correctly. In that case, the app keeps crashing. To resolve this problem, you need to reinstall the app on your phone.
First of all, you need to uninstall the app from the phone. To uninstall the app, tap on the app for a second, click on info, a new page will appear, then click on the uninstall app. This will uninstall the app from the phone.
Now you have to again install the app on your device. To install the app, you only have to click the run button on the android studio.
This will install the app on your device.
Network issues
One of the major problems is that if your app uses the internet to fetch data and your internet is not fast enough; your app will crash. To resolve this problem, all you can do is to have a good internet connection.
Issues in code
This is also one of the biggest issues. The issues in your code will crash your app because due to issue in code, the will now be able to compile, and it will generate the run time error and the app will exit. To resolve this, you need to check your code thoroughly and make sure that there is no issue in the code.
You can also take the help of a logcat to trace your issue. We have talked about logcat in another article. You can read it here.
Issues with emulator
When you use an android emulator, then also some issues happen when your app gets crashed. It is probably the not proper installation of the emulator. All you need to fix this problem is that you have to reinstall the emulator on your system. It will fix the problem.
If you still can’t fix the problem, then you need to check where the problem. We will now see how to do it.
Reading stack trace
If you have done all the things above we mentioned and you still can’t fix the problem now you need the trace the problem. To do that, you need to take the help of the stack trace. The stack trace will help you in finding the problems which are causing the crash. You can use the stack trace tool available in the logcat window. android studio app keeps stopping
The stack trace gives two kinds of information about the crash.
- The kind of exception happened
- Where the exception has happened in the entire code.
These two things will help to tace the problem and resolve it.
Memory errors
When you are using the emulator on a low memory computer, it leads to the crash of the app. You can fix it by fixing the memory usage of the emulator. You can do this by going to the emulator settings page and fix all the issues. android studio app keeps stopping
You can fix how much the amount of memory can be used by the app—the amount of graphics used by the app and a lot of other things.
This is all for the android studio app keeps stopping.
Android studio rename project
Android studio app keeps stopping & rename project. There comes a time when you want to rename your project, but you can’t because the android studio does not give direct access to change the name of the project. So here we are helping you to do it. There are multiple of the process to do it. We will see most of the methods. Keep reading to know about it.
METHOD 1
Step 1. Start your project.
Step 2. Open the manifest.xml file.
Step 3. android:label=”@string/app_name” write this code. On the place of app_name write the name of the project you want.
This is the first method of how you can change the name of the project.
METHOD 2
Step 1. Open the project.
Step 2. Select the project name and click the setting button.
Step 3. Click on hide empty middle package.
Step 4. Right-click on the androidride folder. Then click on the setting button
Step 5. Click on the refactor and then on the rename.
Step 6. A warning message will pop-up. Click on rename.
Step 7. Input the name of the applicationt. I will keep it abc.
Step 8. Click refactor and then click do refactor.
Step 9. Right-click on the myapplication folder. Then click on the setting button
Step 10. Click on the refactor and then on the rename.
Step 11. A warning message will pop-up. Click on rename.
Step 12. Input the name of the application. I will keep it test.
Step 13. Click refactor and then click do refactor.
Step 14. Now you have to change application id, click on build.gradle, then on change application id.
Step 15. Now a page opens there find application id change it to com.abc.text
Step 16. Hit the sync now option.
Now the name of your application has been renamed.
METHOD 3
In this method, we are going to use the old project name to demonstrate things.
Step 1. Right-click on the package name which is com.abc.text.
Step 2. Hit on refactor and then select move.
Step 3. Select move package “com.abc.txt,” to another package.
Step 4. Click OK.
Step 5. Now when you click OK, you will get a list of warning messages with the list of folders to move. Hit Yes.
Step 6. A new dialog box will appear for entering the name of the project. Enter the name of the project except for the last part. For example, if you want to name the project “com.abc.def” enter till “com.abc”.
Step 7. Now a new pop-up will appear asking for the folder does not exist want to create a new folder. Hit Yes.
Step 8. Hit do refactor.
Step 9. Now we will enter the last part of the name for the project. To do so, right-click on the application folder name.
Step 10. Now, you have to hit refactor and then click on the rename option.
Step 11. Again you will get some warning; click OK.
Step 12. Enter the new name, def. And click OK.
Step 13. Now again, you have to click on do refactor.
Step 14. Now if you want you can remove those old files. You can select multiple of packages at once and press the delete button.
Conclusion
Android studio app keeps stopping & rename project. We have seen how to resolve the problem related to the android studio app, not working. We tried to make easy to tackle those problems. It is not hard to resolve them. We have also seen how to rename the project. These things are quite easy to do. I hope you liked the post.
Источник
How to create a Stopwatch App using Android Studio
In this article, an Android app is created to display a basic Stopwatch.
The layout for Stopwatch includes:
- A TextView: showing how much time has passed
- Three Buttons:
- Start: To start the stopwatch
- Stop: To stop the stopwatch
- Reset: To reset the stopwatch to 00:00:00
Steps to create the Stopwatch:
- Create a new project for Stopwatch App
- Add String resources
- Update the Stopwatch layout code
- Update the code for activity
Below are the steps one by one in detail:
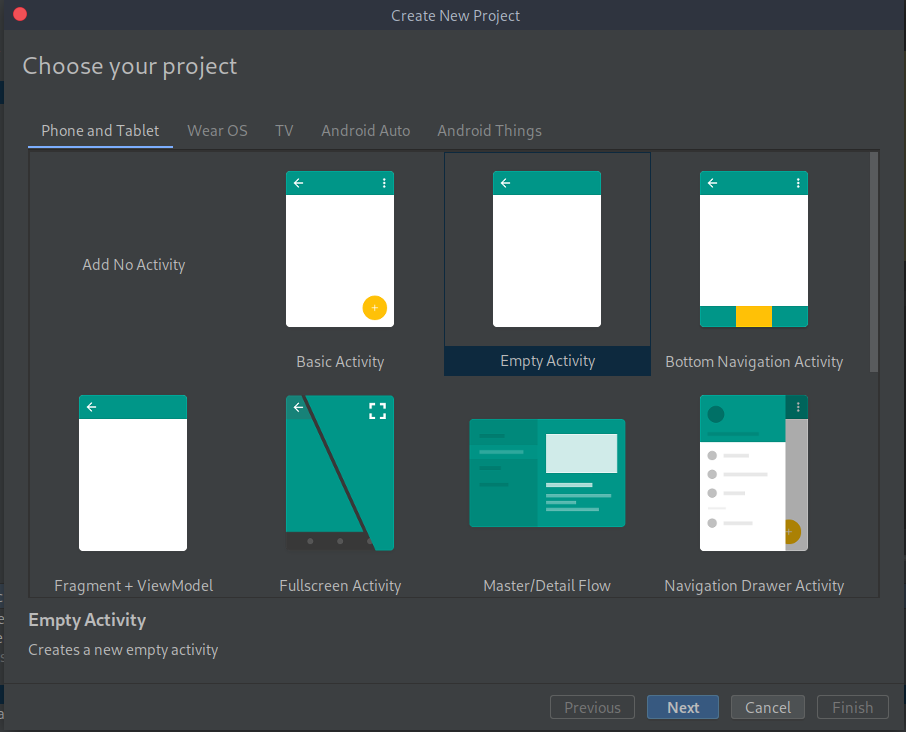
Create a New project and select Empty Activity
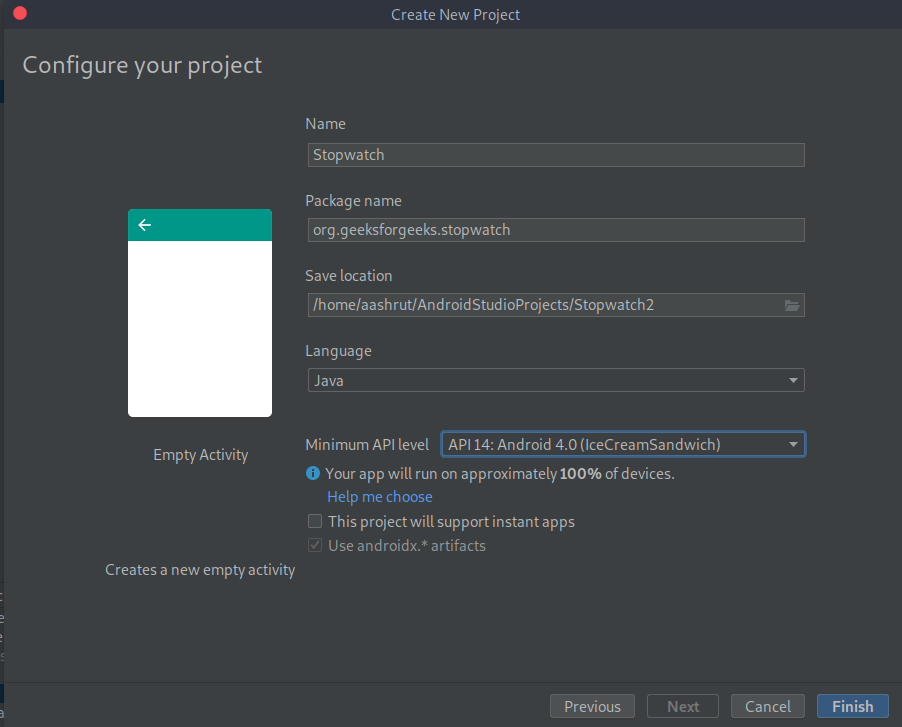
Configure the project

First opening screen
Strings.xml
activity_stopwatch.xml
We will update the stopwatch using a method we will create called runTimer(). The runTimer() method will run code every second to check whether the stopwatch is running, and, if it is, increment the number of seconds and display the number of seconds in the text view.
To help us with this, we will use two private variables to record the state of the stopwatch. We will use an int called seconds to track how many seconds have passed since the stopwatch started running, and a boolean called running to record whether the stopwatch is currently running.
We will start by writing the code for the buttons, and then we will look at the runTimer() method.
- Add code for the buttons When the user clicks on the Start button, we will set the running variable to true so that the stopwatch will start. When the user clicks on the Stop button, we will set running to false so that the sopwatch stops running. If the user clicks on the Reset button, we will set running to false and seconds to 0 so that the stopwatch is reset and stops running.
- The runTimer() method The next thing we need to do is to create the runTimer() method. This method will get a reference to the text view in the layout; format the contents of the seconds variable into hours, minutes, and seconds; and then display the results in the text view. If the running variable is set to true, it will increment the seconds variable.
- Handlers allow you to schedule code A Handler is an Android class you can use to schedule code that should be run at some point in the future. You can also use it to post code that needs to run on a different thread than the main Android thread. In our case, we are going to use a Handler to schedule the stopwatch code to run every second.
To use the Handler, you wrap the code you wish to schedule in a Runnable object, and then use the Handle post() and postDelayed() methods to specify when you want the code to run. - The post() method The post() method posts code that needs to be run as soon as ossible(which is usually immediately). This method takes one parameter, an object of type Runnable. A Runnable object in Androidville is just like a Runnable in plain old Java: a job you want to run. You put the code you want to run in the Runnable’s run() method, and the Handler will make sure the code is run as soon as possible.
- The postDelayed() method The postDelayed() method works in a similar way to the post() method except that you use it to post code that should be run in the future. The postDelayed() method takes two parameters: a Runnable and a long. The Runnable contains the code you want to run in its run() method, and the long specifies the number of milliseconds you wish to delay the code by. The code will run as soon as possible after the delay.
Источник


