- 9 Best Software for Android Data Recovery
- Tenorshare UltData
- dr.fone
- Apeaksoft
- FonePaw
- iMyFone
- EaseUS
- PhoneRescue
- Disk Drill
- AirMore
- Wrapping Up
- Монтирование внутренней памяти Android как Mass Storage и восстановление данных
- Подготовка к подключению внутреннего хранилища
- Подключение внутренней памяти Android как Mass Storage Device
- Восстановление данных из подключенного внутреннего хранилища Android
9 Best Software for Android Data Recovery
![]()
Geekflare is supported by our audience. We may earn affiliate commissions from buying links on this site.
It is truly a heart-sinking moment if you find an important file is deleted from your Android phone or tablet. Maybe that file was a reflection of happy moments you can’t relive, or it was a document you need at work.
Losing a file is painful whatever the case is. The reason you might have lost data in your Android or iOS can be due to accidental deletion, lacking backup, rooting errors, memory card malfunctioning, and so on.
So, what if you realize you cannot find an important file on your phone? Is there a way to get it back?
Well, this is where Android data recovery software comes into the picture!
The catch here is that on deleting a file, its data is not washed away entirely. Android marks that space as empty and treats the file as missing. Hence, you cannot see the file, and that space can be overwritten by new files. When that space is occupied by original files, you can say your file is lost.
Since a majority of Android phones do not have a recycle bin, you cannot retrieve your data back through it. Ultimately, Android data recovery software can be employed to rescue your files. The software can scour the memory of the Android phone to search for pages that are marked with 0 in order to locate recoverable data.
Furthermore, the tool pieces the recoverable data back together while giving it a salvageable format. Also, it is advised to utilize data recovery tools as soon as the file is being deleted so that the chance of recovering data becomes fairly high.
In order to recover data, typically three easy steps are involved:
- Connecting the device successfully with a PC where the recovery software is installed
- Choosing the file type followed by scanning
- Choosing the desired files and recovering the data
Below mentioned are some of the software you can use to recover data from your Android devices.
Tenorshare UltData
Tenorshare is considered one of the best Android data recovery software you can find. It claims to have the highest success rate in the industry and is compatible with more than 6000 devices, including Samsung, Oppo, Xiaomi, Huawei, and so on.
This software has made it effortless to recover your deleted photos and WhatsApp messages from your smartphone without root. Even if you have no backup, it can recover videos, voice, stickers, documents, etc. on WhatsApp.

Irrespective of the file type, Tenorshare can help you recover important contacts, treasured photos from the gallery, call records, and other files in your internal memory. For this, you must necessarily root your device.
Data recovery is possible in scenarios like:
- Accidental deletion
- Water damage
- OS crash
- Screen is broken
- System root
You can recover your data from both internal memory as well as SD cards. You can also preview the file before recovering it. Speaking of the security aspect, this tool is read-only and risk-free, where there is no chance of information leak or data loss.
dr.fone
dr.fone data recovery software claims to be the world’s first brand that provides data recovery services for personal usage. It has been leading the industry for over eight years and supports more than 6000 Android devices. You can even extract files from your broken Samsung smartphones.

This software is capable of recovering a wide range of file types, including music, text messages, contacts, videos, photos, documents, and WhatsApp messages for rooted phones. With this tool by your side, lost data can be recovered no matter what the scenario was, for instance, accidental deletion, system crash, forgotten passwords, SD card issues, rooting errors, ROM flashing, damages, black screen, factory reset, etc.
Using dr.fone solution, you can scan and then preview lost files to recover all or selected data with a few simple clicks. It offers three recovery modes, namely, internal storage, broken device, and SD cards.
Apeaksoft
Recovering your lost data from tablets and android phones is now super easy with Apeaksoft Android Data Recovery. It helps you retrieve your deleted and lost files, including text messages, documents, call history, photos, and contacts. You can easily manage and backup your Android data on your Mac and Windows computer with a USB cable.
Whether you faced a system crash, accidental deletion, SD card issue, forgotten password, or rooting error, Android Data Recovery allows you to recover all the data whatever the scenario. Apeaksoft is compatible with more than 5000 Android devices.
Apart from recovery, you can backup your Android data and Reboot your Android phone. It is an easy-to-use and powerful software that confirms a safe and quick recovering process. It lets preview all the data before restoring the files so you can choose which data to retrieve.
Apeaksoft helps you recover videos, messages, contacts, etc., from broken Android devices. All you need to do is install the software on your computer, connect your Android device via a USB cable, and start recovering data after previewing.
Take one month or a lifetime subscription for a single PC. You can also go for a multi-user license to use lifetime service for 3 PCs. It also comes with a 30-day money-back guarantee.
FonePaw
Using FonePaw, you can easily recover your deleted media and texts from your Android device. The scanning speed of this tool is relatively faster while protecting the privacy of your data, including call logs, messages, photos, videos, documents, and WhatsApp media.
It supports a wide range of file formats such as Excel, Word, PPT, HTML, PDF, RAR, ZIP, and more. It does not matter if your data was lost due to accidental damage, OS crash, SD issues, ROM flashing, and virus attack; the software can restore them all.
More than 6000 Android devices are supported by software ranging from version 2.3-9.0. In addition to these, the software also provides features including data extraction from broken Android phones along with backup and restore.
iMyFone
D-Back offers an easy way to recover your deleted data from Android smartphones or tablets. You can even get them back from broken phones. This software supports multiple Android smartphones and file types, including call logs, messages, photos, audios, videos, contacts, documents, and WhatsApp data.

With D-Back, you get a high level of security and faster data retrieval rate after losing them on the grounds of a system crash, accidental deletion, water damage, virus attack, black screen, forgotten passwords, system root, and device not responding scenarios.
The software offers data recovery from internal memory as well as from SD cards. You can even preview and filter files before retrieving them. It does not matter if your device is rooted or not, and the tool can still get your data back.
EaseUS
The easy-to-use software EaseUS can efficiently recover your deleted files such as contact, text messages, videos, photos, documents, and audio. It supports more than 6000 Android devices, including Samsung, LG, HTC, Sony, OnePlus, Asus, and so on.

The software can recover files from SD cards and internal memory on losing data through accidental damage, virus attack, device failure, rooting, improper device handling, SD card issues, and more. You just need to connect your device, scan for lost files, and recover the files you want within minutes.
EaseUS takes care of the security and privacy of data without overwriting them. Besides, it offers free upgrades for a lifetime so that you can enjoy its latest version as soon as it releases. Moreover, if you come across any difficulty, you can seek help from their technical support for free.
To check the quality of recovery files in advance, you can preview the recoverable data and filter the desired ones. Furthermore, you can track changes in real-time because the software sends recovery result notifications to the device’s notification center.
PhoneRescue
PhoneRescue is probably the only one that can recover deleted data and restore it directly to your smartphone. Whether you root your device or not, it can still find and recover deleted data.

The software can restore different types of data from your phone, including WhatsApp data and attachments. Leveraging customized technologies for each smartphone and tablet, PhoneRescue recovers files at an impressive speed.
Apart from that, the software can save your device when it is locked with pattern, password, or fingerprint, without losing data.
Disk Drill
7-Data Recovery, which now Disk Drill, leverages powerful technology to recover data from Android devices. It is simple to use and free that can retrieve your data back after it is deleted unintentionally or through corruption.

The types of files recoverable by this software are documents, apps, music files, videos, databases, emails, and more. In order to recover data, you need to connect your Android device to your PC after enabling the mode “Mass Storage”. Now, open the software and scan for the lost files and recover them. However, if this mode is not available in your device, root it beforehand.
This software not only can retrieve the data from your Android smartphone but also from Android tables and TV Boxes.
AirMore
If you have deleted some useful data from your device by system updates, ROM flashing, device rooting, or simply by accident, AirMore can help you restore the files like you never lost it. It offers a faster way of data recovery from both SD cards and internal memory of the device.

From internal storage, the software can recover data such as contacts, messages, photos, audio, videos, call logs, documents, and WhatsApp data. On the other hand, the device can restore data such as photos, videos, audio, and documents from SD cards.
In an event when your device is broken, dropped in water, or went through a system crash, its data can be recovered. However, this feature is applicable for only Samsung Galaxy phone models, but more devices are expected to be supported soon.
Wrapping Up
Losing data is indeed a painful experience, especially when you cannot afford to lose them permanently. But it happens and not to worry; the above-listed Android data recovery software can help you restore the files. No matter what type of file you have lost or the android device you use, data recovery software offers an efficient, secure, and faster way to get them back.
Источник
Монтирование внутренней памяти Android как Mass Storage и восстановление данных

Восстановление данных, удаленных фото и видео, документов и других элементов из внутренней памяти современных Android телефонов и планшетов стало сложной задачей, поскольку внутреннее хранилище подключается по протоколу MTP, а не Mass Storage (как флешка) и привычные программы для восстановления данных не могут найти и восстановить файлы в этом режиме.
Существующие популярные программы для восстановления данных на Android (см. Восстановление данных на Android) пробуют обойти это: в автоматическом режиме получить root-доступ (либо предоставляя сделать это пользователю), а затем — прямой доступ к хранилищу устройства, но это работает не для всех устройств.
Однако, существует способ вручную смонтировать (подключить) внутреннее хранилище Android как флешку (Mass Storage Device) с помощью команд ADB, а затем использовать любую программу восстановления данных, работающую с файловой системой ext4, использующуюся на этом хранилище, например, PhotoRec или R-Studio. О подключении внутреннего хранилища в режиме Mass Storage и последующем восстановлении данных из внутренней памяти Android, в том числе после сброса на заводские настройки (хард ресета) и пойдет речь в данной инструкции.
Предупреждение: описываемый способ не для начинающих. Если вы относите себя к ним, то какие-то пункты могут оказаться непонятными, а результат действий не обязательно будет ожидаемым (теоретически, можно сделать хуже). Используйте изложенное только под свою ответственность и с готовностью к тому, что что-то пойдёт не так, а ваше Android устройство больше не включится (но, если всё делать, понимая процесс и без ошибок, этого произойти не должно).
Подготовка к подключению внутреннего хранилища
Все действия, описанные ниже можно выполнить в Windows, Mac OS и Linux. В моем случае использовалась Windows 10 с установленной в ней подсистемой Windows для Linux и Ubuntu Shell из магазина приложений. Установка компонентов Linux не обязательна, все действия можно провести и в командной строке (и отличаться они не будут), но я предпочел этот вариант, так как при использовании ADB Shell в командной строке возникли проблемы с отображением спецсимволов, не влияющие на работу способа, но представляющие неудобства.
Прежде чем начать подключение внутренней памяти Android как флешки в Windows выполните следующие шаги:
- Скачайте и распакуйте Android SDK Platform Tools в папку на вашем компьютере. Загрузка доступна на официальном сайте https://developer.android.com/studio/releases/platform-tools.html
- Откройте параметры системных переменных среды (например, начав в поиске Windows вводить «переменных», а затем в открывшемся окне свойств системы нажав «Переменные среды». Второй способ: открыть Панель управления — Система — Дополнительные параметры системы — «Переменные среды» на вкладке «Дополнительно»).

- Выберите переменную PATH (не важно, системную или пользовательскую) и нажмите «Изменить».
- В следующем окне нажмите «Создать» и укажите путь к папке с Platform Tools из 1-го шага и примените сделанные изменения.


Если вы проделываете указанные действия в Linux или MacOS, то поищите в Интернете, как в этих ОС добавить папку с Android Platform Tools в PATH.
Подключение внутренней памяти Android как Mass Storage Device
Теперь приступаем к основной части этого руководства — непосредственно подключение внутренней памяти Android как флешки к компьютеру.
- Перезагрузите ваш телефон или планшет в режиме Recovery. Обычно для этого нужно выключить телефон, затем зажать и удерживать кнопку питания и «громкость вниз» в течение некоторого времени (5-6) секунд, а после появления экрана fastboot выбрать Recovery Mode с помощью кнопок громкости и загрузиться в него, подтвердив выбор коротким нажатием кнопки питания. Для некоторых устройств способ может отличаться, но легко находится в Интернете по запросу: «модель_устройства recovery mode»
- Подключите устройство к компьютеру по USB и подождите некоторое время, пока оно не будет настроено. Если по окончании настройки в диспетчере устройств Windows устройство будет отображаться с ошибкой, найдите и установите ADB Driver именно для вашей модели устройства.
- Запустите Ubuntu Shell (в моем примере используется именно оболочка Ubuntu под Windows 10), командную строку или терминал Mac и введите adb.exe devices (Примечание: из-под Ubuntu в Windows 10 я использую adb для Windows. Можно было бы установить adb для Linux, но тогда бы он не «видел» подключенных устройств — ограничение функций подсистемы Windows для Linux).
- Если в результате выполнения команды вы видите подключенное устройство в списке — можно продолжать. Если нет — введите команду fastboot.exe devices
- Если в этом случае устройство отобразилось, значит всё подключено правильно, но рекавери не позволяет использовать команды ADB. Вероятно, придется установить кастомный рекавери (рекомендую найти TWRP для вашей модели телефона). Подробнее: Установка кастомного рекавери на Android.
- После установки кастомного рекавери, зайдите в него и повторите команду adb.exe devices — если устройство стало видным, можно продолжать.
- Введите команду adb.exe shell и нажмите Enter.


В ADB Shell по порядку выполняем следующие команды.
В результате получаем имя устройства block, которое будет использовать далее (не теряем его из виду, запоминаем).

Следующей командной размонтируем раздел data на телефоне, чтобы иметь возможность подключить его как Mass Storage.
Далее находит индекс LUN нужного раздела, соответствующего Mass Storage Device
Будет отображено несколько строк, нас интересуют те, которые имеют в пути f_mass_storage, но пока мы не знаем, какая именно (обычно, заканчивающиеся на просто lun или lun0)
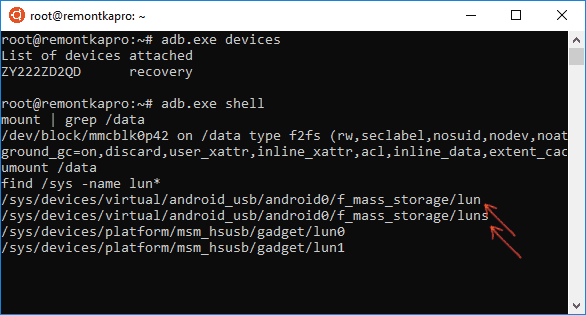
В следующей команде используем имя устройства из первого шага и один из путей с f_mass_storage (один из них соответствует внутренней памяти). Если будет введен неверный, вы получите сообщение об ошибке, тогда пробуем следующий.

Следующий шаг — создаем скрипт, подключающий внутреннее хранилище к основной системе (всё, что ниже — одна длинная строка).

В этот момент сессия ADB Shell будет закрыта, а к системе будет подключен новый диск («флешка»), представляющий собой внутреннюю память Android.

При этом, в случае Windows вас могут попросить отформатировать накопитель — не делайте этого (просто Windows не умеет работать с файловой системой ext3/4, но многие программы для восстановления данных умеют).
Восстановление данных из подключенного внутреннего хранилища Android
Теперь, когда внутренняя память подключена как обычный накопитель, мы можем использовать любую программу для восстановления данных, которая умеет работать с разделами Linux, например, бесплатную PhotoRec (доступную для всех распространенных ОС) или платную R-Studio.
Я пробую выполнить действия с PhotoRec:
- Скачиваем и распаковываем PhotoRec с официального сайта https://www.cgsecurity.org/wiki/TestDisk_Download
- Запускаем программу, для Windows и запуска программы в графическом режиме запустите файл qphotorec_win.exe (подробнее: восстановление данных в PhotoRec).
- В главном окне программы вверху выбираем устройство Linux (тот новый диск, который мы подключили). Ниже указываем папку для восстановления данных, а также выбираем тип файловой системы ext2/ext3/ext Если вам требуются файлы лишь определенного типа, рекомендую указать их вручную (кнопка «Форматы файлов»), так процесс пойдет быстрее.
- Еще раз убедитесь, что выбрана нужная файловая система (иногда переключается «сама»).
- Запустите поиск файлов (находиться они начнут на втором проходе, первый — поиск заголовков файлов). При нахождении, они автоматически будут восстановлены в указанную вами папку.


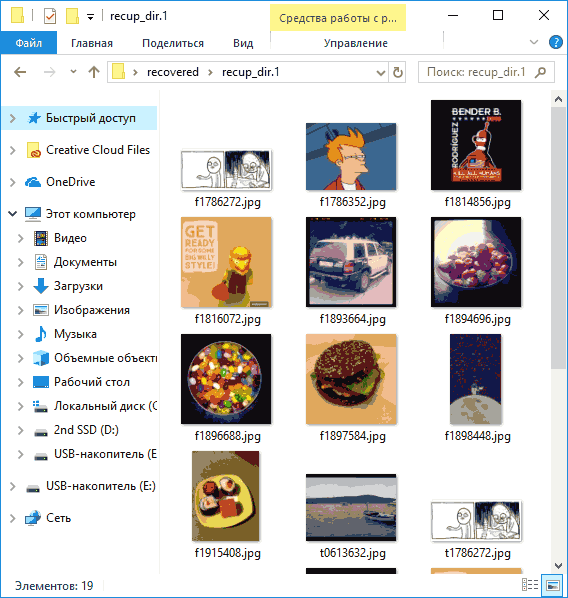
В моем эксперименте из 30 удаленных из внутренней памяти фотографий в идеальном состоянии было восстановлено 10 (лучше, чем ничего), для остальных — только миниатюры, также были найдены скриншоты png, сделанные ещё до хард-ресета. R-Studio показала примерно тот же результат.
Но, так или иначе, это не проблема способа, который работает, а проблема эффективности восстановления данных как таковой в некоторых сценариях. Так же отмечу, что DiskDigger Photo Recovery (в режиме глубокого сканирования с root) и Wondershare Dr. Fone for Android показали сильно худший результат на том же устройстве. Конечно, вы можете попробовать и любые другие средства, позволяющие восстанавливать файлы с разделов с файловой системой Linux.
По окончании процесса восстановления, извлеките подключенное USB устройство (используя соответствующие способы вашей операционной системы).

Затем можно просто перезагрузить телефон, выбрав соответствующий пункт в меню рекавери.
Источник


