- Stream from android to linux
- About
- How to Stream Android Music / Audio to Ubuntu over WIFI
- How to Stream Audio from Your Linux PC to Android
- Installations Abound
- Connecting Android to PC
- A Great Solution
- How to cast video from Android to Linux
- Casting Video from Android to Linux
- What are scrcpy and sndcpy?
- Prerequisites for scrcpy and sndcpy
- Step 1: Enable “Developer Options” and “USB Debugging”
- Step 2: Install ADB Tools and VLC on your Linux PC
- How to install and set up “scrcpy” and “sndcpy” to Cast Video from Android to Linux
- Step 1: Install scrcpy and sndcpy
- Step 2: Connect your Android Device to your Linux PC
- Step 3: Start scrcpy & sndcpy
- Step 4: Get Full Control Over scrcpy Mirroring.
- (Optional) Step 5: Use scrcpy and sndcpy Wirelessly
- How to Remove scrcpy and sndcpy From Your System?
- Wrapping Up
Stream from android to linux
Instructions how to mirror Android phone to Linux computer
These instructions will show you how to fully mirror your Android phone screen to your Linux computer; this means that everything on the phone will be rendered on the computer, including video playback from any application, including proprietary player-based applications (like NowTV).
- Android phone (Android>5.0);
- Linux computer (tested with Ubuntu 18.04)
- USB cable;
Before you start
- Make sure that you have installed all the latest updates on your Linux box; on Ubuntu:
also important is your sytem be a recent version of the OS (example: this method has been tested succesfully on Ubuntu 18.04LTS but also found impossible to use for 14.04LTS);
- You need to enter the Developer Mode of your Android phone (note: this does not mean you are rooting it!); follow the steps in this post; this enables Debugging and USB connection;
Installing needed software packages
The only two needed software packages you’ll need are:
- adb Android Debug Bridge; deb; install with sudo apt-get install adb
- scrcpy — main application — see their gitHub page;
After you’ve installed adb , install scrcpy as a snap package; first install snapd :
then install scrcpy :
Final step: connecting phone and start cast
Once all the software packages have been installed correctly, connect the phone to the computer via the USB cable and check the adb daemon starts:
- with the screen unlocked on the phone, type adb start-server (if, for some reason, the server is running, kill it first by adb kill-server );
- the phone will display a sha code and ask you to accept authentication — say yes and also tick the box saying do not display this message again;
- type scrcpy and the application should start immediately!
Do not even try
Do not even try to install scrcpy on older OS’s (I tried on Ubuntu 14.04 and tried both as a snap package and build from source) — the problem is that dependency libraries are old and if the OS is not supported anymore you will have to download and build them manually one by one. A few issues I encountered:
- install as a snap package: snapd and scrcpy install fine but when running scrcpy all fails since libmirclient.so.9 is not found (I have libmirclient.so.7 on Ubuntu 14.04 and updating it to 9 is close to impossible since mir needs a whole lot of other dependencies);
- build from source: you will need python3 ; you will also benefit from a virtual environment you can create using e.g. Anaconda; this is because you will need a host of newer packages and compilers:
- gcc > 4.8
- ninja
- meson
- ffmpeg (note that on Ubuntu 14.04 ffmpeg had been temporarily replaced with another package and you’ll need to do a lot of gymnastics to get it installed);
In brief — if you are trying to get it working on an unsupported OS, better not 🙂
About
Instructions how to stream video from Android phone to Linux computer
Источник
How to Stream Android Music / Audio to Ubuntu over WIFI

Want your Android Phone’s music plays out of the Ubuntu machine’s speaker over WIFI? Well, here’s step by step howto using DLNA/UPnP. Tested with Ubuntu 14.04 and LG E960 (Nexus 4).
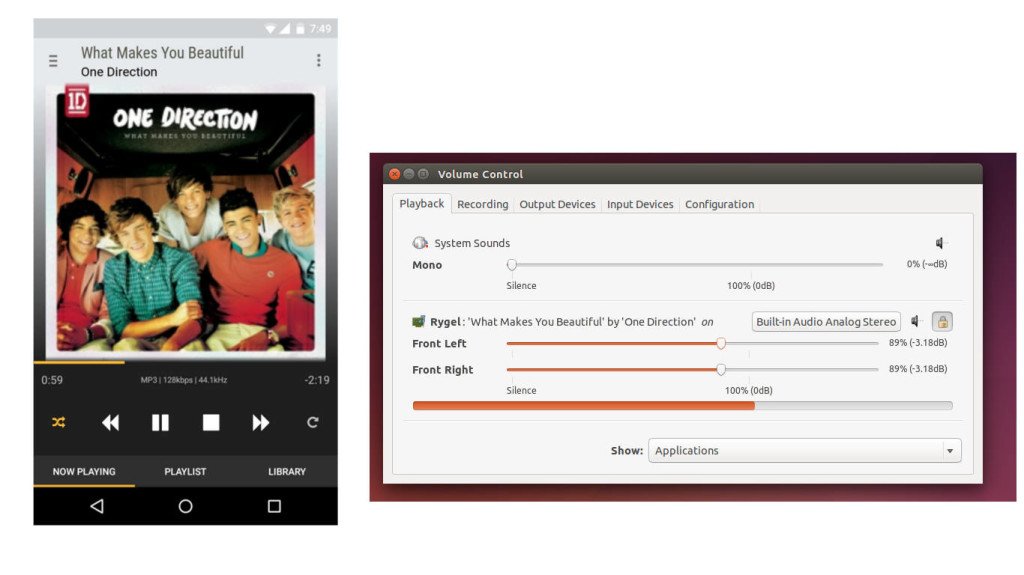
First take a look at result. Android phone plays music, and sound comes out of my Ubuntu laptop’s speaker.
To get started, first do below steps in Ubuntu machine:
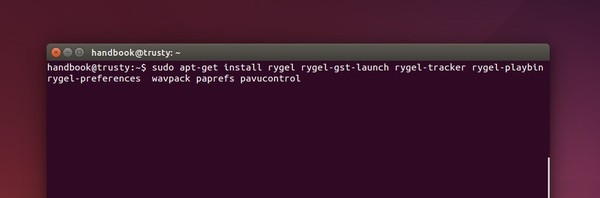
1. Open Terminal from the Dash/Menu, run below command to install rygel, PulseAudio Preferences, and Volume Control utilities.
Type in your user password when it asks and answer yes to confirm the install process.
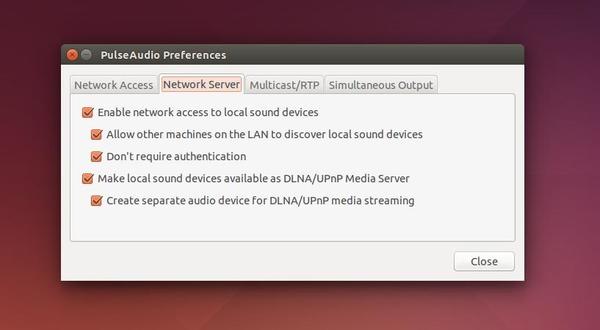
2.Open PulseAudio Preferences utility from the Unity Dash or Application Menu. When it opens, check to enable every option under Network Server tab.
3. Finally start the rygel service by running command rygel in terminal window so that your Android phone can see Ubuntu machine.
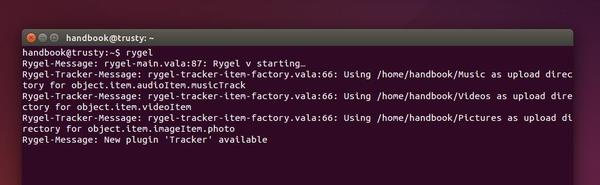
Leave the terminal window open as long as you want to stream the music plays.
Now do below steps in Android device:
First you need a music player with DLNA/UPnP support. Here I installed the BubbleUPnP from Google Play.
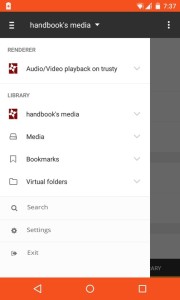
1. Open the DLNA/UPnP player/client and select Ubuntu machine as audio renderer. In my case, it’s Audio/Video playback on trusty (see the picture below).
Restart Ubuntu machine and start the rygel service if you don’t see it in the drop-down list.
2. Now browser music from library (Both local and remote libraries are OK), add to playlist and play them. Depends on the required bandwidth, there might be a time delay before music starts playing.
Here the sound from Ubuntu machine’s speaker? If not, make sure you have selected the right output from Ubuntu’s sound setting utility.
Источник
How to Stream Audio from Your Linux PC to Android
I listen to music all the time while working at my PC (which is much of the day). Sometimes I’m pretty much tethered to the desk for long stretches, and sometimes I wander about the office (aka house) for new ideas or just to change my perspective. When I decide to step away, I like to take my music with me. How do I do that? Sure, I could turn the music up to eleven, but the cats (and my wife) aren’t too keen on hearing Devin Townsend Project at near blistering levels. And, sometimes I’m the only one in the mood for classical music.
To avoid the issue of too much music for the average ears, I stream what I’m listening to from my Linux PC to my Android device. How do I do that?
 Figure 1: The SoundWire Server GUI in action.
This is a simple-to-use app duo, installed on both your PC and your Android device, that allows you to stream whatever you’re listening to so that you can take your audio with you…as long as you remain on the same wireless network.
Before you get too thrilled about this, there is one caveat to the system. You must not mute the volume of your PC; otherwise, the sound streaming to your Android device will also mute. Other than that, the SoundWire system works great.
Let’s get it installed and working.
Installations Abound
I’ll be demonstrating the installation on Ubuntu GNOME 16.04. The first thing you must do is install the SoundWire Server on your PC. Download the tar file from the SoundWire Server page (and make sure you get the server from that page). You’ll notice there are both 64- and 32-bit versions of the server. Download the correct file for your system architecture.
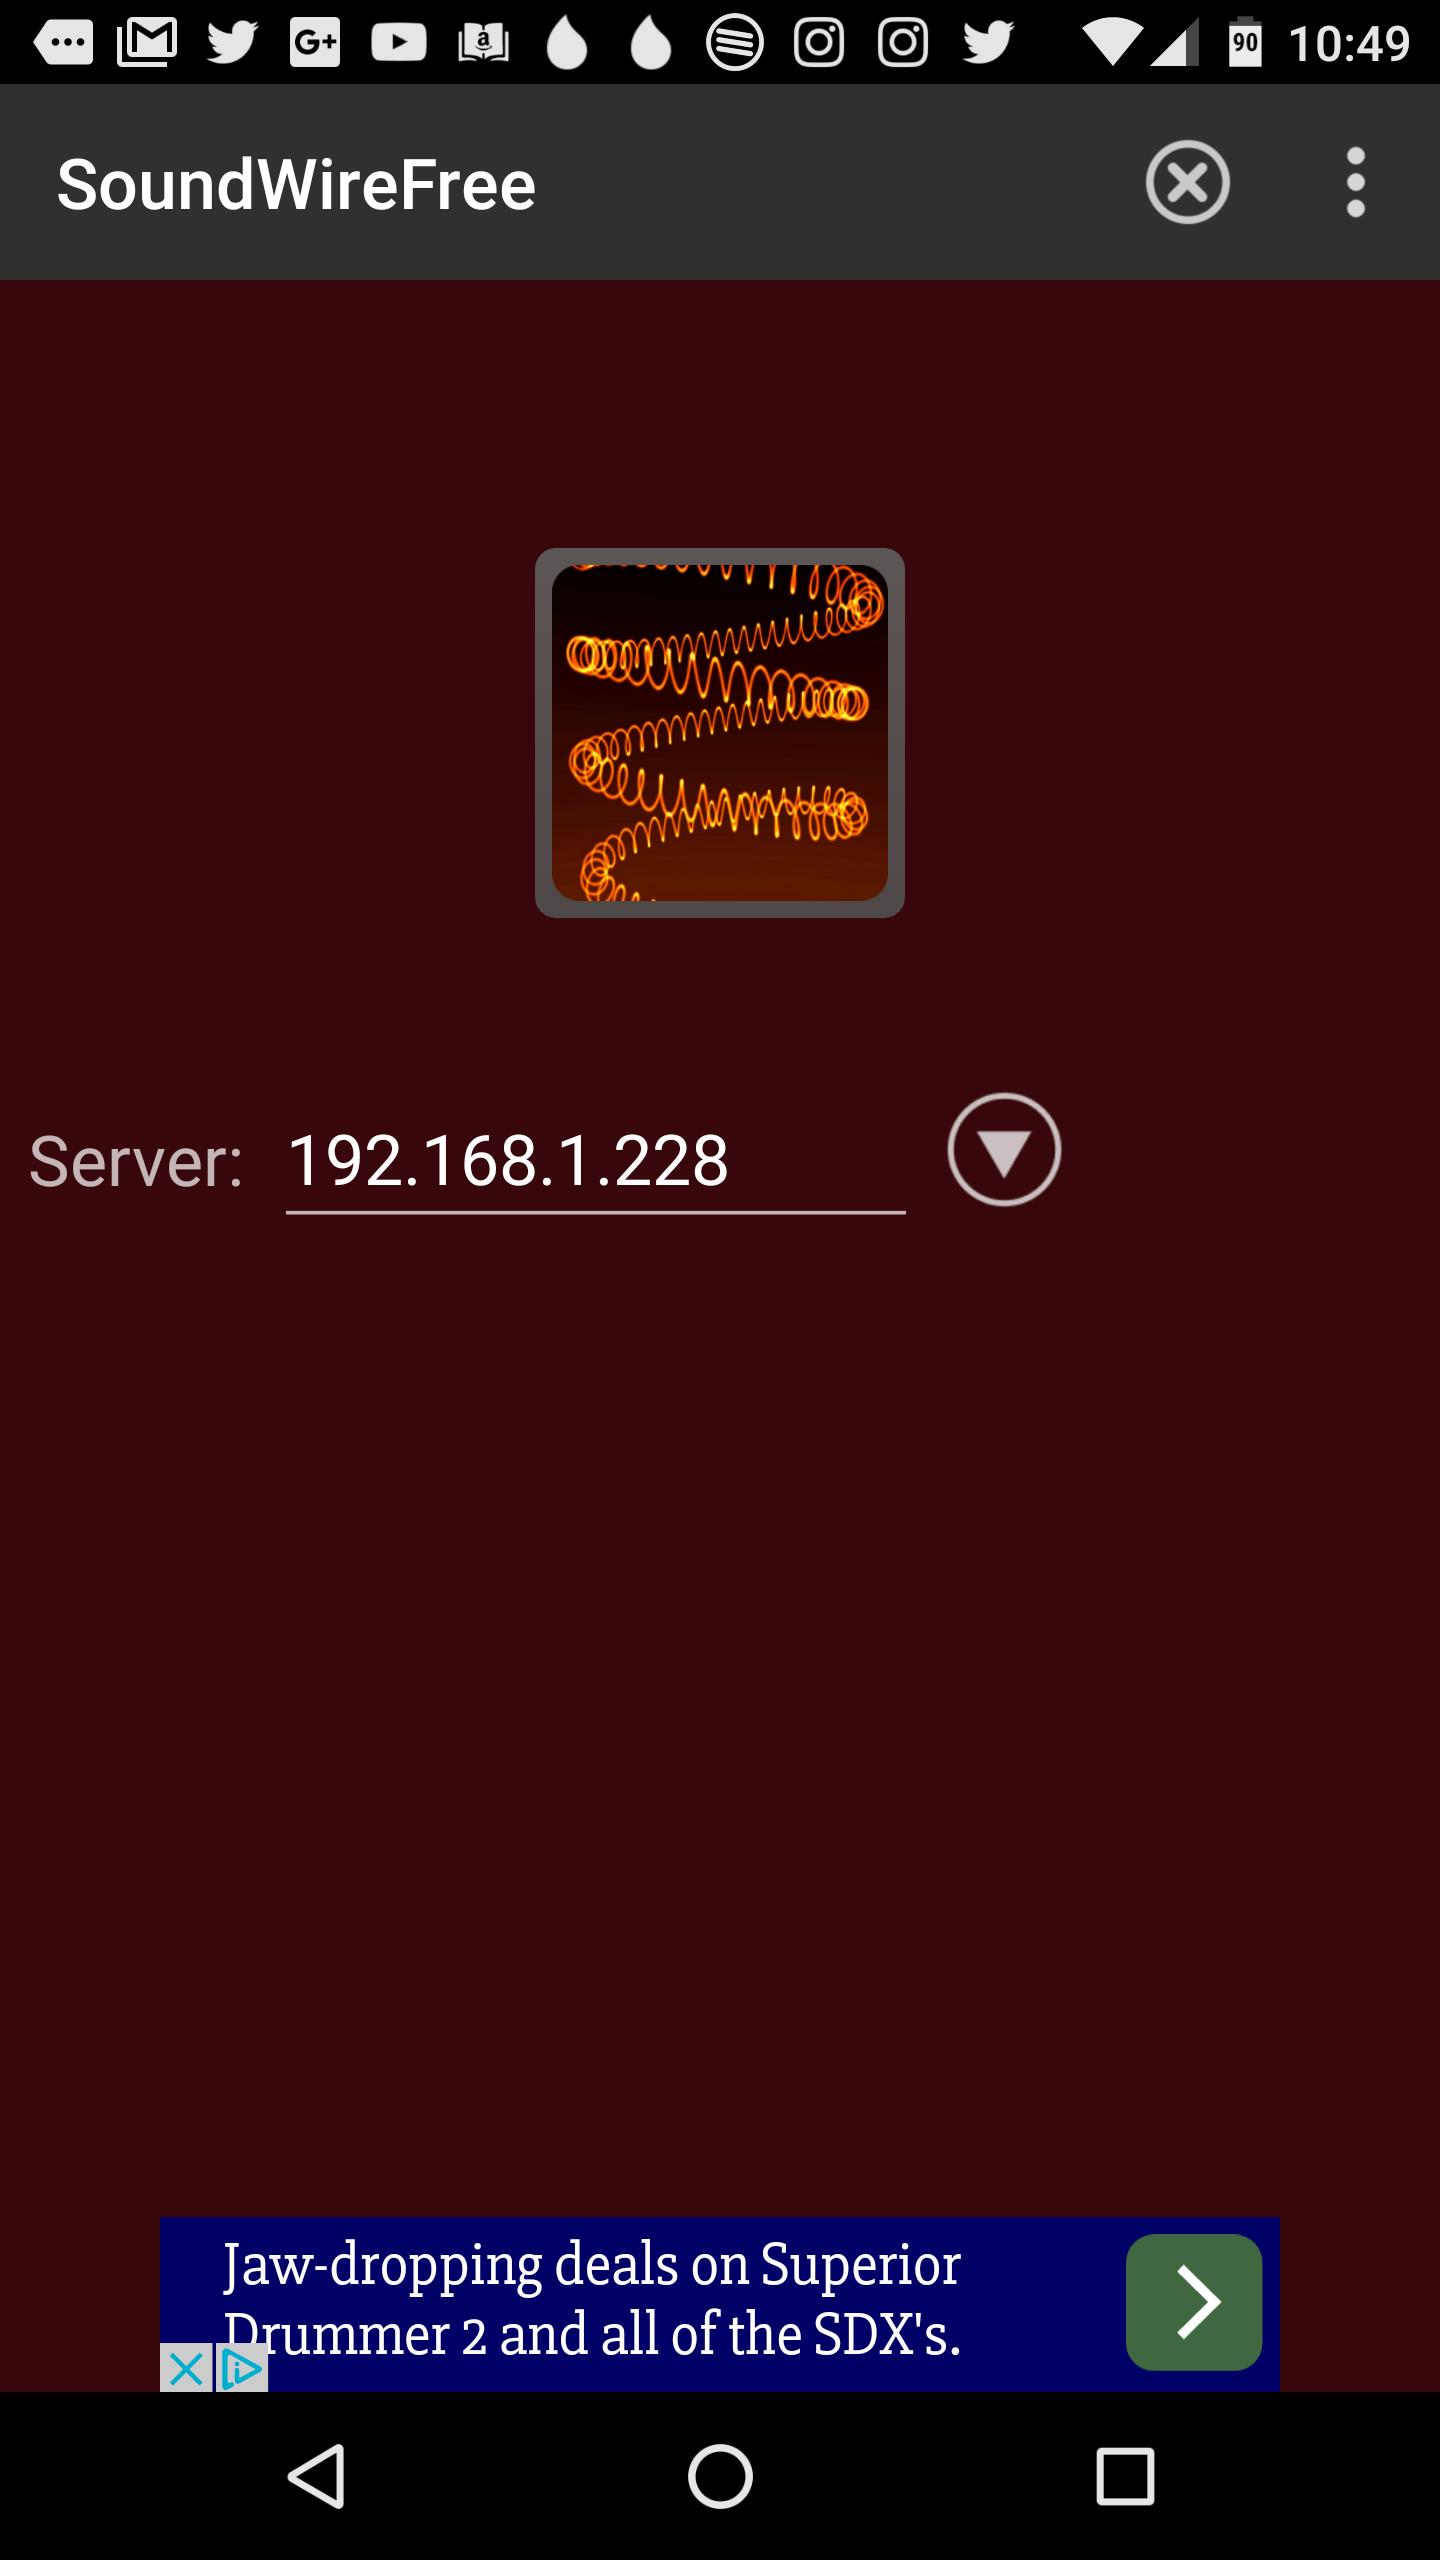 Figure 2: The SoundWire Android app.
Before the SoundWire Server will run, you must install PulseAudio Volume Controller. This can be done with a single command: sudo apt-get install pavucontrol . The SoundWire Server also requires portaudio, but most likely your system already has libportaudio2 installed. If you issue the command sudo apt-get install libportaudio2, it will either install the app (if it’s missing) or report to you that it is already installed.
Now let’s take a look at the downloaded SoundWire Server package. If you’ve downloaded the file into the
/Downloads directory, open up your file manager and navigate to that folder. Locate the SoundWire_Server_linuxXX.tar.gz file (Where XX is either 64 or 32), right-click it, and select Extract here. This will create a new folder, SoundWireServer. Change into that folder, and you’ll see a number of files, ready to serve.
NOTE: If you don’t want to use the file manager to extract the folder, you can always open a terminal window, change into the
/Downloads directory with the command cd
/Downloads , and issue the command tar xvzf SoundWire_Server_linuxXX.tar.gz (Again, where XX is either 64 or 32).
To start the server, you can either double-click the SoundWireServer file (depending upon which file manager you are using) or work with the command line. To run the app with the command line, do the following:
Open a terminal window
Change into SoundWireServer folder with the command cd
Issue the command ./SoundWireServer
The GUI tool will open, ready to serve up your sound. Before you issue that command, however, let’s install the Android app.
The first thing you must know is that there are two versions of the app: Free and Paid. The free version will identify itself every 45 minutes (interrupting your music). To bypass that, you must purchase the Paid version , which will set you back $3.99.
To install the SoundWire Android app (we’ll install the Free version so you can find out if it’s an app you want to eventually pay for), follow these steps:
Open up the Google Play Store on your Android device
Search for soundwire
Locate and tap the Free version by GeorgieLabs
Read the permissions listing
If the permissions listing is acceptable, tap Accept
Allow the installation to complete
Once the installation is complete, you’ll find the launcher for SoundWire in either your App Drawer or your home screen (or both). Tap the launcher to start up the app.
Connecting Android to PC
The first thing you must do is start up the SoundWire Server. On your Linux PC, go back to the
/Downloads/SoundWireServer directory (from the command line) and then issue the command ./SoundWireServer . The GUI will start up ( Figure 1 above ) and display the IP address to be used for connection.
Once the GUI is running, and you have your IP address, open up the SoundWire app on your Android device. When the app opens ( Figure 2 ), enter the IP address of your Linux PC and then tap the square button in the center of the app.
The app will connect to the server and you can then start playing music from any app on your Linux PC. The sound should automatically start playing through both your PC and your Android device. The SoundWire Server GUI should display the word “Connected” to indicate your Android device has connected to the server.
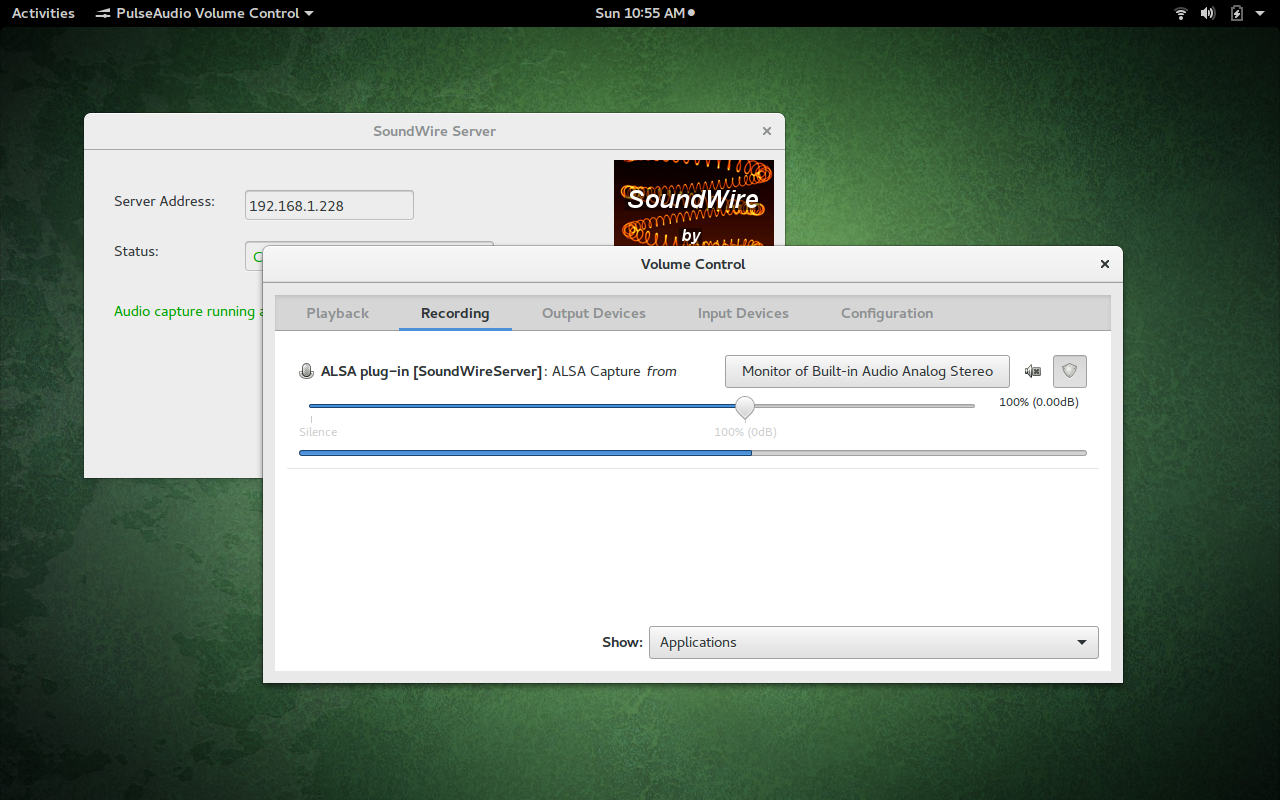 Figure 3: Selecting the right capture from device in the PulseAudio Volume Control app. If you find the GUI claims the Android device is connected, but you’re not hearing any sound on your mobile device, go back to the SoundWire Server GUI and click on the Open PulseAudio Volume Control button. In this new window ( Figure 3 ), go to the Recording tab and make sure Monitor of Built-In Audio Analog Stereo is selected from the Alsa Capture from drop-down. Once that is selected, the sound should start spilling from your Android device.
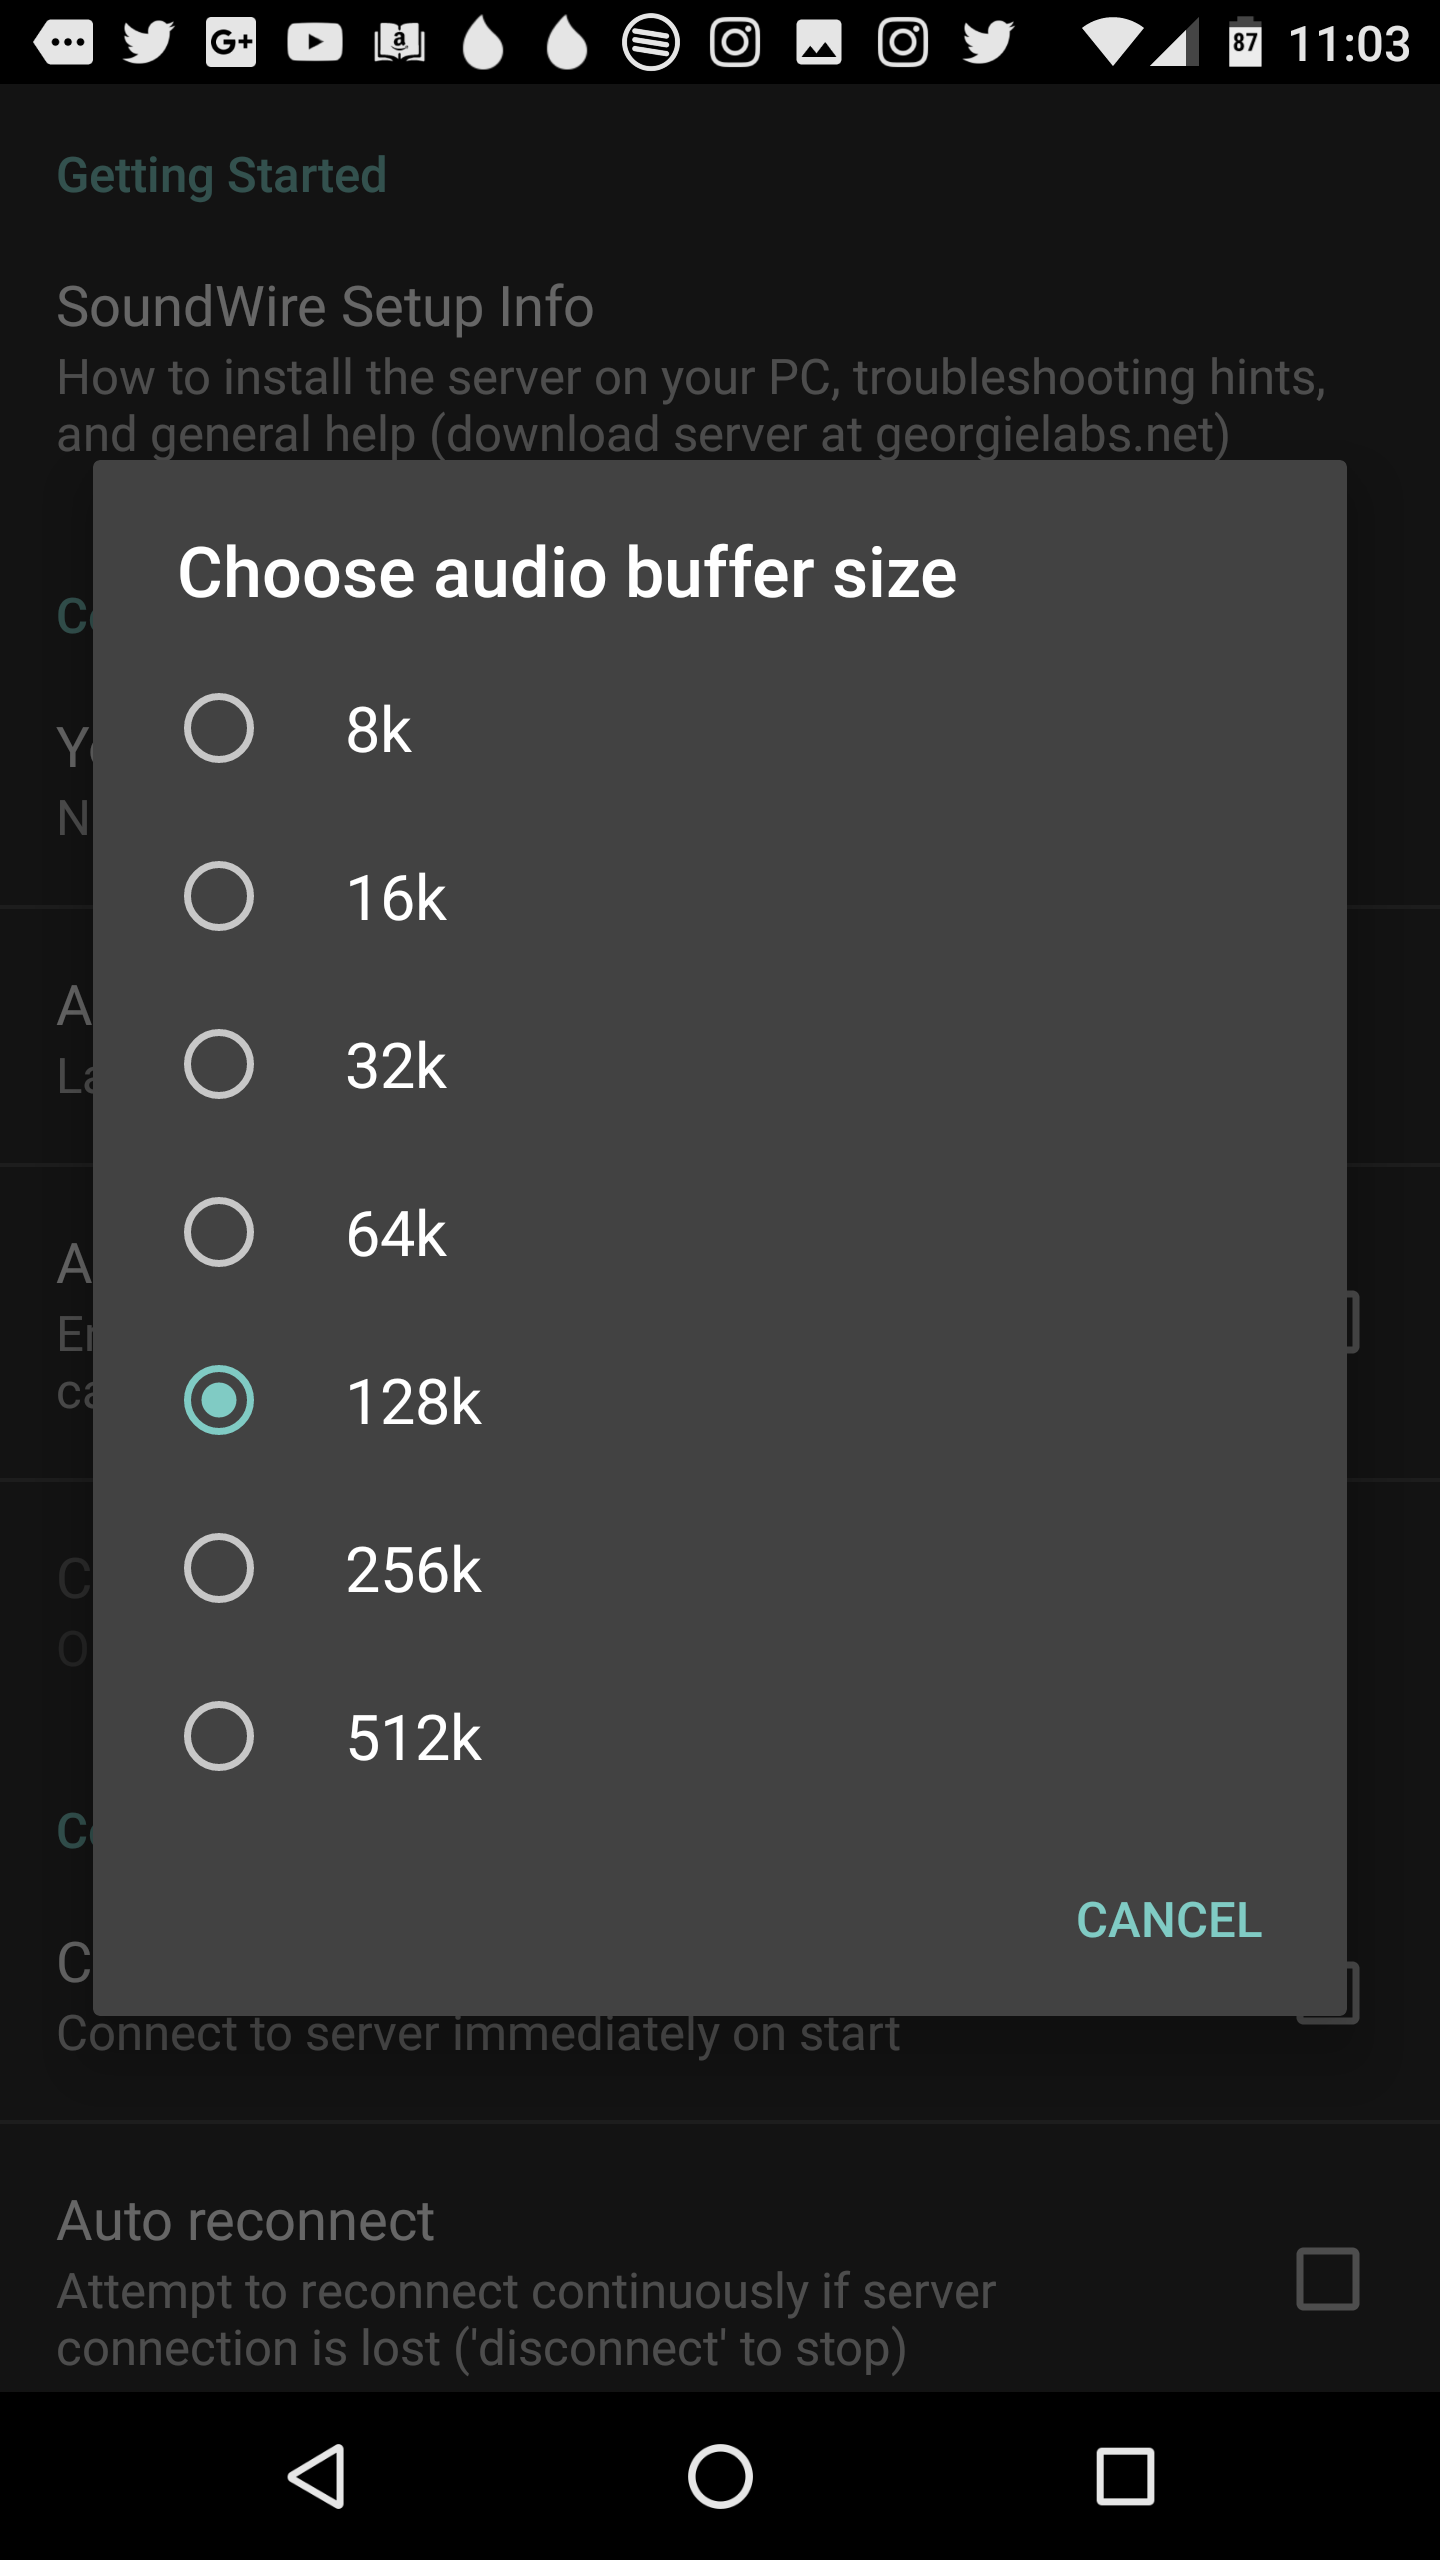 Figure 4: Setting the buffer size for less latency.
Do note that there is a lag (latency) in the sound between the PC and the Android device. You can shrink the latency by opening up Settings (in the Android app) and changing the latency to a lower buffer size ( Figure 4 ). The larger the buffer size, the smoother the audio. The smaller the buffer size, the lower the latency. The default is 128k (which gives a smooth sound with some latency).
Unfortunately, you cannot achieve zero latency with SoundWire…but you can come close.
A Great Solution
If you’re looking for one of the easiest Linux to Android audio streaming solutions, you cannot go wrong with SoundWire. Both the Server and App are reliable, quick to set up, and will function with any audio playback application. Give SoundWire a try and see if it doesn’t help you untether yourself from your desktop audio.
Learn more:
To learn more, check out the “Introduction to Linux” course from The Linux Foundation. This free self-paced course will provide you with a good working knowledge of Linux using both the graphical interface and command line.
Источник
How to cast video from Android to Linux
The entire process basically involves using two tools — scrcpy (screen copy) and sndcpy (sound copy). If it does seem a bit complicated, then we got you covered. Here is a complete step-by-step guide on casting video from Android to Linux.
![]()
T here are many apps and tools out there that will help you cast your Android screen to your Linux PC. However, the main problem is that it only mirrors what’s on the screen and not the audio. This can be an issue if you are trying to cast video from Android, which requires you to forward both video and audio.
Also, the tools that do let you effectively cast video (including its audio) from your Android device to your Linux PC either require a rooted Android phone or suffers from latency issues. And if not that, then it’s a premium tool and requires you to pay money.
But it’s Linux we are talking about! Ain’t there a free and open-source tool that will help us cast video and forward audio from Android to Linux?
Well, yeah, sure there is! But it can be a bit complicated to set up if you are new to Linux. It basically involves using two tools – scrcpy (screen copy) and sndcpy (sound copy). Neither of the tools requires Android root privileges, but you need to enable “developer mode” and “USB debugging” on your Android phone to get things working.
Now, if all of these seem a bit complicated, then we got you covered. Here is a complete step-by-step guide on using scrcpy and sndcpy to cast video from Android to Linux.
Casting Video from Android to Linux
But first, let’s get a quick idea of the tools we will be using.
What are scrcpy and sndcpy?
The scrcpy tool – short for screen copy – is an application that will mirror your Android device to a connected Linux PC via USB or TCP/IP. Not just that, but it will also let you control your Android device from your PC using a mouse and keyboard.
Here is a quick look at some of the main features offered by scrcpy:
- No root access necessary on Android devices.
- Mirror Android screen via USB or over TCP/IP.
- Option to Mirror multiple Android devices.
- Adjust the size of the mirrored window.
- Tweak how the mirrored window looks. Control window title, position, border, rotation, and much more.
- Control over video bitrate and framerate.
- Crop the device screen only to show a part of it.
- Lock video orientation.
- Record the screen while mirroring.
- SSH Tunneling support for remote connections.
- Enable “show touches” on Android to the mirrored instance.
- Control Android phone using Keyboard and Mouse on Linux PC.
- Support for Keyboard shortcuts.
- Send files from your Linux PC to your Android phone.
So as you can see, scrcpy is a powerful and feature-rich tool for casting video. However, it lacks one crucial functionality – audio forwarding. And this is where the sndcpy tool comes into the picture.
Short for sound copy, sndcpy has one function and one function only to forward audio from your Android phone to your PC. It is designed to be used while mirroring with scrcpy, but both tools can be used independently.
Prerequisites for scrcpy and sndcpy
To make scrcpy and sndcpy work, we need to configure our Android device and Linux PC by turning on some settings and installing some additional tools. Here is a quick look at the requirements and what you’ll need:
- Android smartphone/device must be running Android 10
- Android device must have “Developer Options” and “USB Debugging” enabled.
- ADB tools are installed on your Linux PC.
- VLC must be installed on the Linux PC.
Having a device with Android 10 is pretty self-explanatory. The sndcpy tool, which we will use for audio forwarding, uses the Playback Capture API to work, and it was introduced in Android 10. However, the scrcpy tool used for screencasting is compatible with Android 5 and higher.
If you are not interested in audio forwarding, you can get away with a bit outdated (>Android 5) Android smartphone.
Moving on, you need to enable “Developer Options” & “USB debugging” on your Android phone and also install “ABD” and “VLC” on Linux. If you don’t know how that’s done, here is a quick guide to help you out.
Step 1: Enable “Developer Options” and “USB Debugging”
The “USB Debugging” option is inside the “Developer Options,” a hidden settings area on Android devices.
To enable it, open “Settings” and scroll down to “About Phone.” Now open it, and again scroll down till you see the phone “Build Number.” Tap on it 7 times, and you will get a message stating, “you are now a developer!”.
 Find Android Build Number
The “Developer Options” setting is now enabled on your device, and you can find it under Settings > System.
 Developer Options Unlocked
Disclaimer: We are using a Nokia 6.1 Plus phone running stock Android 10. If you are using an Android device with a custom skin, then the manufacturers might have juggled around these settings. We have included some guides on how to enable “Developer Options” on all the popular devices.
With “Developer Options” enabled, all the settings you have inside it are pretty much the same on all devices. Just scroll down, and you should see an option called “USB debugging.” Just turn it on, and you are good to go.
 Turn On USB Debugging
Note: In some devices, you might see an additional option called “USB debugging (security settings).” If that’s available, you need to turn that on as well for scrcpy to function properly.
And that’s it. You have successfully configured your Android phone. Now it’s time to set up your Linux PC.
Step 2: Install ADB Tools and VLC on your Linux PC
You most likely have VLC already installed on your Linux PC. If not, then you can easily install it using your distro’s package manager.
Now, to install ADB tools, type in the following commands based on the distro you are using:
For Ubuntu and Debian-based distros:
For Arch-based distros:
For Fedora and RHEL-based distros:
We also have a detailed read on how to install and set up ADB tools on Linux that you might want to check out.
By now, both your Android phone and Linux PC are ready. So it’s finally time that we install and configure scrcpy and sndcpy.
How to install and set up “scrcpy” and “sndcpy” to Cast Video from Android to Linux
Step 1: Install scrcpy and sndcpy
First things first, we need to install scrcpy on our Linux PC. To do this, depending on which distro you are running, enter the following command in your terminal:
Debian and Ubuntu-based distros:
Fedora and RHEL based distros:
Arch and Arch-based distros:
The tool is also available as a snap package. If you have snap enabled on your system, type in the following command to install the tool:
With scrcpy installed, we have to install sndcpy next. However, it is not yet available in any of the repos.
So to download it, we need to head over to the official sndcpy GitHub page. Once there, you have two options – you can either download the latest sndcpy release as a zip file or build the app.
For the sake of this tutorial, we will be downloading the .zip file as it’s far simpler.
 Download sndcpy
Once downloaded, extract the content of that .zip file into a folder. We have created a dedicated folder for the app and named it “sndcpy.” We will be coming back to this later.
Step 2: Connect your Android Device to your Linux PC
With “USB debugging” enabled on your Android device, connect it to your Linux PC using a USB cable. This is going to bring up a pop-up window on your Android device, asking whether you want to “Allow USB debugging?”
 Authorize USB Debugging
Hit the “Allow” button, and that’s it!
Note: Yes, scrcpy does allow you to connect your Android device to your Linux PC via WiFi and then cast your screen on your PC monitor. A guide on how to do that is provided in a later step. The first time you connect your Android device to your Linux PC, it is best to do so via a wired USB connection.
Step 3: Start scrcpy & sndcpy
To start scrcpy, type in the following command in your terminal:
 Start scrcpy
You have successfully mirrored your Android screen to your Linux PC. You should now also control your Android device using the mouse and keyboard on your Linux PC.
Note: Make sure that the screen is unlocked on your Android device. Otherwise, screencasting will not work.
Now it’s time to start sndcpy.
We need to open the folder where we stored the downloaded sndcpy file. To do this, enter the cd command followed by the path to your folder as shown below:
Since we created the “sndcpy” folder in the home directory, we just entered the following command in our terminal:
Once inside, type in the following command to start the sndcpy tool:
This is going to bring up the following pop-up window on your Android device.
 Authorize sndcpy
Authorize it, and then press enter on your terminal.
Note: You may notice this error message “main stream error: connection error: connection refused.” According to the developer, it is “expected” and won’t affect your usage.
And that’s it! The sndcpy tool is now running.
 Start sndcpy
Try playing some music on your phone, and you will find that both your phone and Linux PC are sending out the audio. To get the audio solely from your Linux PC, turn the volume down on your Android phone.
Notice that the Volume levels of your Android device and your Linux PC function independently.
Important: If you want to turn off the mirror and audio forwarding, close their respected terminal windows. You can also disconnect the USB cable from your Android phone.
Step 4: Get Full Control Over scrcpy Mirroring.
The whole configuration is working perfectly. You can now cast video from your Android device to your Linux PC. However, by default, the scrcpy mirrors the screen in portrait mode, and we don’t want to watch videos in portrait mode.
So how do we fix that?
Well, by default, the window will auto-rotate from portrait to landscape mode, depending on the app you are using.
For example, you might be aware that while watching YouTube on your phone, if you open a video and then go full-screen, it will automatically go into landscape mode!
Same here! As YouTube goes into landscape mode, the scrcpy window will also rotate from portrait mode to landscape mode.
But that being said, you can manually control the rotation by using the following hotkeys:
- mod + r = switches between landscape and portrait mode.
- mod + ← (left arrow) = rotate window 90 degree counterclockwise.
- mod + → (right arrow) = rotate window 90 degree clockwise.
You can also toggle on and off fullscreen mode by pressing mod + f.
If you don’t know which key is the mod key – it’s typically the left alt button or the left super button on most systems unless you have manually changed it.
For a complete list of all the shortcuts, you can turn on a terminal window and type in the following command:
These shortcuts and other options are also well documented inside the Github page.
(Optional) Step 5: Use scrcpy and sndcpy Wirelessly
The scrcpy and sndcpy tools can mirror your android screen and also forward audio wirelessly over WiFi. However, you need to understand that this is going to affect the overall performance.
By default, scrcpy functions at 8Mbps bitrate. But for the most part, this is too much for the standard WiFi to handle. As such, to get a smoother experience, you might need to lower the bitrate as well as the resolution by launching scrcpy using this command:
So with that out of the way, let’s set up your Android device to cast video wirelessly to your Linux PC.
- First, make sure that your Android phone and Linux PC are on the same WiFi network.
- After that, turn on “USB debugging” on your Android phone and connect it to your Linux PC using a USB cable.
- Open a terminal and type in “adb device.” Your Android device should be listed here.
- Once you have confirmed your Android device is listed, enter this command into the terminal – “adb TCPIP 5555.” This is going to establish a connection between your Linux PC and Android device over port 5555.
Important: Make sure that the 5555 port is not blocked by a switch or by a firewall. If it’s blocked by a firewall, then set up a firewall rule to allow connection through that port. Alternatively, you can also try using different ports like 3389 (rdp) or 443 (https).
- Now open your Android device and go to Settings > About Phone > Status. From here, note down your phone’s IP Address.
- Head back to your Linux terminal and type in this command: adb connect IP_Address:5555. Replace IP_Address with the actual IP Address of your phone. Also, if you didn’t connect through port 5555, replace it with the port you used to connect.
In practice, this command should look something like this:
Here 199.64.70.96 is the IP address of the device, and it’s connecting through 443 port.
Here 199.64.70.96 is the IP address, and it’s connecting through 5555 port.
- You should now see a “connect” message by the ADB command.
- And that’s it. You can unplug the USB cable. All further ADB commands will now use the TCP/IP connection instead of a USB cable.
Now, open a terminal and start scrcpy using the above-discussed command: scrcpy –bit-rate 2M –max-size 800. You can start sndcpy without any additional options or parameters.
How to disable ADB over WiFi?
If you want to disable ADB over WiFi, open a terminal window and type the following command:
This will disable ADB over WiFi. You will now need to connect your phone via USB to execute ADB commands.
How to Remove scrcpy and sndcpy From Your System?
It would be an injustice to show our readers how to install a software/package and yet skip out on the part of how to uninstall/remove it.
Now with that being said, removing scrcpy is fairly simple.
If you installed it using your distro’s package manager, use its uninstall command to remove it.
Alternatively, if you installed the scrcpy package, then use the following command to uninstall it:
To remove sndcpy, open the path where you extracted it from the .zip file and remove/delete all the sndcpy files. As simple as that!
Wrapping Up
So this was our in-depth, comprehensive guide on how to cast video from your Android device to your Linux PC. We hope you found this useful and that it helped you enjoy your phone’s content on the bigger screen with the louder speakers of your Linux PC.
Now, as you can see, scrcpy isn’t merely an app for casting video. In fact, it’s an extremely powerful tool that can help you work with your mobile applications using your PC peripherals. We are sure that hearing about scrcpy, and sndcpy has got your imagination running on potential use cases. So let us know how you plan to use these in the comments below.
Also, in case you ran into an issue setting up the tools, don’t hesitate to write to us in the comments. You can also check out the official FAQ page for a possible solution to your problem.
Источник


