- WooCommerce
- Stripe
- Installation ↑ Back to top
- Setup and Configuration ↑ Back to top
- Webhooks ↑ Back to top
- Test Mode ↑ Back to top
- Stripe Checkout ↑ Back to top
- Express checkouts ↑ Back to top
- Express checkouts customization ↑ Back to top
- Apple Pay ↑ Back to top
- Google Pay / Microsoft Pay ↑ Back to top
- Additional Payment Methods ↑ Back to top
- Customer Usage ↑ Back to top
- Checkout Page ↑ Back to top
- Express checkouts ↑ Back to top
- Saved Payment Methods ↑ Back to top
- SCA/PSD2 ↑ Back to top
- What is SCA/PSD2 ↑ Back to top
- Failed Payments, Subscription Renewals and SCA ↑ Back to top
- Frequently Asked Question ↑ Back to top
- The Stripe payment method is not showing. ↑ Back to top
- The express checkout button is not showing. ↑ Back to top
- What type of Products can be purchased with express checkouts? ↑ Back to top
- Does WooCommerce Subscriptions support using Apple Pay or another express checkout? ↑ Back to top
- Product Add-Ons are not charged with express checkouts from a single product page. ↑ Back to top
- PCI Compliance – what level does the Stripe extension cover? ↑ Back to top
- How can I test Stripe transactions? ↑ Back to top
- Can I test Apple Pay or Google Pay? ↑ Back to top
- Can I test paying with cards saved in the browser? ↑ Back to top
- Can a single customer have multiple subscriptions? ↑ Back to top
- What version of the Stripe API does this extension use?
- Does this extension support Stripe Connect? ↑ Back to top
- Does Stripe use AVS – Address Verification System? ↑ Back to top
- Does Stripe Support Authorization and Capture? ↑ Back to top
- Does Stripe allow refunds inside WooCommerce? ↑ Back to top
- Does Stripe Support ACH? ↑ Back to top
- Why aren’t my subscriptions displayed on the Stripe Dashboard? ↑ Back to top
- Do I need to enable “payments via saved cards” to process subscriptions? ↑ Back to top
- What Stripe payment methods support Subscriptions? ↑ Back to top
- What is Level3 Data? ↑ Back to top
- Am I eligible for Stripe Instant Payouts? ↑ Back to top
- Is Stripe’s Saved Cards feature supported? ↑ Back to top
- Troubleshooting ↑ Back to top
- Root Relative URLs ↑ Back to top
- I get an error when placing an order telling me to enable JavaScript. ↑ Back to top
- Apple Pay – I am getting this error “Error: Unable to copy domain association file to domain root” ↑ Back to top
- Apple Pay – I am getting this error “Error: Unable to verify domain – Bad Request” ↑ Back to top
- Apple Pay – Button only shows in private/incognito Safari window ↑ Back to top
- Apple Pay – Button stuck at loading status when using with WP-Rocket ↑ Back to top
- I’m getting an API error. ↑ Back to top
- I’m seeing the error “Could not find payment information.” ↑ Back to top
- Code Snippets ↑ Back to top
- How can I change the style of the Stripe Form? ↑ Back to top
- Custom CSS to change the style of the Stripe Elements form: ↑ Back to top
- How can I translate the placeholders text inside the credit card form? ↑ Back to top
- How can I change the payment icons used such as Visa, Mastercard…etc? ↑ Back to top
- How can I change the width of the express checkout button? ↑ Back to top
- Hooks (Actions/Filters) ↑ Back to top
- Action Hooks
- Filter Hooks
- How to activate the new checkout experience? ↑ Back to top
- Payments accepted on checkout (Early access) ↑ Back to top
- Requirements for non-Credit Card payment methods to show at checkout ↑ Back to top
- Does this new checkout experience work with the WooCommerce Pre-Orders plugin? ↑ Back to top
WooCommerce
The most customizable eCommerce platform for building your online business. Get started today for free.
Stripe
The Stripe payment gateway for WooCommerce lets you accept payments directly onsite, and includes the option to offer express checkouts (such as Apple Pay and Google Pay), iDeal, SEPA, SOFORT, and more international payment methods.
Download it now at WordPress.org or via the “Add New” option under Plugins on your site. For full details of updates, please see the Changelog.
Installation ↑ Back to top
- Go to Plugins > Add New on your WordPress site.
- Enter WooCommerce Stripe in the Search Plugins bar. The author is WooCommerce.
- Click Install Now and Activate.
Setup and Configuration ↑ Back to top
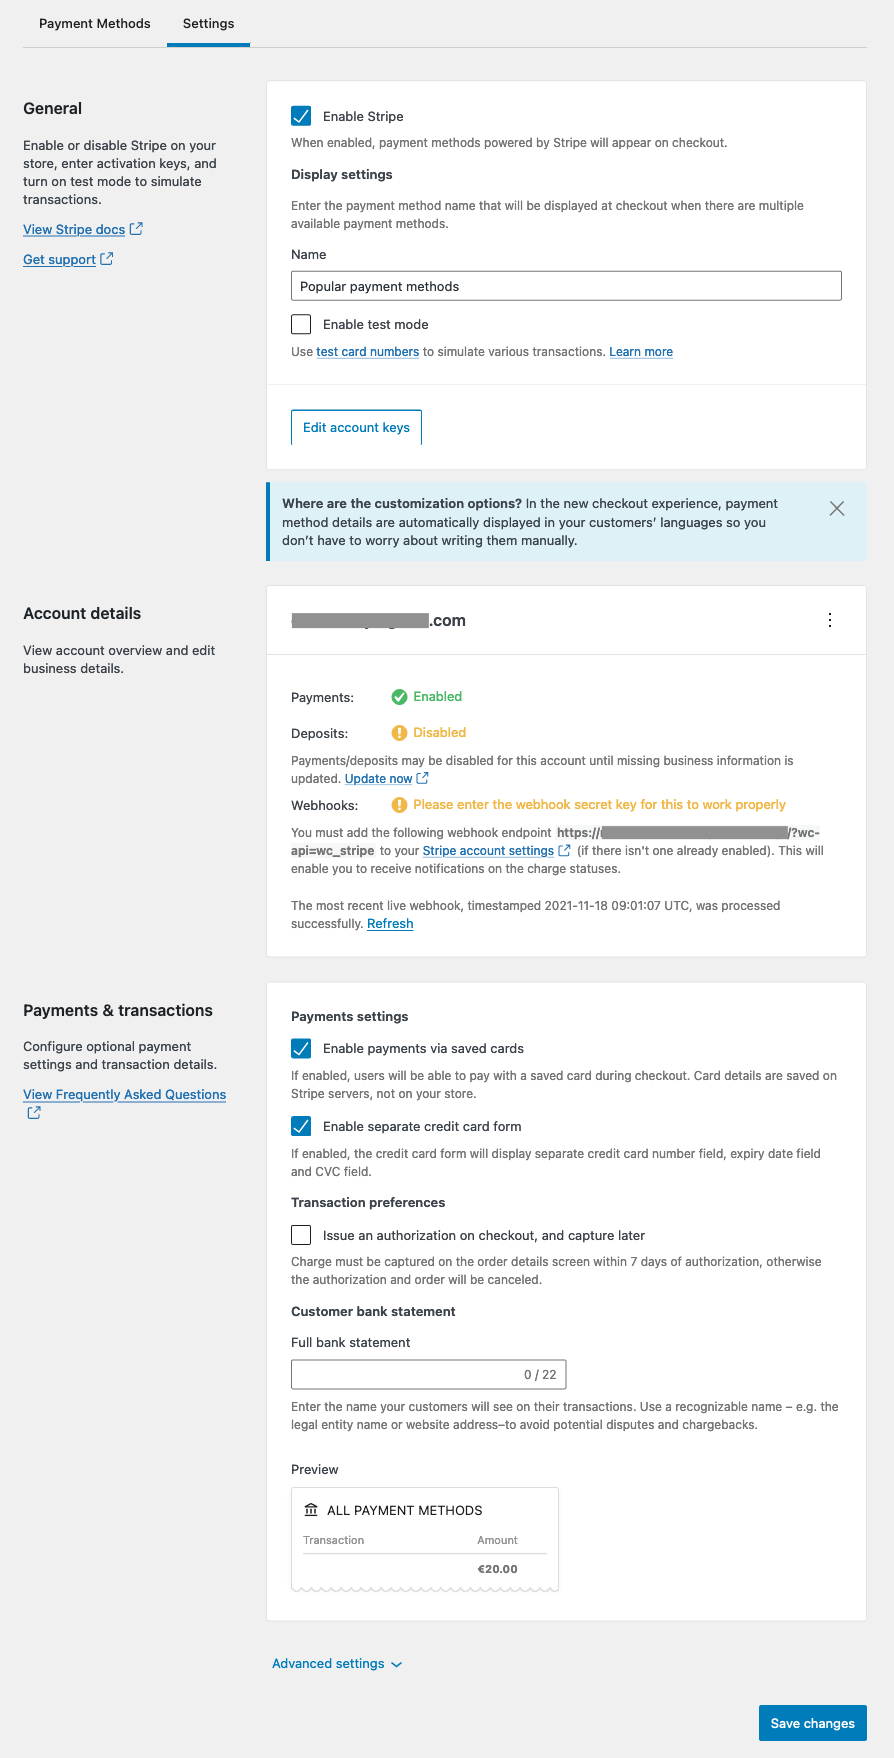
- Go to WooCommerce » Settings » Payments » Stripe:

- On initial setup, click “Create or connect an account” to configure the Stripe payment method with a new or existing Stripe account (or enter keys manually, copied from your Stripe dashboard).
- When first set up, the Stripe payment method will be Disabled. Under “Settings”, tick the Enable Stripe checkbox to Enable.
- When the new checkout experience is enabled, then by editing the Name under Display Settings, you can change the payment method title in the event that more than one payment method is available.
- Tick the Enable test mode checkbox, if you wish to test before going live, and enter test account keys if prompted. Untick to begin accepting payments with Stripe.
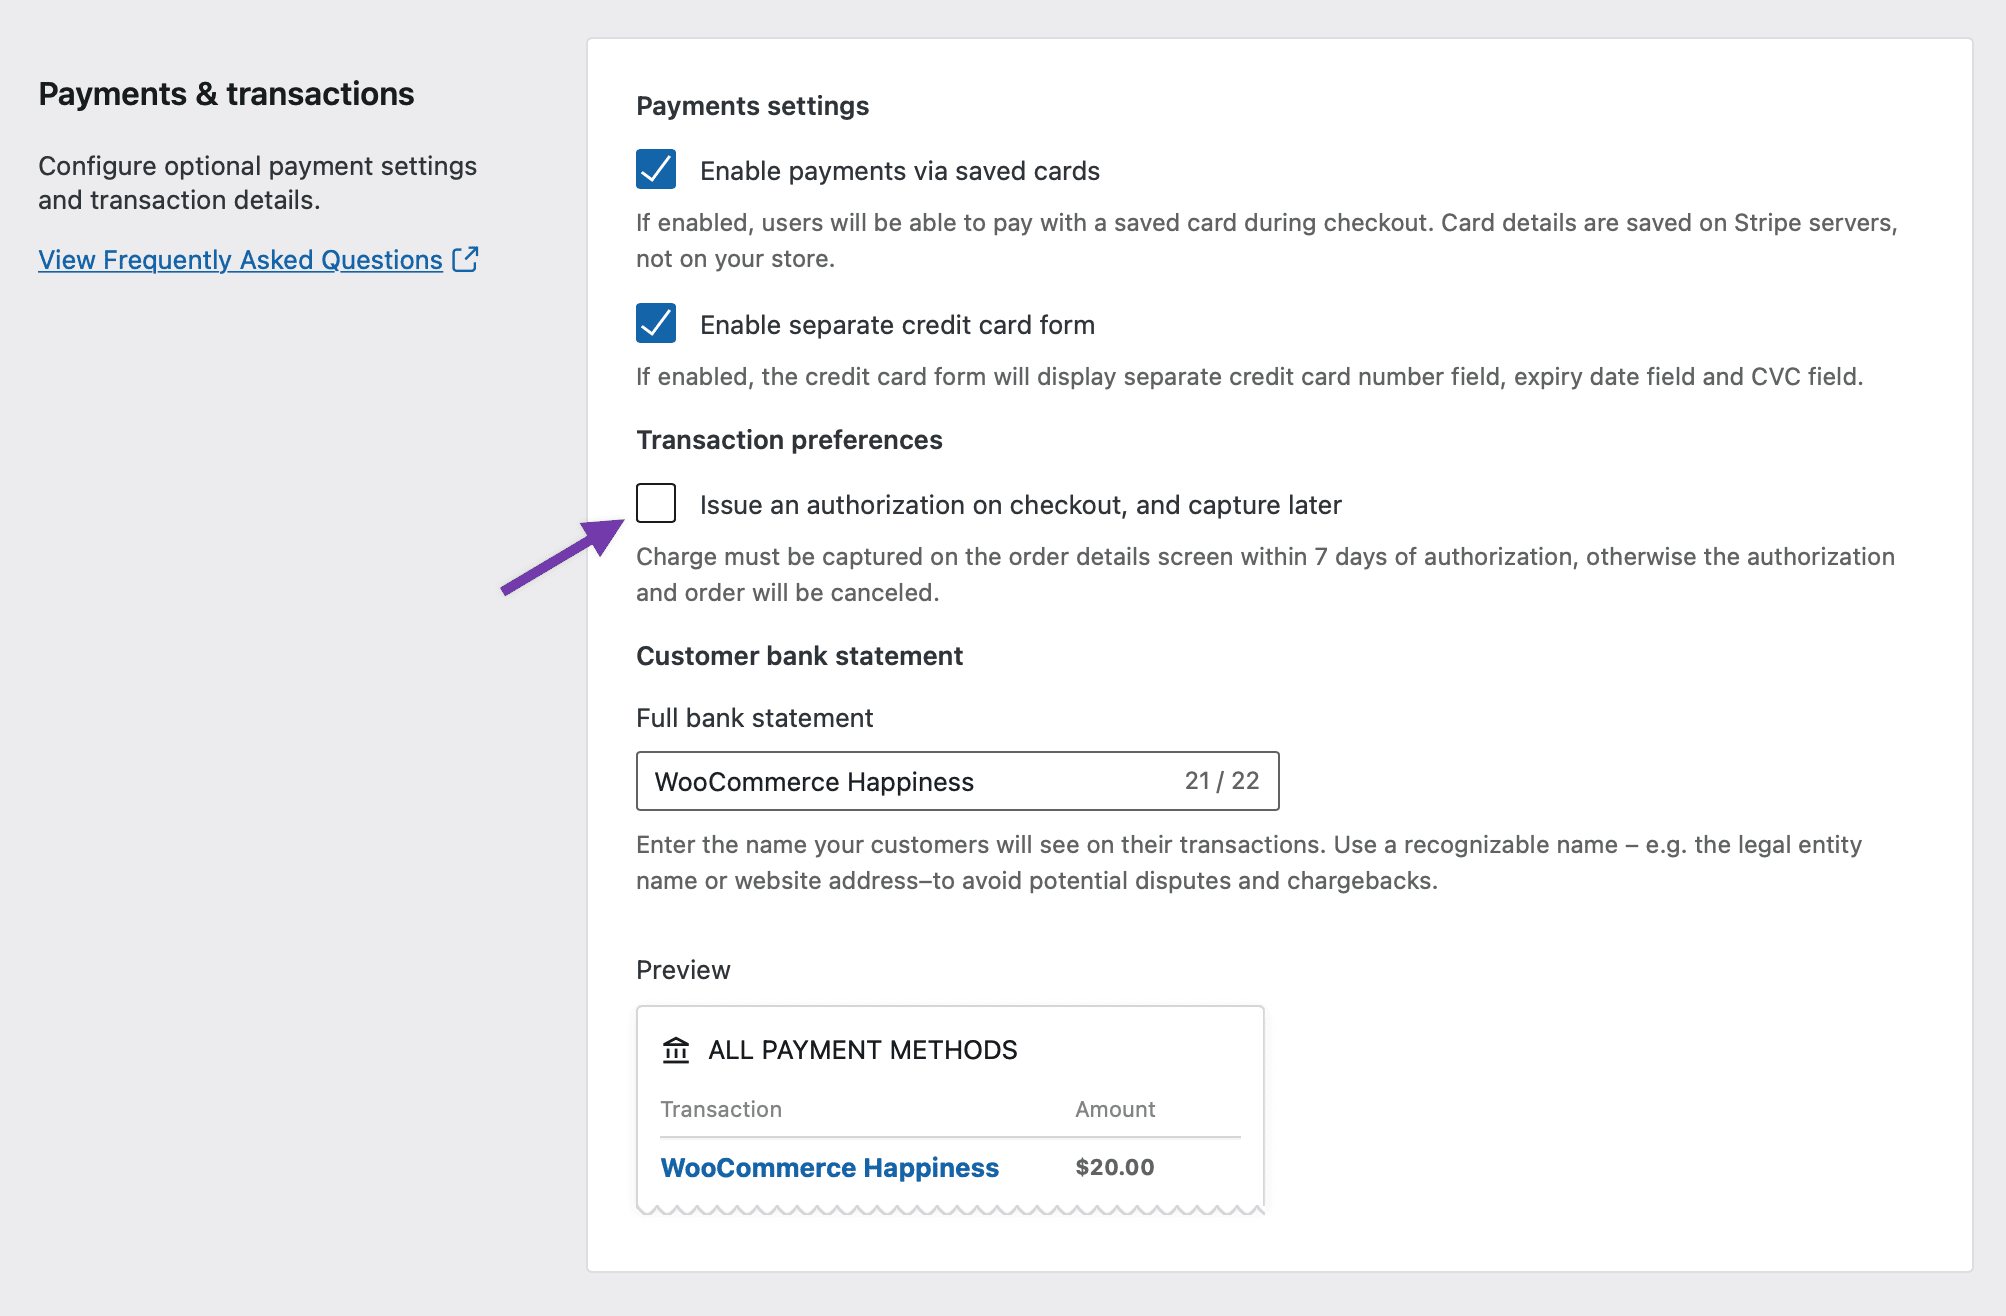
- Leave Enable payments via saved cards checked, if you want to give Stripe customers the ability to use a card saved on their account for future purchases.
- If available, leave Enable separate credit card form checked unless you would like all credit card inputs to appear as one field.
- If you prefer, tick the checkbox to Issue an authorization on checkout, and capture later. (Otherwise, it will authorize and capture at the same time.) If this setting is enabled, you’ll need to capture funds manually for each order within 7 days – otherwise the authorization will be canceled alongside the order. See our FAQ on this for more.
- Optionally enter a Customer bank statement, i.e. the descriptor that will appear on a customer’s bank or credit card statement. This can be up to 22 characters, must contain at least one letter, and may not include these characters: > (see full requirements). If left blank, the setting on the Stripe account will be used.
- Under “Advanced settings”, tick Log error messages if you wish to save logs that can help you/us troubleshoot your site. Can be disabled and enabled as needed.
- Logs will appear under WooCommerce » Status » Logs. Use the dropdown menu to select, and view.
- The log will be titled in the same format as other WooCommerce plugin log files: `woocommerce-gateway-stripe-[date]-[string].log`
- When enabled, only events that happen after the point of being enabled are logged.
- Logs will appear under WooCommerce » Status » Logs. Use the dropdown menu to select, and view.
- Save changes.

Webhooks ↑ Back to top
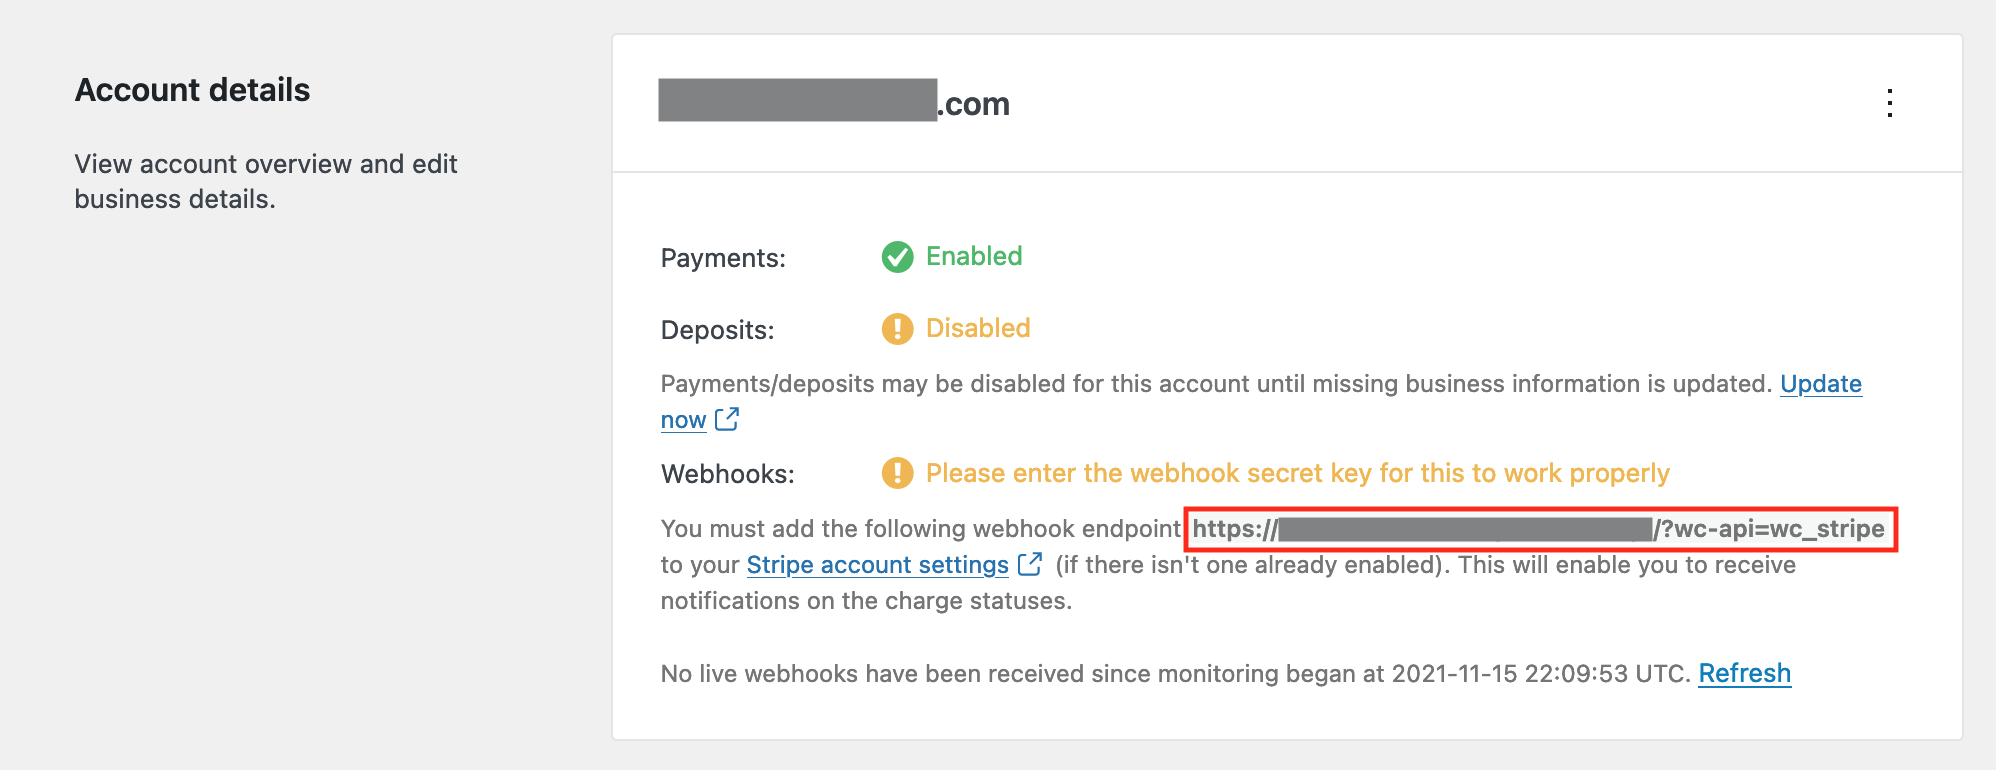
Webhooks are used by Stripe to communicate with your site. It provides information such as the status of the payment, and is used to update the order based on certain events from Stripe’s side of things.
In the settings, you’ll find a webhook endpoint URL ready for you to copy and paste into your Stripe dashboard:
- Head to WooCommerce » Settings » Payments » Stripe. Under the Settings » Account details section, copy your webhook endpoint URL into your clipboard.
- Next, in your Stripe Dashboard go to Developers » Webhooks and select Add endpoint (with “Test mode” enabled or disabled, depending on which mode is being configured).
- Paste the webhook endpoint URL you copied earlier into the Endpoint URL field, and select the following events (at minimum):
- source.chargeable
- source.canceled
- charge.succeeded
- charge.failed
- charge.captured
- charge.dispute.created
- charge.dispute.closed
- charge.refunded
- review.opened
- review.closed
- payment_intent.succeeded
- payment_intent.payment_failed
- payment_intent.amount_capturable_updated
- setup_intent.succeeded
- setup_intent.setup_failed
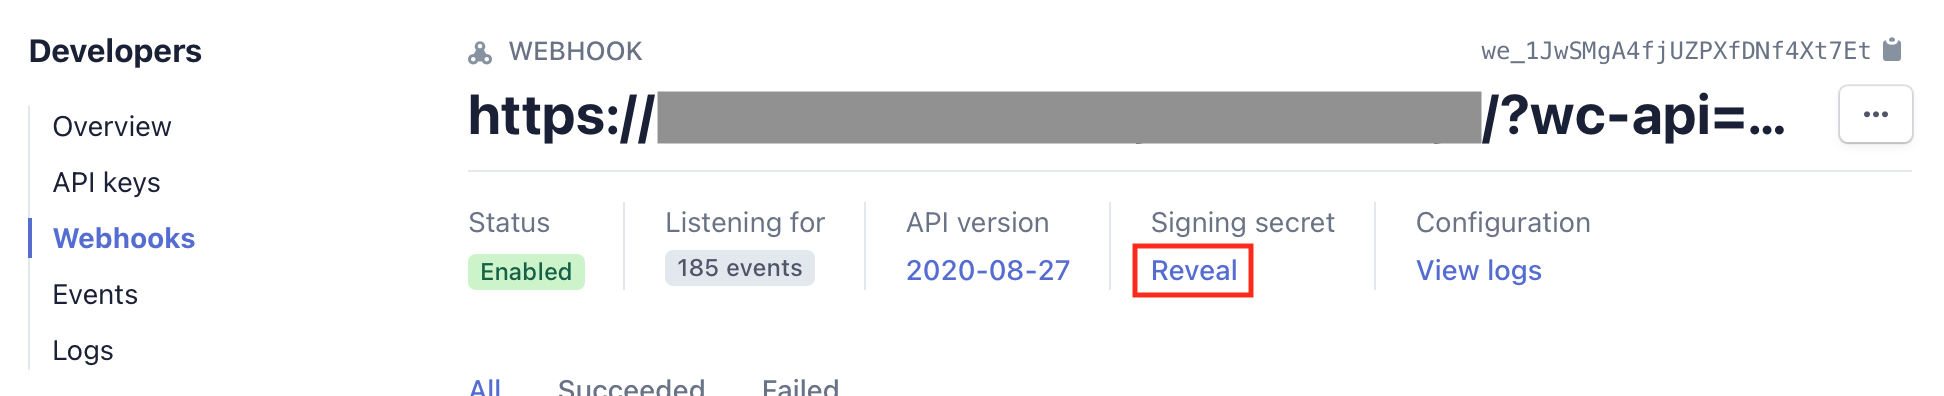
- Select Latest API version from the Version section, if shown, and then “Add endpoint”.
- Copy the Signing secret (after clicking Reveal).
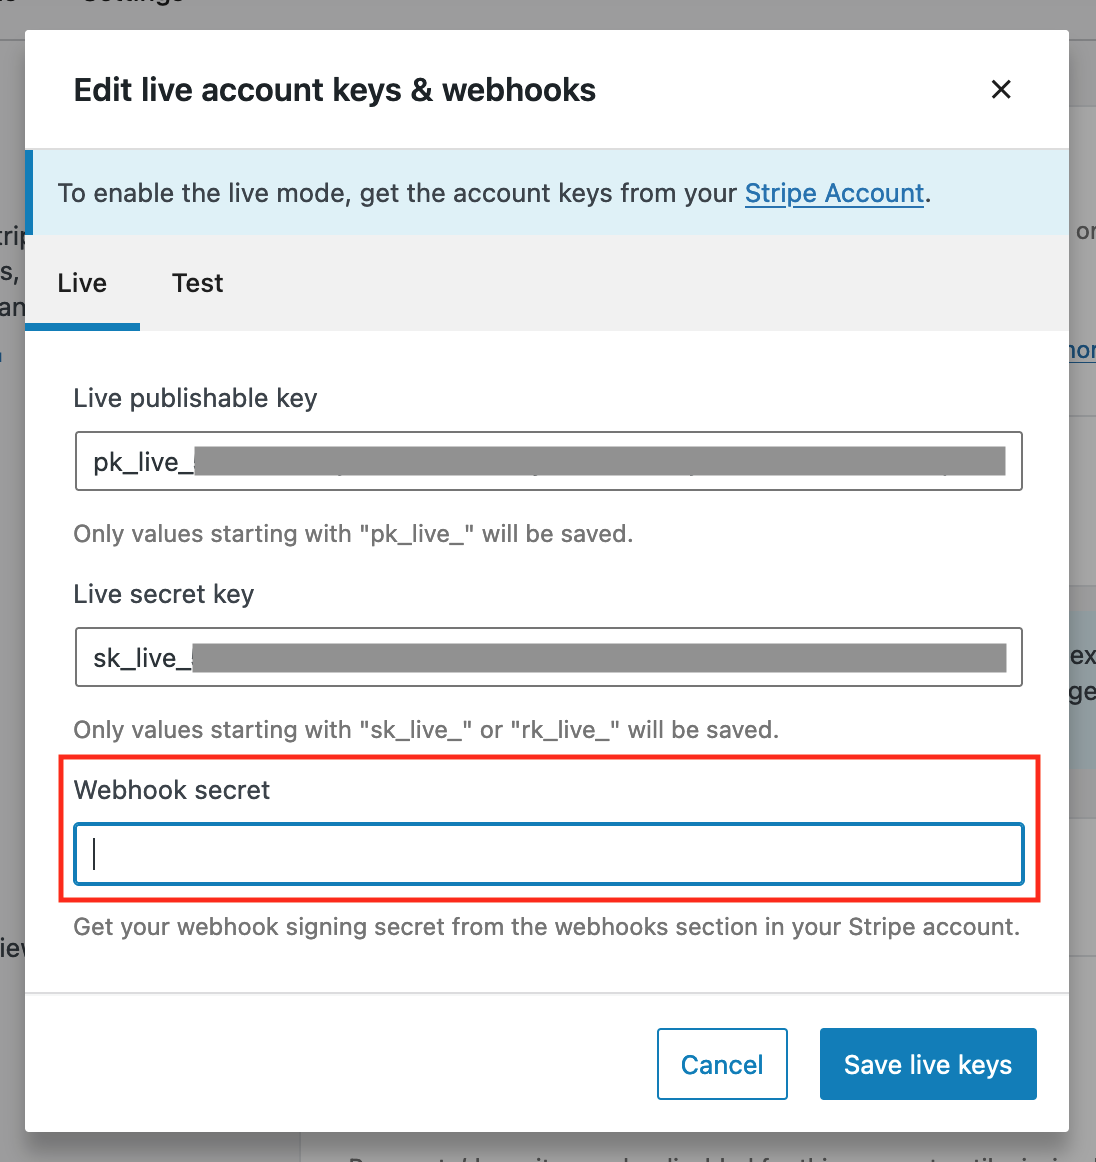
- Back in WooCommerce » Settings » Payments » Stripe, click Edit account keys (above the “Account details”), paste the secret into the Webhook secret field, and save the keys.
- If this was done in test mode, repeat the process after switching Enable test mode off (or vice versa, if necessary).
Test Mode ↑ Back to top
Test Mode allows you to process transactions and simulate different payment responses using Stripe.com Test Cards. Toggle the Enable Test Mode checkbox and ensure the test API Keys are listed. Stripe has documentation on obtaining your test API keys in their documentation. After that, use your store as a customer, adding the test card details at the Checkout. Test Mode can also be used with express checkouts by adding a Stripe Test card to your browser for Google Pay / Microsoft Pay. Using Apple Pay when the Stripe setting for Test Mode is checked will allow you to process a payment without charging your saved Apple Pay payment method.
Note: When Stripe is in Test Mode use one of Stripe’s test cards to avoid using real credit cards. While the latter will still work for testing purposes, it can lead to issues when a profile is created in one mode and then later used in the other.
Stripe Checkout ↑ Back to top
The new Stripe Checkout is not part of the WooCommerce Stripe payment gateway. This is an open enhancement and further details and any future development will be linked from this GitHub Issue.
Express checkouts ↑ Back to top
When the express checkouts option is selected, all types of express checkouts are activated (on your site) at once so you’re ready to accept payments via Apple Pay, Google Pay, or payment methods saved in the browser via the Payment Request API.
Express checkouts can be displayed on the product page, cart and checkout pages, and you can opt for hiding it in certain pages with the “Show express checkouts on” option.

Express checkouts customization ↑ Back to top
You can also customize the the express checkouts call to action, size and theme via “Customize appearance”.
To preview the button, you need a compatible device and browser combination, as well as have a properly configured Apple Pay/Google Pay wallet, or a saved credit card on your browser.
To see what an express checkout button looks like and how it behaves, go to the Stripe.com Demo Shop
Apple Pay ↑ Back to top
Customers need to have a payment method from a supported bank or payment card provider listed on the Apple Pay™ support page and a compatible Apple device. Using this official ApplePay Demo page Apple.com will help confirm if Apple Pay should be available.
The WooCommerce Stripe payment gateway handles domain verification for you automatically, so no manual configuration should be required. If you encounter an issue, you can re-trigger domain verification by disabling the express checkouts option, saving changes, and then re-enabling it. (To manually verify your domain, navigate to the Apple Pay configuration on your Stripe Dashboard – see Stripe’s “Verify your domain with Apple Pay” doc for more.)
 Adding a domain to Stripe.com for Apple Pay
For existing Stripe merchants looking to enable Apple Pay, please ensure that the express checkouts option is ticked on within WooCommerce > Settings > Payments > Stripe (as mentioned above). If you have any issues with accepting Apple Pay, please follow the steps above by logging into your Stripe Dashboard and verifying your domain.
Use of “Apple Pay > Web domains”, which our Stripe integration uses to display the Apple Pay button, is subject to the Apple Pay on the Web terms of service. This is a part of the Stripe Services agreement to which you agree when activating your Stripe account.
Google Pay / Microsoft Pay ↑ Back to top
Make sure that the express checkouts option is enabled, there is no other setup for you to accept payments via these methods.
Note: these buttons usually only show when there is a saved payment method in the browser or device being used. Customers need to have a payment method from a supported bank or payment card provider saved to their browsers.
Additional Payment Methods ↑ Back to top
Aside from standard credit and debit cards, Stripe comes with additional payment methods (APMs) that can be used to target different markets. Our extension supports:
For detailed information about these payment methods, please click on the links above or visit the Stripe Payment Methods – alternatively Stripe.com has a Payments overview page with a lot of useful information. Most of these additional payment methods need to be enabled under Payment Settings on your Stripe.com Dashboard and may require additional information to be fully set up.
Once enabled in Stripe, they can be set up and managed under WooCommerce > Settings > Payments. If the new checkout experience is disabled, all of the APMs will appear separately, and can be enabled by using the slider icon or configured by selecting the payment service name. You can also change the title and description of each service within settings for that method.

If the new checkout experience is enabled, the Stripe gateway accepts multiple payments methods, as described under “Customer Usage” below. To enable or disable payment methods, toggle the corresponding checkboxes and click “Save changes” at the bottom of the page.
Payment methods that are not currently accepted in the new checkout experience can be enabled from WooCommerce » Payments » Settings:

Customer Usage ↑ Back to top
Checkout Page ↑ Back to top
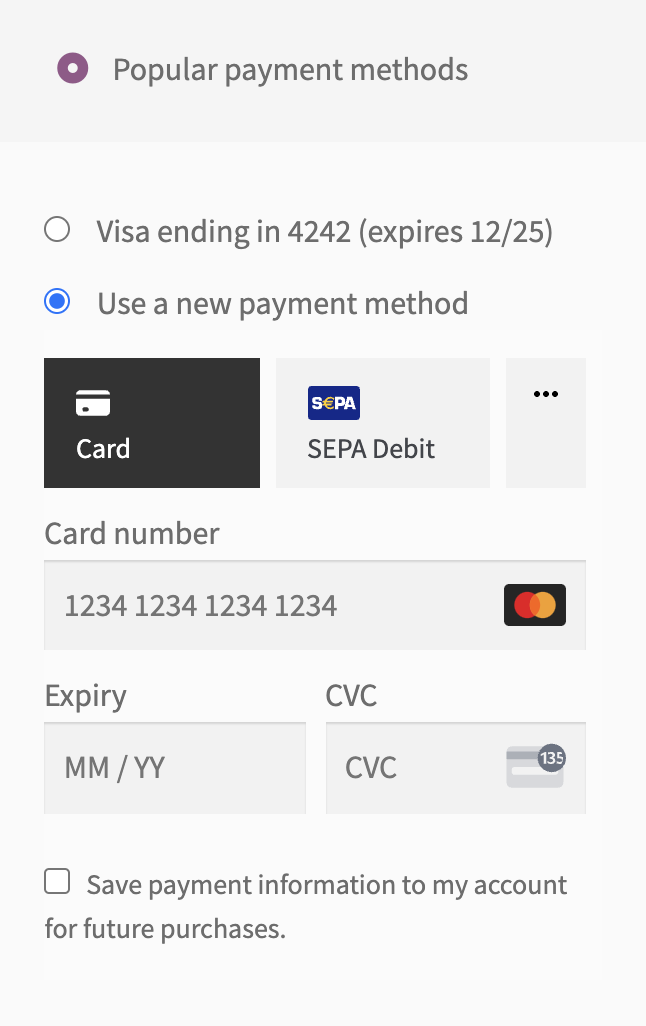
Customers pay on the checkout page, and if the new checkout experience is enabled, the form uses the Stripe Payment Element, which provides a way to accept multiple payment methods in a single secure component.
Payment methods are dynamically displayed based on your customer’s currency and location, and are automatically translated.
If the new checkout experience is disabled, the form uses Stripe Elements, and different payment methods will be displayed as separate fixed components.
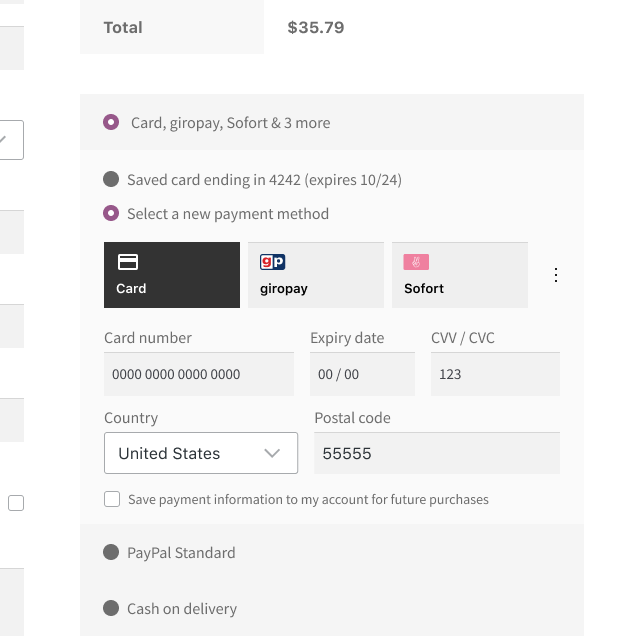
Using a new card, they see the option to enter credit card details, and tick the Save payment info to account box (this screenshot shows a disabled “separate credit card form” version).
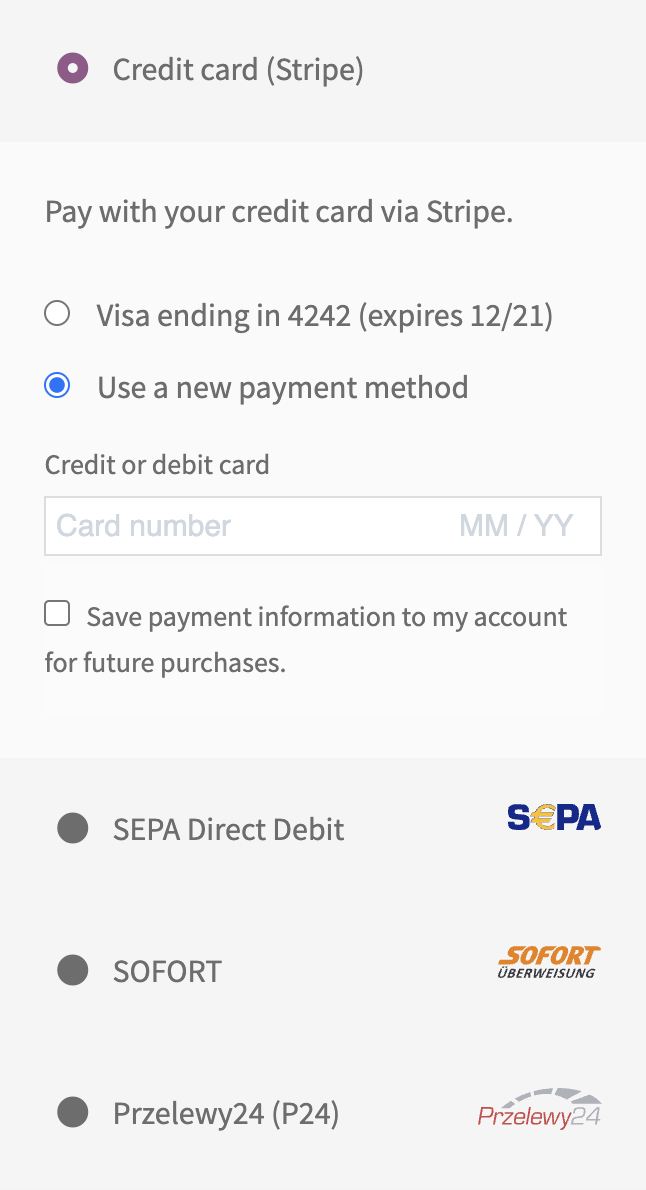
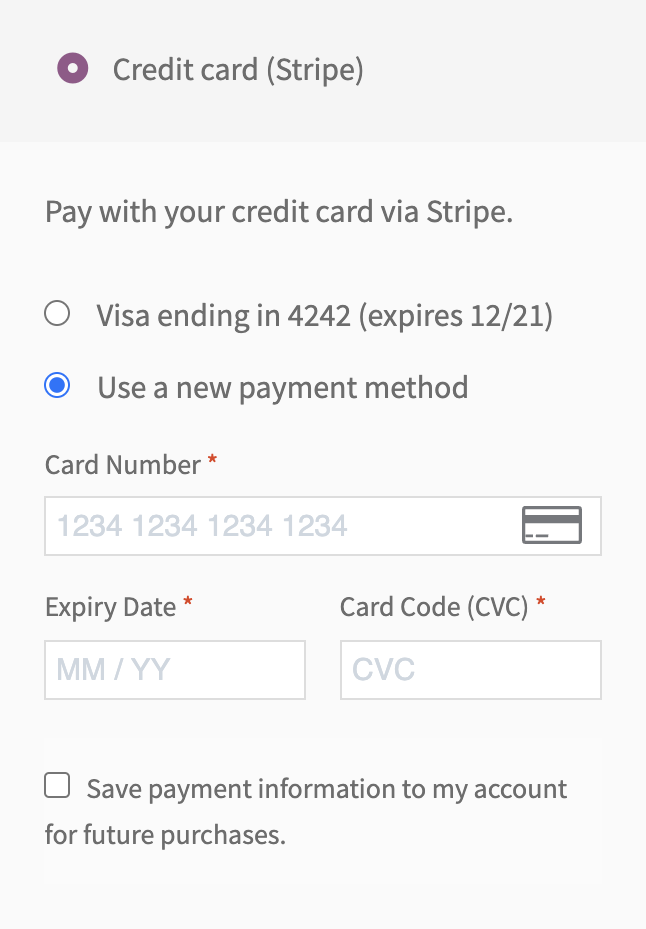
For customers who have a saved card, they are presented with stored card options on file (if that option is enabled) or they can store a new one (screenshot showing the standard separate credit card form):
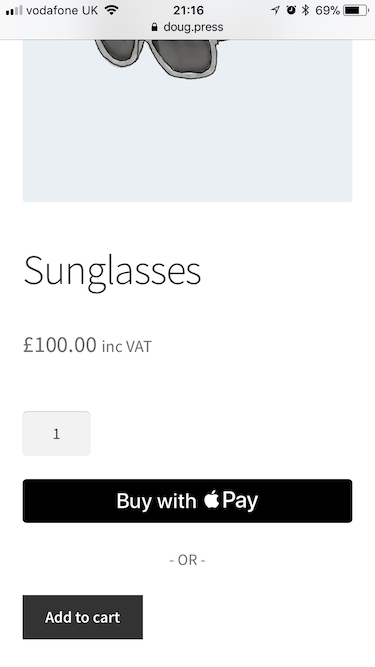
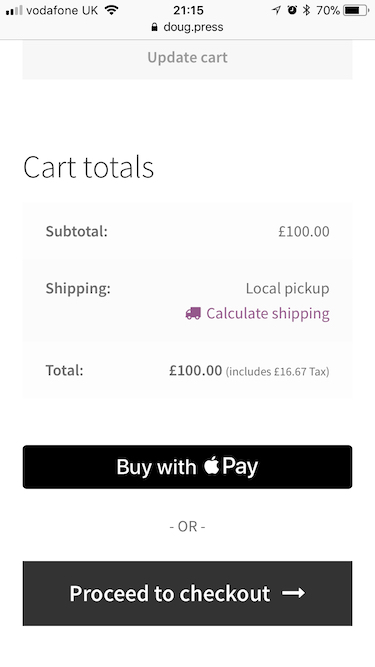
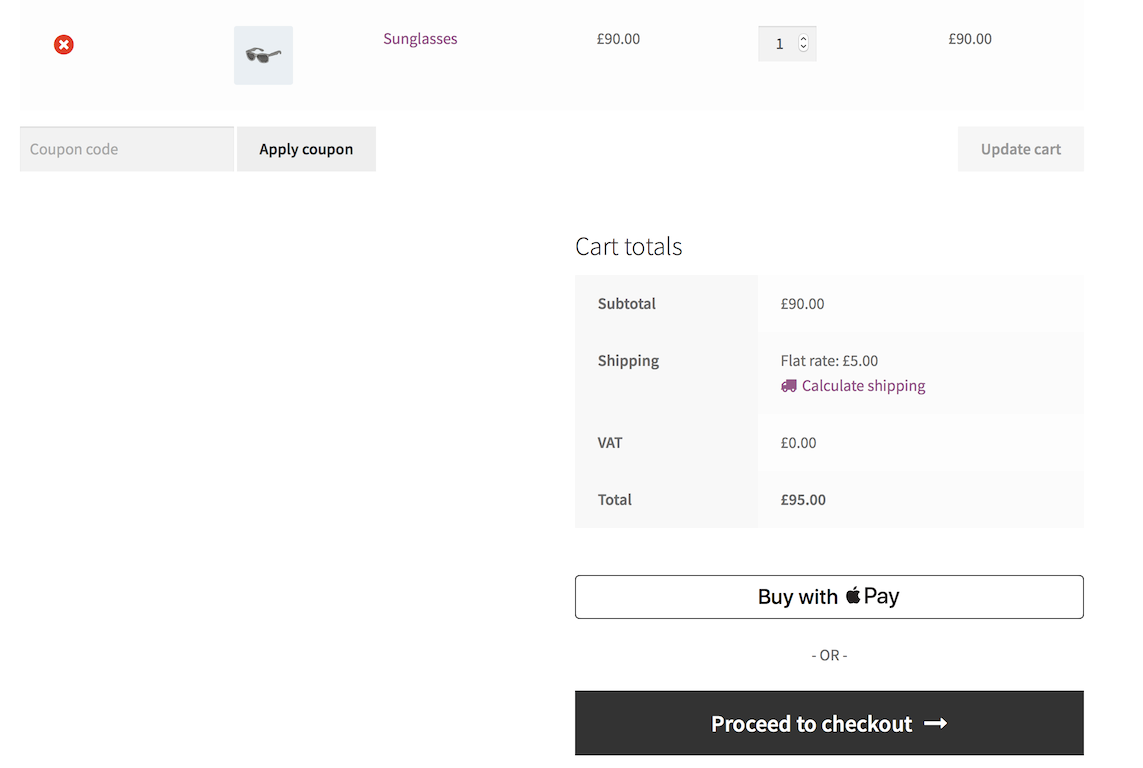
When express checkouts are enabled, customers can see the corresponding button on the product page, cart page or checkout page when using a supported device, browser, and payment method.
Express checkouts ↑ Back to top
Browse the gallery to view default layouts for express checkout buttons.


Saved Payment Methods ↑ Back to top
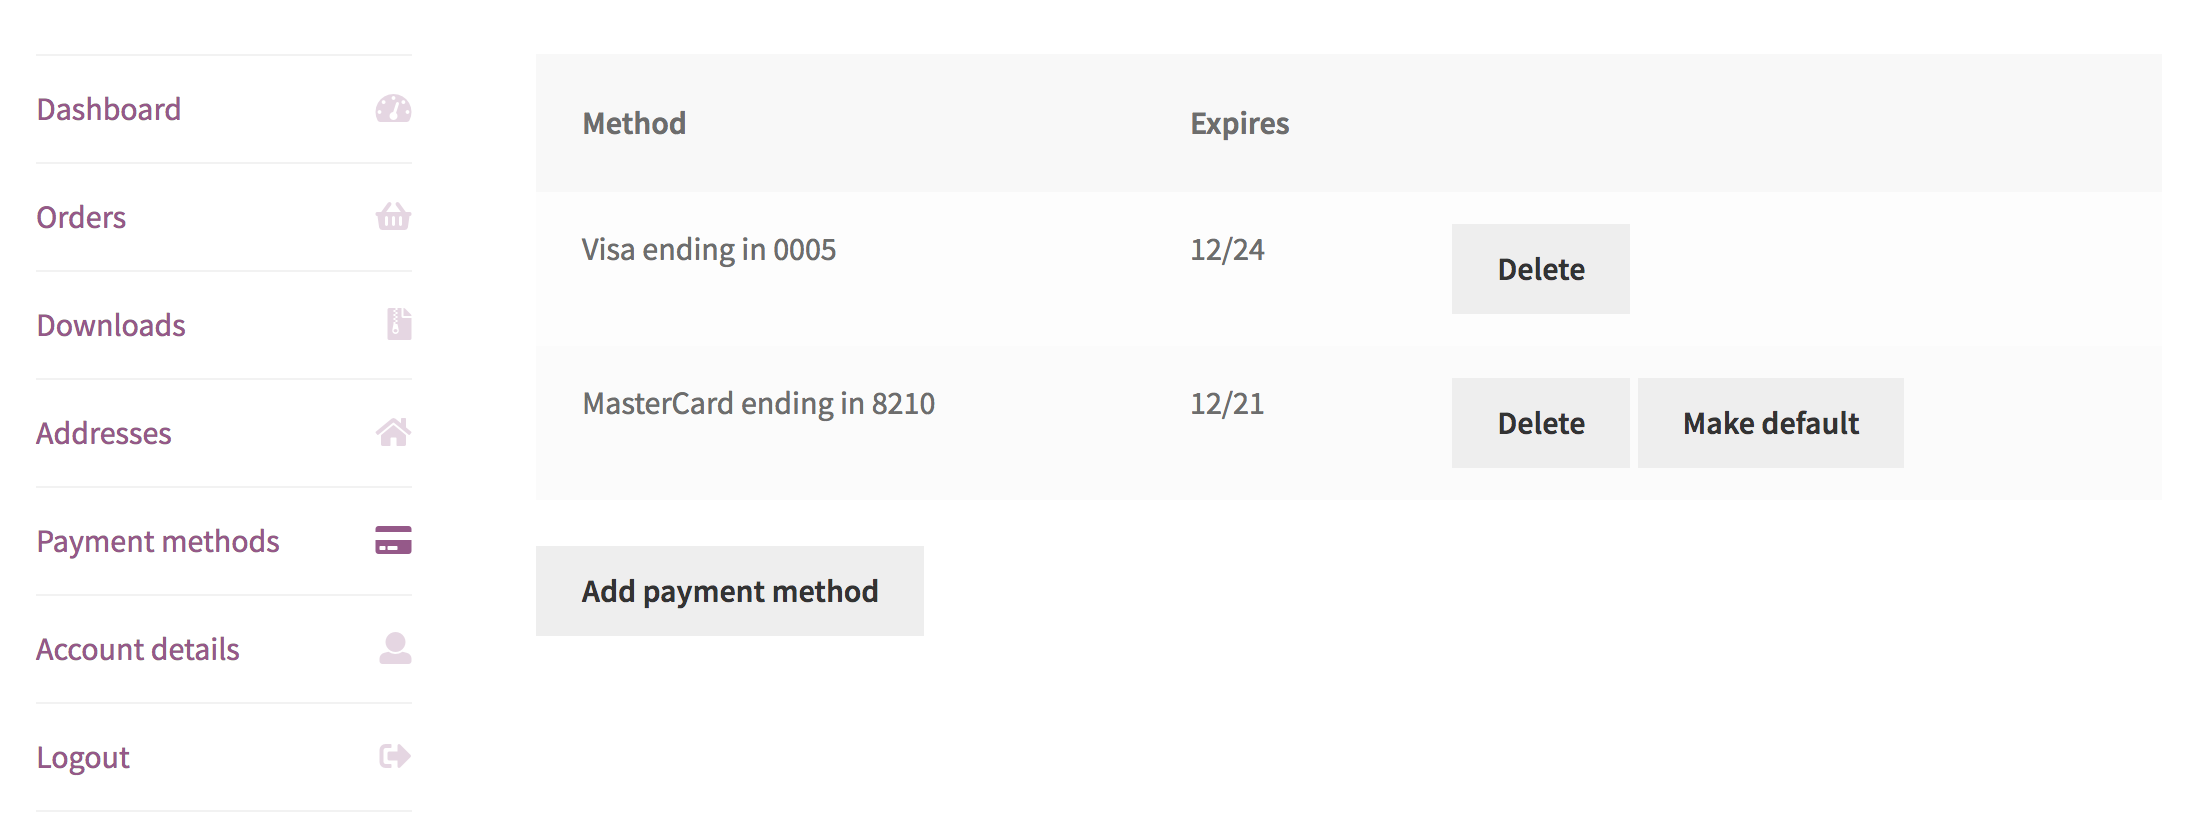
On the My Account page, customers can add, view, and remove payment methods from their account within the Payment Methods submenu.
These are the payment methods which can be saved:
- Credit card
- SEPA Direct Debit
- Bancontact *
- iDEAL *
- SOFORT *
Payment methods with * can only be saved if the new checkout experience is enabled.
SCA/PSD2 ↑ Back to top
What is SCA/PSD2 ↑ Back to top
New requirements for authenticating online payments were introduced in Europe with the second Payment Services Directive (PSD2) as of September 2019. These requirements are referred to as Strong Customer Authentication (SCA) for most electronic payments.
WooCommerce.com works with payment partners, of which Stripe.com is one, to ensure all payment gateway extensions are updated. We have a post that goes through this in more detail. Our Stripe extension implemented this new change as of version 4.2.0 .
Failed Payments, Subscription Renewals and SCA ↑ Back to top
It’s possible that you, the store owner, may receive an “Order #XXX has Failed” email when a subscription is due to renew, or when you are attempting to manually process a subscription renewal (from the Edit Subscription > Subscription Actions > Process Renewal) flow.
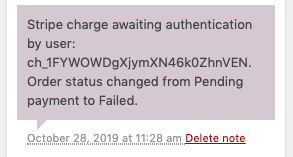
Why? The buyer may need to log in to authenticate the payment due to Strong Customer Authentication (SCA) or other authentication requirements by the bank issuing their credit card. If this is the case, there will be corresponding failed order notes:
- “Stripe charge awaiting authentication by user”
- “Stripe SCA authentication failed.”
- “This transaction requires authentication.”

At the same time you receive the “Order #XXXX has Failed” email, the buyer is sent a “Payment authorization needed for renewal“ email asking them to log back in and authorize the payment with an included link.
Once the buyer returns and authorizes payment, the renewal order changes from Failed to Processing, and the subscription becomes Active again.
Frequently Asked Question ↑ Back to top
The Stripe payment method is not showing. ↑ Back to top
In live mode, an SSL certificate must be installed on your site to use Stripe. In addition to SSL encryption, Stripe provides an extra JavaScript method to secure card data.
The express checkout button is not showing. ↑ Back to top
The customer must have a compatible device and payment method in a supported region, otherwise, the option is unavailable. See the express checkouts section above for more details. Using this official Apple.com page will help confirm if Apple Pay should be available.
For general support, please see the related pages for full details:
What type of Products can be purchased with express checkouts? ↑ Back to top
Currently, Simple and Variable products and Subscription products are supported. The buttons won’t show for other Product types (such as Bookings) and won’t work with custom product fields.
Does WooCommerce Subscriptions support using Apple Pay or another express checkout? ↑ Back to top
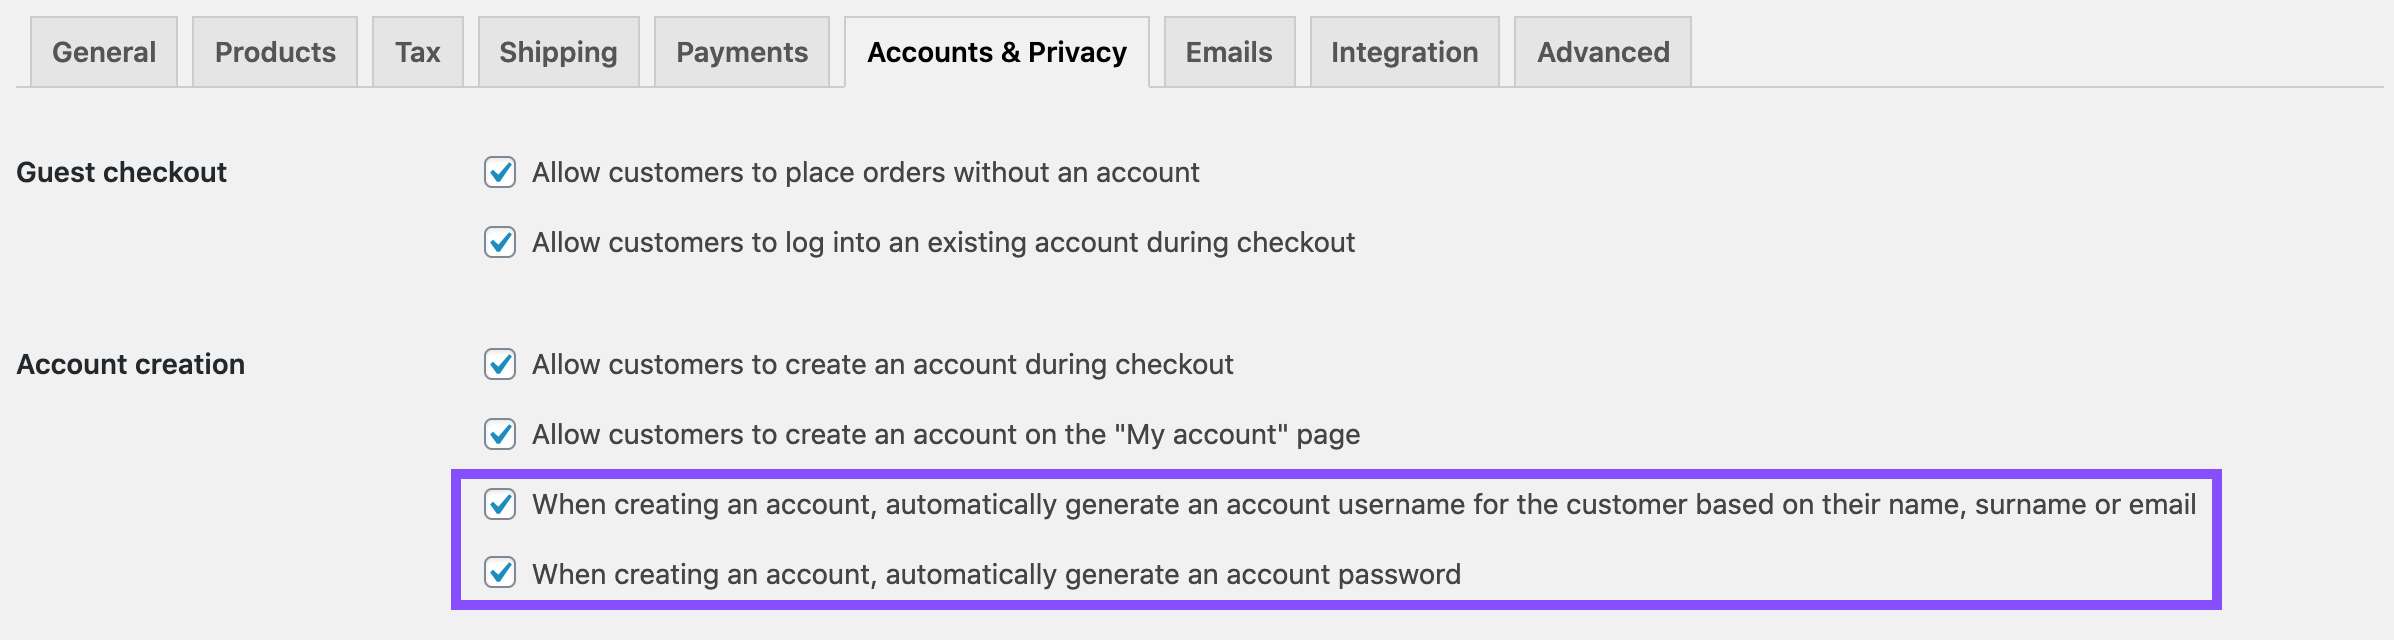
Yes, express checkouts are supported for Simple and Variable products when using the WooCommerce Subscriptions extension. This functionality will only be enabled when account username and password generation settings are enabled in the Account Creation settings:
Product Add-Ons are not charged with express checkouts from a single product page. ↑ Back to top
Express checkouts do not support custom product fields such as Product Add-Ons from single product pages. To avoid orders being placed with no add-ons paid, you can disable express checkouts on single product pages.
PCI Compliance – what level does the Stripe extension cover? ↑ Back to top
Since the Stripe extension uses Stripe Elements, this covers Pre-filled SAQ A – please see the Stripe.com Documentation for more details under “Checkout/Elements”.
How can I test Stripe transactions? ↑ Back to top
When your site is configured using test keys, you will be able to use one of the cards listed under Test card numbers and tokens.
You can view these test transactions on your Stripe Dashboard by using the toggle button to View Test data on the left sidebar at Stripe Dashboard.
Please don’t forget to switch to Live mode when you’re ready to start accepting real payments. You can do that by unchecking the Test mode button at WooCommerce > Settings > Payments > Stripe, and copying the live credentials from Stripe Dashboard.
Can I test Apple Pay or Google Pay? ↑ Back to top
Yes, as long as the WooCommerce Stripe settings are in test mode, then you can use Apple Pay as normal with your real payment card but you won’t be charged.
Can I test paying with cards saved in the browser? ↑ Back to top
Yes, save a Stripe test card to your browser, and view a product page. Cards can be saved via these links:
- Chrome – chrome://settings/payments
- Edge – edge://settings/payments
Can a single customer have multiple subscriptions? ↑ Back to top
Using the WooCommerce Stripe extension and WooCommerce Subscriptions, you can have multiple subscriptions in your WooCommerce store. It should be noted that WC Subscriptions and the WC Stripe extension don’t use Stripe Billing or Plans, but instead manage subscriptions in WooCommerce and Stripe Customer and Card tokens for each recurring payment.
What version of the Stripe API does this extension use?
We try to use the latest possible and we’ll update it whenever we can. Note that you can usually update the API version on your Stripe dashboard without affecting our extension. For clarification, you can find which version we’re using in code on GitHub.
Does this extension support Stripe Connect? ↑ Back to top
No, not currently. We’re unable to integrate at this time.
Does Stripe use AVS – Address Verification System? ↑ Back to top
Yes! AVS is enabled in your Stripe account dashboard and will then work in WooCommerce. See Stripe’s documentation about Avoiding fraud and disputes.
Does Stripe Support Authorization and Capture? ↑ Back to top
There is an option within the settings to only authorize charges. If you’ve opted in to the new Stripe checkout experience this option won’t be available to you. If you enable authorizations then charges then need to be captured within seven days, otherwise the authorization expires and the order will be cancelled.
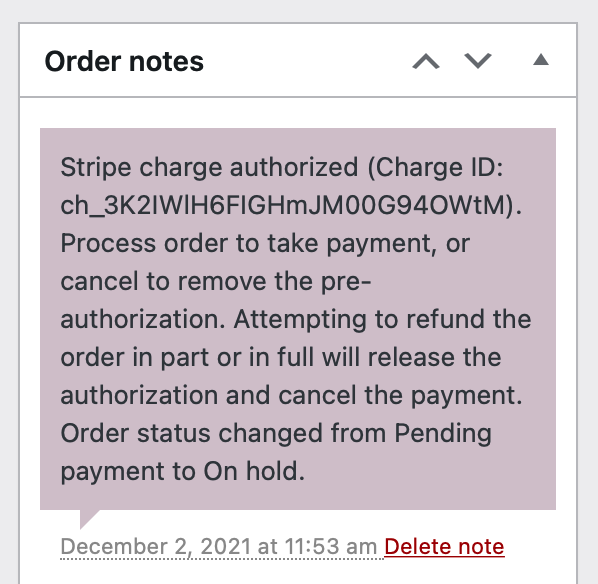
When the Stripe payment gateway is set to authorize, orders will be set to on hold and adds a note like the one shown below. As the note says to capture the charge and take payment for the order you need to change the order status to Processing or Completed. You can also set the order to Cancelled to release the authorization.
Regarding refunding an authorized order, if refunding will cancel the authorization. If you need to partially refund the order then capture it first by setting the order status to Processing, then process your partial refund as usual.
Does Stripe allow refunds inside WooCommerce? ↑ Back to top
It does, please see more info on our WooCommerce Refunds documentation page on processing refunds.
Does Stripe Support ACH? ↑ Back to top
Not currently but Stripe are actively working on this. For more details, please add your votes to our Ideas board.
Why aren’t my subscriptions displayed on the Stripe Dashboard? ↑ Back to top
WooCommerce Subscriptions does not use the Stripe Billing product. Instead, it uses a Stripe Customer and Card token and controls the processing of recurring payments.
This avoids any potential issues that could occur by trying to keep two copies of each subscription’s data in sync on two different systems (one in your store and one at Stripe). It also makes it possible for Stripe to support all of WooCommerce Subscriptions’ features, like payment date changes, rather than only those the Stripe Subscriptions allows.
Because of this, you will not see subscriptions created with WooCommerce in your Stripe Dashboard as Subscriptions. This does not mean recurring payments will not be processed. As long as your store is running correctly, recurring payments will be processed correctly and will show up in the Stripe Dashboard as Payments.
Do I need to enable “payments via saved cards” to process subscriptions? ↑ Back to top
The WooCommerce Subscriptions extension has its own mechanism for saving credit card details. When a customer buys a subscription product, Stripe will create a special payment token that will use the same credit card details for future subscription payments. Saving the same card again on the customer’s account is not necessary unless you want to allow the customer to reuse the card for other purchases in your store.
What Stripe payment methods support Subscriptions? ↑ Back to top
Subscription purchases can be made using the standard debit/credit card fields, express checkouts, and SEPA. No other payment methods currently support WooCommerce Subscriptions.
What is Level3 Data? ↑ Back to top
There are three levels of information that WooCommerce stores can send to Stripe about transactions in order for Stripe to pass that information to the card networks. Each level sends additional data which can be used to boost payment acceptance, reduce fraud, and decrease network costs of processing the transaction.
While Stripe requires merchants to always send at least level 1 data, like the charge date and amount, the WooCommerce Stripe extension will also send level 3 data when possible. When US Stripe accounts connect to the WooCommerce Stripe Platform through Stripe Connect, it is possible for the account to pass tier 3 data.
If manually entering Stripe API keys instead of using Stripe Connect, the Stripe extension will attempt to send the tier 3 data, and if that fails, resend the request without that data. When this happens, you will see 400 errors in your log, followed closely by a near identical log entry with a successful transaction.
Am I eligible for Stripe Instant Payouts? ↑ Back to top
Stripe offers Instant Payouts for immediate access to your funds. Stripe determines your Instant Payouts eligibility. You can check your eligibility by logging into the dashboard and checking for the “Pay out funds instantly” button on the Balance page.
Pricing: 1% of the payout amount
Eligibility: Merchants who have been processing for at least 6 months with Stripe may become eligible.
New Stripe users are not immediately eligible for Instant Payouts. If you’re not eligible for Instant Payouts, you can request access at instantpayouts@stripe.com.
Is Stripe’s Saved Cards feature supported? ↑ Back to top
Yes, you can read more about this in the automatic card updates documentation.
Troubleshooting ↑ Back to top
Root Relative URLs ↑ Back to top
There are known issues with the Root Relative URLs plugin. You will not be able to use this with Stripe.
I get an error when placing an order telling me to enable JavaScript. ↑ Back to top
This error may be caused by non-standard/poorly coded themes and JavaScript (JS) issues. Common issues include:
- Javascript errors on the checkout page – To view the error, open up your browser error console (in Chrome: View > developer > javascript console) and look for red errors. This should indicate where the error is located and lead you to the problem, i.e., loading jquery wrong
- Failing to load scripts – Stripe loads 2 JS files which it needs to function. If these are not loaded you will see errors. The most common reasons for not loading are:
- A theme missing wp_head() or wp_footer() calls
- Old overridden template files from WooCommerce inside your theme
- Loading headers/footers in a non-standard way. WooCommerce uses get_header()’s get_header action to init the checkout and load scripts. If you are not using get_header() you either need to do so, or you need to trigger the get_header action manually using: do_action( ‘get_header ); in your custom header loader.
Apple Pay – I am getting this error “Error: Unable to copy domain association file to domain root” ↑ Back to top
That could mean your server configuration is not allowing files/paths to be written in that location. You would have to manually do this by following the step outlined here.
Apple Pay – I am getting this error “Error: Unable to verify domain – Bad Request” ↑ Back to top
Try manually doing this by following the step outlined here.
Apple Pay – Button only shows in private/incognito Safari window ↑ Back to top
First, perform a conflict test to rule out plugin or theme interference. If the problem persists, try removing the domain from the Stripe dashboard and re-adding it:
- Go to Apple Pay management in Stripe dashboard.
- Remove the existing Apple Pay domain
- Add it again inside the dashboard
Apple Pay – Button stuck at loading status when using with WP-Rocket ↑ Back to top
Try excluding WooCommerce cookies from WP Rocket settings in order for Apple Pay to work.
I’m getting an API error. ↑ Back to top
Ensure that you have entered the correct keys. If you are in Live Mode, you should have entered live keys (not test keys).
- If you are using test mode, keys are prepended with sk_test and pk_test
- If you are using live mode, keys are prepended with sk_live and pk_live
I’m seeing the error “Could not find payment information.” ↑ Back to top
This usually means that test mode is still enabled while using live keys, or that test keys are being used in live mode. For more details, please check the Stripe logs under WooCommerce > Status > Logs
Code Snippets ↑ Back to top
How can I change the style of the Stripe Form? ↑ Back to top
The payment form is served in an iframe method on your site; this provides extra security and is required by Stripe. We have a separate documentation page for Styling Stripe Fields. If you target the iframe with CSS you will find it doesn’t work. What you need to do instead is target the wrapping div element. Here’s some sample CSS that can help you:
Custom CSS to change the style of the Stripe Elements form: ↑ Back to top
Note: You can style the size, margin, padding, and background color of the boxes.
You can also add custom Stripe Elements styles using the wc_stripe_elements_styling filter. Here’s an example of how you can do that:
How can I translate the placeholders text inside the credit card form? ↑ Back to top
The placeholders text inside the credit card form is automatically translated by Stripe and cannot be translated by adding new translation strings to your site. Here’s a screenshot showing which is the placeholder text:
![]()
By default Stripe detects the locale of the browser and use that as the default. The available locales are ar , da , de , en , es , fi , fr , he , it , ja , lt , lv , ms , nb , nl , pl , pt , ru , sv , zh (see the Stripe documentation for more details).
You can change the locale used with the filter wc_stripe_elements_options . For example, to change it to use the site locale you can use this snippet:
To use the site’s locale as the language, you can instead use this line with the above snippet:
How can I change the payment icons used such as Visa, Mastercard…etc? ↑ Back to top
You can change it via a built-in hook. Here is an example showing the use of the hook changing out the Visa logo.
How can I change the width of the express checkout button? ↑ Back to top
You can target the button div using #wc-stripe-payment-request-button and the “OR” separator using #wc-stripe-payment-request-button-separator . See the Styling documentation for more details.
Hooks (Actions/Filters) ↑ Back to top
This section describes all hooks available to you if you need to manipulate how Stripe functions. This is more advanced so read over the Hooks page of the WordPress.org Codex if unfamiliar with how hooks work within WordPress.
Hook name (parameters)
Action Hooks
- wc_gateway_stripe_process_response ($stripe_response, $order) – The response we get back after calling a charge request to Stripe.
- woocommerce_credit_card_form_start ($gateway_id) – Before showing the credit card form.
- woocommerce_credit_card_form_end ($gateway_id) – After showing the credit card form.
- wc_gateway_stripe_process_payment ($stripe_response, $order) – The response we get back after calling a charge request to Stripe but before processing the actual response.
- wc_gateway_stripe_process_payment_error ($error, $order) – Called when an error occurs during the process payment event.
- woocommerce_stripe_add_customer ($args, $response) – Called after creating a Stripe customer.
- woocommerce_stripe_add_source ($stripe_customer_id, $wc_token, $response, $source_id) – Called after creating/attaching a source to a customer.
- wc_stripe_delete_source ($stripe_customer_id, $response) – Called after deleting a source from customer.
- wc_stripe_set_default_source ($stripe_customer_id, $response) – Called after setting a default source to a customer.
- wc_gateway_stripe_process_redirect_payment ($response, $order) – Called after a redirect payment process.
- wc_gateway_stripe_process_redirect_payment_error ($error, $order) – Called after a failed redirect payment process.
- woocommerce_stripe_process_manual_capture ($order, $result) – Called after a manual capture of a charge within admin order.
- woocommerce_stripe_process_manual_cancel ($order) – Called after a cancel of the order that is authorized and not yet captured.
- wc_gateway_stripe_process_webhook_payment ($response, $order) – Called after a webhook payment process.
- wc_gateway_stripe_process_webhook_payment_error ($order, $notification, *$e) – Called after a webhook payment process error.
Filter Hooks
In WooCommerce Stripe version 5.6.0+ , we introduced a new checkout experience allowing shoppers to choose their own preferred payment method.
 An example for credit cards, giropay and Sofort in the new checkout block experience
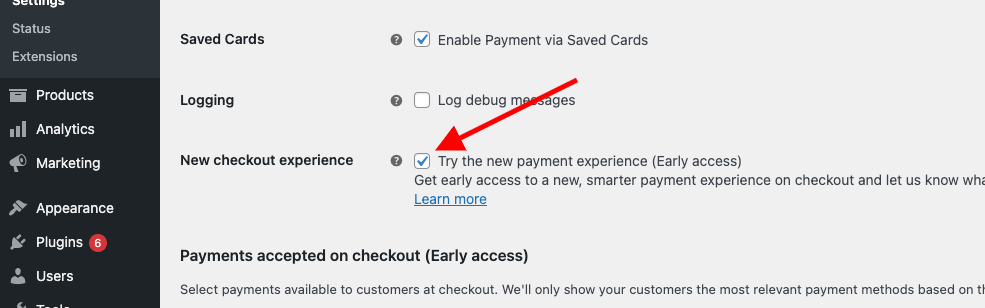
How to activate the new checkout experience? ↑ Back to top
- Go to: WooCommerce > Settings > Payments > Stripe
- Click the checkbox for “New checkout experience” and click “Save changes”
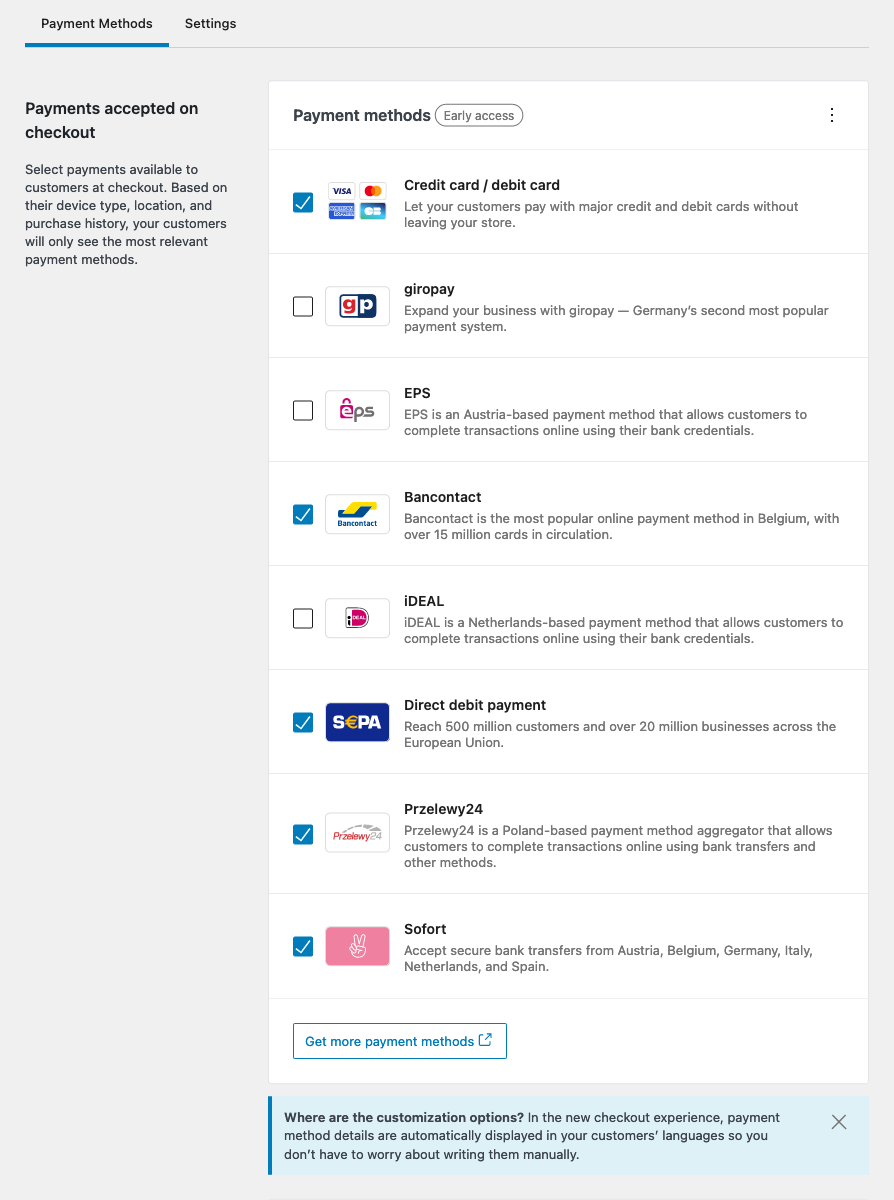
Payments accepted on checkout (Early access) ↑ Back to top
The following new section will show up after enabling “New checkout experience”.
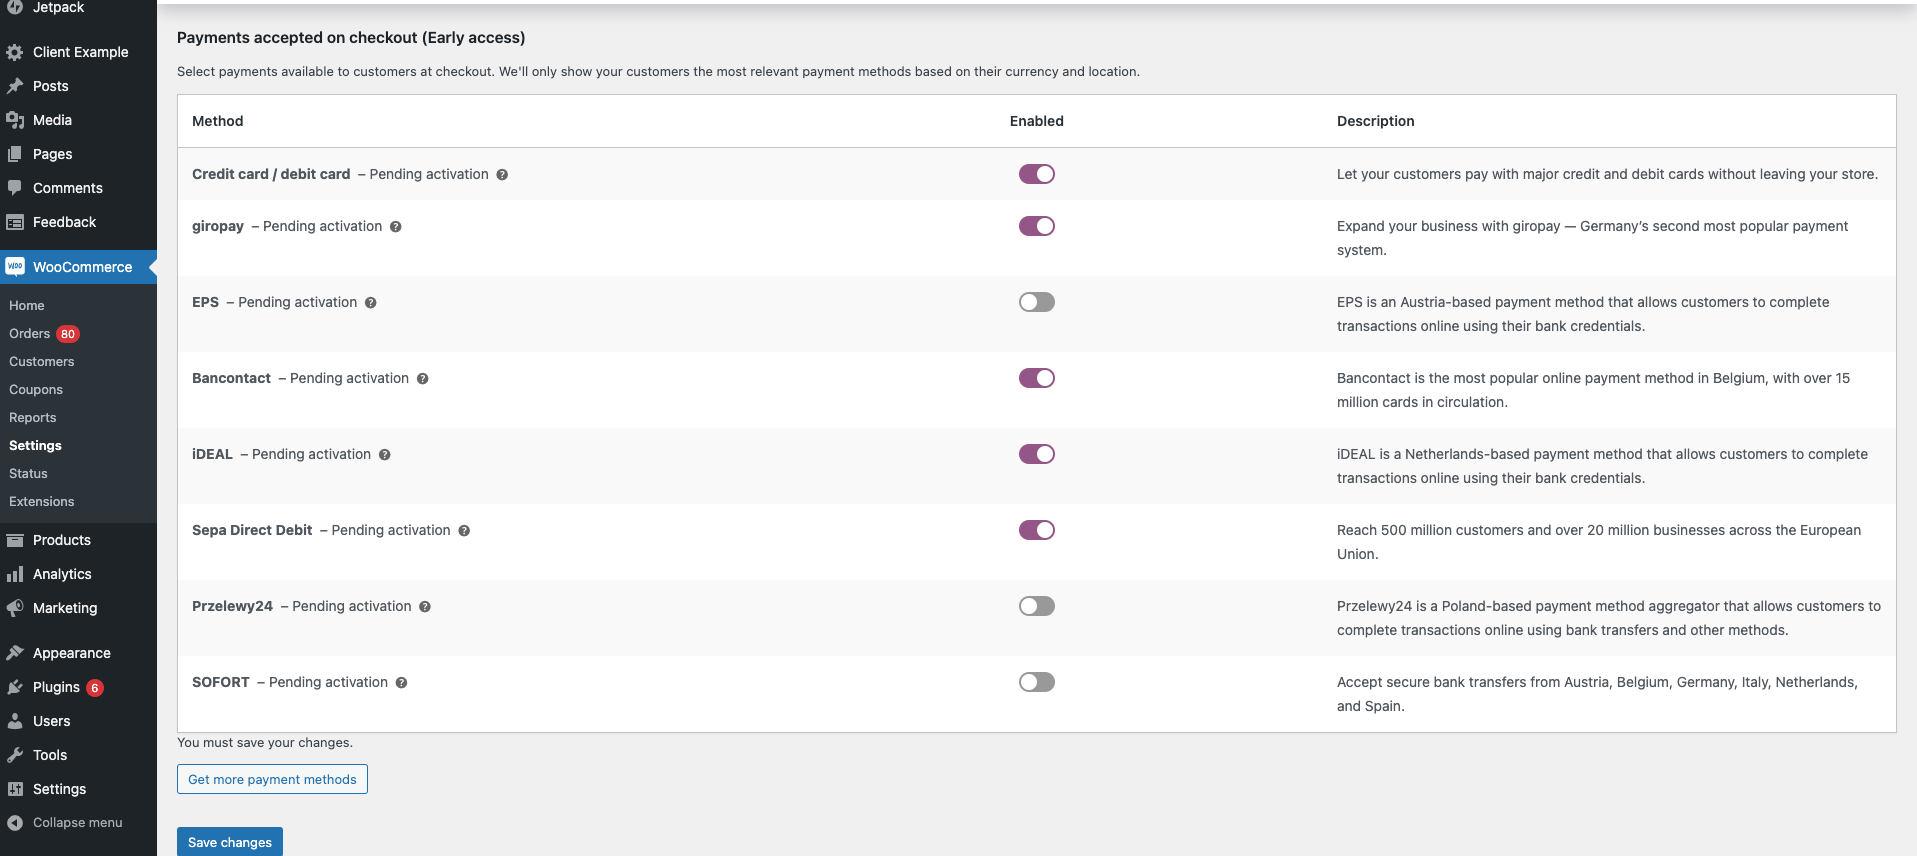
This section shows a list of available payment methods you can use for your checkout. You may need to provide more information to Stripe before enabling them. You can click the “Get more payment methods” button to check your Stripe payment settings for their eligibility.
Requirements for non-Credit Card payment methods to show at checkout ↑ Back to top
Credit Card is the only one that allows “manual capture”. For other payment methods, you will need to enable the “Capture charge immediately” checkbox.

Does this new checkout experience work with the WooCommerce Pre-Orders plugin? ↑ Back to top
Currently the new checkout experience does not work with the WooCommerce Pre-Orders plugin.
WooCommerce — the most customizable eCommerce platform for building your online business.
Источник


