- Swipe back activity android
- About
- Swipe back activity android
- Latest commit
- Git stats
- Files
- README.md
- About
- Topics
- Resources
- Releases
- Packages 0
- Languages
- Drag и Swipe в RecyclerView. Часть 1: ItemTouchHelper
- ItemTouchHelper
- Настройка
- Использование ItemTouchHelper и ItemTouchHelper.Callback
- Заключение
- Исходный код
- Swipe back activity android
- About
- Swipe back activity android
- About
Swipe back activity android
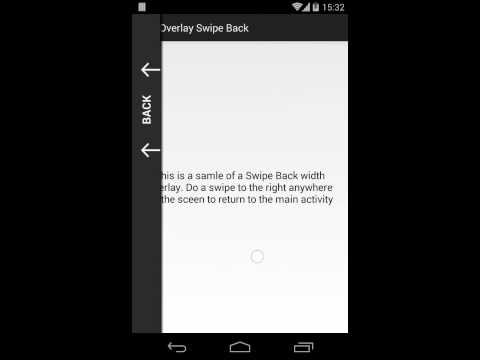
SwipeBack is for Android Activities to do pretty the same as the android «back-button» will do, but in a really intuitive way by using a swipe gesture
Not Actively Maintained
Warning: this project is not actively maintained. It works, but don’t expect any future improvements or major bug fixes but I’m willing to merge any Pull Request.

SwipeBack is available on maven central
It’s not supported yet to build it from xml. You simply have to set it up in you Activities onCreate() method. Instead of Activity.setContentView() call SwipeBack.setContentView() .
The code above will use the default setup. R.layout.swipeback_default , the default swipe back layout is already provided by this library as well as DefaultSwipeBackTransformer , R.anim.swipeback_stack_to_front , R.anim.swipeback_stack_to_back , R.anim.swipeback_stack_right_in and R.anim.swipeback_stack_right_out .
The most important thing is the SwipeBackTransformer . This interface provides an API that will be called from the SwipeBack class. Here is where you implement frame by frame animation while the swipe back view will become open (by users swipe gesture). Additionally you can customize the SwipeBack position, the drag mode (drag content or drag window) and if it should be drawn as overlay or not (Type.BEHIND or Type.OVERLAY).
You can also draw a divider between the normal content view and the swipe back view and a overlay that will fade out while opening the swipe back view.
To distinguish a ViewPager swipe gesture from a SwipeBack swipe gesture you have to setup a OnInterceptMoveEventListener :
The Samsung Galaxy Nexus was one of the first device without hardware buttons for «back», «home» and «app switching (multitasking)» but used the androids navigation bar on screen (introduced in Android 4.0). The navigation bar was at least in my opinion a big step forward, especially on screen rotation from landscape to portrait and vice versa. But I asked myself, do we really need a navigation bar? I mean the navigation bar takes ca. 10 % of the whole screen. Even at the home screen the «back» and «home» button is useless (because they do nothing). So I thought to myself: Why do we not use swipe gestures instead of a navigation bar? But maybe this idea is to futuristic and not suitable for all kind of android user. A few years later apple introduced the swipe back gesture in iOS 7. Why doesn’t Android Apps use swipe gesture as alternative to the back button. Pinterest and Tumblr do so, but at least they use a single Activity and a ViewPager. The problem with this approach is:
You will lost a little bit the ability to jump to any screen by using intents. Take Pinterest as an example: If you get a push notification from Pinterest and you click on it you will see a loading dialog on screen. Internal the navigation stack is generated by adding Fragments to the ViewPager.
ActionBar: The ActionBar is as default not part of a fragment, but it’s part of the activity. So you can not (by using a ViewPager) use the default ActionBar to swipe back to the previous Fragment, because the ActionBar will remain sticky. So you have to implement you own ActionBar and attach that to the fragments view.
My approach can be used for activities. It does pretty the same as the android menu drawers do. It adds an aditional layout and slides the content or the window to the side.
- Simon Vig Therkildsen: The most code of handling swipe gestures has been taken from his android-menudrawer library.
About
SwipeBack for Android Activities to do pretty the same as the android «back-button» will do, but in a really intuitive way by using a swipe gesture
Источник
Swipe back activity android
SwipeBack is an android library that can finish a activity by using gesture.
Latest commit
Git stats
Files
Failed to load latest commit information.
README.md
SwipeBackLayout is an android library that can finish an activity by using gesture.
You can set the slide direction,such as FROM_LEFT,FROM_TOP,FROM_RIGHT and FROM_BOTTOM.
You can also set whether it can only slide from the edge.
Sample Apk Download
Attention: If you are using WxSwipeBackLayout , you must call WxSwipeBackActivityManager.getInstance().init(this) to init it in Application. just like :
| Attribute 属性 | Description 描述 |
|---|---|
| swipeBackFactor | set the factor of swipeback |
| maskAlpha | set the background alpha at the beginning of swipeback |
| directionMode | set the direction of swiping to finish |
| isSwipeFromEdge | set whether it can only slide from the edge |
SwipeBackLayout must contains only one direct child.
- LinearLayout,RelativeLayout,FrameLayout,TableLayout etc.
- ScrollView,HorizontalScrollView,NestedScrollView etc.
- RecyclerView,the subClass of AbsListView(ListView etc.)
- ViewPager,WebView etc.
About
SwipeBack is an android library that can finish a activity by using gesture.
Topics
Resources
Releases
Packages 0
Languages
You can’t perform that action at this time.
You signed in with another tab or window. Reload to refresh your session. You signed out in another tab or window. Reload to refresh your session.
Источник
Drag и Swipe в RecyclerView. Часть 1: ItemTouchHelper

Существует множество обучающих материалов, библиотек и примеров реализации drag & drop и swipe-to-dismiss в Android c использованием RecyclerView. В большинстве из них по-прежнему используются устаревший View.OnDragListener и подход SwipeToDismiss, разработанный Романом Нуриком. Хотя уже доступны новые и более эффективные методы. Совсем немногие используют новейшие API, зачастую полагаясь на GestureDetectors и onInterceptTouchEvent или же на другие более сложные имплементации. На самом деле существует очень простой способ добавить эти функции в RecyclerView . Для этого требуется всего лишь один класс, который к тому же является частью Android Support Library.
ItemTouchHelper
ItemTouchHelper — это мощная утилита, которая позаботится обо всём, что необходимо сделать, чтобы добавить функции drag & drop и swipe-to-dismiss в RecyclerView . Эта утилита является подклассом RecyclerView.ItemDecoration, благодаря чему её легко добавить практически к любому существующему LayoutManager и адаптеру. Она также работает с анимацией элементов и предоставляет возможность перетаскивать элементы одного типа на другое место в списке и многое другое. В этой статье я продемонстрирую простую реализацию ItemTouchHelper . Позже, в рамках этой серии статей, мы расширим рамки и рассмотрим остальные возможности.
Примечание. Хотите сразу увидеть результат? Загляните на Github: Android-ItemTouchHelper-Demo. Первый коммит относится к этой статье. Демо .apk -файл можно скачать здесь.

Настройка
Сперва нам нужно настроить RecyclerView . Если вы ещё этого не сделали, добавьте зависимость RecyclerView в свой файл build.gradle .
ItemTouchHelper будет работать практически с любыми RecyclerView.Adapter и LayoutManager , но эта статья базируется на примерах, использующих эти файлы.
Использование ItemTouchHelper и ItemTouchHelper.Callback
Чтобы использовать ItemTouchHelper , вам необходимо создать ItemTouchHelper.Callback. Это интерфейс, который позволяет отслеживать действия перемещения (англ. move) и смахивания (англ. swipe). Кроме того, здесь вы можете контролировать состояние выделенного view -компонента и переопределять анимацию по умолчанию. Существует вспомогательный класс, который вы можете использовать, если хотите использовать базовую имплементацию, — SimpleCallback. Но для того, чтобы понять, как это работает на практике, сделаем всё самостоятельно.
Основные функции интерфейса, которые мы должны переопределить, чтобы включить базовый функционал drag & drop и swipe-to-dismiss:
Мы также будем использовать несколько вспомогательных методов:
Рассмотрим их поочередно.
ItemTouchHelper позволяет легко определить направление события. Вам нужно переопределить метод getMovementFlags() , чтобы указать, какие направления для перетаскивания будут поддерживаться. Для создания возвращаемых флагов используйте вспомогательный метод ItemTouchHelper.makeMovementFlags(int, int) . В этом примере мы разрешаем перетаскивание и смахивание в обоих направлениях.
ItemTouchHelper можно использовать только для перетаскивания без функционала смахивания (или наоборот), поэтому вы должны точно указать, какие функции должны поддерживаться. Метод isLongPressDragEnabled() должен возвращать значение true , чтобы поддерживалось перетаскивание после длительного нажатия на элемент RecyclerView . В качестве альтернативы можно вызвать метод ItemTouchHelper.startDrag(RecyclerView.ViewHolder) , чтобы начать перетаскивание вручную. Рассмотрим этот вариант позже.
Чтобы разрешить смахивание после касания где угодно в рамках view -компонента, просто верните значение true из метода isItemViewSwipeEnabled() . В качестве альтернативы можно вызвать метод ItemTouchHelper.startSwipe(RecyclerView.ViewHolder) , чтобы начать смахивание вручную.
Следующие два метода, onMove() и onSwiped() , необходимы для того, чтобы уведомить об обновлении данных. Итак, сначала мы создадим интерфейс, который позволит передать эти события по цепочке вызовов.
Самый простой способ сделать это — сделать так, чтобы RecyclerListAdapter имплементировал слушателя.
Очень важно вызвать методы notifyItemRemoved() и notifyItemMoved() , чтобы адаптер увидел изменения. Также нужно отметить, что мы меняем позицию элемента каждый раз, когда view -компонент смещается на новый индекс, а не в самом конце перемещения (событие «drop»).
Теперь мы можем вернуться к созданию SimpleItemTouchHelperCallback , поскольку нам всё ещё необходимо переопределить методы onMove() и onSwiped() . Сначала добавьте конструктор и поле для адаптера:
Затем переопределите оставшиеся события и сообщите об этом адаптеру:
В результате класс Callback должен выглядеть примерно так:
Когда Callback готов, мы можем создать ItemTouchHelper и вызвать метод attachToRecyclerView(RecyclerView) (например, в MainFragment.java):
После запуска должно получиться приблизительно следующее:
Заключение
Это максимально упрощённая реализация ItemTouchHelper . Тем не менее, вы можете заметить, что вам не обязательно использовать стороннюю библиотеку для реализации стандартных действий drag & drop и swipe-to-dismiss в RecyclerView . В следующей части мы уделим больше внимания внешнему виду элементов в момент перетаскивания или смахивания.
Исходный код
Я создал проект на GitHub для демонстрации того, о чём рассказывается в этой серии статей: Android-ItemTouchHelper-Demo. Первый коммит в основном относится к этой части и немного ко второй.
Источник
Swipe back activity android
An Android library that help you to build app with swipe back gesture.

The latest android-support-v4.jar should be referenced by your project.
- Add SwipeBackLayout as a dependency to your existing project.
- To enable SwipeBackLayout, you can simply make your Activity extend SwipeBackActivity :
- In onCreate method, setContentView() should be called as usual.
- You will have access to the getSwipeBackLayout() method so you can customize the SwipeBackLayout .
- Make window translucent by adding true to your theme.
Download via Jcenter:

I will gladly accept pull requests for fixes and feature enhancements but please do them in the develop branch.
Copyright 2013 Isaac Wang
Licensed under the Apache License, Version 2.0 (the «License»); you may not use this file except in compliance with the License. You may obtain a copy of the License at
Unless required by applicable law or agreed to in writing, software distributed under the License is distributed on an «AS IS» BASIS, WITHOUT WARRANTIES OR CONDITIONS OF ANY KIND, either express or implied. See the License for the specific language governing permissions and limitations under the License.
About
An Android library that help you to build app with swipe back gesture.
Источник
Swipe back activity android
![]()
![]()
![]()
| library | smart-swipe | smart-swipe-support | smart-swipe-x |
|---|---|---|---|
| latest version |  |  |  |
A smart swipe android library helps you make View (and Activity) swipes easier.
In addition, to facilitate the use, SmartSwipe encapsulates the following tool classes:
- SmartSwipeBack:
All Activities slide back in an easy way via a single line code.
without any super activity class; without translucent theme; without any code into BaseActivity; without any code into xml layout files; - SmartSwipeRefresh:
With a single line code to achieve swipe refresh and load more. Compatible with vertical and horizontal - SwipeConsumerExclusiveGroup:
Manages a set of exclusive SwipeConsumer s, can only open one at a time.
| Stretch StretchConsumer | Space SpaceConsumer | Translucent Sliding TranslucentSlidingConsumer |
|---|---|---|
 |  | |
| Drawer above DrawerConsumer | Drawer behind (factor is settable) SlidingConsumer | |
 |  | |
| Doors Open DoorConsumer | Shutters Open ShuttersConsumer | |
 |  |
| Doors open | Shutters Open | Drawer Open |
|---|---|---|
 |  |  |
Activity sliding back
All Activities slide back in an easy way via a single line code.
- without any super activity class;
- without translucent theme;
- without any code into BaseActivity;
- without any code into xml layout files;
| Back via release velocity StayConsumer | Translucent Sliding Back ActivitySlidingBackConsumer | Back with bezier BezierBackConsumer |
|---|---|---|
 |  |  |
| Like doors open ActivityDoorBackConsumer | Like shutters open ActivityShuttersBackConsumer | Global Usage SmartSwipeBack |
 |  |  |
First add SmartSwipe to your project
Nested scrolling only compatible after android api above 21(android 5.0) with core library(smart-swipe)
Add extension library to compat for android support library or androidX like below:
SmartSwipe can be used by chain programming within a single line code. The usage of API looks like follow:
Add more than one ‘SwipeConsumer’ to the same View. Such as:
Click here for more details about SwipeConsumers
Activity slides back with a single line of code globally
Click here For more Details
Add swipe refresh to a View via a single line code
You can use default headers and footers, and you can also customize your own.
The refresh extension library( smart-swipe-refresh-ext :  ) will include some fancy third-party headers and footers.
here is the first one(Based on Ifxcyr/ArrowDrawable):
![]()
Click here For more Details
- support for 4 directions swipe( left/top/right/bottom)
- supports adding multiple SwipeConsumer s to the same View(/Activity)
- supports nested usage
- support to use for list items in ListView and RecyclerView and the list itself
- compat for NestedScroll (android support library and androidX)
- A dozen of built-in SwipeConsumer s effects
About
An android library to make swipe more easier and more powerful. Android各种侧滑,有这一个就够了
Источник


