- Swipeable cardview android example
- Добавляем кнопки при свайпе в RecyclerView
- Создание RecyclerView
- Добавление класса для свайпа
- Swipe cardview android studio
- About
- Android Tinder Swipe View Example
- Tutorial using PlaceHolderView
- Objectives of This Tutorial
- SwipePlaceHolderView:
- Step 1:
- Notes:
- Step 2:
- Step 3:
- Notes:
- Step 4:
- Step 5:
- Step 6:
- Notes:
- Step 7:
- Step 8:
- Notes:
- Step 9:
- Notes:
- Step 10:
- Notes:
- Important developments since the 0.2.7 version:
Swipeable cardview android example

In this tutorial, we will develop views and architecture to simulate the Swipe card view in android. using PlaceHolderView.
Set up the project in the android studio.
In app’s build.gradle add the dependencies like Retrofit, Recyclerview, glide etc.
Add Internet permission in the app’s AndroidManifest.xml
setup the layouts.
- Add PlaceHolderView into your main activity layout.
activity_main.xml
2. Add layout for the Swipecard view.
swipecardview_layout.xml
3. Add a separate view for swipe in view and swipe out views. swipe_in_layout will appear when you start swipe in.
swipe_out_layout will appear when you start swipe out.
Setup an HTTP client for Android. In this tutorial, I am using Retrofit. Please check my detailed post about Retrofit.
2. creating an API interface.
ApiInterface.java
3. movie model.
Movie.java
setup the swipe card view.
- initialise and setup placeholder view in your MainActivity.java. Also, Add swipe in layout and swipe out layouts.
2. Once initialize the SwipePlaceHolderView, then load the data from the API and create swipecard view. That swipecard view needs to be added in SwipePlaceHolderView.
@layout is used to bind the layout with this class.
@View is used to bind the views in a layout we want to refer to.
@Resolve annotation bind a method to be executed when the view is ready to be used. Any operation we want to perform on view references should be written in a method and annotated with this.
@SwipeOut calls the annotated method when the card has been rejected.
@SwipeIn calls the annotated method when the card has been accepted.
4. The callback of the swipe event to MainActivity.
5. Implement the callback in your MainActivity,
Источник
Добавляем кнопки при свайпе в RecyclerView
Для того, чтобы разработать хорошее приложение, недостаточно лишь наполнить его функционалом. Важно также, чтобы интерфейс приложения был удобен и понятен пользователю, а также выглядел презентабельно. Приложение, в котором пользователь не знает, куда нужно нажимать, вряд ли будет пользоваться популярностью.
Отличным инструментом для создания продуманного интерфейса в Android являются свайпы (Swipe). С их помощью всего лишь одним-двумя жестами можно выполнять самые разные действия с объектами: перемещать их по экрану, удалять, изменять и много другое. Например, можно с помощью свайпа выводить на экран приложения такие элементы интерфейса, как боковое меню.
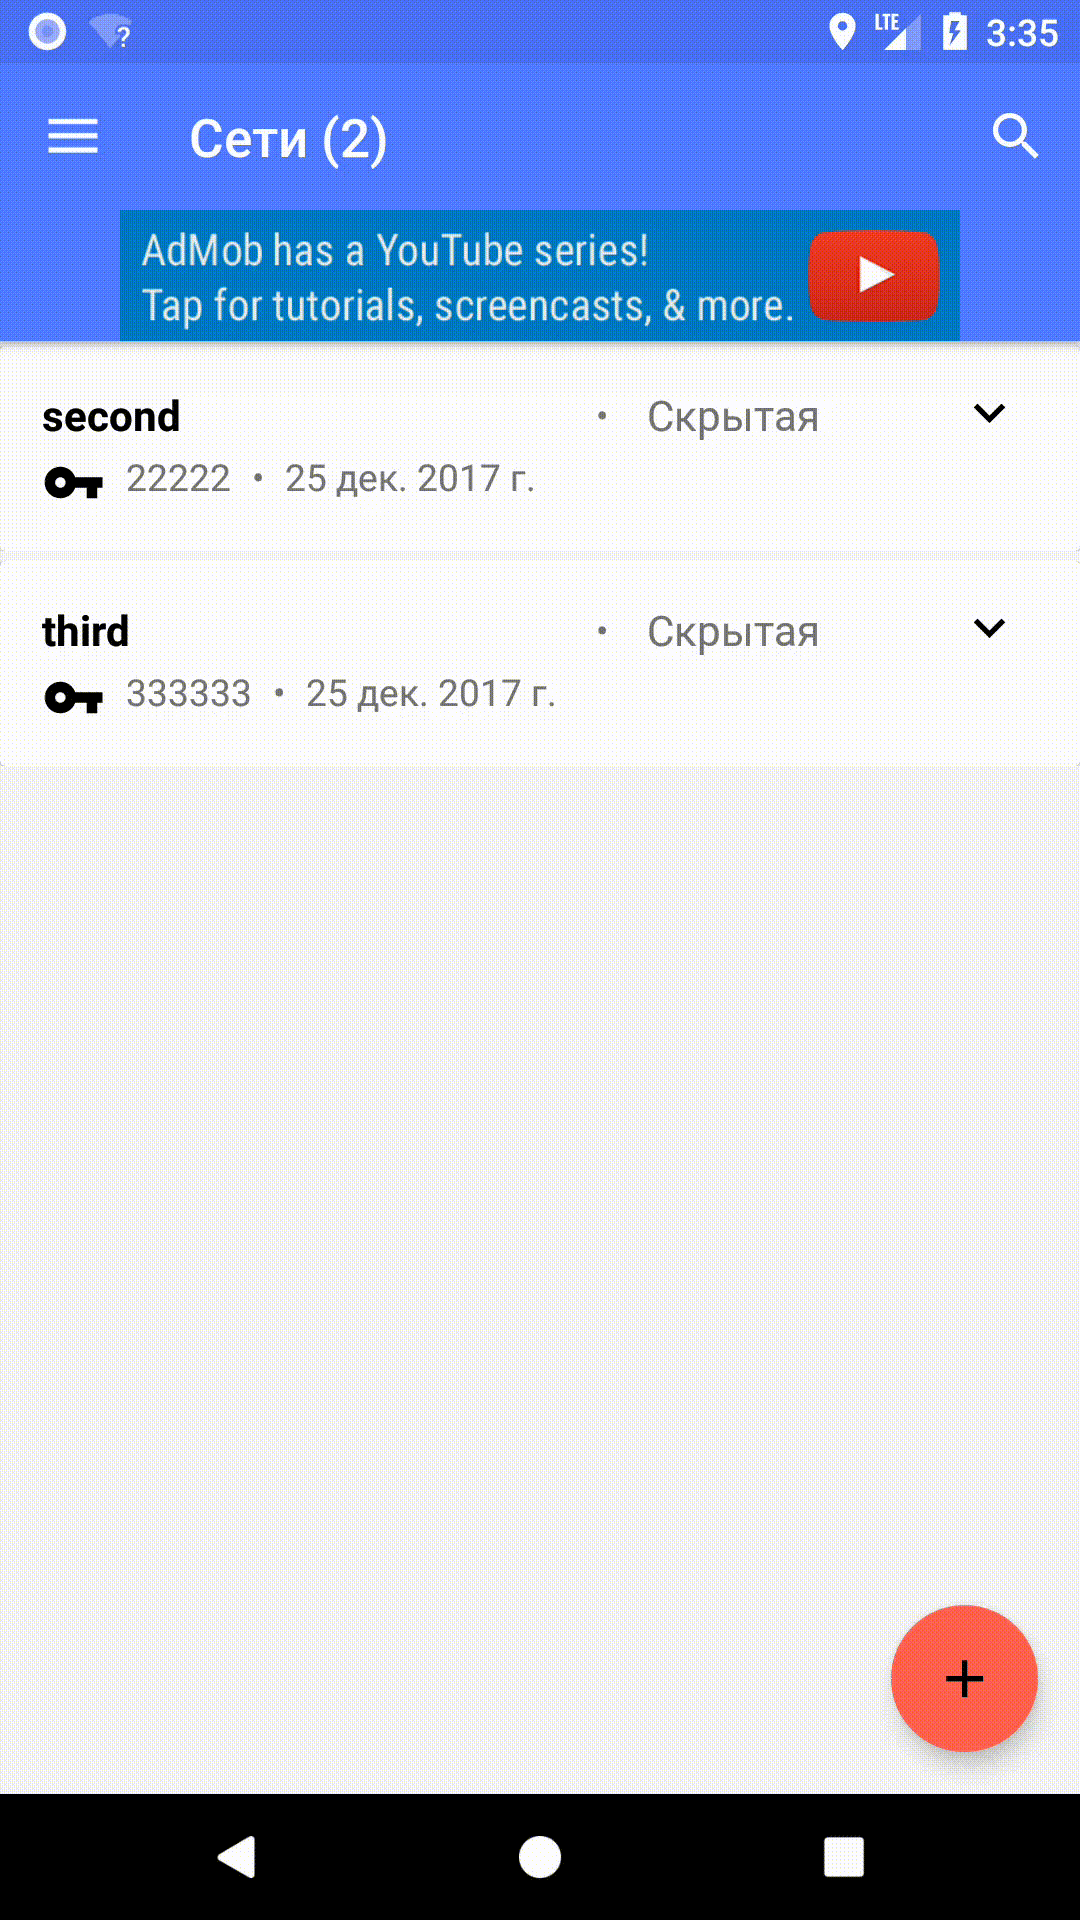
В этой статье мы рассмотрим, как добавить свайп для виджета CardView, расположенного внутри RecyclerView, который будет выводить с правой стороны карточки кнопку. Для примера делать мы это будем в одном из наших приложений Менеджер паролей от Wi-Fi сетей.
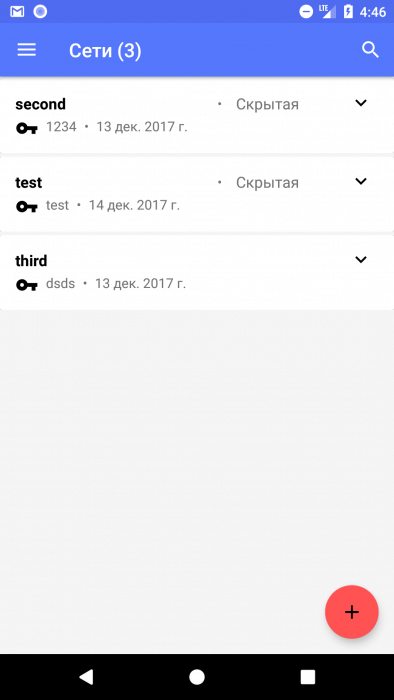
Задачей здесь является сделать кнопку, которая будет перемещать сети из списка активных в Архив (или удалять, если сеть уже находится в Архиве).
Создание RecyclerView
Поскольку список сетей может быть довольно большим, в приложении используется виджет RecyclerView. Чтобы использовать его в своём проекте, нужно для начала добавить зависимость. Для этого в файле build.gradle модуля приложения в dependencies нужно добавить следующую строку:
После этого нужно разместить виджет на разметке активности. Пример этого можно увидеть ниже:
Наше приложение отображает список сетей, сохранённых пользователем. Чтобы RecyclerView смог выводить этот список, для начала нужен класс, который будет хранить данные о сетях. Для этих целей используется класс WifiInfo, содержащий следующий код:
Следующим этапом является создание адаптера. Класс RecyclerView.Adapter крайне важен здесь, поскольку благодаря ему данные, хранящиеся в классе WifiInfo, будут выводиться в итоговый список. В классе нужно переопределить несколько методов, таких как:
- getItemCount() — возвращает количество элементов, которое мы хотим отобразить;
- onCreateViewHolder() — создает экземпляр класса RecyclerView.ViewHolder и создает разметку. Он вызывается только тогда, когда RecyclerView требуется добавить в список новый объект.
- onBindViewHolder() — привязывает данные к разметке ViewHolder. Он вызывается тогда, когда RecyclerView заполняет объект данными.
Ниже вы можете увидеть код адаптера, реализующего заполнение списка данными по сетям.
Здесь же, как можно увидеть, создаётся класс ViewHolder, который описывает разметку элемента и метаданные о его месте в RecyclerView. Реализация адаптера должна использовать ViewHolder в качестве подкласса, поскольку в них кешируются затратные по ресурсам операции findViewById().
Теперь нужно создать разметку, которая будет подгружаться во ViewHolder. Она представляет собой два виджета FrameLayout, помещённых внутри кастомного SwipeRevealLayout, о котором будет сказано позднее. Код разметки вы можете увидеть ниже.
Наконец, нужно создать экземпляр класса RecyclerView в коде активности и инициализировать его. Для правильной работы нужно настроить две вещи: адаптер, который будет предоставлять данные, и менеджер разметки (LayoutManager), который говорит виджету, как нужно отобразить объекты в списке. В результате создание выглядит следующим образом:
Добавление класса для свайпа
Теперь можно приступить к реализации свайпа для элементов списка. Для этого мы использовали в приложении исходный код библиотеки SwipeRevealLayout, которую вы можете скачать на GitHub по следующей ссылке. Стоит заметить, что способ реализации подобных свайпов в сети достаточно много, этот способ был выбран как самый оптимальный для наших задач.
Как уже говорилось, этот класс используется два FrameLayout, на одном из которых размещается собственно элемента списка, а на втором то, что должно отображаться при свайпе.
Библиотека поддерживает свайпы в любом направлении (слева, справа, сверху, снизу), а также имеет два режима:
- normal — дополнительный элемент рисуется позади основного;
- same level — дополнительный элемент рисуется на том же уровне, что и основной.
В библиотеке также используется дополнительный класс ViewBinderHolder, задачей которого является сохранения состояния свайпа и его восстановление. В нашем приложении в этом нет особой необходимости, поэтому этот класс был выкинут вместе с некоторыми методами основного класса. В результате код класса SwipeRevealLayout получился следующим:
В результате мы добавили в список кнопку, которая появляется при свайпе элемента и позволяет либо добавить сеть в архив, либо удалить её.
Источник
Swipe cardview android studio
SwipeCardsView ![]()


Add SwipeCardView to the layout xml file where it is needed
The various customisation attribures available are
max_visible — maximum card to be show in stack as visible
min_adapter_stack — minimum card count left at which callback about adapter to empties will be called
left_swipe_detect — whether swipe to lelf should be enabled or not. true by default
right_swipe_detect — whether swipe to right should be enabled or not. true by default
top_swipe_detect — whether swipe to top should be enabled or not. true by default
bottom_swipe_detect — whether swipe to bottom should be enabled or not. true by default
Create an ArrayAdapter with card list
Set the adapter and fling listener to SwipeCardView
The cards can be removed by code with fling animation
Licensed under the Apache License, Version 2.0 (the «License»); you may not use this work except in compliance with the License. You may obtain a copy of the License in the LICENSE file, or at:
Unless required by applicable law or agreed to in writing, software distributed under the License is distributed on an «AS IS» BASIS, WITHOUT WARRANTIES OR CONDITIONS OF ANY KIND, either express or implied. See the License for the specific language governing permissions and limitations under the License.
About
Android library to implement cards stack view with swipe to remove feature
Источник
Android Tinder Swipe View Example

Tutorial using PlaceHolderView
In this example we will develop views and architecture to simulate the Tinder Swipe.
Objectives of This Tutorial
- We would be creating the swipe view as used in the Tinder. Swipe right is considered accepted and swipe left is rejected.
- As we can see in the above gif that there are a lot of stuffs happening in the scene. Gestures, animations, view integrity model, dynamic data, view management and lots more. All these are implemented in the SwipePlaceHolderView class in the PlaceHolderView library.
- We will load the images from urls and set it in the view display. For this purpose we will use a library Glide.
- The profile data list will be seeded in the application and this seed json file will be stored in the assets folder.
- The seed file will be parsed into Profile object using another library gson.
- This structure will also be compatible if we are pulling url json data from a live server.
SwipePlaceHolderView:
This view is a generic implementation of views in stacked form. The detail about this class can be found here
As we have been doing in my other tutorials, we will take step oriented approach to implement this view in a detailed fashion.
Let’s start the construction:
Step 1:
Set up the project in android studio with default activity.
In app’s build.gradle add the dependencies.
Notes:
- Add an assets folder in the src/main directory and point to it in gradle assets.srcDirs
- CardView is used to display the image in the deck
Add Internet permission in the app’s AndroidManifest.xml
Step 2:
Step 3:
Notes:
- Used fixed size width so get a smooth interaction behavior with the card.
Step 4:
Create src/layout/tinder_swipe_in_msg_view .xml
- This layout will be provided as swipe state accept/reject indicator on the card.
- To avoid text wrapping issue. Make the view of same size as the card in the previous step and then provide a message text at position wherever display is required.
Step 5:
Create src/layout/tinder_swipe_out_msg_view .xml
Step 6:
Place profiles.json file in the assets folder created in the above step 1.
Notes:
- This strategy is very useful in bundling app with seed files. Seed files contain data build in the app package and can be used to populate database or use to display default data to the user. Placing seed files in the form of json makes is extremely easy to parse into models.
Step 7:
- Utils contain methods required to parse seed json file and also populate the model Profile.java
Step 8:
Create model Profile.java
Notes:
- @SerializedName annotation belongs to gson class and used to read json file variable and bind it to the model variable.
- @Expose is used to make the variable readable to the gson
Step 9:
We will now create the class to bind the card view and its operations on layout.
Create TinderCard.java for the profile views.
Notes:
- @layout is used to bind the layout with this class.
- @View is used to bind the views in a layout we want to refer to.
- @Resolve annotation bind a method to be executed when the view is ready to be used. Any operation we want to perform on view references should be written in a method and annotated with this.
- @SwipeOut calls the annotated method when the card has been rejected.
- @SwipeIn calls the annotated method when the card has be accepted.
- @SwipeCancelState calls the annotated method when the card is put back in the deck/canceled.
- @SwipeInState pings the annotated method till the card is moving in accepted state.
- @SwipeOutState pings the annotated method till the card is moving in rejected state.
- IMPORTANT: If we don’t plan to re add a view then the class should be annotated with @NonReusable so that the references are released and memory is optimises. For the demonstration of this tutorial we are adding a view back in the deck if rejected, so we have not used @NonReusable.
For detailed explanations view PlaceHolderView at GitHub repository
Step 10:
Notes:
- We obtain the instance of the SwipePlaceHolderView.
- We then use the getBuilder() method to modify the default view configurations. In this example we are adding 3 cards in the display and keep adding next card when top card is removed.
- SwipeDecor class is used to adjust the visual elements of the view. Here paddingTop and relativeScale gives the perception of a card being placed in stack. The message for card stated is added through setSwipeInMsgLayoutId()and setSwipeOutMsgLayoutId().
- We load the json data and parse into Profile Object and add it to the SwipePlaceHolderView list using addView() method.
- To programmatically do swiping we call doSwipe() method with flag to indicating accepted or rejected swipe.
PlaceHolderView GitHub repository is here
Note: If you want to auto resize the cards and fix issue of card overlapping the like/dislike buttons for mobiles having bottom navigation bar. Then go through below link for the solution:
The source code for this example is here
Important developments since the 0.2.7 version:

All the remaining release version information can be found here: Link
Learning is a journey, let’s learn together!
Источник


