- Switch
- SwitchCompat
- Оператор switch
- How to change default apps in Android
- How to manage default apps
- Manage defaults as you go
- Nuclear option: Reset all default apps
- Android Switch (ON / OFF) Button with Examples
- Create Switch in XML Layout File
- Create Switch Control in Activity File
- Handle Switch Click Events
- Android Switch Control Attributes
- Android Switch Control Example
- activity_main.xml
- MainActivity.java
- Output of Android Switch Example
Switch
Switch — ещё один вид переключателей, который появился в Android 4.0 (API 14). Находится в разделах Commons и Buttons. Фактически, это замена немного устаревшего ToggleButton. В новых проектах лучше использовать Switch.
Компонент используется в том случае, когда нужно переключиться на противоположное состояние — да/нет, вкл./выкл., открыть/закрыть. В реальной жизни это выглядит следующим образом.
При добавлении компонента в макет студия рекомендует использовать использовать SwitchCompat или SwitchMaterial. Общий принцип работы у них одинаковый, отличия касаются дизайна.
Компонент представляет собой полоску с двумя состояниями и сопровождающим текстом. Переключиться можно сдвиганием ползунка или касанием экрана в области компонента (не только на самом ползунке, но и на сопровождающем тексте).
По умолчанию компонент находится в выключенном состоянии. Чтобы установить его в включённом состоянии на этапе разработки, используйте атрибут android:checked=»true».
Сопровождающий текст задаётся в атрибуте android:text. А текст на самом переключателе задаётся при помощи атрибутов android:textOn (методы getTextOn() и setTextOn()) и android:textOff (методы getTextOff() и setTextOff()). Обратите внимание, что сопровождающий текст может быть очень большим и положение самого переключателя относительно этого текста можно регулировать при помощи атрибута android:gravity (смотри пример ниже). Если сопровождающий текст вам не нужен, то не используйте атрибут android:text.
Момент переключения можно отслеживать при помощи слушателя CompoundButton.OnCheckedChangeListener.
SwitchCompat
Студия рекомендует использовать SwitchCompat. Явных отличий у него нет.


Для показа текста на кнопке переключателя установите в true значение атрибута app:showText.
Не забывайте, что данный компонент можно использовать только в активностях типа AppCompatActivity.
Вы можете задать свой стиль для SwitchCompat, добавив строки в styles.xml

Цвет дорожки, вдоль которой двигается ползунок, можно поменять также через стиль:
Источник
Оператор switch
В отличие от операторов if-then и if-then-else, оператор switch применим к известному числу возможных ситуаций. Можно использовать простые типы byte, short, char, int. Также можно использовать Enum и String (начиная с JDK7), и специальные классы, которые являются обёрткой для примитивных типов: Character, Byte, Short, Integer.
Дублирование значений case не допускается. Тип каждого значения должен быть совместим с типом выражения.
Команду switch часто называют командой выбора. Выбор осуществляется в зависимости от целочисленного выражения. Форма команды выглядит так:
Параметр ВыражениеДляСравнения — выражение, в результате вычисления которого получается целое число (как правило). Команда switch сравнивает результат ВыражениеДляСравнения с каждым последующим Совпадением. Если обнаруживается совпадение, то исполняется команда или набор команд, которые прописаны за данным оператором. Если совпадений не будет, то исполняется команда после ключевого слова default. Однако оператор default не является обязательным. В этом случае при отсутствии совпадений программа не выполняет никаких действий.
Каждая секция case обычно заканчивается командой break, которая передаёт управление к концу команды switch.
Рассмотрим простейший пример с месяцами. Запустим наш учебный проект и добавим код в обработчик нажатия кнопки:
Запустите проект и нажмите кнопку — в текстовом поле появится слово Март (любимый месяц котов).
При желании, можно переписать пример с использованием if-then-else:
В каждом блоке case имеется оператор break, который прерывает свой блок кода. Его нужно использовать обязательно, иначе выполнение кода продолжится. Хотя иногда это и используется.
Если код в блоках case совпадает, то блоки можно объединить. Например, код для подсчёта дней в месяце:
При изучении оператора if мы рассматривали пример с временами года. Перепишем его с использованием оператора switch:
Следующий пример случайным образом генерирует английские буквы. Программа определяет, гласные они или согласные:
Так как метод Random.nextInt(26) генерирует значение между 0 и 26, для получения символа нижнего регистра остаётся прибавить смещение ‘a’, при этом символ a автоматически преобразуется к типу int. Символы в секциях case также представляют собой целочисленные значения, используемые для сравнения.
Чтобы вывести переменную c в символьном виде, её необходимо преобразовать к типу char, иначе значение будет выведено в числовом виде.
В Java SE 7 появилась возможность использовать объект String в операторе switch. Возможно, это будет работать и на Android в будущем (Upd.: вроде уже работает):
Допустимы вложенные операторы switch, но на практике я не сталкивался с таким кодом.
Запомните важные свойства оператора switch:
- Оператор switch отличается от оператора if тем, что может выполнять проверку только равенства, а оператор if может вычислять результат булева выражения любого типа.
- Две константы case в одном и том же операторе switch не могут иметь одинаковые значения
- Оператор switch эффективнее набора вложенных операторов if
Источник
How to change default apps in Android
![]()
It’s a problem you might run into regularly. You tap a file that you really want to open with a particular app, but for some reason, Android keeps opening it with some application you couldn’t care less about. That’s because you’ve got the wrong app selected for that type of file. You’re in the right place, however. In this brief guide, we’ll walk you through the process of changing default apps on Android.
Editor’s note: These instructions were put together using a Pixel 4a running stock Android 11. It’s a great device to base any guide on but some steps might be different, depending on the device and software you use.
How to manage default apps
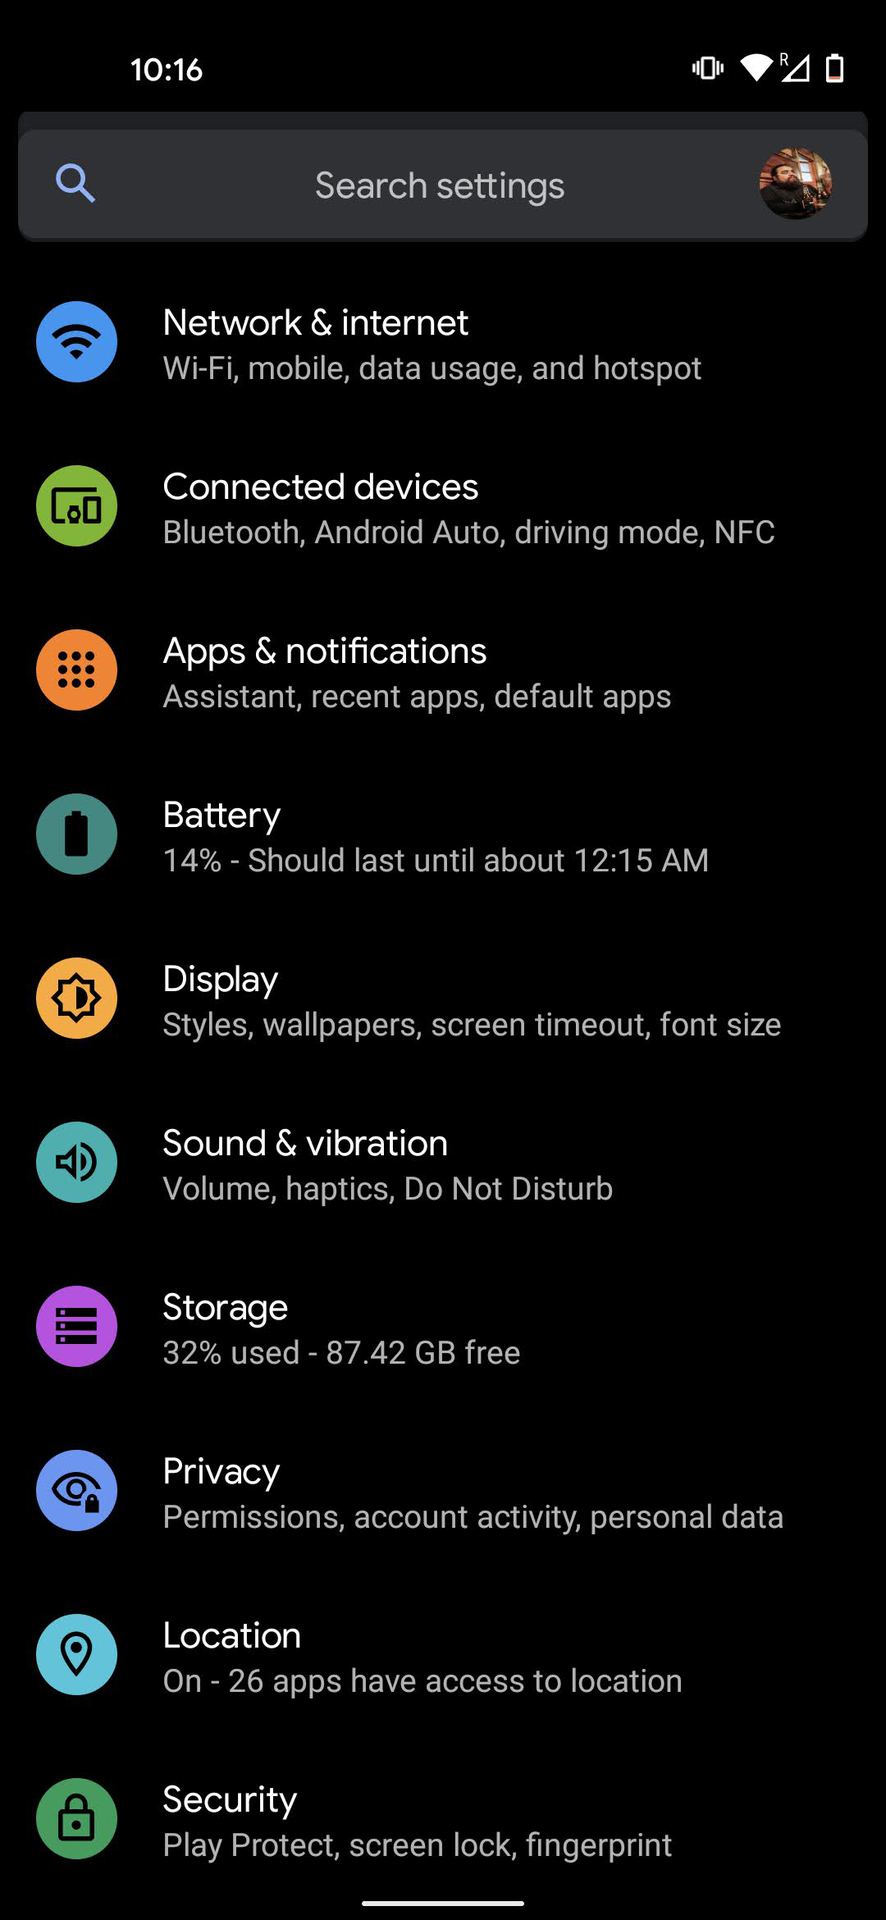
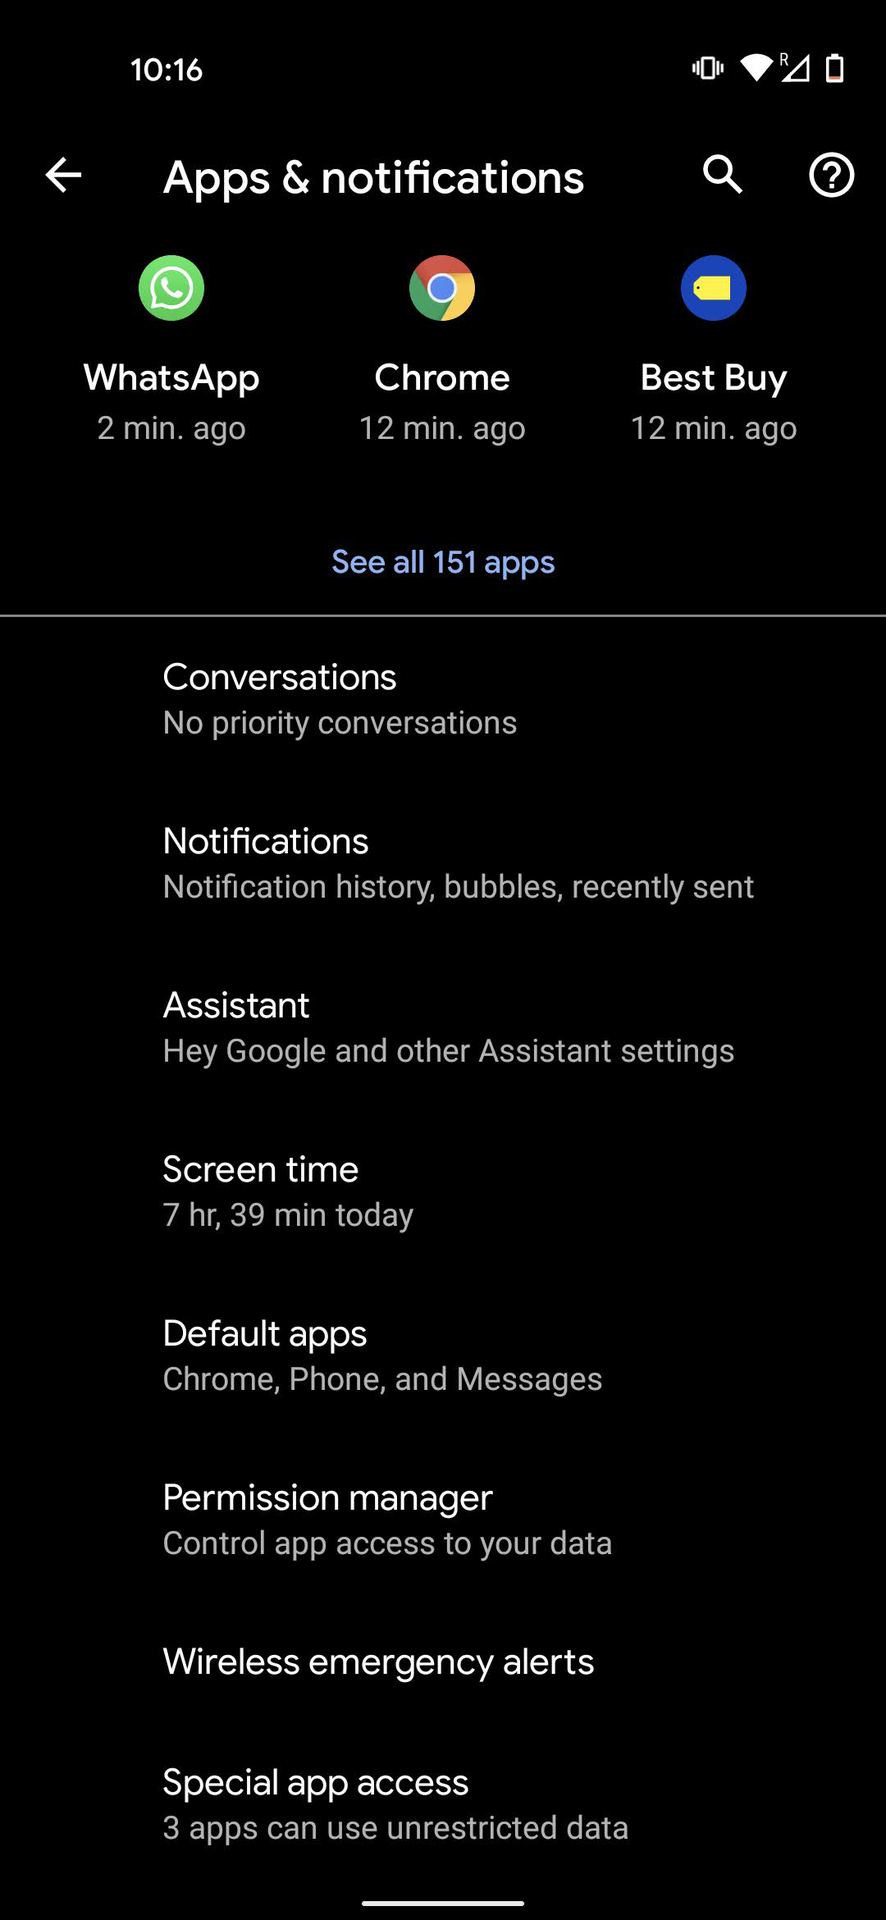
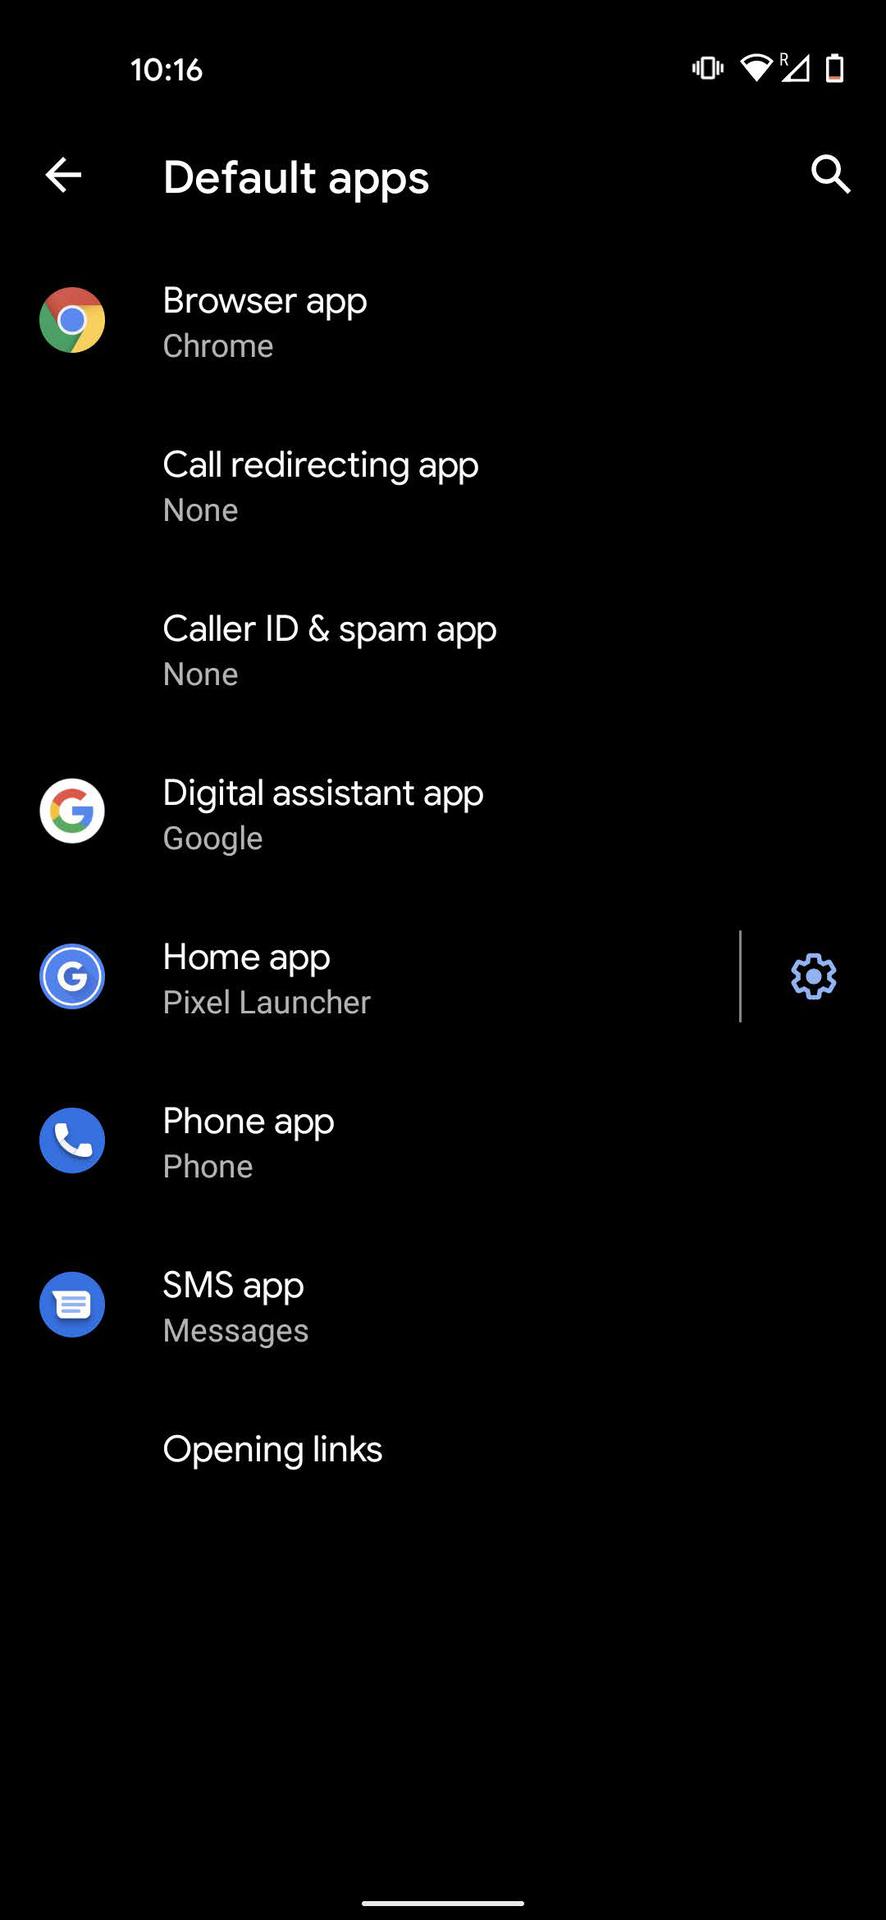
The process used to be much more complicated, but Google has turned managing default apps into an effortless task. It’s baked right into the settings. Just go into your Settings app, select Apps & notifications, click on Advanced, and then go into Default apps.
From there, you can pick your default browser, call redirecting, caller ID, digital assistant, home launcher, phone, and SMS default applications. You can also go into Opening links to edit individual apps on your phone.
Step-by-step instructions to manage default apps:
- Open the Settings app on your Android phone.
- Go into Apps & notifications.
- Hit Advanced.
- Select Default apps.
- Pick the apps you want for each option.
Manage defaults as you go

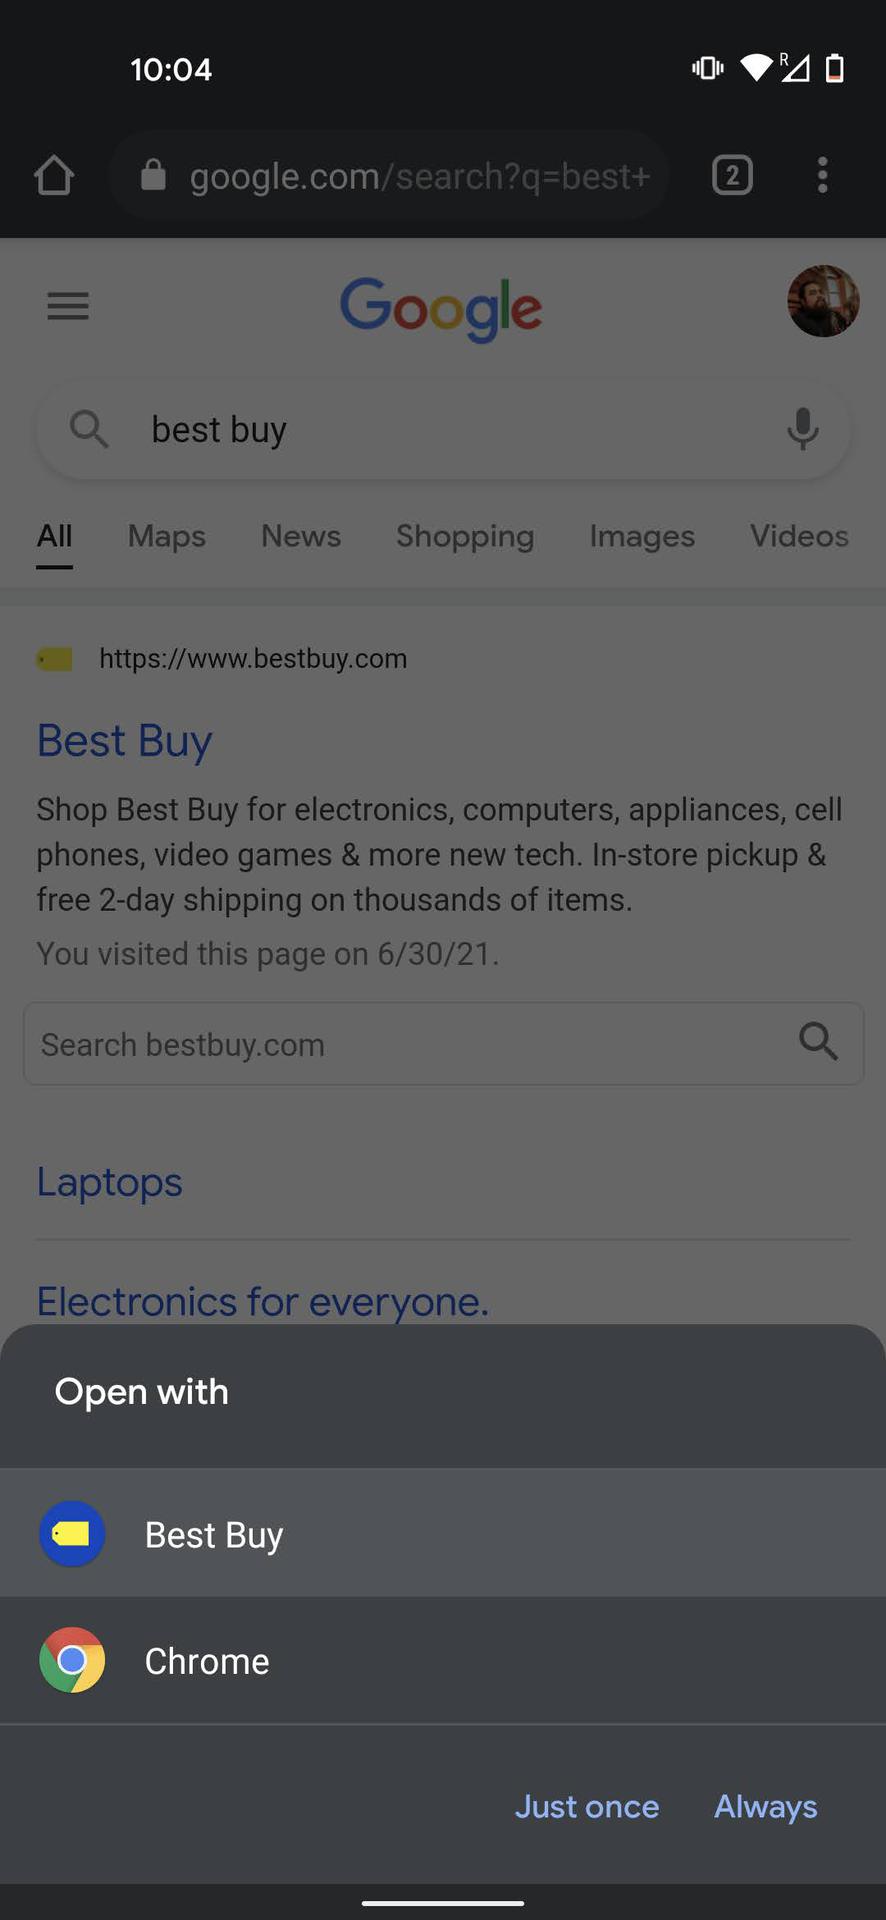
The Android operating system uses a pretty slick concept called “implicit intent.” Basically, if the user or an app calls for the device to do something like “take a picture,” the operating system will look for an app that can get the job done. If more than one option exists, and no default has been selected (or if a new possibility has been installed since the last time a default was set), then Android will ask the user which app they would prefer to use. This makes the process of setting default apps easy and intuitive.
Next time you open any link or action, and Android gives you options for which app to use, select your preferred default app. You can now select Just once or Always. Select Always if you want to make that app the default one. The operating will remember your preference from then on.
The only issue with doing this is that sometimes people accidentally set a default app they didn’t intend to. You can follow the steps in the previous section to change your preference. Once you get to the Default apps section, go into Opening links. Find the app you want to change your preferences for and go into it. You’ll get all the options you need there.
Step-by-step instructions to manage defaults as you go:
- Open a link to a website or action you want to set a default app for. I’m using BestBuy as an example.
- Android will ask you which app you want to use.
- You can pick to use this app Just Once or Always.
- Pick Always to set it as the preferred method.
Nuclear option: Reset all default apps

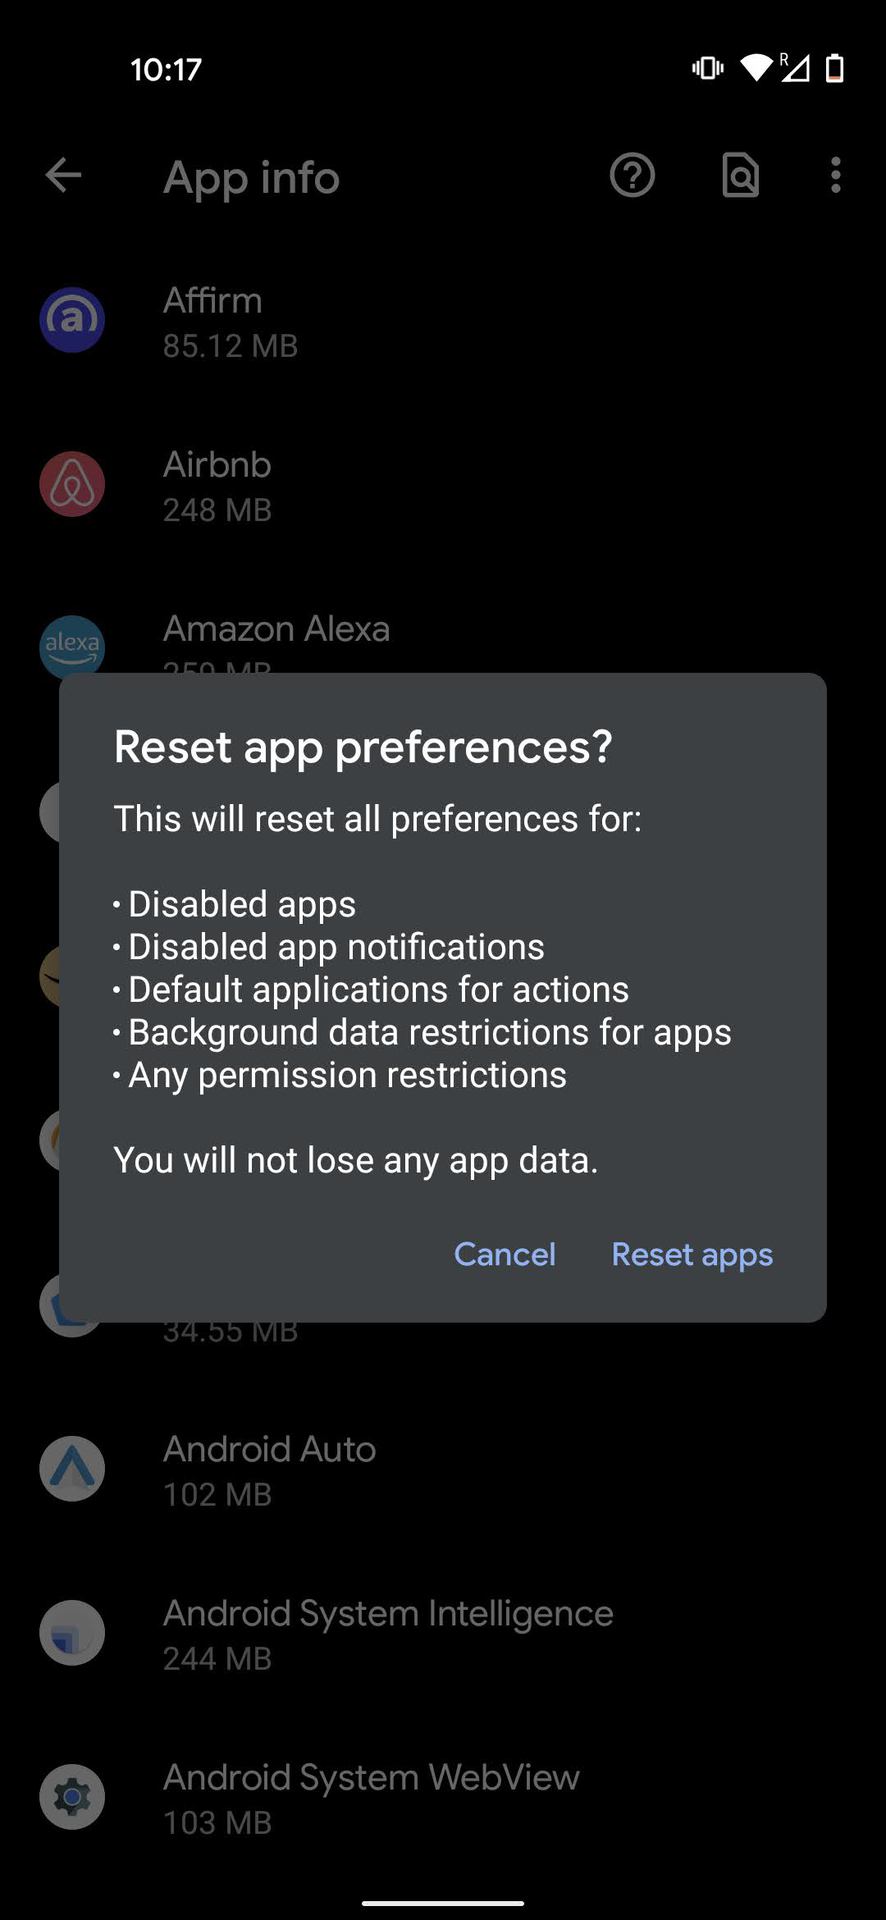
If you can’t quite figure out which app default is giving you fits and the option to choose a new default isn’t appearing no matter what you do, there’s still hope!
However, bear in mind that going through with this procedure will also enable all disabled apps, reset any app notification options, remove any background data restrictions or permission restrictions placed on specific apps. You won’t lose any data, but if you play around with your apps’ settings a lot, you might have to do a fair amount of reconfiguring to get things back to how you like them.
If you’re ready for an app settings reset, go into your Settings app. Select Apps & notifications, and tap on See all apps. Hit the three-dot menu button in the top-right corner. Tap on Reset app preferences. Confirm by tapping on Reset apps.
Step-by-step instructions to reset default apps:
- Open the Settings app on your Android phone.
- Go into Apps & notifications.
- Tap on the See all apps option.
- Hit the three-dot menu button.
- Tap on Reset app preferences.
- Confirm by selecting Reset apps.
Источник
Android Switch (ON / OFF) Button with Examples
In android, Switch is a two-state user interface element that is used to display ON (Checked) or OFF (Unchecked) states as a button with thumb slider. By using thumb, the user may drag back and forth to choose an option either ON or OFF.
The Switch element is useful for the users to change the settings between two states either ON or OFF. We can add a Switch to our application layout by using Switch object.
Following is the pictorial representation of using Switch in android applications.

By default, the android Switch will be in the OFF (Unchecked) state. We can change the default state of Switch by using android:checked attribute.
In case, if we want to change the state of Switch to ON (Checked), then we need to set android:checked = “true” in our XML layout file.
In android, we can create Switch control in two ways either in the XML layout file or create it in the Activity file programmatically.
Create Switch in XML Layout File
Following is the sample way to define Switch control in XML layout file in the android application.
If you observe above code snippet, here we defined Switch control and setting Switch state ON using android:checked attribute and textOff / textOn attributes are used to set the text to represent Switch state in xml layout file.
Create Switch Control in Activity File
In android, we can create Switch control programmatically in activity file based on our requirements.
Following is the example of creating Switch control dynamically in an activity file.
RelativeLayout layout = (RelativeLayout)findViewById(R.id. r_layout );
Switch sb = new Switch( this );
sb.setTextOff( «OFF» );
sb.setTextOn( «ON» );
sb.setChecked( true );
layout.addView(sb);
This is how we can define Switch in XML layout file or programmatically in activity file based on our requirements.
Handle Switch Click Events
Generally, whenever the user clicks on Switch, we can detect whether the Switch is in ON or OFF state and we can handle the Switch click event in activity file using setOnCheckedChangeListener like as shown below.
Switch sw = (Switch) findViewById(R.id.switch1);
sw.setOnCheckedChangeListener( new CompoundButton.OnCheckedChangeListener() <
public void onCheckedChanged(CompoundButton buttonView, boolean isChecked) <
if (isChecked) <
// The toggle is enabled
> else <
// The toggle is disabled
>
>
>);
This is how we can handle Switch click events in android applications based on our requirements.
Android Switch Control Attributes
Following are the some of commonly used attributes related to Switch control in android applications.
| Attribute | Description |
|---|---|
| android:id | It is used to uniquely identify the control |
| android:checked | It is used to specify the current state of switch control |
| android:gravity | It is used to specify how to align the text like left, right, center, top, etc. |
| android:text | It is used to set the text. |
| android:textOn | It is used to set the text when the toggle button is in the ON / Checked state. |
| android:textOff | It is used to set the text when toggle button is in OFF / Unchecked state. |
| android:textColor | It is used to change the color of the text. |
| android:textSize | It is used to specify the size of the text. |
| android:textStyle | It is used to change the style (bold, italic, bolditalic) of text. |
| android:background | It is used to set the background color for toggle button control. |
| android:padding | It is used to set the padding from left, right, top and bottom. |
| android:drawableBottom | It’s a drawable to be drawn to the below of text. |
| android:drawableRight | It’s a drawable to be drawn to the right of the text. |
| android:drawableLeft | It’s drawable to be drawn to the left of the text. |
Android Switch Control Example
Following is the example of defining a two Switch controls and one Button control in RelativeLayout to get the state of Switch controls when we click on Button control in the android application.
Create a new android application using android studio and give names as SwitchExample. In case if you are not aware of creating an app in android studio check this article Android Hello World App.
Now open an activity_main.xml file from \res\layout path and write the code like as shown below
activity_main.xml
xml version= «1.0» encoding= «utf-8» ?>
RelativeLayout xmlns: android = «http://schemas.android.com/apk/res/android»
android :layout_width= «match_parent» android :layout_height= «match_parent» >
Switch
android :id= «@+id/switch1»
android :layout_width= «wrap_content»
android :layout_height= «wrap_content»
android :switchMinWidth= «56dp»
android :layout_marginLeft= «100dp»
android :layout_marginTop= «120dp»
android :text= «Switch1:»
android :checked= «true»
android :textOff= «OFF»
android :textOn= «ON»/>
Switch
android :id= «@+id/switch2»
android :layout_width= «wrap_content»
android :layout_height= «wrap_content»
android :switchMinWidth= «56dp»
android :layout_below= «@+id/switch1»
android :layout_alignLeft= «@+id/switch1»
android :text= «Switch2:»
android :textOff= «OFF»
android :textOn = «ON»/>
Button
android :id= «@+id/getBtn»
android :layout_width= «wrap_content»
android :layout_height= «wrap_content»
android :layout_marginLeft= «150dp»
android :layout_marginTop= «200dp»
android :text= «Get»/>
RelativeLayout >
If you observe above code we defined a two Switch controls and one Button control in RelativeLayout to get the state of Switch controls when we click on Button control in XML layout file.
Once we are done with the creation of layout with required controls, we need to load the XML layout resource from our activity onCreate() callback method, for that open main activity file MainActivity.java from \java\com.tutlane.switchexample path and write the code like as shown below.
MainActivity.java
package com.tutlane.switchexample;
import android.support.v7.app.AppCompatActivity;
import android.os.Bundle;
import android.view.View;
import android.widget.Button;
import android.widget.Switch;
import android.widget.Toast;
public class MainActivity extends AppCompatActivity <
private Switch sw1 , sw2 ;
private Button btnGet ;
@Override
protected void onCreate(Bundle savedInstanceState) <
super .onCreate(savedInstanceState);
setContentView(R.layout. activity_main );
sw1 = (Switch)findViewById(R.id. switch1 );
sw2 = (Switch)findViewById(R.id. switch2 );
btnGet = (Button)findViewById(R.id. getBtn );
btnGet .setOnClickListener( new View.OnClickListener() <
@Override
public void onClick(View v) <
String str1, str2;
if ( sw1 .isChecked())
str1 = sw1 .getTextOn().toString();
else
str1 = sw1 .getTextOff().toString();
if ( sw2 .isChecked())
str2 = sw2 .getTextOn().toString();
else
str2 = sw2 .getTextOff().toString();
Toast.makeText(getApplicationContext(), «Switch1 — » + str1 + » \n » + «Switch2 — » + str2,Toast. LENGTH_SHORT ).show();
>
>);
>
>
If you observe above code we are calling our layout using setContentView method in the form of R.layout.layout_file_name in our activity file. Here our xml file name is activity_main.xml so we used file name activity_main and we are trying to get the state of two Switch controls on Button click.
Generally, during the launch of our activity, the onCreate() callback method will be called by the android framework to get the required layout for an activity.
Output of Android Switch Example
When we run the above example using an android virtual device (AVD) we will get a result like as shown below.

This is how we can use Switch control in android applications to switch the settings between two states either ON or OFF based on our requirements.
Источник


