- Can’t sync calendar and contacts with my phone or tablet
- Which email app are you using?
- Common questions for the Outlook app:
- Check your sync settings
- Troubleshoot calendar and contacts in the Outlook mobile app
- Check the app settings
- Check Gmail app permissions
- Check your app settings
- Delete, re-add account
- Check app settings
- Re-add account
- Check app settings
- Remove and re-add a count
- Having trouble? We can help.
- How to Sync Outlook Contacts With Android Phone?
- Before We Sync Outlook Contacts with Android:
- Part 1: What is Outlook?
- Part 2: Syncing Outlook Contacts With Android Device in Many Ways
- Method 1: Syncing Your Outlook Contacts with Android Device Via Gmail
- Method 2: Transferring Your Outlook Contacts to Your Android Device Using Microsoft Exchange
- Part 3: An Alternative Way of Backing Up and Restoring Contacts to Android Device
- Method 1: Backup Contacts Via FoneDog Toolkit Android Data Backup and Restore
- Step 1: Download and Install
- Step 2: Launch the Program
- Step 3: Connect Your Android Device
- Step 4: Choose The Data Type to Backup
- Step 5: Backup Contacts Complete
- Method 2: Restore Contacts from PC to Android Device Via FoneDog Toolkit – Android Data Backup and Restore
- Step 1: Launch FoneDog Android Toolkit and Connect Android Device
- Step 2: Choose Backup File That You Want to Restore
- Step 3: Select The Data to Restore on Android Device
- Step 4: Contacts Restored to Android Device Successfully
- Video Guide: How to sync Outlook Contacts with Android Phone
- Part 4: Conclusion
Can’t sync calendar and contacts with my phone or tablet
Before you begin:
You’re on the right page if you’re troubleshooting sync issues while setting up your mobile email for the first time.
If your email, calendar, and contacts were syncing before and now they don’t, see Fix Outlook.com email sync issues. If you don’t use an Outlook.com or Microsoft 365 for business account, contact your email provider.
Things to remember:
IMAP and POP are sync protocols that are unable to sync calendar, contacts, etc. They can only sync email. What are IMAP and POP?
You must have an email provider that uses Microsoft Exchange ActiveSync. Most common providers like Gmail do.
Which email app are you using?
Common questions for the Outlook app:
Can I edit contacts in Outlook and have it sync across all my devices? Yes! See this blog post on the new People improvements in Outlook for iOS and Android.
Are my phone’s calendar events also in the Outlook app’s calendar? In order to have your device’s calendar events display in your Outlook calendar, they must be added through an account that has been synced to Outlook. For example, if you’re adding events to the iPhone calendar, you’ll have to sync them to your iCloud account and then add your iCloud account to the Outlook app.
Check your sync settings
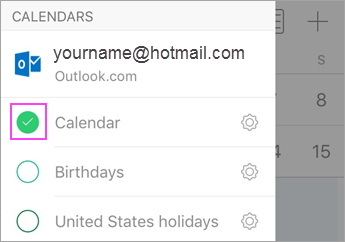
Check that Calendar is enabled for your account:
Go to the Calendar in the Outlook app and tap the three lines in the upper left-hand corner.
Under your email accounts, make sure «Calendar» is selected.
If your email address is not displayed in the list, it’s not set up using Exchange ActiveSync. You’ll have to delete and re-add your account and make sure not to use IMAP.
Check that access to Contacts is allowed for Outlook:
Steps may vary between devices and between operating systems. If you don’t own an iOS or Samsung Android device, use these directions as a guideline:
For iOS: Open the Settings app > scroll down and tap Outlook > Contacts and Background App Refresh should be on.
For Android: Open phone Settings > Applications > Outlook > Make sure Contacts is enabled.
Then open the Outlook app and go to Settings > tap on your account > tap Sync Contacts.
Troubleshoot calendar and contacts in the Outlook mobile app
In the Outlook app, go to Settings  > Tap the account that is not syncing > Tap Reset Account. Check to see if your account is syncing.
Still not working? Delete and re-add your email account:
From Settings , tap the account that is not syncing > tap Delete Account > Delete From This Device.
Then re-add your email account in Outlook for Android or Outlook for iOS.
Note: If you’re prompted to set up your email as an IMAP account, your email provider may not be able to sync calendar and contacts. Contact them or your administrator for help. If you’re asked to enter server settings, you need to get server settings from your provider.
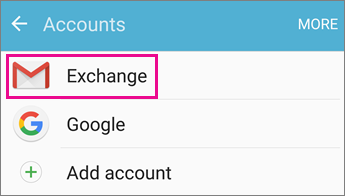
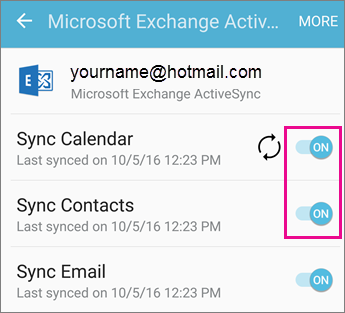
Check the app settings
Go to Settings > Accounts > tap Exchange > tap your email address that is not syncing.
Note: Different Android devices may look different than the screenshots here. Use these steps as a guideline.
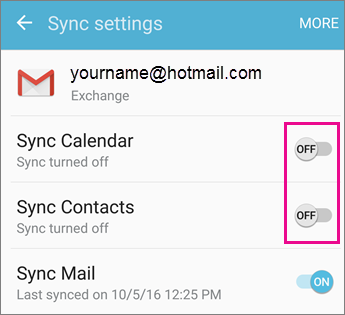
Make sure » Sync Calendar» is enabled. Wait and check your device’s calendar app.
Note: If you see IMAP instead of Exchange or a sync error, your email account may have been added incorrectly. Remove it by tapping More > Remove account.
Wait a few minutes and then check your device’s calendar.
Note: We also recommend double-checking that your account was added as an Exchange account by going to Settings > Accounts.
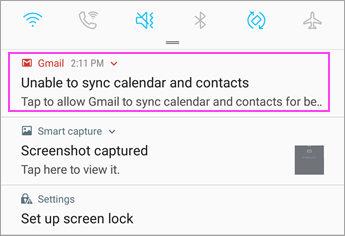
Check Gmail app permissions
Check to make sure Gmail is allowed access to your calendar and contacts:
Pull down the Android notification bar by swiping down from the top of your device’s screen.
Tap » Unable to sync calendar and contacts«.
Note: If you don’t see a sync error notification, you’re good to go!
Gmail will ask for access. Tap Allow and follow the prompts.
Important: Apple has fixed an issue in 11.0 that caused a «Cannot send mail» error for Outlook.com and Exchange mail accounts. If you’re on iOS 11.0, update your device to iOS 11.0.1 or later to fix the issue.
Check your app settings
Go to your iPhone or iPad’s Settings > Accounts & Passwords > select the account you’re trying to sync.
Note: If you’re using iOS 10, go to Settings > Mail > Accounts.
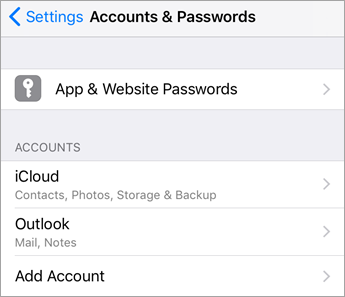
Make sure «Calendars» and «Contacts» are enabled and then check your sync again. If it works, you’re done!
If you don’t see a calendar option, your email address may have been added as an IMAP account. Go to the next step.

Delete, re-add account
Select Delete Account. Choose Exchange when re-adding your email.
Note: If you do not have a common email provider such as Microsoft, Google, or Yahoo, you may have to contact them to see if your email is limited to IMAP or POP.
Check app settings
Go to Settings > Accounts > Exchange > tap your email address.
Note: If it is added as an IMAP account, you will have to delete it and re-add as an Exchange account.
Make sure » Sync Calendar» is enabled. Wait and check your calendar app.
If you don’t see a calendar option or your account was listed as IMAP, tap More and select Remove account. Then go to the next step.
Re-add account
Re-add your email account and choose Exchange ActiveSync or Exchange.
For detailed directions, see the Samsung tab in Set up email in Android email app.
Note: If you do not have a common email provider such as Microsoft, Google, or Yahoo, you may have to contact them to see if it is possible to add email without using IMAP or POP.
If you are using a tablet with a screen size larger than 10.1 inches like a Surface Pro tablet, you most likely have the desktop version of Outlook. See Resolve sync issues in Mail and Calendar apps in Windows 10, as well as Mail and Calendar for Windows 10 FAQ.
Check app settings
Open the Outlook Mail app. Tap the three dots at the bottom to open the menu. Tap Settings.
Tap Accounts > tap the account you wish to sync.
Tap Change mailbox sync settings. Check to make sure the settings are as you want them.
Change Server to eas.outlook.com if you use an Outlook.com account such as hotmail.com, or use outlook.office365.com if you have a Microsoft 365 for business account. For all other accounts see Server settings to request from your email provider.
Remove and re-add a count
In the Outlook Mail app; open the menu, tap Settings > Accounts > tap your email account > Delete.
Go back to the Accounts page and tap Add Account.
Tap the kind of account you wish to add:
Outlook.com — For @outlook.com, @hotmail.com, @live.com, or @msn.com email accounts.
Exchange — For a Microsoft 365 for business account or accounts using Exchange ActiveSync.
Other account — For none of the above. This may set up your email account as IMAP or POP in which case you won’t be able to sync calendar or contacts.
Having trouble? We can help.
If you have a work or school account that uses Microsoft 365 for business or Exchange-based accounts, talk to your Microsoft 365 admin or technical support.
Contact Microsoft support for questions related to the Outlook app or Outlook.com accounts.
If you still need help syncing your calendar or contacts to your mobile device, tell us about your question in detail using the comment box below so we can address it in the future. For the easiest way to manage email, calendar, contacts, we recommend the Outlook for Android or Outlook for iOS mobile app.
Источник
How to Sync Outlook Contacts With Android Phone?
By Nathan E. Malpass, Last updated: October 28, 2021
If you already owned an Android device, then you have probably already known that all the contacts that you have on your Android device can be synced to your Outlook even without having the help of any third-party application, right?
Actually, doing this is one way of backing up those important contacts that you have on your Android device to your Outlook account. And because of that, you will be able to have them easily recovered. In this article, we are going to show you more on how you can sync Outlook contacts with your Android device in 2021.
As we all know, a lot of Android users are actually using a lot of ways for them to be able to backup all the important data that they have. And one of the most commonly used tools is the Outlook. Though normally, Android users use Outlook for their email purposes. However, there are still some users of the tool who back up their contacts, calendar and some other files that the Outlook tool can support.
Using this is actually easy and simple. All you need to have is to sync your Outlook contacts with your Android device and you are all set. But, not everyone knows how to do this right? So here are some guides for you that will surely help you in syncing your outlook contacts with your Android device.
Before We Sync Outlook Contacts with Android:
Having concentrated on software development for Android devices, we have created a powerful tool that every Android users are able to operate.
Here is a tip for you: Download FoneDog Android Data Backup and Restore to backup and restore your Outlook contacts in case of data loss. If you want to do the backing up without a third-party application, we have some great thoughts and solutions below.
Android Data Backup and Restore Selectively backup Android data to computer with one click. Encrypt your backup files. Compatible with 6000+ Android devices. Free Download Free Download 
Part 1: What is Outlook?
Outlook is known to be as one of the personal information managers from the Microsoft. This program is commonly used as an email application. However, aside from that, it also includes some other features such as calendar, task manager, contact manager, note taking, journal, and web browsing.
Because of this, some Android users are actually using this application as a means of backing up their contacts from or to their Android device. This way, they will be able to save their precious contacts in a safe place.
Part 2: Syncing Outlook Contacts With Android Device in Many Ways
Now, syncing your Outlook contacts with your Android device is actually an easy thing to do. All you need to have is the proper knowledge on how you can do it. Here are some ways on how you can sync your Outlook contacts with your Android device.
Method 1: Syncing Your Outlook Contacts with Android Device Via Gmail
Step 1: On your PC, go ahead and launch on Outlook.
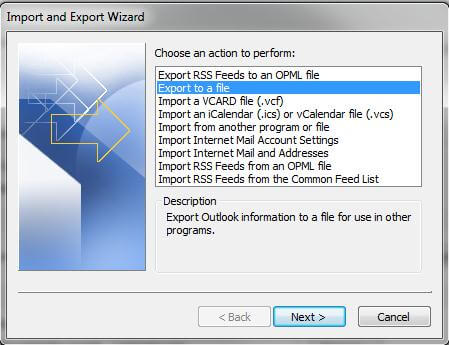
Step 2: After that, go ahead and locate the import tool by pressing on the FILE button.
Step 3: And then, go ahead and choose Options and then click on Advanced and then select Export.
Step 4: After that, go ahead and choose “Export to A File” and then go ahead and click on the “Next” button.
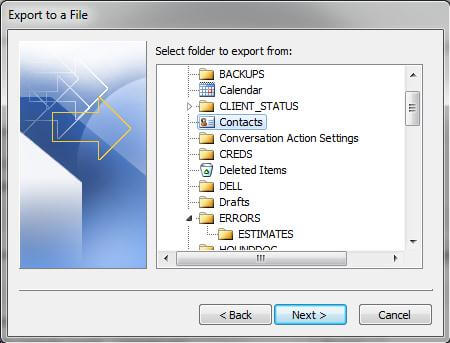
Step 5: Then, if you are in the file tab, all you need to do is to look and choose the Comma Separated Values option. This is a tool wherein the contacts are stored.
Step 6: Then, what you need to do is to choose then contacts file from the Select Folder tab. Remember that the Outlook contacts that you have on your device are saved in a CVS file that is why you can only have them exported in one folder at a time.
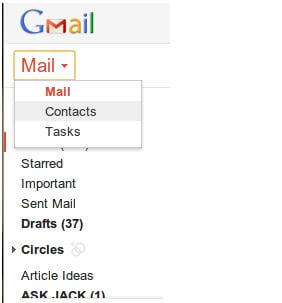
Step 7: After that, go ahead and launch your Gmail and sign in your account.
Step 8: And then, from the main interface of the program, go ahead and click on the Gmail tab and then choose the Contacts option.
Step 9: After that, go ahead and choose “More” and then choose “Import”.
Step 10: And then, go ahead and select on the “Choose File” and then look for your CVS files.
Step 11: And then, on your Android device, go ahead and log in to your Google account. And once that your Android device is already been synced, then all contacts will be automatically uploaded.
Method 2: Transferring Your Outlook Contacts to Your Android Device Using Microsoft Exchange
Step 1: From your Android device, go ahead and launch the Play Store application and then look for Outlook application. And then, have the application installed on your Android device.
Step 2: Once that you have installed Outlook application on your Android device, go ahead and launch it and log in to your Outlook account. The program will then ask you to set up a nickname. Once that you are done, go ahead and tap on the “Next” button.
Step 3: And then, go ahead and choose “Menu” and then choose “Account Settings”. Then, all of your Outlook contacts will then be imported on your Android device once that you press on “Contacts”. After that, go ahead and tap on the “Sync Contacts” option. Then all the contacts that you have on your Outlook account will then be fully imported on your Android device.
Part 3: An Alternative Way of Backing Up and Restoring Contacts to Android Device
Aside from using Microsoft Outlook as your backup tool for your contacts, there is another tool that best fit when it comes to this kind of concern. This is no other than by using the FoneDog Toolkit – Android Data Backup and Restore.
The FoneDog Toolkit – Android Data Backup and Restore is one of the most effective ways for you to be able to back up all of your Contacts on your Android device. And aside from your Contacts, you can also backup some other data that you have on your Android device. This includes your Call History, Messages, Photos, Video, Audio, and more.
The FoneDog Toolkit – Android Data Backup and Restore allows you to selectively choose the files that you only want to restore from your backup file to any of the Android devices that you have. This tool is also very safe to use because rest assured that there will be no data that will be lost during the restoration process of your data. And also, there will be no data that will be overwritten.
With the FoneDog Toolkit – Android Data Backup and Restore, you will be able to show all the available backups that you have and that you will be able to view the backup information. This includes your contacts, call history, messages, and more.
The FoneDog Toolkit – Android Data Backup and Restore will also work on any Android device as it can support more than 8,000 Android devices.
And, for you to know on how to use the FoneDog Toolkit – Android Data Backup and Restore, here is a guide that you can follow for you to back up your contacts from your Android device to your PC. And as well as restore them from your PC to your Android device.
Method 1: Backup Contacts Via FoneDog Toolkit Android Data Backup and Restore
Step 1: Download and Install
Download the FoneDog Android Toolkit from our official website and have it installed on your PC.
Android Data Backup and Restore Selectively backup Android data to computer with one click. Encrypt your backup files. Compatible with 6000+ Android devices. Free Download Free Download
Step 2: Launch the Program
Once that you have completely installed the FoneDog Android Toolkit, go ahead and launch it on your PC. You have to make sure that there are no backup applications running in the background aside from the FoneDog Android Toolkit.
Step 3: Connect Your Android Device
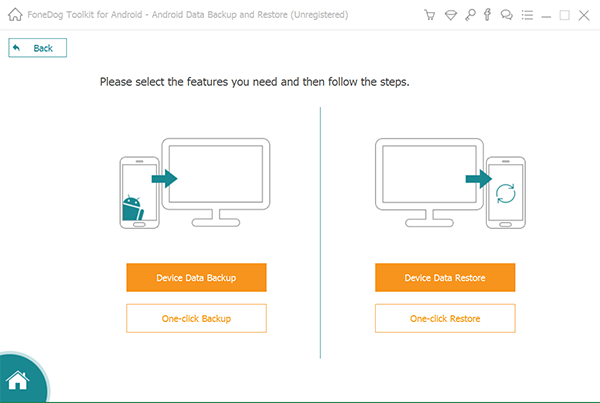
After that, go ahead and connect your Android device to your PC using your USB cable. And once that the FoneDog Android Toolkit had already detected your Android device, go ahead and choose “Android Data Backup and Restore”. Then after that, choose “Device Data Backup”.
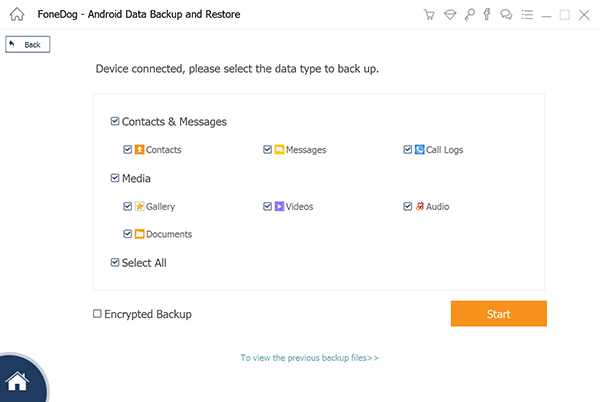
Step 4: Choose The Data Type to Backup
After that, you will be able to see on your screen that by default, the FoneDog Android Data Backup and Restore will choose all the file types by default.
From here, you will be able to choose the data that you would want to back up. In this case, go ahead and choose “Contacts”. Then after that, go ahead and click on the “Start” button. The FoneDog Toolkit – Android Data Backup and Restore will then start to backup all the contacts that you have on your Android device.
NOTE: This process may take some time depending on how large the file is. Also, you have to make sure that your Android device will stay connected to your PC so that there will be no interruptions. Do not also use your Android device while the process is on.
Step 5: Backup Contacts Complete
Once that the backup process is complete, go ahead and simply click on the “OK” button. Then after that, you can go ahead and preview all the backups that you have made. You can also use this backup file to restore it to the same Android device you are using, or to any other Android device that you have.

Method 2: Restore Contacts from PC to Android Device Via FoneDog Toolkit – Android Data Backup and Restore
Step 1: Launch FoneDog Android Toolkit and Connect Android Device
Android Data Backup and Restore Selectively backup Android data to computer with one click. Encrypt your backup files. Compatible with 6000+ Android devices. Free Download Free Download
Just like the process of backing up your data using the FoneDog Android Toolkit, go ahead and launch the program and have your Android device connected to your PC using your USB cable.
Step 2: Choose Backup File That You Want to Restore
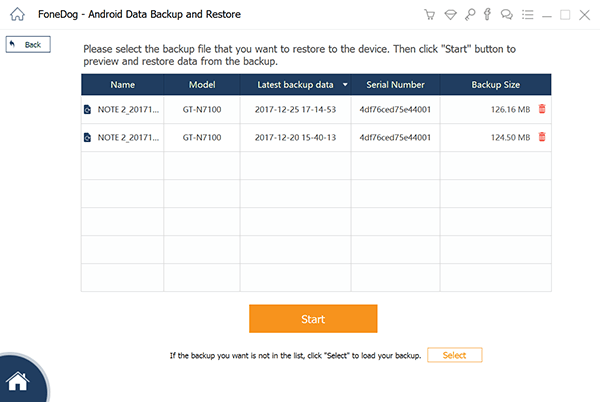
Once that the FoneDog Android Toolkit had fully detected your Android device, go ahead and choose “Device Data Restore”. Then the FoneDog Toolkit – Android Data Backup and Restore will then show you all the backup files that you have starting with the latest backup file that you made. Here, you can also choose other backup files that you have on the list for you to restore.
Once that you have chosen your backup file, go ahead and click on the “Start” button. Then the FoneDog Toolkit – Android Data Backup and Restore will start scanning your backup file.
Step 3: Select The Data to Restore on Android Device
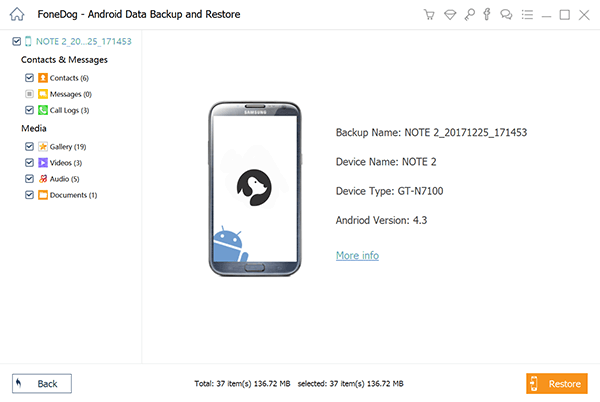
Once that the scanning process is complete. The FoneDog Toolkit – Android Data Backup and Restore will then show you all the data types that you have on your backup file. They will all be located on the left side of your screen.
From there, go ahead and choose “Contacts” from the list of file types. And then, click on the “Restore” process. The process of restoring your Contacts from your PC to your Android device will then begin.
Step 4: Contacts Restored to Android Device Successfully
The process of restoring your Contacts from your PC to your Android device may take some time. This will depend on how large your files are. So all you have to do is to wait patiently.
Also, make sure that you do not disconnect your Android device and do not use it as well while the restoration process is on. And once that the process is complete, FoneDog Toolkit – Android Data Backup and Restore will notify you.
Video Guide: How to sync Outlook Contacts with Android Phone
Part 4: Conclusion
As you can see, Outlook is one of the most used tools for all Android devices. They usually use it for email purposes and as well as backing up some contacts from their Android device. This way, it will be easier for them to sync these contacts to their Android device.
However, there is a better way for you to backup all the data that you have on your Android device. Since the Outlook application can only backup limited data from your Android device, then, using the FoneDog Toolkit – Android Data Backup and Restore is the best tool that you can use.
The FoneDog Toolkit – Android Data Backup and Restore has the ability to backup not just only your contacts, but as well as your messages, photos, videos, call history, and a lot more. Also, the FoneDog Toolkit – Android Data Backup and Restore will be able to restore any backup files from your PC to any of your Android devices.
This tool is also very safe to use and that you do not have to worry about losing any of your data. This is because the FoneDog Toolkit – Android Data Backup and Restore will not overwrite any of your data. It is also very easy and simple to use.
Источник


