- Включение синхронизации Google-аккаунта на Android
- Включаем синхронизацию данных на Андроид-смартфоне
- Включаем функцию резервного копирования
- Распространенные проблемы и варианты их устранения
- Заключение
- How to Sync Google Contacts with Android
- Part 1: Sync Google Contacts with Android Directly
- Part 2: Sync Google Contacts to Android with TunesGo
- Must-Have Android Manager — One Stop Solution to Manage, Backup and Sync Android Contacts
- Part 3: How to Backup Android contacts to Gmail
- Three Easiest Ways to Sync Android Phone Contacts to Google
- Method one: How to sync contacts to Google on Android directly
- Method two: How to export contacts from Android to Google with USB cable
- Method three: How to sync phone contacts to Google with Google Contacts App
Включение синхронизации Google-аккаунта на Android

Включаем синхронизацию данных на Андроид-смартфоне
На большинстве мобильных устройств, функционирующих под управлением ОС Android, синхронизация данных включена по умолчанию. Однако различные сбои и/или ошибки в работе системы вполне могут привести к тому, что эта функция будет деактивирована. О том, как ее включить, мы расскажем далее.
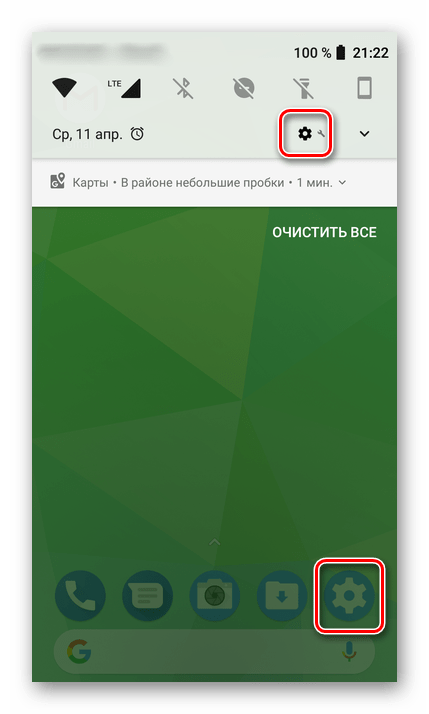
- Откройте «Настройки» своего смартфона, воспользовавшись одним из доступных способов. Для этого можно тапнуть по иконке на главном экране, нажать на нее же, но в меню приложений или выбрать соответствующий значок (шестеренка) в шторке.
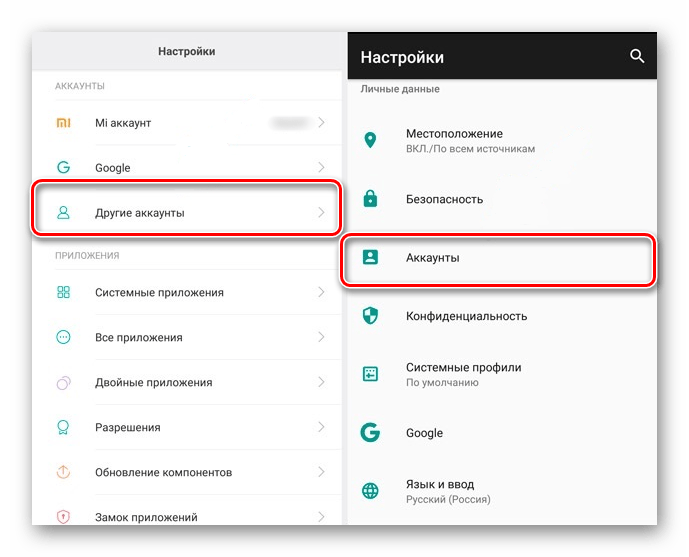
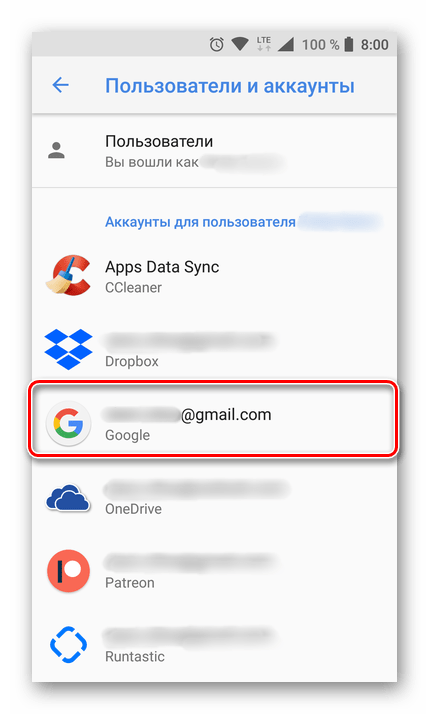
В перечне настроек найдите пункт «Пользователи и аккаунты» (может еще называться просто «Аккаунты» или «Другие аккаунты») и откройте его.
Теперь тапните по пункту «Синхронизировать аккаунты». Это действие откроет список всех фирменных приложений. В зависимости от версии ОС, установите галочку или активируйте тумблер напротив тех сервисов, для которых требуется включить синхронизацию.
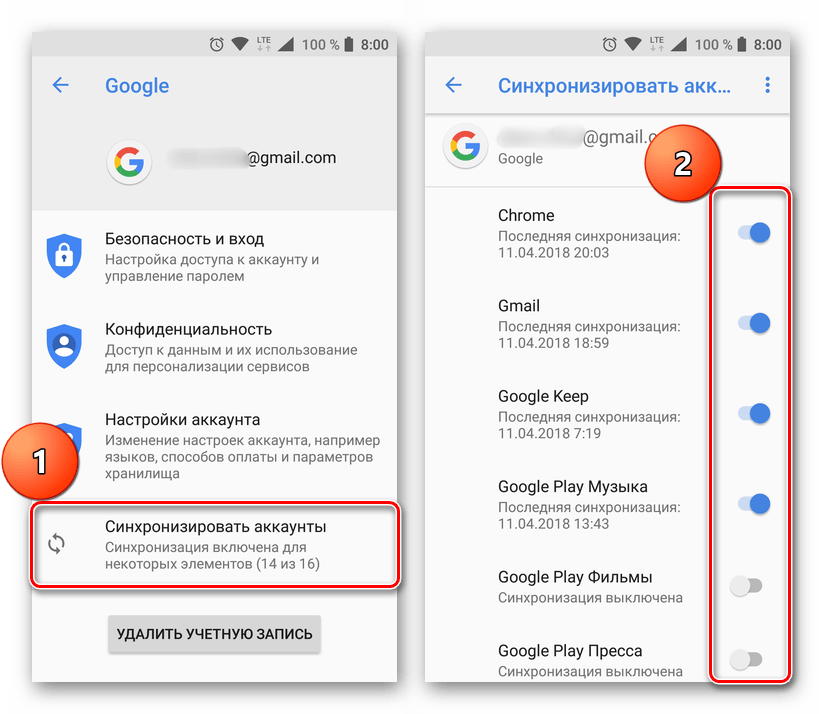
Можно поступить немного иначе и синхронизировать все данные принудительно. Для этого нажмите по трем вертикальным точкам, расположенным в правом верхнем углу, или кнопке «Еще» (на устройствах производства Xiaomi и некоторых других китайских брендов). Откроется небольшое меню, в котором следует выбрать пункт «Синхронизировать».
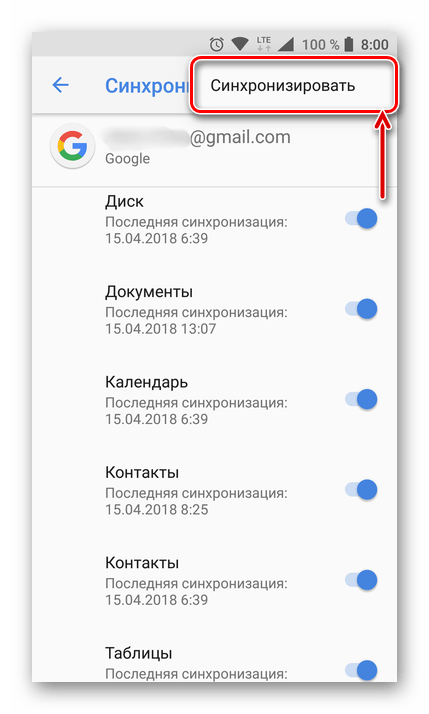
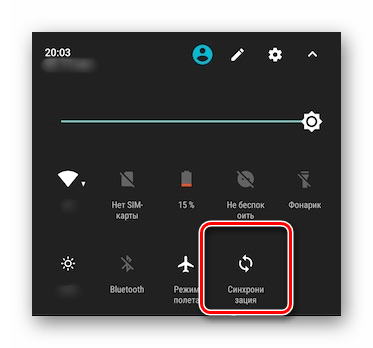
Примечание: На некоторых смартфонах принудительно синхронизировать данные можно более простым способом – воспользовавшись специальным значком в шторке. Для этого нужно ее опустить и найти там кнопку «Синхронизация», выполненную в виде двух круговых стрелок, и установить ее в активное положение.
Как видите, нет ничего сложного в том, чтобы включить синхронизацию данных с Гугл-аккаунтом на Андроид-смартфоне.
Включаем функцию резервного копирования
Некоторые пользователи под синхронизацией подразумевают резервирование данных, то есть копирование сведений из фирменных приложений Google в облачное хранилище. Если ваша задача – создание резервной копии данных приложений, адресной книги, сообщений, фото, видео и настроек, тогда выполните следующие действия:
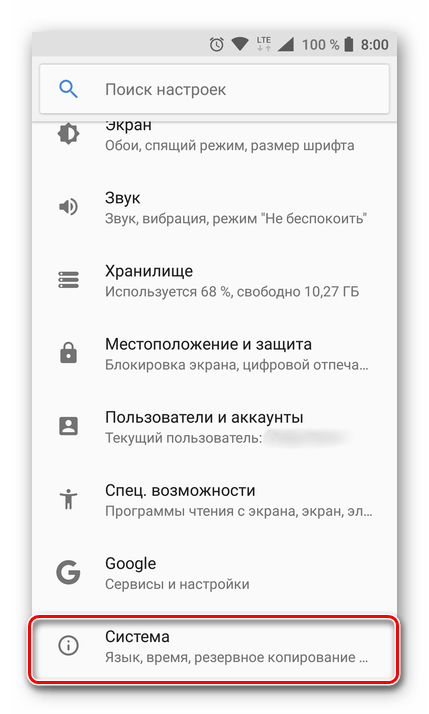
- Откройте «Настройки» своего гаджета и перейдите к разделу «Система». На мобильных устройствах с версией Android 7 и ниже предварительно потребуется выбрать пункт «О телефоне» или «О планшете», в зависимости от того, что вы используете.
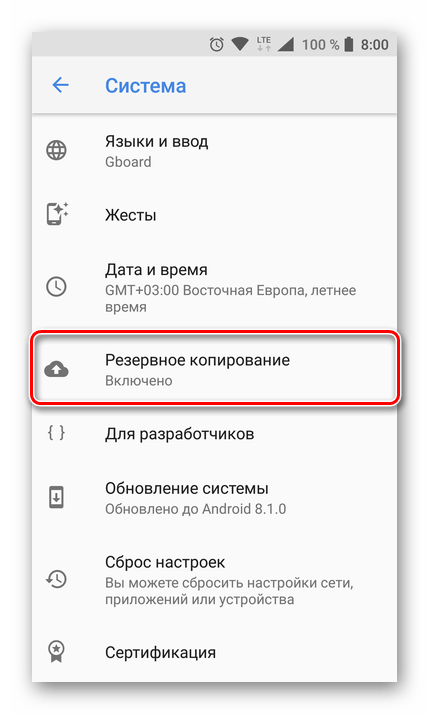
Примечание: На мобильных устройствах со старыми версиями Андроид пункты «Резервное копирование» и/или «Восстановление и сброс» могут находиться непосредственно в общем разделе настроек.
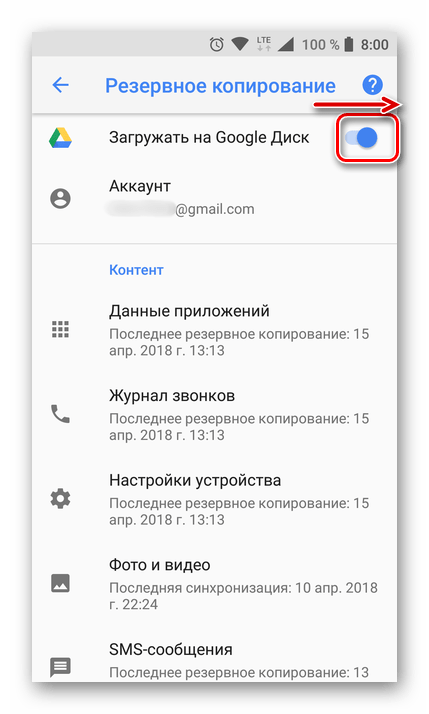
После выполнения этих простых действий ваши данные будут не только синхронизироваться с учетной записью Google, но и сохраняться в облачное хранилище, откуда их всегда можно будет восстановить.
Распространенные проблемы и варианты их устранения
В некоторых случаях синхронизация данных с учетной записью Google перестает работать. Причин у этой проблемы несколько, благо, определить их и устранить довольно легко.
Проблемы с подключением к сети
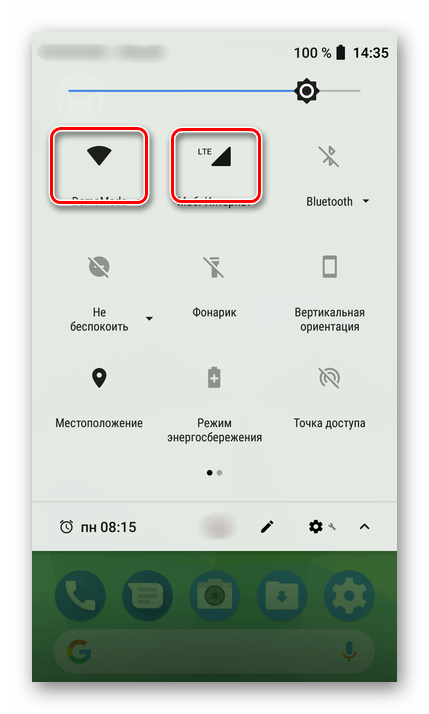
Проверьте качество и стабильность подключения к интернету. Очевидно, что при отсутствии на мобильном устройстве доступа в сеть, рассматриваемая нами функция работать не будет. Проверьте подключение и, если это потребуется, подключитесь к стабильному Wi-Fi или найдите зону с более качественным покрытием сотовой связи.
Отключена автосинхронизация
Убедитесь в том, что на смартфоне включена функция автоматической синхронизации (5-ый пункт из части «Включаем синхронизацию данных…»).
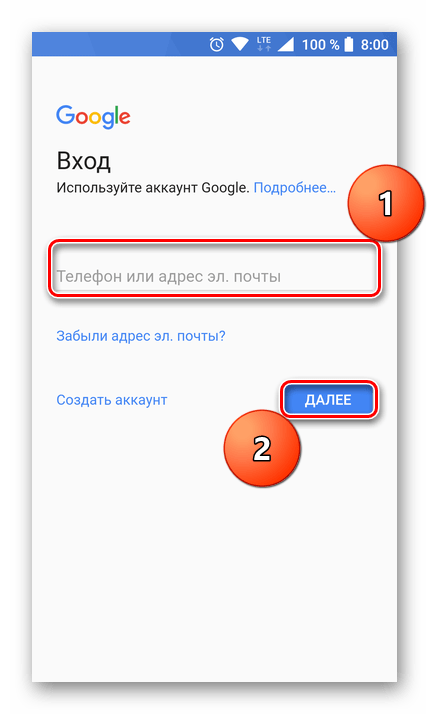
Не выполнен вход в Гугл-аккаунт
Убедитесь, что вы авторизованы в учетной записи Google. Возможно, после какого-то сбоя или ошибки она была отключена. В таком случае нужно просто повторно войти в аккаунт.
Не установлены актуальные обновления ОС
Возможно, ваше мобильное устройство нуждается в обновлении. Если вам доступна новая версия операционной системы, ее обязательно нужно скачать и установить.
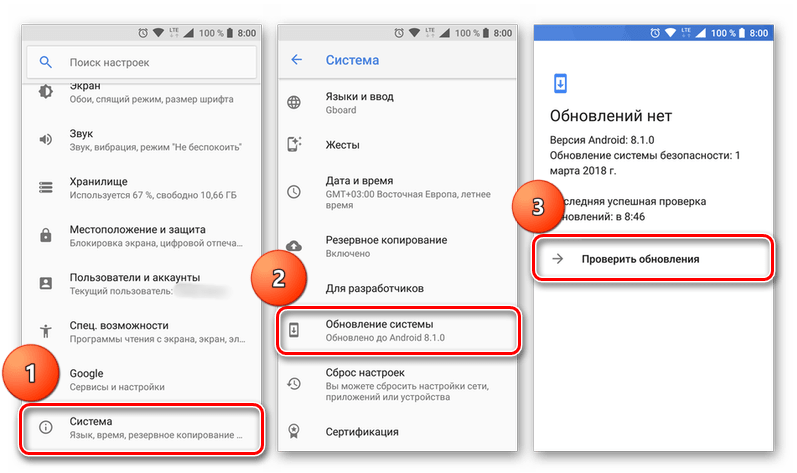
Для проверки наличия апдейта откройте «Настройки» и поочередно перейдите по пунктам «Система» — «Обновление системы». Если у вас установлена версия Android ниже 8, предварительно потребуется открыть раздел «О телефоне».
Заключение
В большинстве случаев синхронизация данных приложений и сервисов с учетной записью Google включена по умолчанию. Если же она по каким-то причинам отключена или не работает, проблема устраняется всего за несколько простых шагов, выполняемых в настройках смартфона.
Помимо этой статьи, на сайте еще 12470 инструкций.
Добавьте сайт Lumpics.ru в закладки (CTRL+D) и мы точно еще пригодимся вам.
Отблагодарите автора, поделитесь статьей в социальных сетях.
Источник
How to Sync Google Contacts with Android
People around the world handle with so many devices nowadays that it is very hard to remember what you left on which device. Instead, much easier solution would be to have all the informations and data in one place, and then you could acces them from any point or any device. Years ago, it was immposible to imagine that you could have a phone that is connected to the internet, and today, it is hard to imagine a device that is not synchronized.
Synchronization is a smart solution, not only for those who have many devices or change them in short period, but also for those who are not careful with their data and contacts. Losing an important number can be very tricky. Today, we will show you how to synchronize your Android smartphone with google contacts, and will also introduce you with the application that can make the enire process much easier. There is another way of synchronizing with google accounts, and that goes through vcard format. That is where Wondershare TunesGo comes to our aid. We will also show how to export contacts from Android to computer as vcard file, then import vcard file to gmail account. Adding Android contacts to Gmail is now easier than ever, and you will be able to backup Android contacts to Google. For someone who wants to use Android contacts on Gmail, this article will be very useful. Nevertheless, Gmail backup contacts is something everyone should do every once in a while.
Part 1: Sync Google Contacts with Android Directly
We are showing you here how to synchronize your Google contacts with Android directly, so follow next steps.
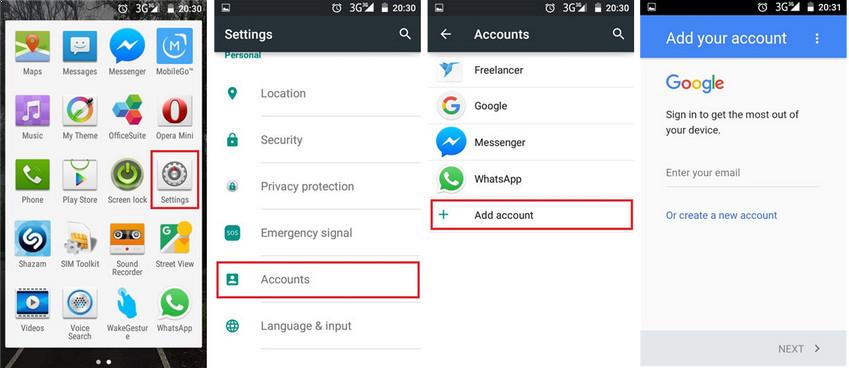
1. Go to the main menu and find the Settings icon, press it.
2. When you enter the Settings menu, search for Accounts. Here, you can manage not only Google accounts, but many more.
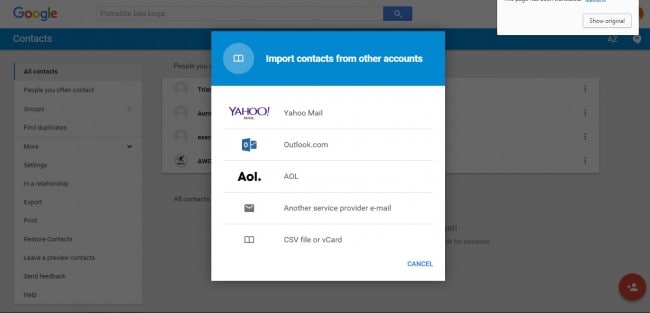
3. As it is on the picture, other accounts appeared, but we will stay on Google. You have the possibility to synchronize your Android smartphone with vast varieties. For now, click Add account.
4. When you are done with that, press Google account and you can create a new one if you do not have it, or if you do, simply login with the existing one.
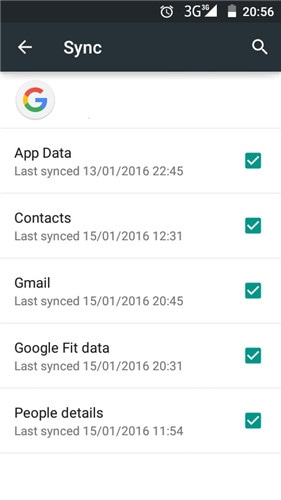
5. Last step is synchronization. You can choose in options what will be synchronized and what not, and among them you can choose contacts also.
Wondershare TunesGo could help you edit, manage, transfer, backup and restore Gmail contacts if you login Gmail on your Android phone.
![]()
Part 2: Sync Google Contacts to Android with TunesGo
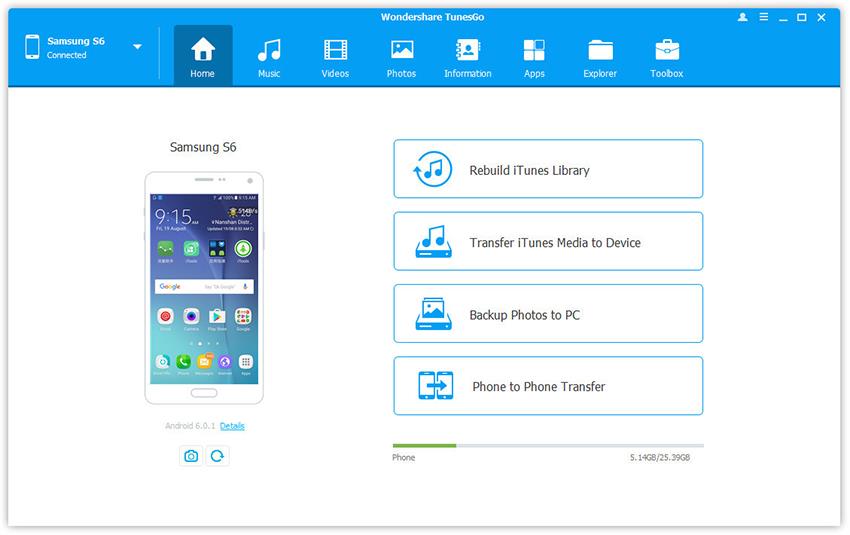
Here, we present to you Wondershare TunesGo application, which will help us to export the contacts in vcard format. Beside this, an application provides much more for its users, and is certainly helpful. From here, you can manage your applications, music, SMS services, videos, files and much more. It is not an ordinary tool that will control your smartphone, but rather your powerful ally in all challenges. Follow the few next steps to get everything done:
Must-Have Android Manager — One Stop Solution to Manage, Backup and Sync Android Contacts
- Backup your music, photos, videos, contacts, SMS etc. to computer and restore them easily.
- Manage, export&import your Contacts and SMS, deduplicate Contacts, reply SMS with computer.
- One-click Root — Root your Android phones/tablets to take full control of your device.
- Phone to Phone Transfer — Transfer music, photos, videos, contacts, SMS between two mobiles (both Android and iPhone are supported).
- App Manager — Install, uninstall, import or backup Apps in batch.
- Gif Maker — Create Gif from photos, motion photos, videos.
- iTunes Manager — Sync iTunes Music to Android or transfer music from Android to iTunes
- Fully compatible with 3000+ Android devices (Android 2.2 — Android 8.0) from Samsung, LG, HTC, Huawei, Motorola, Sony etc.
1. First, start Gmail, and after that go to Contacts menu on the left side.
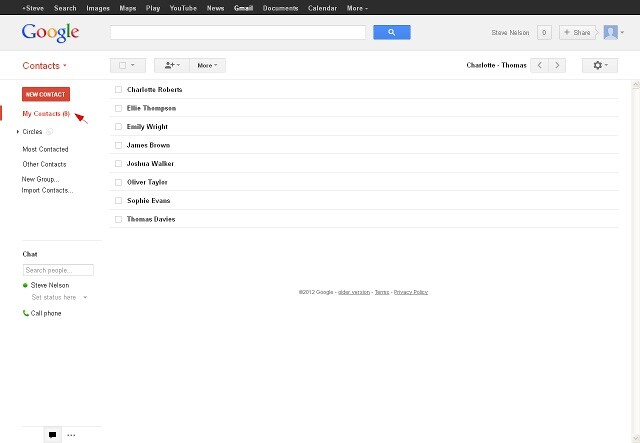
2. Choose More > Export.
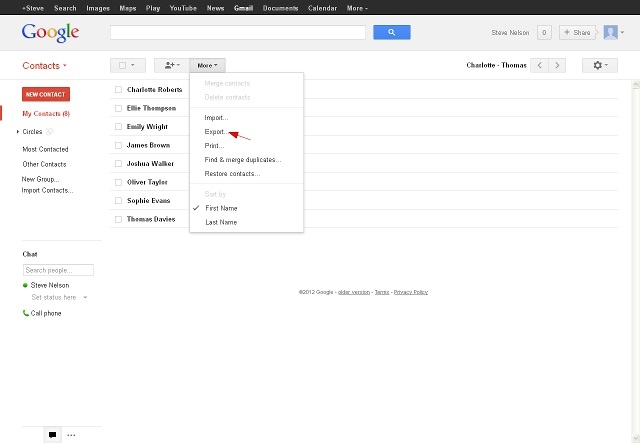
3. After that, pick «All contacts» and then «vCard format».

4. Download and install Wondershare TunesGo. Launch it and connect your Android device to computer. It will automatically recognize your smartphone, so you do not have to do anything, the application is very user friendly and will do most of the work for you.
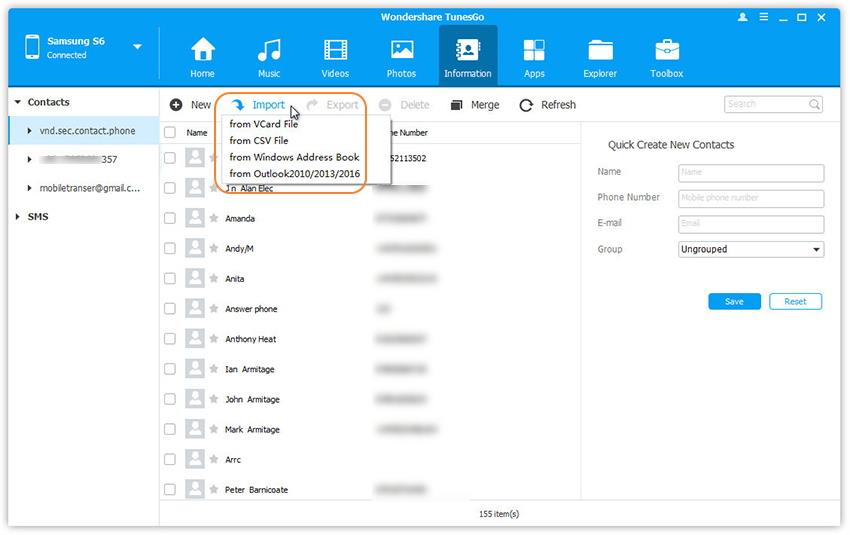
5. After the application recognized your device, select Information tap. In the contact management window, go to upper Import button, press it and when you see the next menu, enter it and choose «from vCard file». That is all the procedure you need to do.
Part 3: How to Backup Android contacts to Gmail
You can also use Wondershare TunesGo to backup Android contacts to Gmail. Here, the procedure is a little bit different. We will use Wondershare TunesGo to export contacts as vCard file, but later import them in Gmail accounts.
1. Like we did in the previous part, run TunesGo. The download link was shared in the section before.
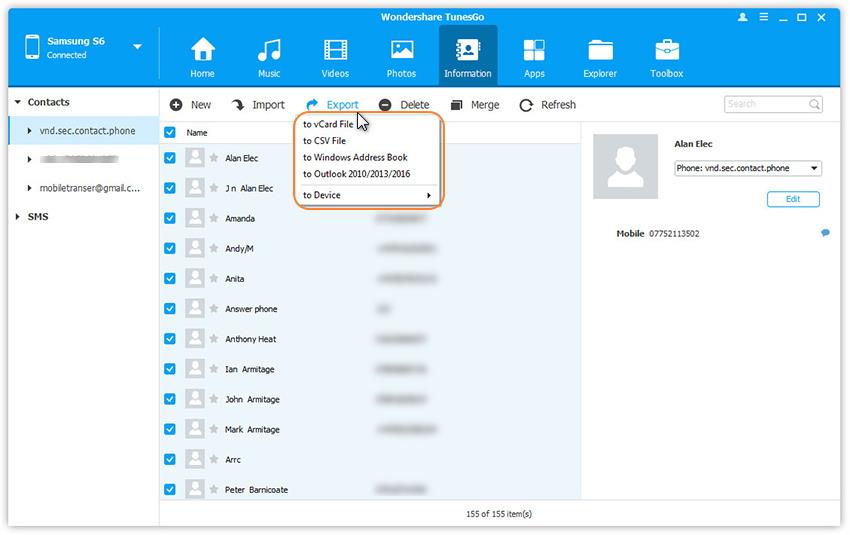
2. This time, under the same menu, but different card, pick Export > to vCard files. You are done here with TunesGo, and as you see, it is very easy to use.
3. Next step is to import vCard files in Gmail. Go to Contacts, and choose More > Import > vCard. Easy and simple procedure.
After we have shown you detailed steps on all of the procedures, you can choose which one fits you most. Not all users can use all of them, but Wondershare TunesGo is for sure hell of a player when it comes to this topic. Being one of the rare applications that does this kind of synchronizing, it is for sure worth mentioning. Gmail contacts on Android now can be safer more than ever. Also, you do not have to worry anymore do you have someones number, as you have them all in one place. Simply log into your Google account from anywhere and any device, and you will be close to all of your contacts. Also, make sure that your Android device is capable of doing these procedures. Sometimes, it is not just about being connected, but also preserving the said words. For these actions, use regular backup, or if you do not feel like doing it every day, you can simply set your smartphone to automatic backup, and he will do all the work for you. Synchronizing was never easier than now, with Wondershare TunesGo application that will find thousands of users, and every single one of them satisfied!
Источник
Three Easiest Ways to Sync Android Phone Contacts to Google
As an Android user, we think it is easy to transfer photos, music, videos, etc., between Android phone and computer. However, have you ever noticed the important contacts on Android? Have you transferred contacts from Android to computer? Do you back up Android contacts frequently? My answer is no. It is no doubt that contacts are important for us, but we always ignore to back up Android phone contacts. In this point, Google is generous enough to allow you to sync Android contacts to Google with a Google account.
Keep reading this article to get the secret: How does Google sync Android Contacts?
Kindly note: before you transfer phone contacts to Google, you must be sure you have gotten a Google account. If you forgot Google password, recover Google password.
Method one: How to sync contacts to Google on Android directly
In method one, what you need is to make sure your Android phone is in the condition of Wi-Fi.
Step 1 Sign in Google account
Tab «Settings» on your Android phone, find «Account» > «Google account», sign in your Google account with Gmail address and password.
If you do not have one on your phone, just create Google account on Android.
If you forgot Gmail, just lauch the Gmail recovery firstly.
Step 2 Back up android contacts to Google
Tab «Sync Contacts». Wait several minutes to sync Android contacts to Google.
If you keep turning on this button, then Google will sync your Android contacts automatically with the internet connection. If you turn it off, then it will not sync your Android contacts even with Wi-Fi.
In this way, you have to keep your Android phone connecting Wi-Fi. And every time, when you move contacts from phone to Google, your previous contacts backup on Google will be replaced with a new backup.
Method two: How to export contacts from Android to Google with USB cable
Method two is a little complicated to sync Android phone contacts to Google. We need a USB cable to realize it.
Step 1 Export Contacts
Tab «Contacts» on your Android phone, you will see your contacts list. Select those contacts that you want to sync to Google.
Step 2 Select Contacts
Tab the «Menu» button on the right bottom of the contact list > «Import/Export» > «Export to storage». Then you will find your contacts are transferred into internal storage or SD Card as vCard File (VCF).
Step 3 Export phone contacts to Google
Plug Android phone with USB cable to computer. Log in your Gmail address on PC. Click «Contacts» > «More» > «Import». Click «Browse» to navigate to your synced contacts backup, click «Open» to import phone contacts to Google.
If you have Android contacts backup before on your PC, then you can skip two steps above, and come to step 3 directly.
Kind tip: Gmail only allows users to import phone contacts with the VCF file or CSV. This way is capable of syncing the contacts to Google with Android phone and USB cable. But it will take you some time to operate the process on your Android phone.
Method three: How to sync phone contacts to Google with Google Contacts App
If you only need to sync contacts on your Android to Google, then the above two methods are suitable for you. But if you want to sync all your contacts to Google, including those accidental deleted contacts on your phone, then you can follow method three. It is the perfect choice for you. Before you begin to transfer phone contacts to Google, you need to use a third-party tool, Google Contacts App for Android. It will achieve this goal with two steps.
Step 1 Back up Android contacts to PC.
This app will help you recover and transfer deleted and existing Android contacts to PC. For the detailed steps to move contacts from Android to computer, you could refer to this part: Export Android contacts to PC
The exported Android contacts are kept in three formats in your computer, HTML, CSV and VCF.
Step 2 Import contacts to Google
Sign in your Google account, click «Contacts» > «More» > «Import» to sync your Android contacts backup to Google. (This step is the same as the step 3 of method two.)
After you sync phone contacts to Google account completely, you could manage the contacts on www.contacts.google.com. Definitely, if you do think Google account is a little troublesome to let you manage Android contacts, you can eaisly delete Gmail account.
What do you think of this post?
Rating: 4.8 / 5 (based on 108 votes)

If you lost contacts n Android, you can try to restore contacts from Gmail in thid post.
Switching Android to iPhone is easy with money. How about transferring Android SMS messages to iPhone? Also easy with two apps to make it.
If you want to sync contacts from Android to iPhone, then you shoule read this article.

Copyright © 2021 Aiseesoft Studio. All rights reserved.
Источник


