- Управление контактами в Android (импорт, экспорт, перенос, настройка)
- В статье будет рассмотрено:
- Заключение
- How to Transfer Contacts from Android to Android
- Method 1: Sync Android Contacts to Google account
- Method 2: One-Click Transfer Contacts from Android to Android
- How to transfer Contacts from android to android?
- Step 1: Install and run Android Data Transfer
- Step 2: Select contacts to transfer to Android
- Best 6 Ways to Transfer Contacts Android to Android
- Part 1. How to Transfer Contacts from Android to Android with One Click
- MobileTrans — Phone Transfer
- Part 2. How to transfer contacts from Android to Android with a SIM card
- Part 3. How to Transfer Contacts from Android to Android via a VCF file
- Part 4. How to Transfer Contacts from Android to Android with Google Account and Sync
- Part 5. How to Transfer Contacts from Android to Android with SHAREit
- Part 6. How to Transfer Contacts from Android to Android via Bluetooth
Управление контактами в Android (импорт, экспорт, перенос, настройка)
При покупке нового телефона всегда встаёт вопрос о переносе контактов из старого в новый. Всё проще если перенос производится с телефонами одной марки, (т.к. большинство производителей предусмотрели эту нехитрую задачу) или же если они изначально хранились на сим карте. Но ведь часто приобретаешь новый телефон от другого производителя или вовсе не пользуешься памятью сим карты, так как количество телефонов или другой нужной информации превысило возможности сим карт.
В статье будет рассмотрено:
- Варианты хранения контактов
- Получение копии контактов с телефонов Nokia S40, S60
- Синхронизация контактов
- Группировка контактов в телефонной книге
- Настройка уведомлений о днях рождения
- Обратная синхронизация с S40, S60
Варианты хранения контактов
Контакты можно хранить в трёх местах: SIM карта (прошлый век), в памяти телефона и в профиле Gmail. Я думаю первый вариант можно пропускать, так как в наше время у всех людей по 2-3 номера не считая домашних номеров, и памяти сим карты просто не хватит. Хранение контактов в памяти телефона на базе Android не отличается от других мобильных телефонов. Последний вариант интересен своими возможностями. Перед продолжением Вам следует определиться с выбором памяти для контактов. Я лично выбрал вариант хранения в профиле Gmail как самый производительный.
Выбор памяти: Контакты -> [Меню] -> Опции -> Настройки -> Сохранять контакты -> Здесь нужно выбрать память (Рекомендую профиль Gmail). Так как настройка аккаунта выходит за рамки этой статьи то здесь не рассматривается целиком, а только в части синхронизации аккаунта.
Получение копии контактов с телефонов Nokia S40, S60
Есть несколько вариантов для этой операции. Рассмотрим самые простые.
Первый и самый простой заключается в использовании только телефона и Bluetooth:
Выделим все контакты. Заходим в Контакты -> [Функции] -> Отметить/Снять -> Отметить все
Далее передадим их по Bluetooth [Функции] -> Передать -> По каналу Bluetooth
В это время включим Bluetooth на нашем новом телефоне. Меню -> Настройки -> Беспроводные сети -> Параметры Bluetooth -> Включить, и здесь же Открыто
На Nokia выбираем второй телефон и передаём ему контакты.
Осталось только подождать, когда закончится передача. После передачи контакты сразу попадают в записную книжку. Остаётся только очистить список уведомлений [Меню] -> Очистить список
Минусом этого варианта является то, что если в контактах были сделаны заметки на русском языке, могут быть проблемы при записи. Скорее всего, такие контакты просто останутся висеть во временном каталоге /sdcard/bluetooth. Их придётся добавлять отдельно. Если вы выбрали хранение в профиле Gmail, то их можно будет добавить по примеру в следующем шаге.
Второй вариант будет нужен, если на вашем старом телефоне не установлен Bluetooth, а так же для всех остальных вариантов.
В этом случае нужно использовать Nokia PC Suite.
Открываем Nokia PC Suite -> Контакты -> Нажимаем Ctr+A -> Файл -> Экспорт -> Выбираем формат файла csv -> Выбираем путь и сохраняем.
Все контакты сохранятся в один файл.
Далее зайдём на http://gmail.com или http://www.google.com/contacts и входим под своей учётной записью Google/Gmail.
Выбираем [Дополнительные действия](Кнопка в Gmail. По второй ссылке сразу доступны следующие шаги) -> Импорт -> Обзор -> Выбираем Ваш csv файл с контактами -> Импорт
По итогу в первом случае ваши контакты хранятся на телефоне (и ждут синхронизации с сервером, если выбран профиль Gmail), во втором контакты хранятся в профиле и ждут синхронизации с телефоном.
Синхронизация контактов
Для того, что бы наши контакты были приведены в полный порядок, нужно синхронизироваться. Подчёркиваю, что не синхронизируются контакты хранящиеся в памяти телефона.
Подключаем синхронизацию: Меню -> Настройки -> Учётные записи -> Отмечаем пункт «Фоновые данные» и «Автосинхронизация» -> Далее в низу выбираем учётную запись и проверяем, включена ли синхронизация контактов (по умолчанию все включено). Выбор остальных пунктов остаётся за Вами. После этого через короткий промежуток времени контакты, импортированные в Gmail, должны отобразиться в контактах телефона. Сохранённые контакты на телефоне (при выборе памяти Gmail) должны будут отобразиться в контактах на почте.
Группировка контактов в телефонной книге
Теперь все наши контакты должны быть видны как в телефоне, так и в контактах профиля Gmail. Приоритет синхронизации при изменении отдаётся последней редакции.
Если была выбрана память телефона, то создание групп происходит достаточно просто: Контакты -> Группы -> [Меню] -> Задаём имя и мелодию группы по желанию.
Для добавления контакта в группу заходим в неё и нажимаем на пиктограмму силуэта человека со знаком ‘+’ возле поля поиска. Выбор будет возможен только из контактов хранящихся в памяти телефона.
Если используется память профиля Gmail, то создание групп несколько усложняется так, как по непонятным причинам создание групп для профиля недоступно (надеюсь, вскоре исправят этот, как мне кажется, недочёт). Каталогизацию контактов можно производить и из Gmail. Но можно и на телефоне. Для этого понадобится приложение aContacts. Найти его можно в Маркете, имеет русский интерфейс в настройках. Его также можно назначить на стандартное использование при наборе номера или совершения звонков. Но лично я рекомендую использовать только для создания групп.
Заходим в приложение: [Groups] -> [Новая группа] -> Вводим имя новой группы.
Для добавления в группу: Выбираем контакт (удерживаем) -> Группировка -> Добавить в группу -> Выбираем нужную группу.
После синхронизации группы создадутся и в Gmail.
Настройка уведомлений о днях рождения
Достаточно удобно, когда дни рождения родственников или коллег заранее отображаются в календаре. По умолчанию такой возможности не предусмотрено.
Можно установить виджет с напоминаниями. Наиболее простой и не перегруженный «Birthday Countdown». Найти его можно в Маркете. Настройки практически не требует.
Ещё можно сделать, что бы дни рождения отображались в календаре. Если контакты хранятся в профиле Gmail: Входим под нужным аккаунтом в http://www.google.com/calendar -> Настройки -> Настройки Календарь -> Календари -> Просмотреть интересные календари -> Дополнительно -> Выберите «Дни рождения и мероприятия контактов» и нажмите Подписаться
После этого нужно синхронизировать календарь там же в меню настроек синхронизации. По завершению дни рождения должны будут отобразиться в календаре.
Обратная синхронизация с S40, S60
Уже давно в телефонах заложена функция синхронизации. Но по объективным причинам она не используется часто. Google полностью перевернул это, до состояния необходимости и удобства, используя свои технологии. Но всё же для тех, у кого несколько телефонов и сим карт, можно также синхронизировать контакты со своим старым аппаратом по технологии SyncML. Минус этой синхронизации — передача основных полей контакта, таких как номера телефонов, имя, фотография. Поэтому лучше синхронизацию производить от сервера к телефону. Я думаю, вся информация на втором телефоне уже не так актуальна. Ведь наиболее важным остаётся всё-таки номер телефона и имя. И очень удобно, если они обновляются вовремя. Поэтому этой технологии должно вполне хватать. В общем, стоит обновлять контакты только в направлении от сервера к мобильному телефону.
Для настройки S60 заходим: Меню -> Связь -> Синхр. (Синхронизация) -> [Функции] -> Нов. проф. синхр
Для настройки S40 заходим: Меню -> Настройки -> Конфигурация -> Настр.персональн.конф. -> Добавить новый «Синхронизация»
Далее вводим следующие настройки:
Имя профиля: любое_имя
Канал передачи данных: Интернет
Точка доступа: точка_доступа_gprs
Адрес сервера: https://m.google.com/syncml
Порт: 443
Имя пользователя: логин_от_gmail
Пароль: ваш_пароль
Далее заходим на вторую закладку. Будем синхронизировать только контакты (остальное можно переключить в )
Выбираем: Контакты -> Да
Выставляем настройки:
Удалённая БД: contacts
Тип синхронизации: Обновлять телефон (т.е. выставляем направление синхронизации, о чём говорилось раньше)
Всё. Настройка завершена. Делаем бэкап контактов, удаляем контакты из записной книги Nokia и пробуем запустить синхронизацию. Если всё запустилось удачно, то будет обычное окошко со статусом и по завершению операции нас уведомят.
Так же можно передавать контакты обратно по Bluetooth. Но согласитесь, зачем возвращаться в прошлый век?
Заключение
Android дитя двух сущностей, которые были созданы в сети и стали важными частями её самой — это Linux и Google. Весь потенциал Android’а раскрывается только при полной работе с сетью. Постоянная мощность развития Google привязывает и в тоже время даёт огромный потенциал для устройства на базе Android.
Источник
How to Transfer Contacts from Android to Android
Have had your old Android device for years, and intended to get an upgrade? Moving all contacts from an old Android to an new Android phone running Android 6.0 or above may sound complicated, but it’s actually really easy. In following article, we shows two ways to sync contacts from one Android phone to the other at ease. You can simply choose a method for yourself.
Method 1: Sync Android Contacts to Google account
For an Android user, you almost certainly already have a google login. Nonetheless, manay Android phone users aren’t familiar with its features on syncing contacts. Although, the synchronizing process is kind of cumbersome and old fashion, it do transfer contacts from Android to Android phone. Here is how it works:
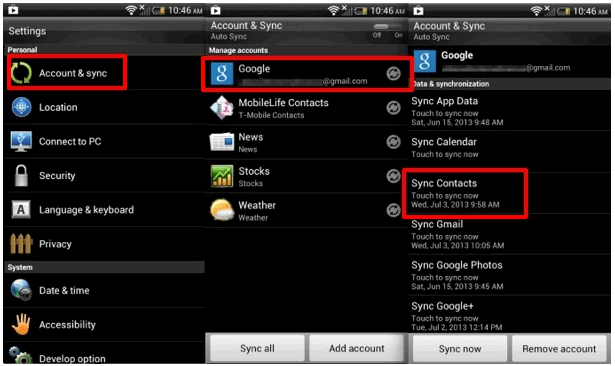
1. Open Settings on your old Android phone, then go to “Accounts & Sync”, and ten tap on the Google account.
2. Tap on “Sync Contacts” (or Sync All if you want to sync everything) and let the syncing process complete.
3. Navigate to your new phone. Open “Settings” then go to “Accounts & Sync” and login the same Google account.
4. Select «Sync Contacts» to restore your Android address book. This may take a few minutes if you have a very large address book.
 Method 2: One-Click Transfer Contacts from Android to Android
 Method 2: One-Click Transfer Contacts from Android to Android
Obviously, transferring contacts from phone to phone using Google account is a bit troubblesome. What if you could connect your old android to the new one and switch contacts directly via USB cable? It is more convenient, isn’t it? Hence, we’d like to introduce you an phone-to-phone contacts transfer tool -Syncios Data Transfer, an easy-to-use tool, can clone address book from old Android phone to the new one with a lot less hassle.
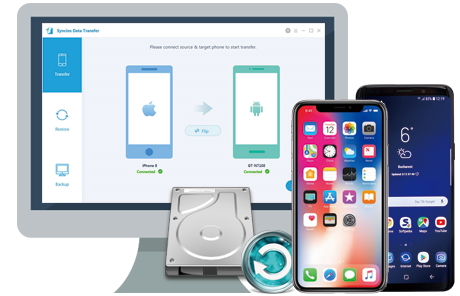
Syncios Data Transfer
Syncios Data Transfer is a professional iOS & Android synchronizing tool, which enables you to backup or transfer messages, contacts, call logs, music, video, audio and other files between iOS & Android devices and computer with only few clicks or directly phone-to-phone transfer.
How to transfer Contacts from android to android?
Step 1: Install and run Android Data Transfer
Connect both of your Android devices to your computer and launch the Syncios Android Data Transfer. To transfer contacts from Samsung to HTC, Samsung to LG, or Sony to Moto etc, click «start» button under «Phone to Phone Transfer» section.
![]()
Step 2: Select contacts to transfer to Android
Between the two Android phones display all the contents you can transfer. The ‘contacts’ section would be automatically checked. You can uncheck any content you dislike to transfer. Then, click Start Copy.
It only takes few seconds to copy all contacts to Android phone.
Источник
Best 6 Ways to Transfer Contacts Android to Android


“I use more than one Android phone. How could I transfer contacts from one to another and merge both contacts?”
If you use more than one android device, perhaps one for business and another for personal purposes, you may find that sometimes the contacts on these devices can overlap. In this case, you may need to transfer contacts from one Android device to another.
In this article, we will be looking at some of the most effective solutions, beginning with the easiest and the most effective solution.
Part 1. How to Transfer Contacts from Android to Android with One Click
One of the best ways to transfer contacts from Android to Android is to use a third-party application known as MobileTrans — Phone Transfer. It is one of the best ways to transfer data from one phone to another, but you can also use it to transfer data selectively. That means that you will be able to choose the contacts you want to transfer, which can come in handy if you need to move just some of your contacts and not all of them.
MobileTrans — Phone Transfer
Transfer Contacts from Android to Android with One Click
- Easily transfer contacts, music, messages, notes, apps, photos, videos, and more.
- No iTunes, iCloud needed. Easy to operate and fast transfer speed.
- Fully compatible with iOS 14 and Android 10.0
- Transfer data to a new android phone without resetting.
To use MobileTrans to transfer contacts from Android to Android, follow these steps:
- Download and install MobileTrans on your computer. After successful installation, launch the program and then select the “Phone Transfer” feature on the main window.
![]()
Now, connect both Android devices to the computer using USB cables and make sure that MobileTrans can recognize both devices (You may have to enable USB debugging for the program to detect the devices).
It is also important to make sure that you have the order of devices correctly. Ensure that the device you want to transfer contacts from is the “Source” device, and the one you want to transfer contacts to is the “Destination”. If this order is not correct, click on “Flip” to change it.
![]()
Once the devices are both connected, and MobileTrans can detect them, you should see a list of all the data on the source device displayed between the two devices. Select “Contacts” and then click “Start” to transfer the contacts from the source device to the destination device.
![]()
Please note that if you want to replace the contacts on the destination device completely, check “Clear data before copy” before beginning the transfer process.
If you want to learn the six methods quickly, you can go through the video below:
Part 2. How to transfer contacts from Android to Android with a SIM card
If the SIM card you have on your device is removable, you can easily use it to transfer contacts to a new device by simply copying all the contacts to the SIM card, inserting it into the other device, and moving the stored contacts. Here’s a simple step by step guide to help you do that;
- Open the “Contacts” app on the source Android device and then tap on “Menu” (the three vertical dots at the top)
- Select “Manage Contacts” from the options that appear and then tap “Import/Export Contacts”.
- Tap “Export Contacts” and then select to a SIM card
- When all the contacts on the device have been transferred to the SIM card, remove the SIM card and then insert it into the destination device
- Open the Contacts app on the destination device and go to «Menu > Manage Contacts > Import/Export Contacts» and then select “Import from SIM Card.”
- Keep the devices connected to the computer until all the contacts are transferred.
- You will be able to see the transferred contacts on the destination device in a few minutes.
![]()
Part 3. How to Transfer Contacts from Android to Android via a VCF file
If your SIM card is not removable or you have too many contacts on your Android device to justify transferring them one by one, you can easily move them from one Android device to another via a VCF file. This process is particularly useful since you can transfer all your contacts at once as an email attachment. Follow these simple steps to transfer contacts from Android to Android using a VCF file;
- Open the “Contacts” app on your Android phone and then tap on the three dots at the top (menu). Select “Manage Contacts” to continue.
Please note that these buttons may be different on some Android models.
![]()
Part 4. How to Transfer Contacts from Android to Android with Google Account and Sync
You might also be able to transfer contacts from Android to Android by syncing the contacts from a Google backup. The following are simple steps to show you how to do that;
- If you haven’t already, the first thing you need to do is add a Google account to the source device. To do that, go to Settings > Accounts > Add account and select Google. Sign in to your Google account to add the account.
- Now sync the contacts to this Google account. To do that, go to Settings > Accounts > Google and then enable “Sync Contacts”.
- On the destination device, add the same Google account and then go to Settings > Account >Google and then select “Contacts” from the Google Backups list. Tap on “Sync Now” and the contacts will be transferred to the destination device.
![]()
Part 5. How to Transfer Contacts from Android to Android with SHAREit
If you don’t want to use Google sync to transfer contacts from one Android device to another, you may want to use an app like SHAREit. When installed on both devices, this app allows users to share contacts between the two devices easily. Here’s how to use it;
- Begin by installing the SHAREit app on both devices from the Google Play Store
- On the source device, open the contacts app and then select the apps you want to transfer to the destination device.
- When the contacts are selected, tap on the “Share” icon, and then choose “SHAREit” as the method to share.
- Now open “SHAREit” on the destination device and ensure that both devices are on the same Wi-Fi network. The SHAREit app on the source device will scan the target device. When the name of the destination device appears, tap on it to begin the transfer process.
![]()
Part 6. How to Transfer Contacts from Android to Android via Bluetooth
Of course, you can also choose to transfer contacts from Android to Android using Bluetooth. This solution is simple, as all you have to do is connect both devices via Bluetooth. Here’s how you can transfer your contacts from the one device to another using Bluetooth;
- On the Source device, open the contacts app and tap on Menu (three dots) > Share icon. Please note that these steps may be different on different devices.
- Tap on “Import/Export” and then select “Share name card via” before selecting the contacts you would like to transfer. If you want to transfer all of them, simply check “Select All”.
- This will open the sharing options. Select “Bluetooth”, you will be prompted to enable “Bluetooth” if you haven’t already. Ensure that Bluetooth is enabled on both devices.
- Allow Bluetooth to scan for nearby devices and select the destination device when it appears. When the devices are paired successfully, the transfer process should begin immediately.
![]()
The solutions above are the most effective ways to transfer contacts from Android to Android. Select a solution that is as easy to implement as it is valid and then follow the instructions laid out above to apply it. If you have any questions, don’t hesitate to ask and we’ll do our best to help.
Источник


