- How to Sync Google Contacts with Android
- Part 1: Sync Google Contacts with Android Directly
- Part 2: Sync Google Contacts to Android with TunesGo
- Must-Have Android Manager — One Stop Solution to Manage, Backup and Sync Android Contacts
- Part 3: How to Backup Android contacts to Gmail
- Синхронизация контактов с учетной записью Google на Android
- Вариант 1: Обычная синхронизация
- Вариант 2: Импорт и синхронизация контактов
- Вариант 3: Синхронизация с другим аккаунтом
- Дополнительно: Проверка работы синхронизации
How to Sync Google Contacts with Android
People around the world handle with so many devices nowadays that it is very hard to remember what you left on which device. Instead, much easier solution would be to have all the informations and data in one place, and then you could acces them from any point or any device. Years ago, it was immposible to imagine that you could have a phone that is connected to the internet, and today, it is hard to imagine a device that is not synchronized.
Synchronization is a smart solution, not only for those who have many devices or change them in short period, but also for those who are not careful with their data and contacts. Losing an important number can be very tricky. Today, we will show you how to synchronize your Android smartphone with google contacts, and will also introduce you with the application that can make the enire process much easier. There is another way of synchronizing with google accounts, and that goes through vcard format. That is where Wondershare TunesGo comes to our aid. We will also show how to export contacts from Android to computer as vcard file, then import vcard file to gmail account. Adding Android contacts to Gmail is now easier than ever, and you will be able to backup Android contacts to Google. For someone who wants to use Android contacts on Gmail, this article will be very useful. Nevertheless, Gmail backup contacts is something everyone should do every once in a while.
Part 1: Sync Google Contacts with Android Directly
We are showing you here how to synchronize your Google contacts with Android directly, so follow next steps.
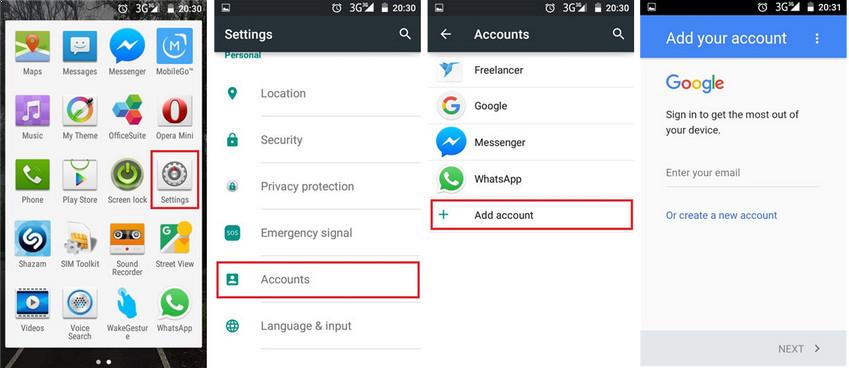
1. Go to the main menu and find the Settings icon, press it.
2. When you enter the Settings menu, search for Accounts. Here, you can manage not only Google accounts, but many more.
3. As it is on the picture, other accounts appeared, but we will stay on Google. You have the possibility to synchronize your Android smartphone with vast varieties. For now, click Add account.
4. When you are done with that, press Google account and you can create a new one if you do not have it, or if you do, simply login with the existing one.
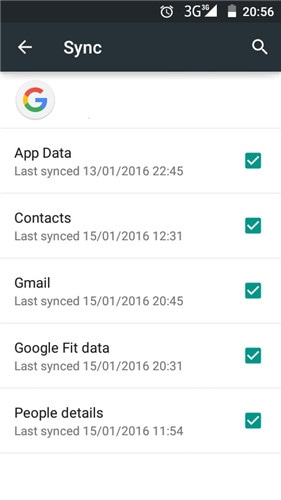
5. Last step is synchronization. You can choose in options what will be synchronized and what not, and among them you can choose contacts also.
Wondershare TunesGo could help you edit, manage, transfer, backup and restore Gmail contacts if you login Gmail on your Android phone.
![]()
Part 2: Sync Google Contacts to Android with TunesGo
Here, we present to you Wondershare TunesGo application, which will help us to export the contacts in vcard format. Beside this, an application provides much more for its users, and is certainly helpful. From here, you can manage your applications, music, SMS services, videos, files and much more. It is not an ordinary tool that will control your smartphone, but rather your powerful ally in all challenges. Follow the few next steps to get everything done:
Must-Have Android Manager — One Stop Solution to Manage, Backup and Sync Android Contacts
- Backup your music, photos, videos, contacts, SMS etc. to computer and restore them easily.
- Manage, export&import your Contacts and SMS, deduplicate Contacts, reply SMS with computer.
- One-click Root — Root your Android phones/tablets to take full control of your device.
- Phone to Phone Transfer — Transfer music, photos, videos, contacts, SMS between two mobiles (both Android and iPhone are supported).
- App Manager — Install, uninstall, import or backup Apps in batch.
- Gif Maker — Create Gif from photos, motion photos, videos.
- iTunes Manager — Sync iTunes Music to Android or transfer music from Android to iTunes
- Fully compatible with 3000+ Android devices (Android 2.2 — Android 8.0) from Samsung, LG, HTC, Huawei, Motorola, Sony etc.
1. First, start Gmail, and after that go to Contacts menu on the left side.
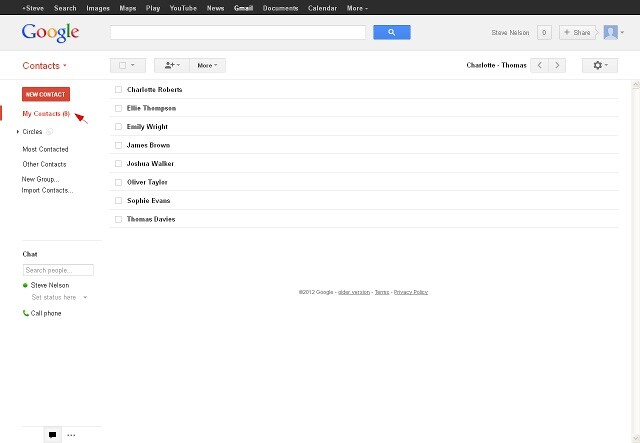
2. Choose More > Export.
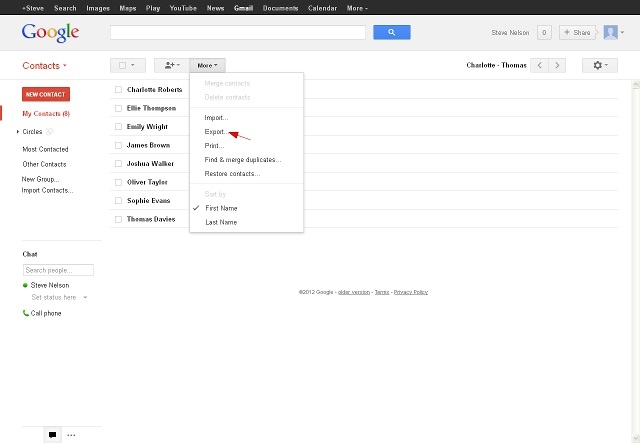
3. After that, pick «All contacts» and then «vCard format».

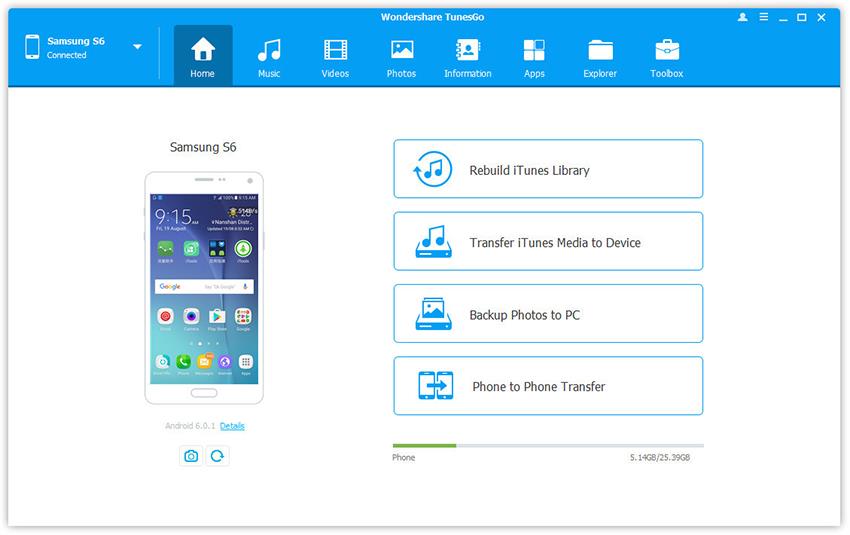
4. Download and install Wondershare TunesGo. Launch it and connect your Android device to computer. It will automatically recognize your smartphone, so you do not have to do anything, the application is very user friendly and will do most of the work for you.
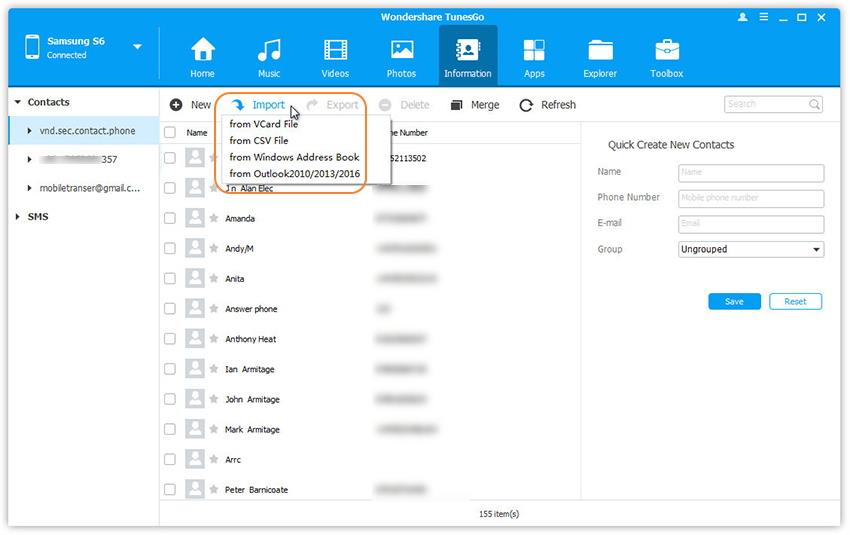
5. After the application recognized your device, select Information tap. In the contact management window, go to upper Import button, press it and when you see the next menu, enter it and choose «from vCard file». That is all the procedure you need to do.
Part 3: How to Backup Android contacts to Gmail
You can also use Wondershare TunesGo to backup Android contacts to Gmail. Here, the procedure is a little bit different. We will use Wondershare TunesGo to export contacts as vCard file, but later import them in Gmail accounts.
1. Like we did in the previous part, run TunesGo. The download link was shared in the section before.
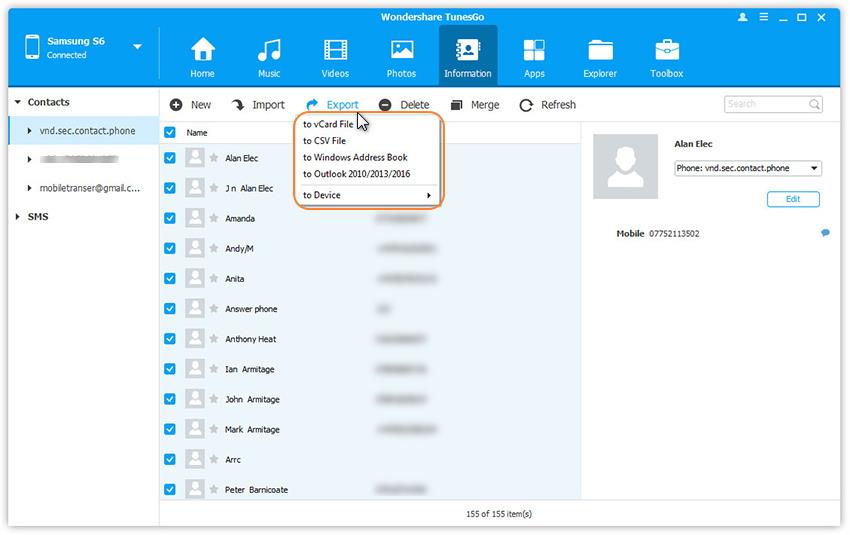
2. This time, under the same menu, but different card, pick Export > to vCard files. You are done here with TunesGo, and as you see, it is very easy to use.
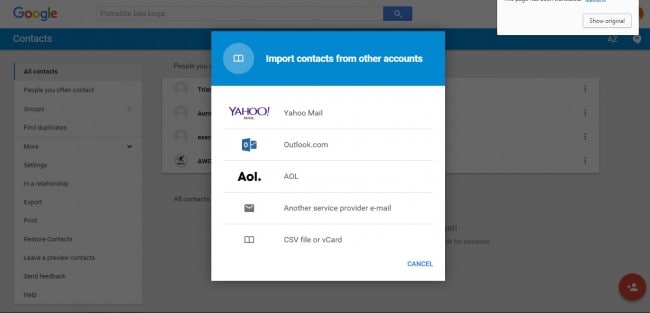
3. Next step is to import vCard files in Gmail. Go to Contacts, and choose More > Import > vCard. Easy and simple procedure.
After we have shown you detailed steps on all of the procedures, you can choose which one fits you most. Not all users can use all of them, but Wondershare TunesGo is for sure hell of a player when it comes to this topic. Being one of the rare applications that does this kind of synchronizing, it is for sure worth mentioning. Gmail contacts on Android now can be safer more than ever. Also, you do not have to worry anymore do you have someones number, as you have them all in one place. Simply log into your Google account from anywhere and any device, and you will be close to all of your contacts. Also, make sure that your Android device is capable of doing these procedures. Sometimes, it is not just about being connected, but also preserving the said words. For these actions, use regular backup, or if you do not feel like doing it every day, you can simply set your smartphone to automatic backup, and he will do all the work for you. Synchronizing was never easier than now, with Wondershare TunesGo application that will find thousands of users, and every single one of them satisfied!
Источник
Синхронизация контактов с учетной записью Google на Android
Вариант 1: Обычная синхронизация
Для того чтобы синхронизировать контакты, хранящиеся на смартфоне с Андроид, тем самым сделав их доступными для просмотра на других устройствах, необходимо активировать один из параметров в настройках мобильной операционной системы.
- Откройте «Настройки» ОС Android, пролистайте их немного вниз и перейдите к разделу «Аккаунты».

Найдите ту учетную запись, контакты для которой требуется синхронизировать, и коснитесь ее наименования.

Тапните по пункту «Синхронизация аккаунта».

Прокрутите немного вниз список доступных параметров и активируйте расположенный напротив «Контактов» переключатель.

Ожидайте, пока процедура будет завершена. Как вариант, вы можете инициировать ее в принудительном порядке, вызвав меню и выбрав единственный доступный в нем пункт.

Как только синхронизация данных будет завершена, сохраненные в выбранном Гугл-аккаунте контакты станут доступными на всех устройствах, где он используется. О том, как это проверить, мы расскажем в последней части статьи.
Вариант 2: Импорт и синхронизация контактов
В том случае, если контакты, которые требуется синхронизировать с учетной записью Google, в настоящий момент хранятся на SIM-карте или другом устройстве, их сначала потребуется импортировать на используемый Android.
Примечание: В примере ниже показано стандартное для чистой ОС Андроид приложение «Контакты». Если на вашем мобильном девайсе установлено другое, действуйте по аналогии.
- Откройте «Контакты» (отдельное приложение, а не вкладку в стандартной «звонилке» — «Телефоне») и вызовите его меню, коснувшись трех горизонтальных полос в начале поисковой строки.

Перейдите в раздел «Настройки».

Тапните по пункту «Импортировать».

Далее выберите место-источник, из которого будут импортироваться контакты, — это может быть VCF-файл с записями или СИМ-карта.

Обратите внимание! Контакты с другого устройства предварительно потребуется экспортировать в файл формата VCF и поместить на накопитель используемого девайса.
Читайте также: Как перенести контакты с Андроида на компьютер
Если импорт будет осуществляться с SIM-карты, подтвердите данное действие и дождитесь завершения процедуры. В случае с VCF, используя автоматически открывшийся файловый менеджер, выполните следующее:
- «Разрешите» приложению получить доступ к данным на накопителе.

Перейдите к месту расположения файла с записями адресной книги и коснитесь его для выбора.

Ожидайте, пока процедура копирования будет завершена.

Когда контакты будут импортированы, проверьте их наличие в одноименном приложении, после чего воспользуйтесь инструкцией из предыдущей части статьи, чтобы синхронизировать эти записи с Гугл-аккаунтом.

Вариант 3: Синхронизация с другим аккаунтом
Если на вашем Android-девайсе используется несколько учетных записей и вы хотите сохранять все новые контактные данные в одну из них, выполните следующее:
- Повторите действия из двух первых шагов предыдущей инструкции.

Тапните по пункту настроек «Аккаунт для новых контактов».

Во всплывающем окне выберите ту учетную запись, в которой в дальнейшем хотите хранить записи адресной книги.

Для того чтобы новые данные правильно сохранялись, проверьте, включена ли для выбранного аккаунта синхронизация, в частности, контактов, воспользовавшись инструкцией из первой части статьи.
Дополнительно: Проверка работы синхронизации
Убедиться в корректной работе синхронизации записей можно, если войти в ту же учетную запись Google на другом устройстве – это может быть как смартфон или планшет (необязательно на базе Android), так и компьютер. В качестве наглядного примера далее воспользуемся последним.
- С помощью любого браузера перейдите по представленной выше ссылке, и вы сразу же увидите все сохраненные в адресной книге записи.

Примечание: Для того чтобы попасть на указанную выше страницу, может потребоваться войти в учетную запись Google (если этого не было сделано ранее), указав логин и пароль от нее, а затем подтвердив данное действие.

и выберите пункт «Экспортировать».

В появившемся всплывающем окне выберите группу контактов, которые будут сохраняться (по умолчанию отмечены все), определите формат исходного файла и нажмите «Экспортировать».

Обратите внимание! Если контакты из файла, загруженного через веб-версию сервиса, будут переноситься на Android, полученный в результате экспорта CSV сначала потребуется конвертировать в VCF. На смартфоне же по умолчанию создается файл именно этого формата.
Файл с записями будет сохранен практически моментально, после чего останется лишь скопировать его на другое устройство. Отметим, что значительно более простым вариантом решения задачи переноса контактов в данном случае будет вход в учетную запись Google в настройках мобильной ОС, о чем мы ранее рассказывали в отдельной статье, и последующее включение синхронизации.
Источник


