- Configuration
- In this document
- See also
- Update channels
- Proxy Settings
- Setting up the Android Studio Proxy
- Android Plugin for Gradle HTTP proxy settings
- SDK Manager HTTP Proxy Settings
- Настройка Android Studio
- Отображение номера строки
- Разделители методов
- Выделение изменённых файлов звёздочкой
- Использование стиля «Верблюжьи горбы»
- Импортирование на лету, «imports on the fly»
- Цветовая гамма
- Настройка цветовой гаммы редактора Java
- Настройка цветовой гаммы окна консоли
- Кодировка
- Именование полей, методы get/set
- 9.2: Adding Settings to an App
- What you should already KNOW
- What you will LEARN
- What you will DO
- App overview
- Task 1: Add a switch setting to an app
- 1.1 Create the project and add the xml directory and resource file
- 1.2 Add the XML preference and attributes for the setting
- 1.3 Add an activity for settings and a fragment for a specific setting
- 1.4 Connect the Settings menu item to the settings activity
- 1.5 Save the default values in shared preferences
- 1.6 Read the changed settings value from shared preferences
- Task 2: Using the Settings Activity template
- 2.1 Explore the Settings Activity template
- 2.2 Add the Settings menu item and connect it to the activity
- 2.3 Customize the settings provided by the template
- 2.4 Add code to set the default values for the settings
- 2.5 Add code to read values for the settings
- Solution code
- Coding challenges
Configuration
In this document
See also
During installation, Android Studio provides wizards and templates that verify your system requirements, such as the Java Development Kit (JDK) and available RAM, and configure default settings, such as an optimized default Android Virtual Device (AVD) emulation and updated system images. This document describes additional configuration settings you may want to use to customize your use of Android Studio.
For specific documentation about emulator and device setup and use, see Managing Virtual Devices, Using Hardware Devices, and OEM USB Drivers.
Update channels
Android Studio provides four update channels to keep Android Studio up-to-date based on your code-level preference:
- Canary channel: Canary builds provide bleeding edge releases, updated about weekly. While these builds do get tested, they are still subject to bugs, as we want people to see what’s new as soon as possible. This is not recommended for production.
- Dev channel: Dev builds are hand-picked older canary builds that survived the test of time. They are updated roughly bi-weekly or monthly.
- Beta channel: Beta builds are used for beta-quality releases before a production release.
- Stable channel: Used for stable, production-ready versions.
By default, Android Studio uses the Stable channel. Use File > Settings > Appearance & Behavior System Settings > Updates to change your channel setting.
Proxy Settings
Proxies serve as intermediary connection points between HTTP clients and web servers that add security and privacy to internet connections.
To support running Android Studio behind a firewall, set the proxy settings for the Android Studio IDE and the SDK Manager. Use the Android Studio IDE HTTP Proxy settings page to set the HTTP proxy settings for Android Studio. The SDK Manager has a separate HTTP Proxy settings page.
When running the Android Plugin for Gradle from the command line or on machines where Android Studio is not installed, such as continuous integration servers, set the proxy settings in the Gradle build file.
Note: After the initial installation of the Android Studio bundle, Android Studio can run with internet access or off-line. However, Android Studio requires an internet connection for Setup Wizard synchronization, 3rd-party library access, access to remote repositories, Gradle initialization and synchronization, and Android Studio version updates.
Setting up the Android Studio Proxy
Android Studio supports HTTP proxy settings so you can run Android Studio behind a firewall or secure network. To set the HTTP proxy settings in Android Studio:
- From the main menu choose File > Settings > Appearance & Behavior — System Settings — HTTP Proxy.
- In Android Studio, open the IDE Settings dialog.
- On Windows and Linux, choose File > Settings > IDE Setting — HTTP Proxy.
- On Mac, choose Android Studio > Preferences > IDE Setting — HTTP Proxy.
The HTTP Proxy page appears.
- Select auto-detection to use an auto-configuration URL to configure the proxy settings or manual to enter each of the settings. For a detailed explanation of these settings, see HTTP Proxy.
- Click Apply to enable the proxy settings.
Android Plugin for Gradle HTTP proxy settings
For application-specific HTTP proxy settings, set the proxy settings in the build.gradle file as required for each application module.
For project-wide HTTP proxy settings, set the proxy settings in the gradle/gradle.properties file.
For information about using Gradle properties for proxy settings, see the Gradle User Guide.
Note: When using Android Studio, the settings in the Android Studio IDE HTTP proxy settings page override the HTTP proxy settings in the gradle.properties file.
SDK Manager HTTP Proxy Settings
SDK Manager proxy settings enable proxy internet access for Android package and library updates from SDK Manager packages.
To set the SDK Manager settings for proxy internet access, start the SDK Manager and open the SDK Manager page.
- On Windows, select Tools > Options from the menu bar.
- On Mac and Linux, choose Tools > Options from the system menu bar.
The Android SDK Manager page appears. Enter the settings and click Apply.
Источник
Настройка Android Studio
В Android Studio имеется возможность определить собственный стиль представления информации в редакторе, сохранить все настройки в отдельный файл, который в дальнейшем можно импортировать в новую версию IDE. Здесь на странице описываются некоторые возможности настройки интерфейса среды разработки. Это даёт Вам возможность понять где искать и как определить тот или иной стиль представления информации.
Чтобы открыть окно настроек в окне приветствия нажмите «Configure» в нижней части формы и во всплывающем меню выберите пункт «Settings». как это представлено на следующем скриншоте :
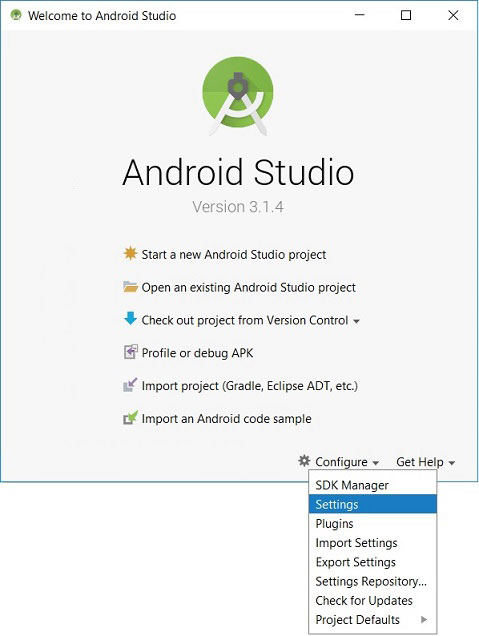
Всплывающее меню раздела конфигурации включает пункты импорта и экспорта настроек (Import Settings, Export Settings), о чем было сказано выше.
Отображение номера строки
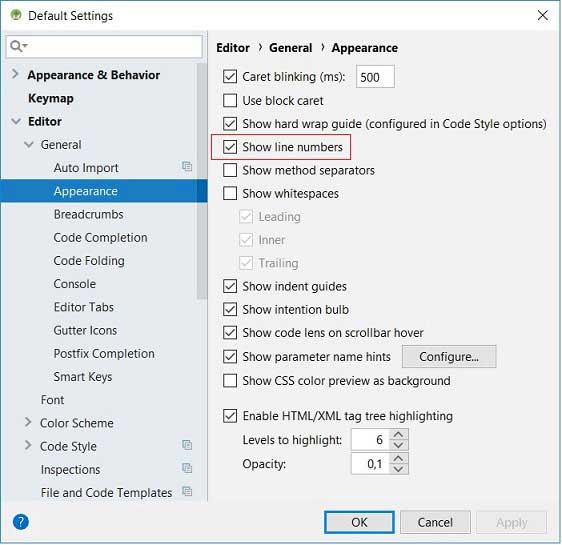
Чтобы отображать номера строк кода в среде разработки необходимо в левой части окна настроек среды разработки IDE выбрать пункт меню Editor/General/Appearance и в правой части установить (не снимать) галочку в чекбоксе «Show line numbers».
Разделители методов
Между методами класса можно установить разделительную черту. Это очень удобно для наглядного отделения одного метода от другого. Чтобы не делать это вручную, можно процесс автоматизировать установкой флага в чекбоксе «Show method separators» (см. скриншот выше).
Выделение изменённых файлов звёздочкой
Часто в различных редакторах изменённые, но не сохранённые файлы на вкладках помечаются звёздочкой. Так работает в Eclipse, Notepad++ и многих других редакторах. Чтобы данную функцию включить в Android Studio необходимо выделить пункт меню Editor/General/Editor Tabs и в панели установить флажок в чекбоксе «Mark modified tabs with asterisk».
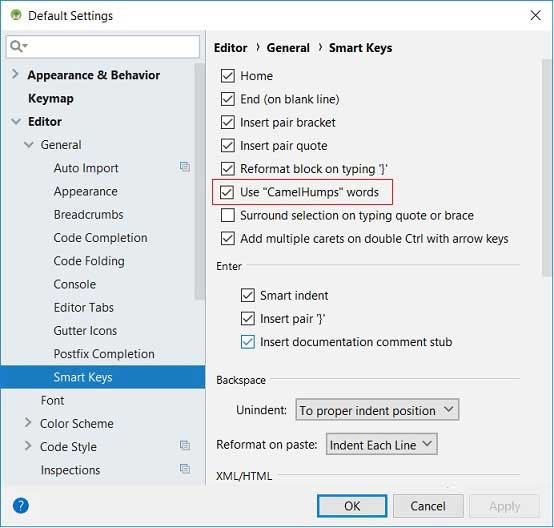
Использование стиля «Верблюжьи горбы»
Стиль редактирования «Верблюжьи горбы» определяет навигацию курсора при использовании клавиш ‘Ctrl+ стрелки влево/вправо’. Ниже представлены анимационные изображения, демонстрирующие использование стиля «Верблюжьи горбы».
 |
| Навигация по словам |
 |
| Навигация с помощью «Верблюжьих горбов» |
Для использования в среде разработки стиля навигации «Верблюжьи горбы» выберите в окне настроек пункт меню Editor/General/Smart Keys и в правой части установите галочку в чекбоксе «Use «CamelHumps» words».
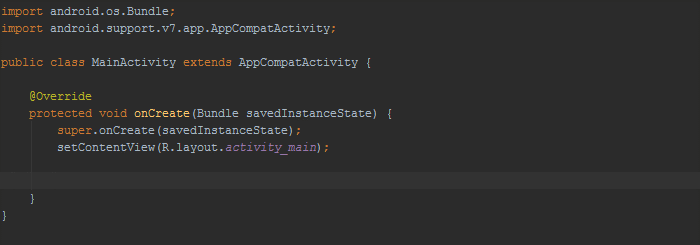
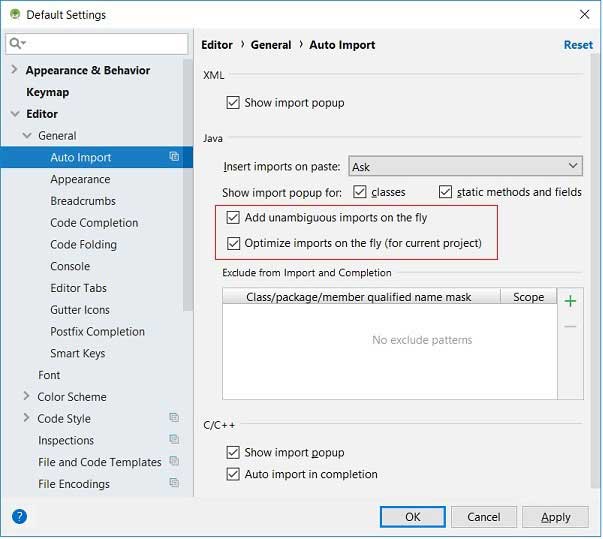
Импортирование на лету, «imports on the fly»
В Android Studio имеется функция автоматического импорта («imports on the fly») и очистки неиспользуемых импортов в Java коде. Ниже представлены анимационные изображения, демонстрирующие использование функции «imports on the fly».
 |
| Без функции «импорт на лету» |
 |
| С функцией «импорт на лету» |
Для установки в среде разработки функции «импорт на лету» выберите в окне настроек пункт меню Editor/General/Auto Import и в правой части установите галочку в чекбоксах «Add unambiguous imports on the fly» и «Optimize imports on the fly», как это представлено на следующем скриншоте.
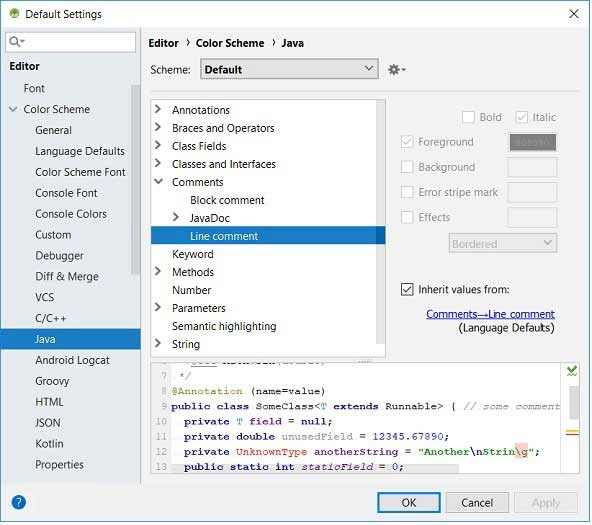
Цветовая гамма
Android Studio позволяет настроить шрифты и цветовую гамму окон редактирования, отладки, консоли для различных языков программирования (Java, C/C++, Groovy) и форматов представления информации (HTML, JSON). На следующих двух скриншотах представлены панели настроек Java и консоли.
Настройка цветовой гаммы редактора Java
Настройка цветовой гаммы окна консоли
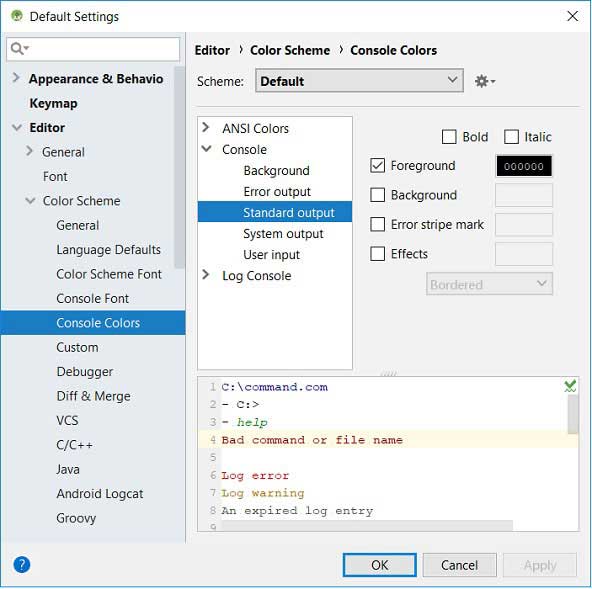
Студия версии 3.1.4 поставляется с двумя предустановленными темами: Default (IntelliJ), Darcula. По умолчанию, используется тема Default со светлым фоном (выпадающий список Scheme). Интерес для программистов IntelliJ представляет тема с чёрным фоном Darcula; здесь обыгрывается слово «dark». Чтобы переключиться на «тёмную тему», поменяйте её в выпадающем списке Scheme.
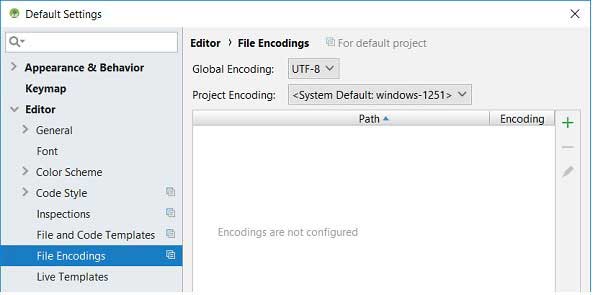
Кодировка
Для изменения кодировки новых проектов и текущего необходимо выделить пункт меню в окне конфигурации File/Settings/Editor/File Encodings и определить значения «Global Encoding» и «Project Encoding». В Android Studio по умолчанию используется в качестве глобальной кодировки UTF-8, а для кодировки проектов используется «системная по умолчанию». У многих разработчиков в качестве системной используется win-1251, с которой могут быть связаны проблемы при выводе строковых сообщений.
Именование полей, методы get/set
Android Studio умеет самостоятельно генерировать так называемые методы get/set класса на основе его полей. Чтобы использовать правильный стиль кодирования согласно ковенции ‘Android Code Style Guidelines for Contributors’, необходимо сначала определить настройки распознавания префиксов ‘m’ (member) и ‘s’ (static) в названии переменных. Для этого следует открыть панель настроек Editor/Code Style/Java и перейти на вкладку ‘Code Generation’. В разделе Naming в поле Naming Prefix строки Field введите префикс ‘m’. После добавьте префикс ‘s’ для статических полей в строке ‘Static field’.
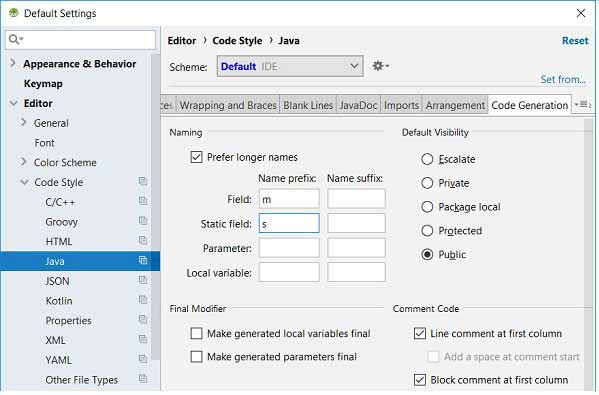
Подобная настройка подскажет IDE о необходимости генерирации методов для поля без соответствующего префикса в его наименовании. Например, для поля mCatName будет создан метод setCatName() вместо setMCatName().
Для генерации в файле класса с полями методов get/set щёлкните правой кнопкой мыши после конструктора и в раскрывшемся меню выберите команду ‘Generate…| Getter And Setter’, определите в открывшемся окне поля класса и щёлкните на кнопке OK, чтобы IDE сгенерировала get/set методы для каждого выделенного поля класса.
Источник
9.2: Adding Settings to an App
Contents:
Apps often include settings that allow users to modify app features and behaviors. For example, some apps allow users to set their home locations, default units for measurements, dining options, and other settings that apply to the entire app. Settings are usually accessed infrequently, because once a user changes a setting, such as a home location, they rarely need to go back and change it again.
Users expect to navigate to app settings by tapping Settings in side navigation, such as a navigation drawer as shown on the left side of the figure below, or in the options menu in the app bar, shown on the right side of the figure below. 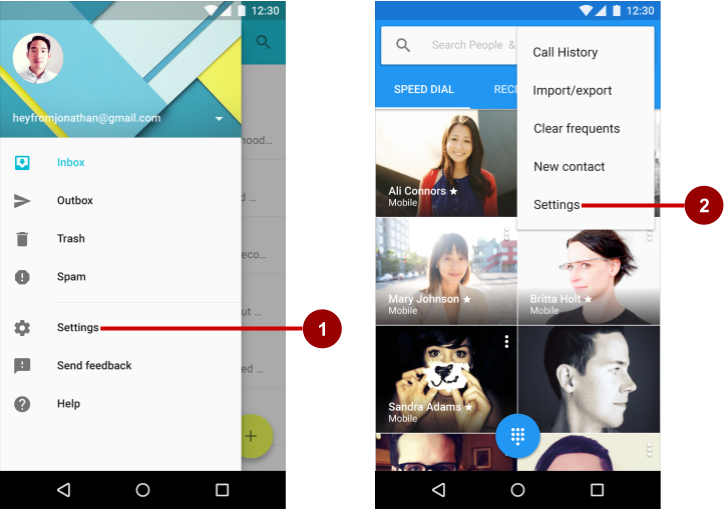
In the figure above:
- Settings in side navigation (a navigation drawer)
- Settings in the options menu of the app bar
In this practical you will add a settings activity to an app. Users will be able to navigate to the app settings by tapping Settings, which will be located in the options menu in the app bar.
What you should already KNOW
From the previous practicals, you should be able to:
- Add an activity to an app.
- Design layouts with buttons and text views.
- Extract string resources and edit string and string array values.
- Create an options menu in the app bar.
- Add and edit the menu items in the options menu.
- Add the event handler for menu item clicks.
- Edit the AndroidManifest.xml file to add Up navigation for a second activity.
- Read preferences from sharedPreferences .
What you will LEARN
You will learn to:
- Add an activity and understand the use of fragments for managing settings.
- Create an XML resource file of settings with their attributes.
- Create navigation to the settings activity.
- Set the default values of settings.
- Read the settings values changed by the user.
- Customize the Settings Activity template for your own use.
What you will DO
In this practical, you will:
- Create an app that includes Settings in the options menu.
- Add «Settings option» as a toggle switch.
- Add code to set the default value for the setting, and access the setting value after it has changed.
- Use and customize the Android Studio Settings Activity template.
App overview
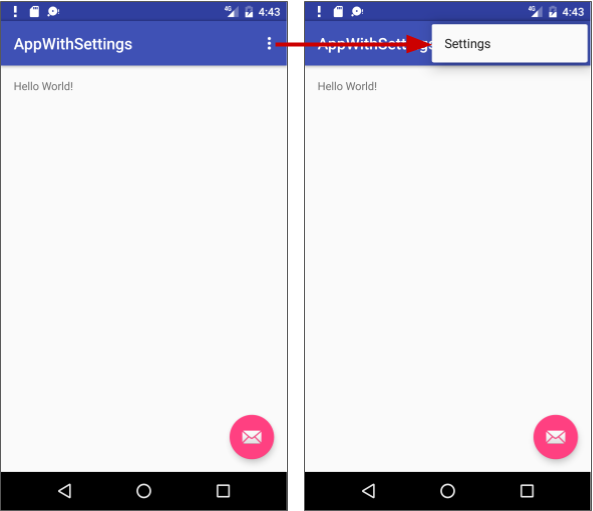
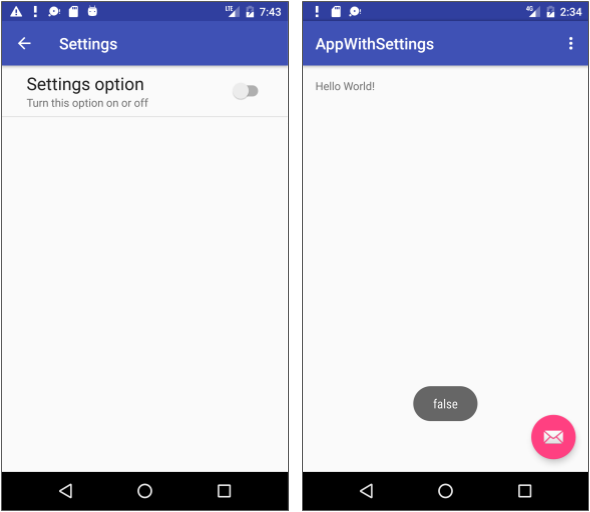
Android Studio provides a shortcut for setting up an options menu with Settings. If you start an Android Studio project for a smartphone or tablet using the Basic Activity template, the new app includes Settings as shown below: 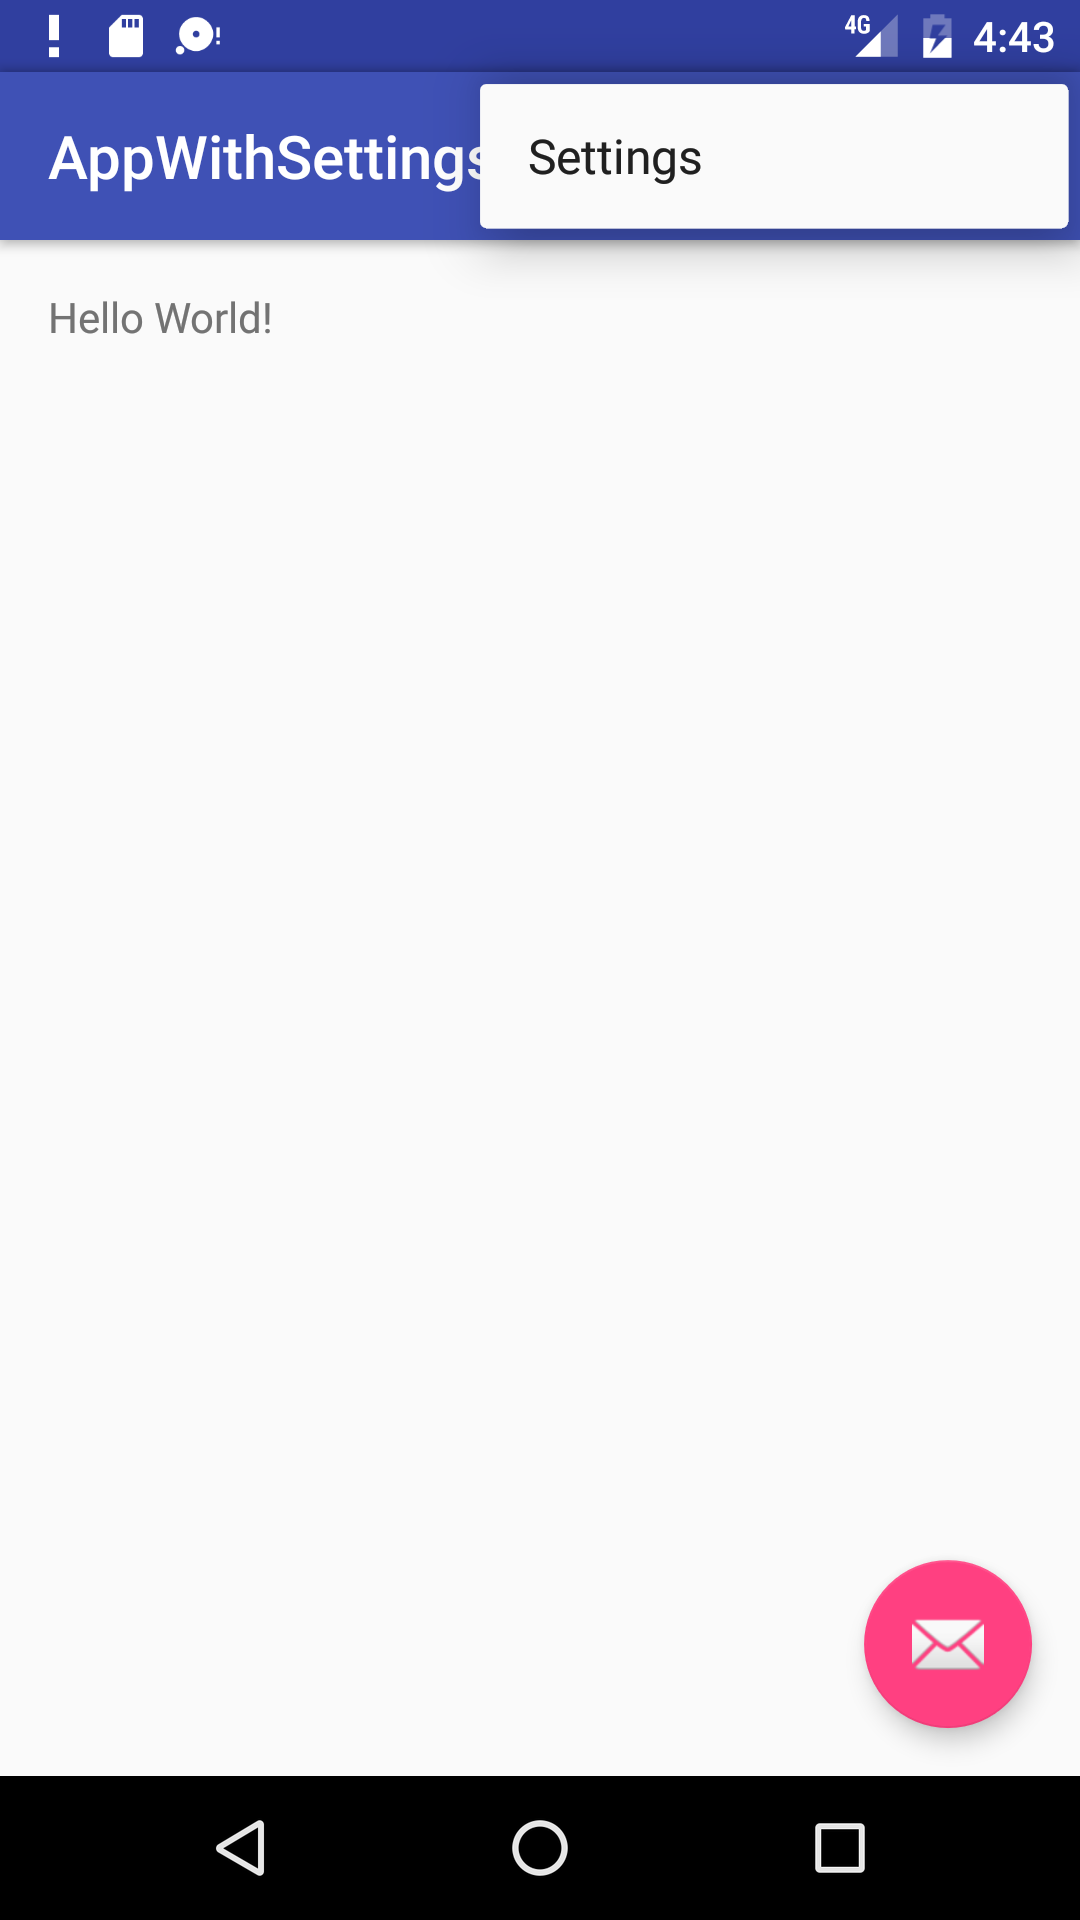
The template also includes a floating action button in the lower right corner of the screen with an envelope icon. You can ignore this button for this practical, as you won’t be using it.
You’ll start by creating an app named AppWithSettings using the Basic Activity template, and add a settings activity that provides one toggle switch setting that the user can turn on or off: 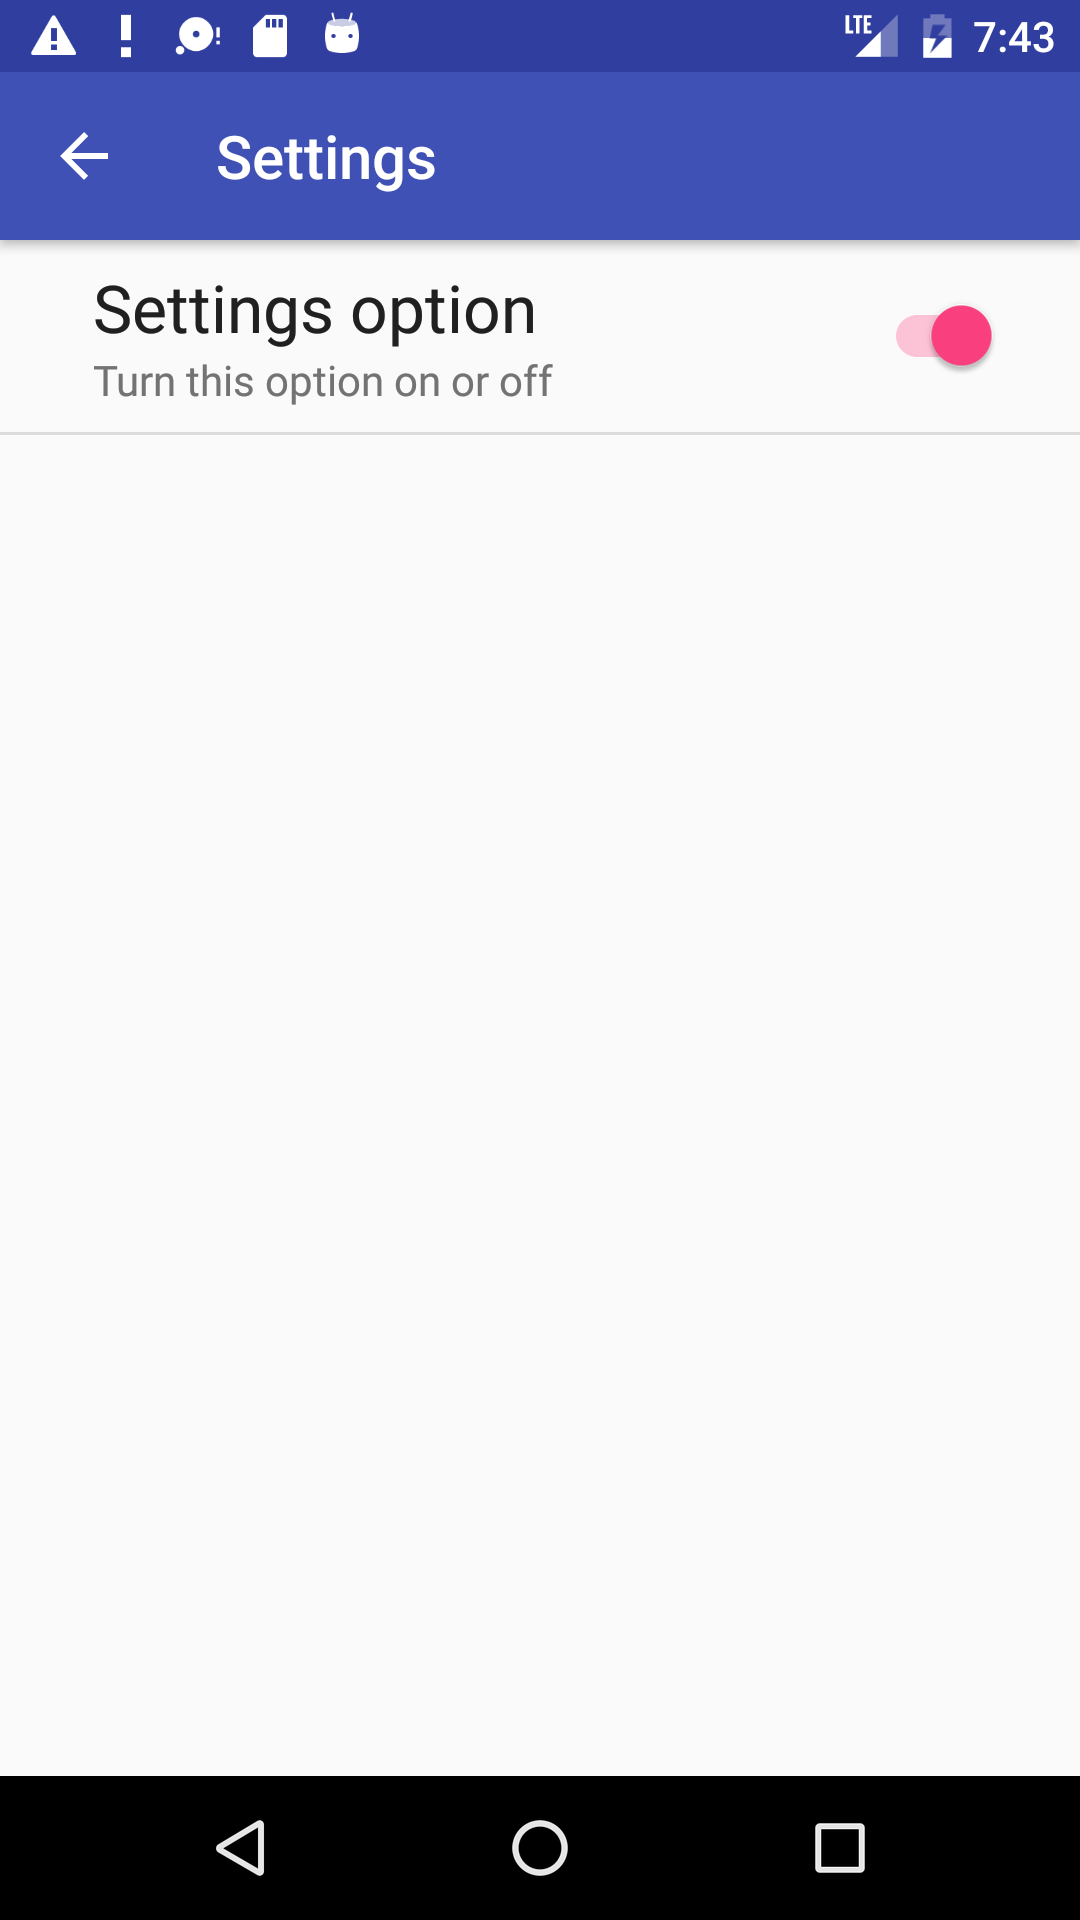
You will add code to read the setting and perform an action based on its value. For the sake of simplicity, the action will be to display a toast message with the value of the setting.
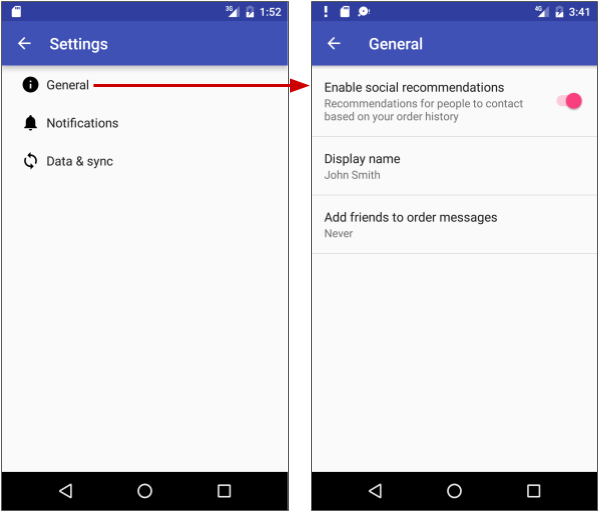
In the second task, you will add the standard Settings Activity template provided by Android Studio to the DroidCafe app you created in a previous lesson. The Settings Activity template is pre-populated with settings you can customize for an app, and provides a different layout for smartphones and tablets:
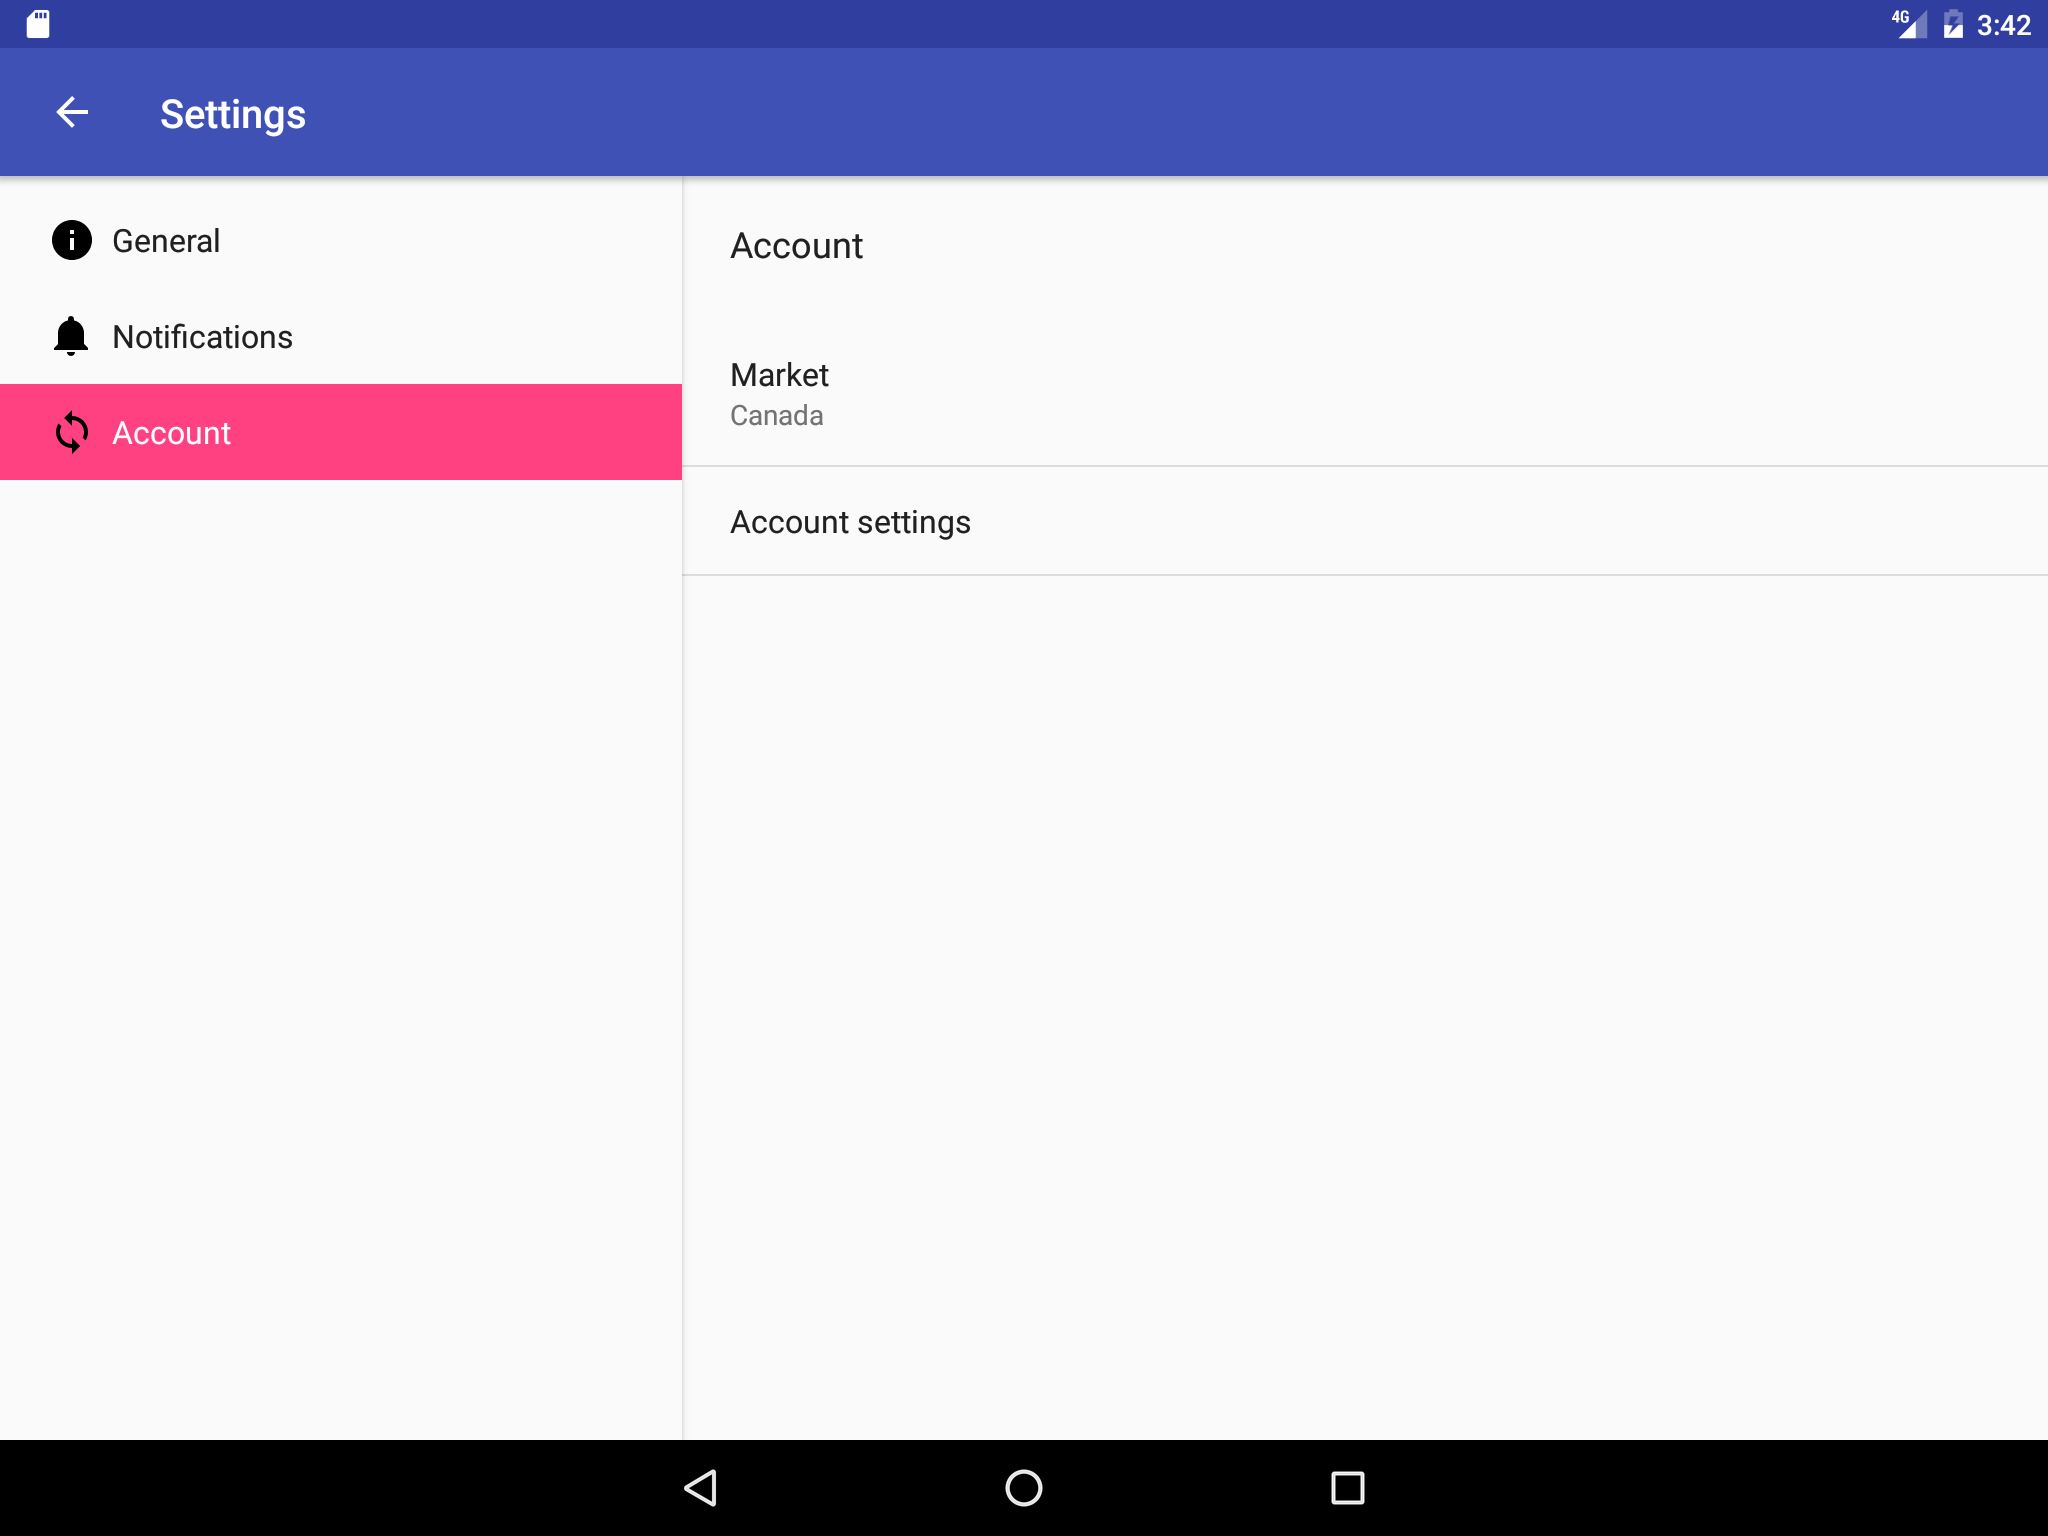
Smartphones: A main Settings screen with a header link for each group of settings, such as General for general settings, as shown below. 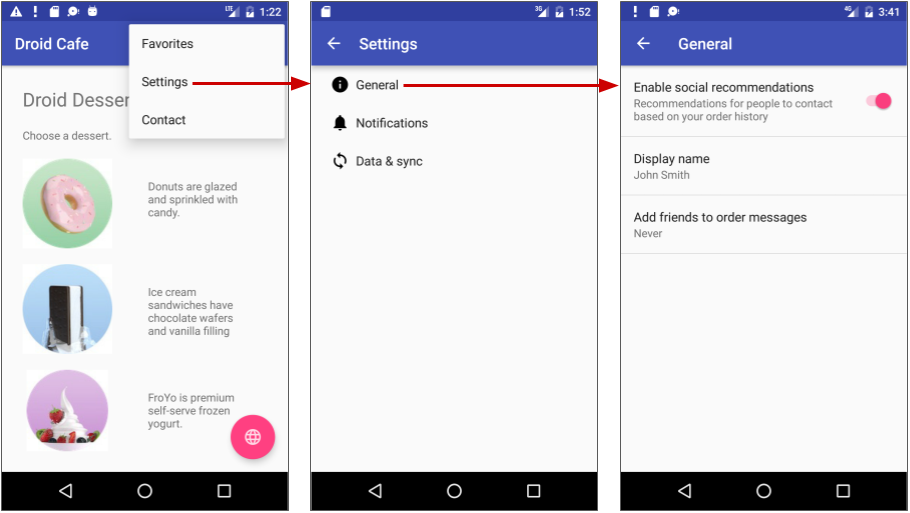
Tablets: A master/detail screen layout with a header link for each group on the left (master) side, and the group of settings on the right (detail) side, as shown in the figure below. 
All you need to do to customize the template is change the headers, setting titles, setting descriptions, and values for the settings, and write the code you would normally write to use the values of the settings.
The Droid Cafe app was created in a previous lesson from the Basic Activity template, which provides an options menu in the app bar for placing the Settings option. You will customize the supplied Settings Activity template by changing a single setting’s title, description, values, and default values. You will add code to read the setting’s value after the user changes it, and display that value.
Task 1: Add a switch setting to an app
In this task, you will:
- Create a new project based on the Basic Activity template (which provides an options menu).
- Add a toggle switch setting with attributes in a preference XML file.
- Add an activity for settings and a fragment for a specific setting. You will use the PreferenceFragmentCompat version of PreferenceFragment in order to maintain compatibility with AppCompatActivity . You will also add the android.support:preference-v7 library.
- Connect the Settings item in the options menu to the settings activity.
1.1 Create the project and add the xml directory and resource file
- In Android Studio, create a new project with the following parameters:
- Run the app, and tap the overflow icon in the app bar to see the options menu, as shown in the figure below. The only item in the options menu is Settings.

- Create a new resource directory to hold the XML file containing the settings:
- Select the res directory in the Project: Android view, and choose File > New > Android Resource Directory. The New Resource Directory dialog appears.
- In the Resource type drop-down menu, choose xml. The Directory name automatically changes to xml .
- Click OK.
- The xml directory appears in the Project: Android view inside the res directory. Select the xml directory and choose File > New > XML resource file (or right-click the xml directory and choose New > XML resource file).
- Enter the name of the XML file, preferences, in the File name field, and click OK. The preferences.xml file appears inside the xml directory, and the layout editor appears, as shown in the figure below.
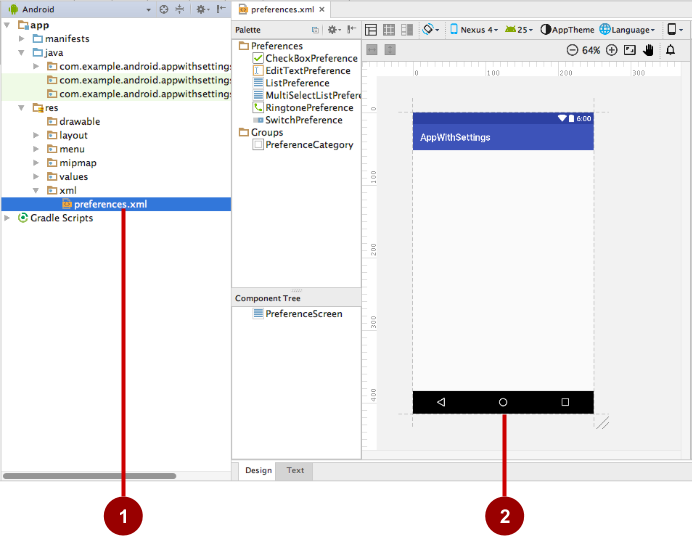
In the figure above:
- The preferences.xml file inside the xml directory.
- The layout editor showing the preferences.xml contents.
1.2 Add the XML preference and attributes for the setting
Drag a SwitchPreference from the Palette pane on the left side to the top of the layout, as shown in the figure below. 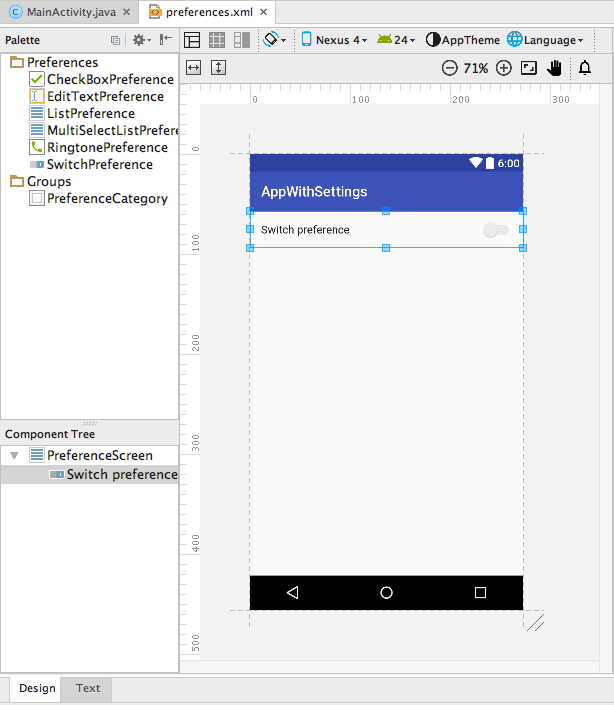
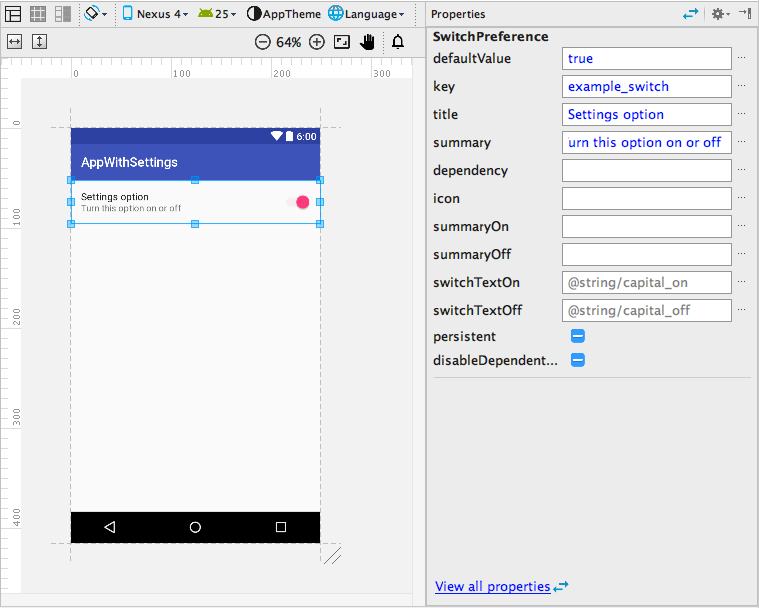
Change the values in the Properties pane on the right side of the layout editor as follows (refer to the figure below):
- defaultValue: true
- key: example_switch
- title: Settings option
- summary: Turn this option on or off
Click the Text tab at the bottom of the layout editor to edit the XML code:
The Properties values you entered represent XML attributes:
- android:defaultValue : The default value of the setting when the app starts for the first time.
- android:title : The title of the setting. For a SwitchPreference , the title appears to the left of the toggle switch.
- android:key : The key to use for storing the setting value. Each setting has a corresponding key-value pair that the system uses to save the setting in a default SharedPreferences file for your app’s settings.
- android:summary : The text summary appears underneath the setting.
Extract the string resources for the android:title and android:summary attribute values to @string/switch_title and @string/switch_summary .
Change in the code to :
In order to use the PreferenceFragmentCompat version of PreferenceFragment, you must also use the android.support.v7 version of SwitchPreference ( SwitchPreferenceCompat ).
The SwitchPreferenceCompat line above may show a yellow light bulb icon with a warning, but you can ignore it.
Open the styles.xml file, and add the following preferenceTheme declaration to the AppTheme :
In order to use the PreferenceFragmentCompat version of PreferenceFragment, you must also declare preferenceTheme with the PreferenceThemeOverlay style to the app theme.
The above adds the android.support:preference-v7 library in order to use the PreferenceFragmentCompat version of PreferenceFragment.
1.3 Add an activity for settings and a fragment for a specific setting
In order to create a Settings activity that provides a UI for settings, add an Empty Activity to the app:
- Select app at the top of the Project: Android view.
- Choose New > Activity > Empty Activity.
- Name the activity SettingsActivity.
- Uncheck the option to generate a layout file (you don’t need one).
- Leave checked the Backwards Compatibility (AppCompat) option.
- The Package name should already be set to com.example.android.projectname, and the Target Source Set should be set to main. If not, make these selections in the drop-down menus.
- Click Finish.
The result is the following class definition in SettingsActivity:
Add a blank fragment for a group of similar settings (without a layout, factory methods, or interface callbacks) to the app, in order to swap them into the Settings activity screen when needed:
- Select app at the top of the Project: Android view again.
- Choose New > Fragment > Fragment (Blank).
- Name the fragment SettingsFragment.
- Uncheck the option to generate a layout file (you don’t need one).
- Uncheck the option to include fragment factory methods.
- Uncheck the option to include interface callbacks.
- Click Finish.
The result is the following class definition in SettingsFragment:
Change the class definition of SettingsFragment to extend PreferenceFragmentCompat :
You use a specialized Fragment subclass to display a list of settings. The best practice is to use a regular Activity that hosts a PreferenceFragment that displays the app settings. Fragments like PreferenceFragment provide a more flexible architecture for your app, compared to using activities alone. A fragment is like a modular section of an activity—it has its own lifecycle and receives its own input events, and you can add or remove a fragment while the activity is running.
Use the PreferenceFragmentCompat version of PreferenceFragment with an activity that extends AppCompatActivity. In order to extend the fragment, you may have to add the following import statement:
Replace the entire onCreateView() method in the fragment with this onCreate() method:
The reason why you replace onCreateView() with onCreatePreferences() in SettingsFragment is because you will be adding this fragment to the existing SettingsActivity to display preferences, rather than showing a separate fragment screen. Adding it to the existing activity makes it easy to add or remove a fragment while the activity is running. The preference fragment is rooted at the PreferenceScreen using rootKey .
You can safely remove the empty constructor from the fragment as well, since the fragment is not displayed by itself:
At the end of the onCreatePreferences() method in SettingsFragment, you need to associate with this fragment the preferences.xml settings resource you just created. Add a call to setPreferencesFromResource() passing the id of the XML file ( R.xml.preferences) and the rootKey to identify the preference root in PreferenceScreen :
The onCreatePreferences() method should now look like this:
Add the following code to the end of the SettingsActivity onCreate() method so that the fragment is displayed as the main content:
The above code is the typical pattern used to add a fragment to an activity so that the fragment appears as the main content of the activity. You use:
- getFragmentManager() if the class extends Activity and the fragment extends PreferenceFragment .
- getSupportFragmentManager() if the class extends AppCompatActivity and the fragment extends PreferenceFragmentCompat .
The entire onCreate() method in SettingsActivity should now look like the following:
1.4 Connect the Settings menu item to the settings activity
Use an intent to launch the SettingsActivity from the MainActivity.
- Find the if block in the onOptionsItemSelected() method in MainActivity, which handles the tap on Settings in the options menu:
- Add an intent to the if block to launch the SettingsActivity:
- Add Up-button navigation to SettingsActivity by editing its declaration in the AndroidManifest.xml file to define the activity’s parent as MainActivity .
- Find the SettingsActivity declaration in AndroidManifest.xml:
- Change the declaration to the following:
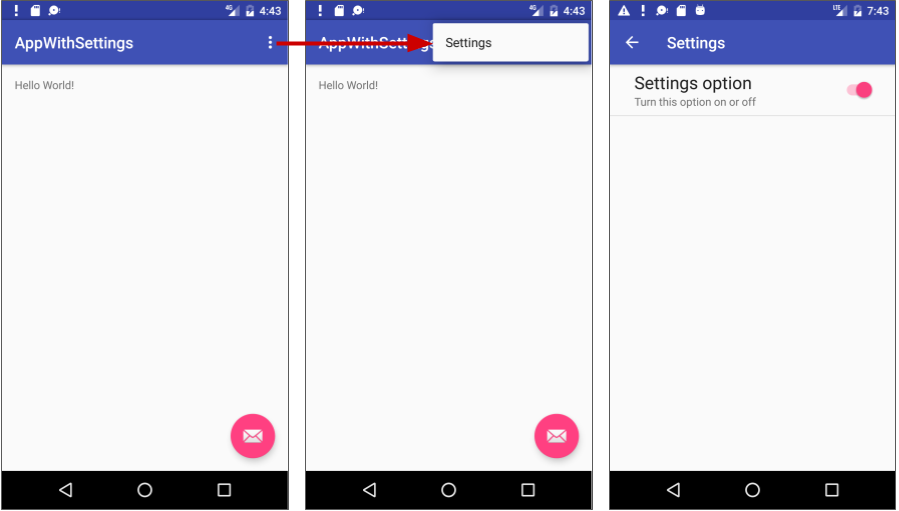
- Run the app. Tap the overflow icon for the options menu (as shown on the left side of the figure below), and tap Settings to see the settings activity (as shown in the center of the figure below). Tap the Up button in the app bar of the settings activity, shown on the right side of the figure below, to return to the main activity.
1.5 Save the default values in shared preferences
Although the default value for the toggle switch setting has already been set in the android:defaultValue attribute (in Step 1.2 of this task), the app must save the default value in the SharedPreferences file for each setting when the user first opens the app. Follow these steps to set the default value for the toggle switch:
In MainActivity, add the following to the end of the existing onCreate() method:
The above code ensures that the settings are properly initialized with their default values. The setDefaultValues() method takes three arguments:
1.6 Read the changed settings value from shared preferences
When the app starts, the MainActivity’s onCreate() method can read setting values that have changed, and use the changed values rather than the default values.
Each setting is identified using a key-value pair. The Android system uses this key-value pair when saving or retrieving settings from a SharedPreferences file for your app. When the user changes a setting, the system updates the corresponding value in the SharedPreferences file. To use the value of the setting, the app can use the key to get the setting from the SharedPreferences file.
Follow these steps to add that code:
- Before adding code to read the setting value, create a static string variable in SettingsActivity to hold the key for the value:
In the onCreate() method in MainActivity, and add the following at end of the method:
The above code snippet uses
- PreferenceManager.getDefaultSharedPreferences(this) to get the setting as a SharedPreferences object ( sharedPref ).
- getBoolean() to get the Boolean value of the setting that uses the key ( KEY_PREF_EXAMPLE_SWITCH defined in SettingsActivity) and assign it to switchPref . If there is no value for the key, the getBoolean() method sets the setting value ( switchPref ) to false . For other values such as strings, integers, or floating point numbers, you can use the getString() , getInt() , or getFloat() methods respectively.
Add a Toast.makeText() method to onCreate() that displays the value of the switchPref setting in a toast:
- Tap Settings to see the settings activity.
- Tap the setting to change the toggle from on to off, as shown on the left side of the figure below.
- Tap the Up button in the settings activity to return to the main activity. The toast message should appear in the main activity with the value of the setting, as shown on the right side of the figure below.
- Repeat these steps to see the toast message change as you change the setting.
Whenever the MainActivity starts or restarts, the onCreate() method should read the setting values in order to use them in the app. The Toast.makeText() method would be replaced with a method that initializes the settings.
You now have a working settings activity in your app.
Solution code:
Android Studio project: AppWithSettings
Task 2: Using the Settings Activity template
If you need to build several sub-screens of settings and you want to take advantage of tablet-sized screens as well as maintain compatibility with older versions of Android for tablets, Android Studio provides a shortcut: the Settings Activity template.
In the previous task you learned how to use an empty settings activity and a blank fragment in order to add a setting to an app. Task 2 will now show you how to use the Settings Activity template supplied with Android Studio to:
- Divide multiple settings into groups.
- Customize the settings and their values.
- Display a main Settings screen with a header link for each group of settings, such as General for general settings, as shown in the figure below.
- Display a master/detail screen layout with a header link for each group on the left (master) side, and the group of settings on the right (detail) side, as shown in the figure below.
In a previous practical you created an app called Droid Cafe using the Basic Activity template, which provides an options menu in the app bar as shown below. 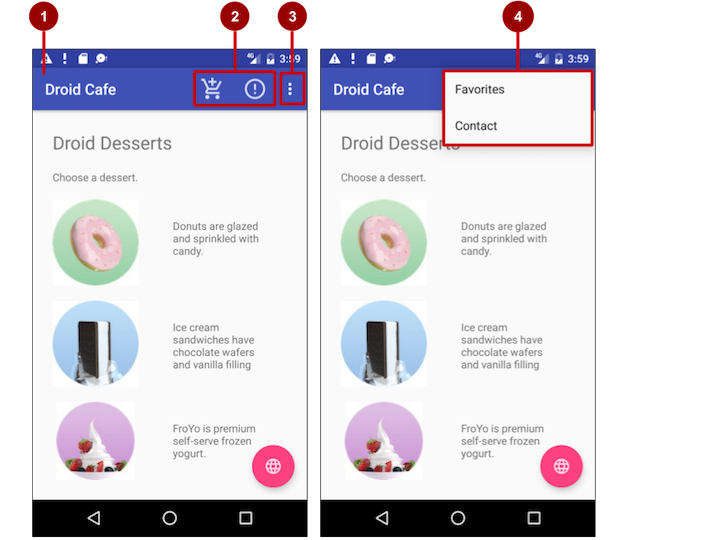
In the above figure:
- App bar.
- Options menu action icons.
- Overflow button.
- Options overflow menu.
Android Studio project: To start the project from where you left off in the previous practical, download the Android Studio project DroidCafe.
2.1 Explore the Settings Activity template
To include the Settings Activity template in your app project in Android Studio, follow these steps:
- Copy the DroidCafe project folder, rename it to DroidCafeWithSettings, and refactor it. (See the Appendixfor instructions on copying a project.) Run the app to make sure it runs properly.
- Select app at the top of the Project: Android view, and choose New > Activity > Settings Activity.
- In the dialog that appears, accept the Activity Name (SettingsActivity is the suggested name) and the Title (Settings).
- Click the three dots at the end of the Hierarchical Parent field and choose MainActivity as the parent activity, so that the Up button in the Settings Activity returns the user to the MainActivity. Choosing the parent activity automatically updates the AndroidManifest.xml file to support Up button navigation.
- Click Finish.
The Settings Activity template not only provides layouts for smartphone-sized and tablet-sized screens, but also provides the function of listening to a settings change, and changing the summary to reflect the settings change. For example, if you change the «Add friends to messages» setting (the choices are Always, When possible, or Never), the choice you make appears in the summary underneath the setting: 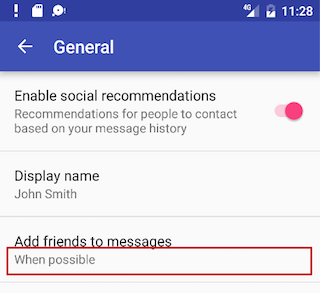
In general, you need not change the Settings Activity template code in order to customize the activity for the settings you want in your app. You can customize the settings titles, summaries, possible values, and default values without changing the template code, and even add more settings to the groups that are provided.
You use the Settings Activity template code as-is. To make it work for your app, add code to the Main Activity to set the default settings values, and to read and use the settings values, as shown later in this task.
The Settings Activity template creates the following for you:
XML files in the res > xml directory, which you can add to or customize for the settings you want.
- pref_data_sync.xml: PreferenceScreen layout for «Data & sync» settings.
- pref_general.xml: PreferenceScreen layout for «General» settings.
- pref_headers.xml: Layout of headers for the Settings main screen.
- pref_notification.xml: PreferenceScreen layout for «Notifications» settings.
The above XML layouts use various subclasses of the Preference class rather than View objects, and direct subclasses provide containers for layouts involving multiple settings. For example, PreferenceScreen represents a top-level Preference that is the root of a Preference hierarchy. The above files use PreferenceScreen at the top of each screen of settings. Other Preference subclasses for settings provide the appropriate UI for users to change the setting. For example:
- CheckBoxPreference: A checkbox for a setting that is either enabled or disabled.
- ListPreference: A dialog with a list of radio buttons.
- SwitchPreference: A two-state toggleable option (such as on/off or true/false).
- EditTextPreference: A dialog with an EditText widget.
- RingtonePreference: A dialog with ringtones on the device.
Tip: You can edit the XML files to change the default settings to settings you need for your app.
String resources in the strings.xml file in the res > values directory, which you can customize for the settings you want.
All strings used in the Settings Activity, such as the titles for settings, string arrays for lists, and descriptions for settings, are defined as string resources at the end of this file. They are marked by comments such as and .
Tip: You can edit these strings to customize the settings you need for your app.
SettingsActivity in the java > com.example.android.projectname directory, which you can use as is.
This is the activity that displays the settings. SettingsActivity extends AppCompatPreferenceActivity for maintaining compatibility with older versions of Android.
AppCompatPreferenceActivity in the java > com.example.android.projectname directory, which you use as is.
This activity is a helper class that SettingsActivity uses to maintain backwards compatibility with previous versions of Android.
2.2 Add the Settings menu item and connect it to the activity
As you learned in a previous practical, you can edit the menu_main.xml file in the res > menu directory for the options menu to add or remove menu items.
Edit the menu_main.xml file to add another menu item called Settings with the new resource id action_settings :
Specify «never» for the app:showAsAction attribute so that Settings appears only in the overflow options menu and not in the app bar itself, since it should not be used often.
Specify «50» for the android:orderInCategory attribute so that Settings appears below Favorites (set to «40» ) but above Contact (set to «100» ). 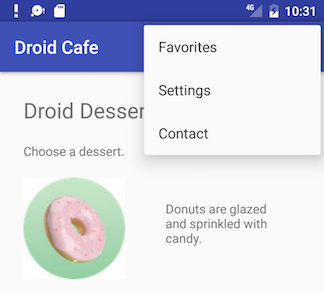
In MainActivity, find the switch-case block in the onOptionsItemSelected() method which handles the tap on items in the options menu:
Use an intent to launch the SettingsActivity from the MainActivity. Add the intent to the end of the switch case block:
Run the app using a smartphone or smartphone emulator so that you can see how the Settings Activity template handles the smartphone screen size, and follow these steps:
Tap the overflow icon for the options menu, and tap Settings to see the settings activity, as shown on the left side of the figure below.
Tap each setting header (General, Notifications, and Data & sync), as shown in the center of the figure below, to see the group of settings on each child screen of the Settings screen, shown on the right side of the figure below.
Tap the Up button in the settings activity to return to the main activity.
2.3 Customize the settings provided by the template
To customize the settings provided by the Settings Activity template, edit the string and string array resources in the strings.xml file and the layout attributes for each setting in the files in the xml directory. In this step you will change the «Data & sync» settings.
Open the strings.xml file in the res > values directory, and scroll the contents to the comment:
Refactor the resource name by following these steps (the app will still work without refactoring the names, but refactoring makes the code easier to understand):
- Control-click (or right-click) the pref_header_data_sync resource name and choose Refactor > Rename.
- Change the name to pref_header_account, click the option to search in comments and strings, and click Refactor.
Edit the pref_title_sync_frequency string resource (which is set to Sync frequency ) to Market.
Since the key for this setting preference ( «sync_frequency» ) is hard-coded elsewhere in the Java code, don’t change the android:key attribute—keep using «sync_frequency» as the key for this setting in this example. If you are thoroughly customizing the settings for a real-world app, you would spend the time changing the hard-coded keys throughout the code.
2.4 Add code to set the default values for the settings
Find the onCreate() method in MainActivity, and add the following PreferenceManager.setDefaultValues statements at the end of the method:
The default values are already specified in the XML file with the android:defaultValue attribute, but the above statements ensure that the Shared Preferences file is properly initialized with the default values. The setDefaultValues() method takes three arguments:
- The app context, such as this .
- The resource ID for the settings layout XML file which includes the default values set by the android:defaultValue attribute.
- A boolean indicating whether the default values should be set more than once. When false , the system sets the default values only if this method has never been called in the past. As long as you set this third argument to false , you can safely call this method every time your activity starts without overriding the user’s saved settings values by resetting them to the default values. However, if you set it to true , the method will override any previous values with the defaults.
2.5 Add code to read values for the settings
Add the following code at the end of the MainActivity onCreate() method. You can add it immediately after the code you added in the previous step to set the defaults for the settings:
As you learned in the previous task, you use PreferenceManager.getDefaultSharedPreferences(this) to get the setting as a SharedPreferences object ( marketPref ). You then use getString() to get the string value of the setting that uses the key ( sync_frequency ) and assign it to marketPref . If there is no value for the key, the getString() method sets the setting value of marketPref to -1 , which is the value of Other in the pref_market_values array.
Tap the Up button in the app bar to return to the Settings screen, and tap it again to return to the main screen. You should see a toast message with «CA» (for Canada): 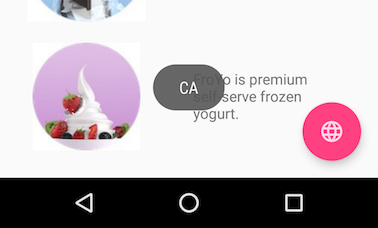
You have successfully integrated the Settings Activity with the Droid Cafe app.
Solution code
Android Studio project: DroidCafeWithSettings (Includes coding challenge #1.)
Android Studio project: DroidCafeWithSettingsChallenge (Includes coding challenge #2.)
Coding challenges
Note: All coding challenges are optional and not prerequisite for the material in the next chapter.
Challenge 1: Add code to DroidCafeWithSettings that reads the value of the toggle switch «Enable social recommendations» on the General child screen of Settings, and displays its value along with the «Market» setting in the same toast message on the main screen.
Hint: Use a Boolean variable with shared.Pref.getBoolean and the key «example_switch» .
Challenge 2: The DroidCafeWithSettings app displays the settings on a tablet-sized screen properly, but the Up button in the app bar doesn’t return the user to the MainActivity as it does on a smartphone-sized screen. This is due to the onOptionsItemSelected() method in each fragment in SettingsActivity. It uses the following to restart the SettingsActivity when the user taps the Up button:
The above is the appropriate action on smartphone screens in which Settings headers (General, Notifications, and Account) appear in a separate screen. After changing a setting, you want the user’s tap on the Up button to take them back to the Settings headers.
However, on a tablet, the headers are always visible in the left pane (while the settings are in the right pane). As a result, tapping the Up button doesn’t take the user to MainActivity.
Find a way to make the Up button work properly in SettingsActivity on tablet-sized screens.
Hint: There are several ways to fix this problem. Consider the following:
Источник


