- Урок 19. Как создать андроид-приложение с вкладками – TabLayout с ViewPager2 на Kotlin
- Добавление TabLayout в макет разметки экрана
- Реализация вкладок в MainActivity
- Делаем вкладки с помощью TabLayout
- Библиотека Android Support Design
- Создание TabLayout
- Создание фрагментов
- Подключение FragmentPagerAdapter
- Настройка вкладки
- Настройка TabLayout
- Создание стиля для TabLayout
- Добавление иконок в TabLayout
- Добавление иконок и текста в TabLayout
- Добавление пользовательской разметки в TabLayout
- Получение или выбор текущей страницы
- Использование вкладок без фрагментов
- Ещё вариант реализации вкладок
- Делаем вкладки с помощью TabLayout : 3 комментария
- Android TabLayout Example
- 1. Introduction
- 2. Technologies used
- 3. Create a Fragment
- 4. Implement the First Fragment class
- 5. Implement the Second Fragment class
- 6. Implement the Third Fragment class
- 7. Fragment Layouts
- 8. Implement the PagerAdapter class
- 9. Implement the MainActivity class
- 10. MainActivity Layout
- 11. Final Application
- 12. Conclusion
Урок 19. Как создать андроид-приложение с вкладками – TabLayout с ViewPager2 на Kotlin
На прошлом уроке мы познакомились с ViewPager2 и создали андроид-приложение, в котором можно листать экраны свайпом вправо или влево. На этом уроке добавим в верхней части экрана вкладки, которые будут содержать заголовки и индикатор экрана, на котором находится пользователь в данный момент, а также рассмотрим некоторые их свойства и способы оформления.
В этом уроке будем использовать проект из прошлого урока, можно скачать его на странице урока 18 по ссылке вверху.
Добавление TabLayout в макет разметки экрана
Чтобы добавить вкладки на экран, нужно открыть макет разметки и добавить компонент com.google.android.material.tabs.TabLayout в верхней части экрана:
Для корректного размещения нужно изменить компонент ViewPager2 – высоту укажем 0dp. Таким образом, высоту компонента будет регулировать корневой ConstraintLayout по заданным ограничениям. А вместо ограничения app:layout_constraintTop_toTopOf=»parent» поставим app:layout_constraintTop_toBottomOf=»@+id/tab_layout» – чтобы верх компонента ViewPager2 был ограничен не верхней границей родительского компонента, а нижней границей компонента TabLayout.
Рассмотрим подробнее компонент com.google.android.material.tabs.TabLayout. Свойство app:tabMode=»scrollable» обеспечивает размещение в видимой части экрана только нескольких вкладок, остальные будут доступны в процессе прокрутки. Если мы не укажем это свойство, то в видимой части экрана будут одновременно отображаться все вкладки, и при большом их количестве визуальное восприятие будет затруднено.
Свойство app:tabIndicatorColor=»@color/teal_200″ указывает цвет, а app:tabIndicatorHeight=»4dp» – толщину индикатора вкладки.
Далее идут свойства ширины – указываем по родителю – и высоты – указываем по содержимому.
Последние три свойства – ограничения верхней части и боковых сторон компонента по родителю.
Реализация вкладок в MainActivity
Открываем класс MainActivity и пишем реализацию вкладок:
Источник
Делаем вкладки с помощью TabLayout
Сейчас вкладки лучше всего реализовывать за счёт использования ViewPager с пользовательским «индикатором вкладок» сверху. В этой статье мы будем использовать TabLayout от Google, включенный в библиотеку Android Support Design в Android 6.0 Marshmallow (API 23).
До Android Marshmallow самым простым способом создания вкладок с помощью фрагментов было использование вкладок ActionBar. Однако, все методы, связанные с режимами навигации в классе ActionBar (такие как setNavigationMode(), addTab(), selectTab() и т.д.) на данный момент являются устаревшими.
Библиотека Android Support Design
Перед началом работы с вкладками, нужно добавить необходимую библиотеку. Чтобы добавить библиотеку в свой проект, нужно в файле build.gradle модуля приложения добавить следующую зависимость в блок dependencies.
Создание TabLayout
Просто добавьте android.support.design.widget.TabLayout, который будет использоваться для отображения различных параметров вкладок, в код разметки. Компонент android.support.v4.view.ViewPager будет использоваться для создания страницы, отображающей фрагменты, которые мы создадим далее.
Создание фрагментов
Теперь, когда у нас есть ViewPager и вкладки в разметке, мы можем перейти к определению содержимого каждой из вкладок. Поскольку каждая вкладка представляет собой только фрагмент, нам необходимо создать и определить Fragment, который нужно показать. В зависимости от ваших требований, в вашем приложении может быть один или несколько фрагментов.
В папке res/layout создадим файл fragment_page.xml и определим в нём код разметки, который будет отображаться на экране при выборе определённой вкладки.
Теперь создадим класс PageFragment и определим в нём логику подключения для фрагмента.
Подключение FragmentPagerAdapter
Следующее, что нужно сделать, это реализовать адаптер для вашего ViewPager, который контролирует порядок вкладок, заголовков и связанного с ними контента. Наиболее важными методами для реализации здесь являются getPageTitle(int position), который используется для получения заголовка нужно вкладки, и getItem(int position), который определяет фрагмент для каждой вкладки.
Настройка вкладки
Наконец, нам нужно прикрепить наш ViewPager к SampleFragmentPagerAdapter, а затем настроить вкладки с помощью двух шагов:
- В методе onCreate() активности определим ViewPager и подключим адаптер.
- Установим ViewPager в TabLayout, чтобы подключить пейджер с вкладками.
Посмотрим, что получилось:
Настройка TabLayout
Существует множество атрибутов, которые вы можете использовать для настройки поведения TabLayout, например:
| Название | Параметры | Описание |
| tabBackground | @drawable/image | Фон, применяемый к вкладкам |
| tabGravity | center, fill | Гравитация вкладок |
| tabIndicatorColor | @color/blue | Цвет линии индикатора |
| tabIndicatorHeight | @dimen/tabh | Высота линии индикатора |
| tabMaxWidth | @dimen/tabmaxw | Максимальная ширина вкладки |
| tabMode | fixed, scrollable | Выбор режима — фиксированные вкладки или прокручиваемый список |
| tabTextColor | @color/blue | Цвет текста на вкладке |
Здесь вы можете посмотреть все атрибуты для TabLayout.
Создание стиля для TabLayout
Как правило, цвет индикатора вкладки устанавливается как accent, определённый в вашей теме Material Design. Вы можете переопределить этот цвет, создав свой собственный стиль в файле res/values/styles.xml и затем применить этот стиль к TabLayout.
Вы можете переопределить этот стиль для TabLayout в коде разметки:
Ниже вы можете увидеть пример ещё одного стиля, который можно задать для TabLayout:
Добавление иконок в TabLayout
В настоящее время класс TabLayout не предоставляет модель, которая позволяет добавлять иконки для вкладок. Однако вы можете вручную добавить иконки после настройки TabLayout.
Внутри класса FragmentPagerAdapter вы можете удалить строку getPageTitle() или просто вернуть null.
После настройки TabLayout в классе активности, вы можете использовать функцию getTabAt() для установки иконки:
Добавление иконок и текста в TabLayout
Другой подход — использовать SpannableString для добавление иконок и текста в TabLayout. Снова перепишем метод getPageTitle().
По умолчанию, вкладка, созданная TabLayout, устанавливает для свойства textAllCaps значение true, что предотвращает визуализацию ImageSpans. Вы можете переопределить это поведение. изменив в styles.xml свойство tabTextAppearance.
Обратите внимание на дополнительные пробелы, которые добавляются перед заголовком вкладки при создании класса SpannableString. Пустое пространство используется для размещения иконки, чтобы название отображалось полностью. В зависимости от того, где вы хотите разместить иконку, вы можете указать начало диапазона и его конец в методе setSpan().
Добавление пользовательской разметки в TabLayout
В некоторых случаях вместо разметки вкладки по умолчанию мы можем использовать собственную разметку для каждой вкладки. Чтобы добиться этого, переберём все вкладки после прикрепления их к ViewPager в коде активности.
Теперь добавим метод getTabView() в класс SampleFragmentPagerAdapter.
Таким образом, можно настроить любую вкладку в адаптере.
Получение или выбор текущей страницы
С последними обновлениями библиотеки Android Suppoty Design вы также можете получить выбранную позицию вкладки, вызвав метод getSelectedTabPosition(). Если вам нужно сохранить или восстановить выбранную позицию вкладки во время поворота экрана или других изменений конфигурации, этот метод полезен для восстановления исходной позиции.
Во-первых, переместите экземпляры tabLayout и viewPager в глобальные переменные класса активности.
Во-вторых, мы можем сохранить и восстановить позицию вкладки, используя методы onSaveInstanceState() и onRestoreInstanceState().
Использование вкладок без фрагментов
В случае, если вы не хотите использовать в своём приложении фрагменты, вы можете воспользоваться классом android.support.v4.view.PagerAdapter, как, например, в нашем приложении «Карточки для детей«.

Здесь вместо фрагментов в ViewPager передаётся адаптер, наследующий от PagerAdapter. Его код можно увидеть ниже.
Установка адаптера аналогична способам выше, просто вызываем метод setAdapter() и передаёт в него экземпляр класса TabAdapter.
Ещё вариант реализации вкладок
Также вы можете создать свои собственные вкладки с помощью шагов ниже. Такой подход используется в нашем приложении «Менеджер паролей для Wi-Fi сетей«.
Для этого в разметке нужно использовать компоненты TabHost и TabWidget. Внутри с помощью FrameLayout мы задаём, какой контент будет отображаться на экране.
Затем в коде активности добавим следующий код для определения этих компонент и настройки вкладок.
В этом случае переключать вкладки можно легко с помощью метода у TabHost setCurrentTab(int position).
Делаем вкладки с помощью TabLayout : 3 комментария
Я создал ретрофит запрос, получил данные и хочу установить количество вкладок соответственно количеству полученных строк. Куда в адаптере мне вставить этот код? Я создал AsyncTask, но не получается нигде изменить значение количества вкладок, которое задано по умолчанию.
Источник
Android TabLayout Example
Posted by: Georges Sofo in widget November 27th, 2017 0 Views
1. Introduction
In this example, we will be going through the process of creating a basic user interface using the tab layout constructs available on the Android platform. In Android, the TabLayout is a construct for better organizing a user interface. It does so by making the user interface more organized and less cluttered.
This example will also explain the different aspect which makes an android application briefly. These aspects include the XML configuration of an android application, the basics of Android activities, the manifest file and some of Gradle basic usages and features in an Android context.
At the end of this article, we will have a working example build using Android Studio, Gradle, The Android SDK which in our case will come packaged with Android Studio.
2. Technologies used
- Android Studio 3
- Android 7.1.1 (Nougat): API 25
- Android Virtual Device: Nexus 5X.
3. Create a Fragment
Below is the very first step when creating a fragment in Android Studio.
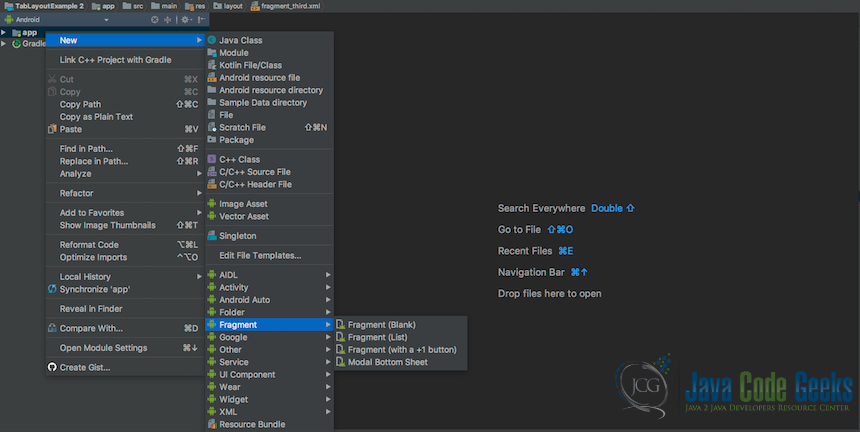
This is the first step in creating a fragment in Android studio.
Below is the second step when creating a fragment in Android Studio.
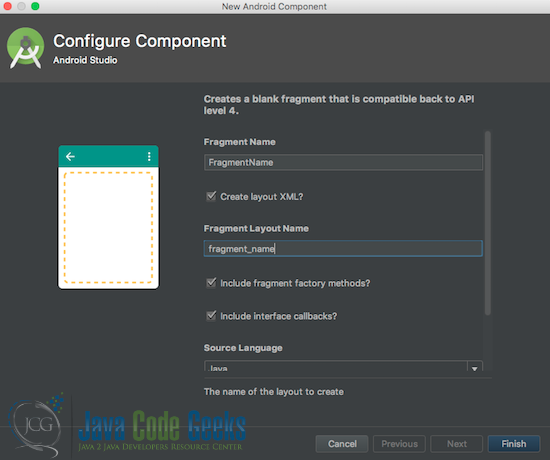
This is the second step in creating a fragment in Android studio.
4. Implement the First Fragment class
Below is a basic implementation of a fragment. In this Fragment all we are basically doing is setting the layout which must be rendered when this fragment loads. This concept applies to all the other fragments implementations in this articles namely SecondFragment and ThirdFragment
- line 2 to 6: we import all the required dependencies for this class.
- line 8: we define the FirstFragment Class which extends the Fragment supper class from the Android platform.
- line 10: we override the onCreateView Method from the Fragment superclass. This method is a lifecycle method that gets executed when the Fragment component is been loaded for the first time.
- line 13: we use the LayoutInflater component to register our XML layout configuration with the rest of the application. This is accomplished by calling the inflate method of the inflater object and passing to the fragment_first as its layout definition.
5. Implement the Second Fragment class
- line 2 to 6: we import all the required dependencies for this class.
- line 8: we define the SecondFragment Class which extends the Fragment supper class from the Android platform.
- line 10: we override the onCreateView Method from the Fragment superclass. This method is a lifecycle method that gets executed when the Fragment component is been loaded for the first time.
- line 13: we use the LayoutInflater component to register our XML layout configuration with the rest of the application. This is accomplished by calling the inflate method of the inflater object and passing to the fragment_second as its layout definition.
6. Implement the Third Fragment class
ThirdFragment.java
- line 2 to 6: we import all the required dependencies for this class.
- line 8: we define the ThirdFragment Class which extends the Fragment supper class from the Android platform.
- line 10: we override the onCreateView Method from the Fragment superclass. This method is a lifecycle method that gets executed when the Fragment component is been loaded for the first time.
- line 13: we use the LayoutInflater component to register our XML layout configuration with the rest of the application. This is accomplished by calling the inflate method of the inflater object and passing to the fragment_third as its layout definition.
7. Fragment Layouts
Below is the corresponding xml layout configuration for all 3 fragments respectively. All that’s happening in a nutshell is, we are defining a text that will get displayed whenever we are on the correct tab. For example when we are on the First Tab, the First Tab text will be displayed in its body. This is accomplished by using the TextView tag and its text property.
Below is the first fragment s layout file.
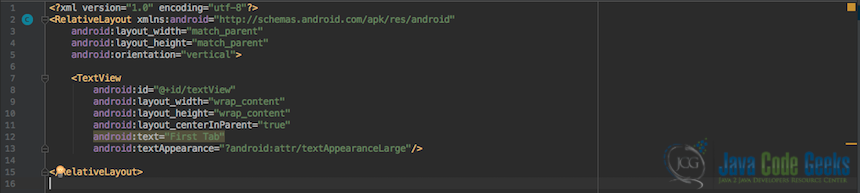
This is the first fragment s layout file.
Below is the second fragment s layout file.
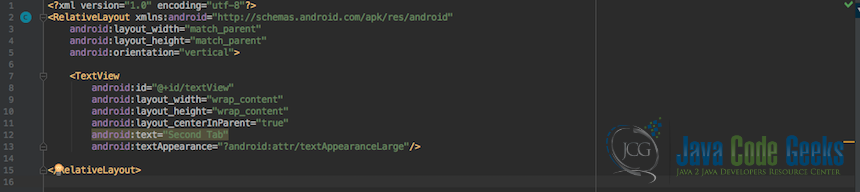
This is the second fragment s layout file.
Below is the third fragment s layout file.

This is the third fragment s layout file.
8. Implement the PagerAdapter class
In order for us to manage all our defined fragments as a single unit, we need to implement an adapter which will help us configure our Fragments from the client application.
Below is our implementation of a FragmentPagerAdapter
PagerAdapter.java
- line 1 to 4: we import all the required dependencies for this class.
- line 6: we define the PagerAdapter Class which extends the FragmentPagerAdapter supper class from the Android platform.
- line 7: we define the numberOfTabs variable to hold the tab number
- line 8 to 10: we define the constructor which will help initialize the FragmentManager and the numberOfTabs
- line 14: we override the getItem method of the FragmentPagerAdapter super class
- line 15 to 26: we define the logic via a switch statement which will be responsible fo assigning the right Fragment to correct Tab.
- line 31: we override the getCount method of the FragmentPagerAdapter class, so that the client code could determine the number of tabs beforehand.
9. Implement the MainActivity class
Any Android or even Java application must always have an entry point. This is why we have to create the MainActivity class which will be in our example, the entry point to the application.
MainActivity.java
- line 2 to 5: we import all the required dependencies for this class.
- line 7: we define the MainActivity class which will be the entry point to our application. This class extends the AppCompatActivity class from the android platform.
- line 9: we override the onCreate method of the AppCompatActivity class. This method is a lifecycle method and it gets excecuted only once and that is when the application loads up for the first time.
- line 10: we call the onCreate method of the AppCompatActivity class in order to save the state of our activity each time we close the application
- line 11: we set the content view of the activity to the activity_main layout.
- line 13 to 17: we define the tab layout using the TabLayout class and the tab_layout definition from the activity_main layout. Next, we add tabs to the layout. Then the Gravity.
- line 19 to 39: here we define the view pager for our tab layout. The very first step in this process is to load the pager configuration from the main activities layout. Then instantiate an object of the PagerAdapter class which will be used to set the number of Tabs most importantly. Once the pager adapter object has been instantiated we have to use the ViewPager ‘s setAdapter method to register the adapter with the view pager. Afterward we have to add a page change listener using the addOnPageChangeListener method of the viewPager. The last step is to add a TabSelectedListener using the addOnTabSelectedListener of the tabLayout object.
10. MainActivity Layout
Main activity s layout file activity_main.xml contains all the layout definitions for the MainActivity . In this layout the few things that happen are:
- We create a TabLayout component using the TabLayout tag. Then we add some basic properties to align the view.
- We create a ViewPager component using the ViewPagerTag tag. Then we add some basic properties to align the view
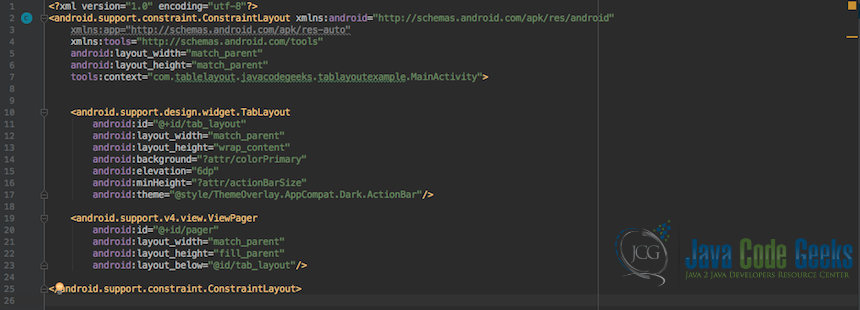
This is the MainActivity s layout file.
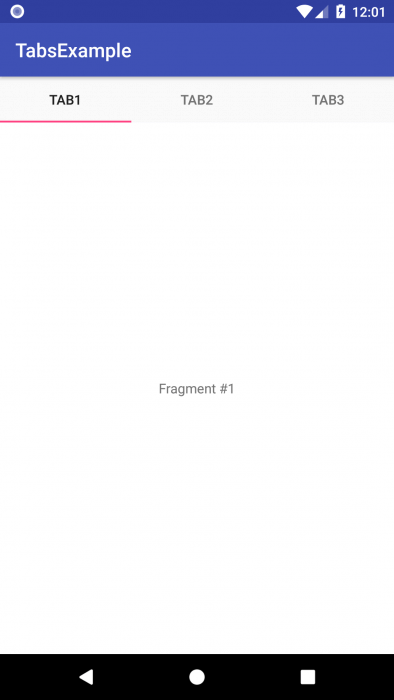
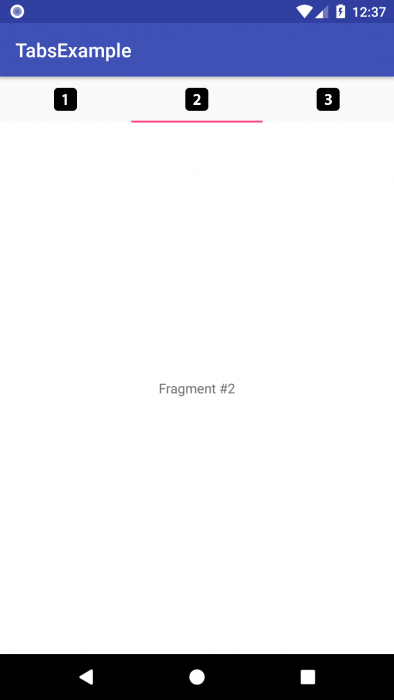
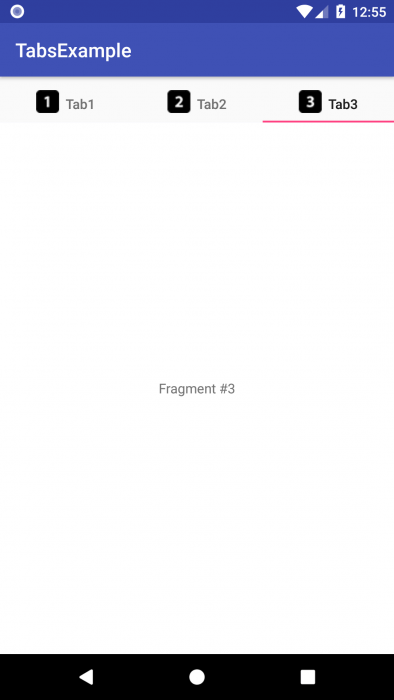
11. Final Application
Below is a screenshot of the final running application.

The final running application.
12. Conclusion
In this example, we’ve seen our to create a tab layout user interface. We did all this by creating Fragments, a PagerAdapter and a MainActivity to wire everything together into an android application.
We also learned a bit about lifecycle methods of fragments and pager adapters. We have intentionally omitted the Manifest file explanation due to the length of the example and the fact it falls more as a general android construct.
Источник


